C++ Pimpl惯用法(桥接模式特例)
Pimpl惯用法
Pimpl术语,即“pointer to implementation”(指向实现的指针),由Jeff Summer最先引入。该技巧可以避免在头文件中暴露私有细节,是促进API接口和实现保持完全分离的重要机制。
Pimpl并不是严格意义上的设计模式,而是桥接模式的一种特例。
如下图,Class A只提供公有接口Function1, Function2,其实现细节由Impl类实现,Class A通过一格Impl 指针impl来提供服务。这样做的目的在于,使用Class A公有接口的用户,不必关系其实现细节,而且实现的变动,对用户也是透明的。
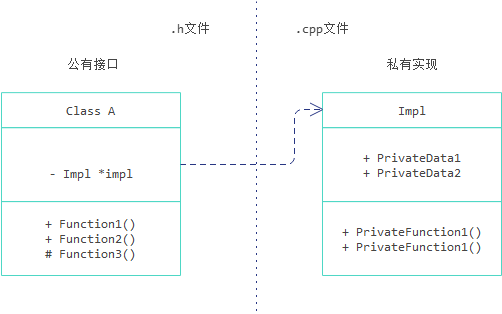
注:- : private, + : public, # : protected
特点:该技巧在公有接口中完全隐藏内部细节。支持将私有成员数据和方法,从.h转移到.cpp文件。是构建接口和实现恰当分离的API的不可或缺的工具。
使用Pimpl
Pimpl将类的数据成员定义为指向某个已经声明过的类型的指针,如上面例子中的impl。这里,类型仅作为名字引入,没有被完整定义,只需要前向声明即可,隐藏可以将该类型定义隐藏在.cpp文件中。该指针也称为不透明指针,因为用户无法看到所指对象细节。
示例:“自动定时器”(AutoTimer)API,对象被销毁时打印出生存时间。
// autotimer.h
#ifdef _WIN32
#include <windows.h>
#else
#include <sys/time.h>
#endif
#include <string>

class AutoTimer
{
public:
    /// 使用易于理解的名字创建新定时器
    explicit AutoTimer(const std::string& name);
    ~AutoTimer();

private:
    // 返回对象已经存在了多长时间
    double GetElapsed() const;

    std::string name_;
#ifdef _WIN32
    DWORD startTime_;
#else
    struct timeval startTime_;
#endif
};
该API的问题:暴露了定时器在不同平台上存储的底层细节,任何人都可以从头文件看到这些平台的定义。
可取之处:仅将必要的方法暴露为public方法(构造函数、析构函数),其余方法、数据标记为private。
由于C++语言特性,要求这些private成员都声明在公有头文件中,导致API包含平台相关#if指令。而设计者的真正目的是将所有private成员隐藏在.cpp文件中。
Pimpl惯用法将所有private成员放在一个class/struct中,这个类在头文件中仅做前置声明,在.cpp中定义。可以像下面这样,利用pimpl重构前面的头文件:
// autotimer.h
#include <string>

class AutoTimer // 接口类
{
public:
    explicit AutoTimer(const std::string &name);
    ~AutoTimer();

private:
    class Impl; // 前置声明
    Impl *impl; // 通过私有内嵌类, 将实现细节封装到内嵌类中
};
接下来是AutoTimer::Impl类的实现:
// autotimer.cpp
#include "autotimer.h"
#include <iostream>
#if _WIN32
#include <windows.h>
#else
#include <sys/time.h>
#endif

class AutoTimer::Impl // 实现类
{
public:
    double GetElapsed() const
    {
#ifdef _WIN32
        return (GetTickCount() - startTime_) / 1e3;
#else
        struct timeval end_time;
        gettimeofday(&end_time, NULL);
        double t1 = startTime_.tv_usec / 1e6 + startTime_.tv_sec;
        double t2 = end_time.tv_usec / 1e6 + end_time.tv_sec;
        return t2 - t1;
#endif
    }

    std::string name_;
#ifdef _WIN32
     DWORD starTime_;
#else
    struct timeval startTime_;
#endif
};

AutoTimer::AutoTimer(const std::string &name) :
    impl_(new AutoTimer::Impl())
{
    impl_->name_ = name;
#ifdef _WIN32
    imp_->startTime_ = GetTickCount();
#else
    gettimeofday(&impl_->startTime, NULL);
#endif
}

AutoTimer::~AutoTimer()
{
    std::cout << impl_->name_ << ": took " << impl_->GetElapsed()
        << " secs" << std::endl;
    delete impl_;
    impl_ = NULL;
}
这样,将原本暴露在原有头文件中的所有private方法和数据,转移到了.cpp文件中定义的AutoTimer::Impl类中。
将Impl类(实现类)声明为AutoTimer类的private内嵌类,是为了避免与该实现相关的符号污染全局命名空间,只有AutoTimer的方法才能访问Impl成员。
在Impl类中放哪些逻辑?接口类中有哪些部分,需要放到Impl类中?
通常,有以下选择:
1)仅private成员变量;
2)private成员变量和方法;
3)所有public方法。接口类中public方法只是对Impl类中等价方法进行简单包装。
推荐第2项,将priavet变量和方法都放到Impl类中,这样可以保持数据和操作这些数据的方法的封装性,从而避免在public头文件中声明private方法。 不过,有2项需要注意:
1)不能在impl类中隐藏private虚方法。virtual方法必须出现在接口类中,以保证任何派生类都能覆盖它。
2)虽然可以将接口类传递给Impl类的方法,但必要时,可以在Impl类中增加指回接口类的指针,便于Impl类调用公有方法。
复制语义
复制使用Pimpl惯用法的接口类,存在潜在风险:
当没有为类显式定义copy构造函数、assignment运算符(operator=)时,C++编译器会默认创建(trivial版本)。但这种trivail版本的copy构造函数、assigment运算符,只能执行浅复制。显然不利于使用Pimpl惯用法,因为如果客户复制了接口类对象,那么2个对象就会指向同一个Impl实现类对象,析构时,就会删除同一个Impl对象2次,从而可能导致程序崩溃。
针对该问题,有2种可选方案:
1)禁止复制类。
如果不打算让用户创建接口类对象副本,可以将对象声明为不可复制。 禁止编译器生成默认copy函数,有以下几种方法:
- 将方法设为private,禁止客户调用;
- 如果使用Boost库,可以让接口类继承自boost::noncopyable;
- C++11以后,可以将方法声明为"=delete"。
2)显式定义复制语义。
如果希望客户能复制采用Pimpl的对象,就应该声明并定义自己的copy构造函数、assignment运算符,进行对象的深拷贝,创建Impl对象的副本。
下面展示如何使得接口类AutoTimer禁止拷贝:
#include <string>

// 方式1
class AutoTimer
{
public:
    explicit AutoTimer(const std::string &name);
    ~AutoTimer();

private:
    // 使对象不可复制
    AutoTimer(const AutoTimer&);
    const AutoTimer& operator=(const AutoTimer&);

    class Impl;
    Impl *impl_;
};

// 方式2
class AutoTimer : boost::noncopyable // 使对象不可复制
{
public:
    explicit AutoTimer(const std::string &name);
    ~AutoTimer();

private:
    class Impl;
    Impl *impl_;
};

// 方式3
class AutoTimer : boost::noncopyable
{
public:
    explicit AutoTimer(const std::string &name);
    ~AutoTimer();

private:
    // 使对象不可复制
    AutoTimer(const AutoTimer&) = delete;
    const AutoTimer& operator=(const AutoTimer&)= delete;

    class Impl;
    Impl *impl_;
};
Pimpl与智能指针
使用裸指针指向Impl类,容易忘记在析构时delete对象,或者在对象分配前就进行访问,从而造成错误。可以借助智能指针(smart pointer)解决该问题,具体来说,可采用shared_ptr(共享指针),或unique_ptr(域指针)指向Impl类对象。
两者区别:共享指针允许用户复制(接口类)对象,域指针不允许用户复制。
利用smart pointer,API可简化为:
#include <memory>
#include <string>

class AutoTimer
{
public:
    explicit AutoTimer(const std::string &name);
    ~AutoTimer();

private:
    class Impl;
    std::unique_ptr<Impl> impl_;
};
使用smart pointer时,Impl对象会自动销毁,接口类析构函数无需手动delete。
// 析构函数中, 无需手动delete Impl对象
AutoTimer::~AutoTimer()
{
    std::cout << impl_->name_ << ": took " << impl_->GetElapsed() << " secs" << std::endl;
}
Pimpl优点
-
信息隐藏
实现细节可以隐藏到Impl类实现中,保护闭源API专有性。同时,接口头文件也能更干净、清晰表达真正的公有接口,易于阅读和理解。 -
降低耦合
接口类只用知道Impl类即可,不用包含私有成员变量所需头文件,也不必包含平台依赖的windows.h或sys/time.h。 -
加速编译
将实现相关头文件移入.cpp,API的引用层次降低,会导致编译时间减少。 -
更好的二进制兼容性
采用Pimpl的对象大小从不改变,因为对象总是单个指针大小。对私有成员变量做任何修改,都只影响隐藏在cpp文件内的实现类大小。而对象的二进制表示可以不变。 -
惰性分配
Impl类可以在需要时再构造,而不必在接口类构造时立即构造。
Pimpl的缺点
1)必须为你创建的每个对象分配并释放实现对象。这使得对象增加了一个指针(Impl* impl_),同时增加了通过指针访问成员的开销,增加了new和delete对象的开销。
2)必须通过impl_->的形式访问私有成员,给开发人员带来了不便。
3)编译器不能捕获接口类中const对成员变量修改。因为成员变量现在存在于独立的对象(impl_指针所指对象)中。编译器仅检查impl_指针是否发生变化,而不会检查其成员。
C语言实现Pimpl惯用法
Pimpl惯用法在C++实现中,在不透明指针所指类AutoTimer::Impl对象构造时捕获当前时间,在析构时捕获当前时间并打印时间差。
C语言中,由于没有类的概念,我们可以用一个struct来替换class。在Create函数中,申请内空间并捕获当前时间;在Destroy函数中,捕获当前时间并打印时间差,最后释放内存空间。
autotimer头文件
/* autotimer.h */
typedef struct AutoTimer *AutoTimerPtr;

AutoTimerPtr AutoTimerCreate();
void AutoTimerDestroy(AutoTimerPtr ptr);
autotimer实现文件
/* AutoTimer.c */
#include "autotimer.h"
#include <stdio.h>
#include <string.h>
#include <stdlib.h>

#ifdef _WIN32
#include <windows.h>
#else
#include <sys/time.h>
#endif

struct AutoTimer
{
    char *name_;
#ifdef _WIN32
    DWORD startTime_;
#else
    struct timeval startTime_;
#endif
} AutoTimer;

AutoTimerPtr AutoTimerCreate(const char *name)
{
    AutoTimerPtr ptr = (AutoTimerPtr)malloc(sizeof(AutoTimer));
    if (ptr) {
        ptr->name_ = strdup(name);
#ifdef _WIN32
        ptr->startTime_ = GetTickCount();
#else
        gettimeofday(&ptr->startTime_, NULL);
#endif
    }
        return ptr;
}

static double GetElapsed(AutoTimerPtr ptr)
{
#ifdef _WIN32
    return (GetTickCount() - ptr->startTime_) / 1e3;
#else
    struct timeval end_time;
    gettimeofday(&end_time, NULL);
    double t1 = ptr->startTime_.tv_usec / 1e6 + ptr->startTime_.tv_sec;
    double t2 = end_time.tv_usec / 1e6 + end_time.tv_sec;
    return t2 - t1;
#endif
}

void AutoTimerDestroy(AutoTimerPtr ptr)
{
    if (ptr){
        printf("%s: took %f secs\n", ptr->name_.GetElapsed(ptr));
        free(ptr);
    }
}
客户端
可以在函数中直接使用,也可以封装到另外一个“类”的实现中。
/* main.c */
#include "autotimer.h"

int main()
{
    AutoTimerPtr *ptr = AutoTimerCreate("hello");
    ... // operation
    AutoTimerDestroy(ptr); // 打印
    return 0;
}
参考
[1]Martin Reddy, 刘晓娜, 臧秀涛,等. C++ API设计[M]. 人民邮电出版社, 2013.

 浙公网安备 33010602011771号