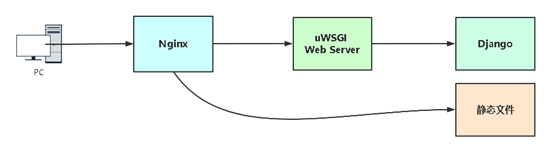
nginx+uwsgi+django+systemd部署django项目
1.将本地项目打包
-
- 导出依赖模块
pip3 freeze > requirements.txt
-
- 修改settings文件中数据库的配置
DATABASES = {
    'default': {
        'ENGINE': 'django.db.backends.mysql',
        'NAME': 'test',
        'USER': 'root',
        'PASSWORD': '123456',
        'HOST': '192.168.31.62',
        'PORT': '3306',
    }
}
-
- 关闭debug模式和白名单
DEBUG = False# 调试模式
ALLOWED_HOSTS = ['*']  # 白名单,只允许列表中的ip访问,*代表所有
2.服务器环境准备
-
- 安装python环境
yum install zlib-devel libffi-devel mysql-devel -y
tar zxvf Python-3.8.6.tgz
cd Python-3.8.6
./configure --enable-optimizations
make && make install
-
- 安装依赖模块
pip3 install -r requirements.txt -i http://mirrors.aliyun.com/pypi/simple --trusted-host mirrors.aliyun.com
-
- 在安装过程中,twisted指定的版本比较新,在仓库里没有,需要单独安装
yum install bzip2
tar jvxf Twisted-20.3.0.tar.bz2
cd Twisted-20.3.0
python3 setup.py install
3.uwsgi
-
- 安装
pip3 install uwsgi -i http://mirrors.aliyun.com/pypi/simple --trusted-host mirrors.aliyun.com
-
- 配置
uwsgi.ini
- 配置
[uwsgi]
# 监听的地址
http = 127.0.0.1:8000

# 工作目录
chdir = /data/ops/

# django入口文件
wsgi-file = ops/wsgi.py

# 进程个数
processes = 4

# 静态文件位置
static-map = /static=/data/ops/static

# 后台运行模式,日志输出位置
#daemonize = uwsgi.log
# 前台运行模式,日志输出位置,如果交给systemd管理,必须用logto方式启动
logto = uwsgi.log

# 大日志文件大小
log-maxsize = 5000000

# 启动用户
user=devops

# 启动组
group=devops

# pid文件,为了结束用的
pidfile=uwsgi.pid

# 启动主进程,来管理其他进程,
# 其它的uwsgi进程都是这个master进程的子进程
# 如果kill这个master进程,相当于重启所有的uwsgi进程
master=true
-
- 启动测试
uwsgi --ini uwsgi.ini
4.nginx
-
- 配置文件
upstream django {
        server 127.0.0.1:8000;
    }
server {
        listen       80;
        location / {
            include     uwsgi_params;
            #uwsgi_pass  django;
            proxy_pass  http://django;
        }
        location /static {
            alias /data/ops/static;
        }
}
-
- 启动测试
5.systemd接管uwsgi,(uwsgi的配置文件中,要注明以前台方式启动!)
[Unit]
Description=devops
Documentation=http://www.xxx.com
After=network.target

[Service]
User=devops
Group=devops
WorkingDirectory=/data/ops
ExecStart=/usr/local/bin/uwsgi --ini /data/ops/uwsgi.ini
ExecReload=/usr/local/bin/uwsgi --reload /data/ops/uwsgi.pid
ExecStop=/usr/local/bin/uwsgi --stop /data/ops/uwsgi.pid
Restart=on-failure
RestartSec=20s

[Install]
WantedBy=multi-user.target
初学linux,每学到一点东西就写一点,如有不对的地方,恳请包涵!

 浙公网安备 33010602011771号