
4.filebeat
安装:下载好安装包,rpm安装就行了
rpm -ivh filebeat-6.8.8-x86_64.rpm
- 收集nginx访问日志和错误日志(转JSON日志时,如果不成功,kibana在创建索引时候message字段拆不开)
#更改nginx日志格式为JSON,注意逗号
    log_format  json '{"@timestamp":"$time_iso8601",'
                           '"@version":"1",'
                           '"client":"$remote_addr",'
                           '"url":"$uri",'
                           '"status":"$status",'
                           '"domain":"$host",'
                           '"host":"$server_addr",'
                           '"size":$body_bytes_sent,'
                           '"responsetime":$request_time,'
                           '"referer": "$http_referer",'
                           '"ua": "$http_user_agent"'
               '}';
    access_log  /var/log/nginx/access.log  json;

#filebeat配置
[root@nginx ~]# cat /etc/filebeat/filebeat.yml
filebeat.inputs:
- type: log
  enabled: true
  paths:
    - /var/log/nginx/access.log
  json.keys_under_root: true  #解析json日志用的选项
  json.overwrite_keys: true
  tags: ["access"]

- type: log
  enabled: true
  paths:
    - /var/log/nginx/error.log
  tags: ["error"]

setup.kibana:
  host: "192.168.1.75:5601"

output.elasticsearch:
  hosts: ["192.168.1.75:9200"]
  #index: "nginx-%{[beat.version]}-%{+yyyy.MM}"
  indices:
    - index: "nginx-access-%{[beat.version]}-%{+yyyy.MM}"
      when.contains:
        tags: "access"
    - index: "nginx-error-%{[beat.version]}-%{+yyyy.MM}"
      when.contains:
        tags: "error"

setup.template.name: "nginx"
setup.template.pattern: "nginx-*"
setup.template.enabled: false
setup.template.overwrite: true
- 收集tomcat日志和nginx日志
#更改tomcat访问日志格式
#vim server.xml
<Valve className="org.apache.catalina.valves.AccessLogValve" directory="logs"
               prefix="localhost_access_log" suffix=".txt"
               pattern="{"clientip":"%h","ClientUser":"%l","authenticated":"%u","AccessTime":"%t","method":"%r","status":"%s","SendBytes":"%b","Query?string":"%q","partner":"%{Referer}i","AgentVersion":"%{User-Agent}i"}"/>

#更改filebeat配置文件
filebeat.inputs:
- type: log
  enabled: true
  paths:
    - /var/log/nginx/access.log
  json.keys_under_root: true
  json.overwrite_keys: true
  tags: ["access"]

- type: log
  enabled: true
  paths:
    - /var/log/nginx/error.log
  tags: ["error"]

- type: log
  enable: true
  paths:
    - /root/apache-tomcat-8.5.37/logs/localhost_access_log.*
  tags: ["tomcat"]
  json.keys_under_root: true
  json.overwrite_keys: true

setup.kibana:
  host: "192.168.1.75:5601"

output.elasticsearch:
  hosts: ["192.168.1.75:9200"]
  #index: "nginx-%{[beat.version]}-%{+yyyy.MM}"
  indices:
    - index: "nginx-access-%{[beat.version]}-%{+yyyy.MM}"
      when.contains:
        tags: "access"
    - index: "nginx-error-%{[beat.version]}-%{+yyyy.MM}"
      when.contains:
        tags: "error"
    - index: "tomcat-access-%{[beat.version]}-%{+yyyy.MM}"
      when.contains:
        tags: "tomcat"

setup.template.name: "nginx"
setup.template.pattern: "nginx-*"
setup.template.enabled: false
setup.template.overwrite: true
- 收集java日志,多行合并成一行
filebeat.inputs:
- type: log
  enabled: true
  paths:
    - /var/log/elasticsearch/elasticsearch.log
  multiline.pattern: '^\['    #匹配[开头的行
  multiline.negate: true      #与正则不匹配的行合并成一行
  multiline.match: after      #将negate匹配到的行向上或向下合并成一行。

setup.kibana:
  host: "10.0.0.51:5601"

output.elasticsearch:
  hosts: ["10.0.0.51:9200"]
  index: "es-java-%{[beat.version]}-%{+yyyy.MM}"

setup.template.name: "nginx"
setup.template.pattern: "nginx-*"
setup.template.enabled: false
setup.template.overwrite: true
- 使用模块收集Nginx日志
1.配置filebeat主配置文件
[root@localhost ~]# egrep -v '^$|#' /etc/filebeat/filebeat.yml
filebeat.config.modules:    #开启模块
  path: ${path.config}/modules.d/*.yml
  reload.enabled: true
setup.kibana:
  host: "192.168.2.100:5601"
output.elasticsearch:
  hosts: ["192.168.2.100:9200"]
  indices:
    - index: "nginx_access-%{[beat.version]}-%{+yyyy.MM.dd}"
      when.contains:
        fileset.name: "access"
    - index: "nginx_error-%{[beat.version]}-%{+yyyy.MM.dd}"
      when.contains:
        fileset.name: "error"
setup.template.name: "nginx"
setup.template.pattern: "nginx_*"
setup.template.enabled: false
setup.template.overwrite: true
processors:
  - add_host_metadata: ~
  - add_cloud_metadata: ~

2.激活并配置filebeat的nginx模块
[root@localhost ~]# filebeat modules enable nginx
[root@localhost ~]# vim /etc/filebeat/modules.d/nginx.yml
- module: nginx
  access:
    enabled: true
    var.paths: ["/var/log/nginx/access.log"]
  error:
    enabled: true
    var.paths: ["/var/log/nginx/error.log"]

3.将nginx日志更改为普通模式
4.es上安装两个插件,es6.7版本之后就不用安装了,自带这两个插件
/usr/share/elasticsearch/bin/elasticsearch-plugin install file:///root/ingest-user-agent-6.6.0.zip
/usr/share/elasticsearch/bin/elasticsearch-plugin install file:///root/ingest-geoip-6.6.0.zip
5.重启es
6.重启filebeat
- 中间加一层redis,架构如下图

#需要更改filebeat和logstash的配置文件
#filebeat.yml
filebeat.config.modules:
  path: ${path.config}/modules.d/*.yml
  reload.enabled: true

filebeat.inputs:
- type: log
  enabled: true
  paths:
    - /var/log/nginx/access.log
  json.keys_under_root: true  #解析json日志用的选项
  json.overwrite_keys: true
  tags: ["access"]

- type: log
  enabled: true
  paths:
    - /var/log/nginx/error.log
  tags: ["error"]

setup.kibana:
  host: "192.168.2.100:5601"

output.redis:  #这次发送给redis,不用区分开存到redis不同的键,因为在上面已经插入了tags,取值得时候根据tags做判断
  hosts: ["192.168.2.4"]
  key: "filebeat"
  #password: "password"
  db: 0
  timeout: 5

setup.template.name: "nginx"
setup.template.pattern: "nginx_*"
setup.template.enabled: false
setup.template.overwrite: true

##下面是logstash的配置,启动的时候需要指定logstash -f xxx/logstsh_redis.conf
##[root@localhost ~]# vim /etc/logstash/conf.d/logstash_redis.conf
input {
  redis {
    host => "192.168.2.4"
    port => "6379"
    db => "0"
    key => "filebeat"    #读这个redis键
    data_type => "list"
  }
}

filter {
  mutate {  #这两项是将nginx日志里面的两项反馈时长转换为浮点数,后期可以做比较
    convert => ["upstream_time", "float"]
    convert => ["request_time", "float"]
  }
}

output {
    stdout {}
     if "access" in [tags] {   #判断在filebeat中插入的键值,对应存到es的索引中
      elasticsearch {
        hosts => "http://192.168.2.100:9200"
        manage_template => false
        index => "nginx_access-%{+yyyy.MM.dd}"
      }
    }
    if "error" in [tags] {
      elasticsearch {
        hosts => "http://192.168.2.100:9200"
        manage_template => false
        index => "nginx_error-%{+yyyy.MM.dd}"
      }
    }
}
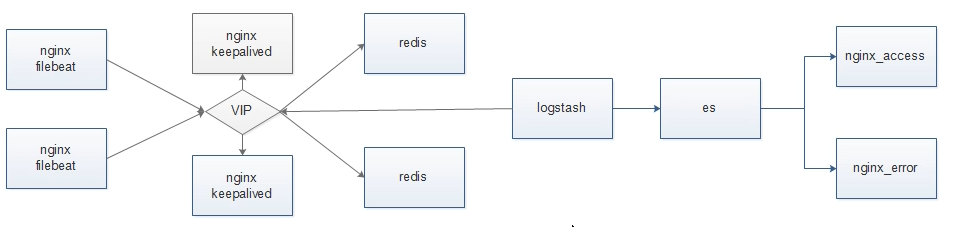
- 使用keepalived+nginx给redis做高可用,架构图如下,这里面唯一不同的地方就是filebeat发送地址和logstash接收地址都改为nginx的vip
#下面这段配置需要放在http段之外,因为属于4层带端口负载均衡,为了保证数据一致性,给一台redis后端主机加上backup,当主的挂了才使用备的。
[root@lb02 ~]# cat /etc/nginx/nginx.conf
..........................
stream {
  upstream redis {
      server 10.0.0.51:6381 max_fails=2 fail_timeout=10s;
      server 10.0.0.51:6382 max_fails=2 fail_timeout=10s backup;
  }

  server {
          listen 6379;
          proxy_connect_timeout 1s;
          proxy_timeout 3s;
          proxy_pass redis;
  }
}
- 收集docker日志,未测试
1.安装docker-compose
yum install -y python2-pip

2.这里使用pip安装,默认源为国外,可以使用国内加速,相关网站
https://mirrors.tuna.tsinghua.edu.cn/help/pypi/
pip加速操作命令
pip install -i https://pypi.tuna.tsinghua.edu.cn/simple pip -U
pip config set global.index-url https://pypi.tuna.tsinghua.edu.cn/simple

3.继续安装docker-compose
pip install docker-compose

4.检查
docker-compose version

5.编写docker-compose.yml
[root@elk-176 ~]# cat docker-compose.yml
version: '3'
services:
  nginx:
    image: nginx:v2
    # 设置labels
    labels:
      service: nginx
    # logging设置增加labels.service
    logging:
      options:
        labels: "service"
    ports:
      - "8080:80"
  db:
    image: nginx:latest
    # 设置labels
    labels:
      service: db
    # logging设置增加labels.service
    logging:
      options:
        labels: "service"
    ports:
      - "80:80"

6.清理镜像
docker ps -a|awk 'NR>1{print "docker rm",$1}'|bash

7.运行docker-compose.yml
docker-compose up -d

8.检查日志是否增加了lable标签
[root@elk-176 ~]# tail -1  /var/lib/docker/containers/b2c1f4f7f5a2967fe7d12c1db124ae41f009ec663c71608575a4773beb6ca5f8/b2c1f4f7f5a2967fe7d12c1db124ae41f009ec663c71608575a4773beb6ca5f8-json.log

{"log":"192.168.47.1 - - [23/May/2019:13:22:32 +0000] \"GET / HTTP/1.1\" 304 0 \"-\"  \"Mozilla/5.0 (Macintosh; Intel Mac OS X 10_14_5) AppleWebKit/537.36 (KHTML, like  Gecko) Chrome/74.0.3729.157 Safari/537.36\"  \"-\"\n","stream":"stdout","attrs":{"service":"nginx"},"time":"2019-05-23T13:22:32.478708392Z"}

9.配置filebeat
[root@elk-176 ~]# cat /etc/filebeat/filebeat.yml
filebeat.inputs:
- type: log
  enabled: true
  paths:
    - /var/lib/docker/containers/*/*-json.log
  json.keys_under_root: true
  json.overwrite_keys: true
output.elasticsearch:
  hosts: ["192.168.47.175:9200"]
  indices:
    - index: "docker-nginx-%{[beat.version]}-%{+yyyy.MM.dd}"
      when.contains:
        attrs.service: "nginx"
    - index: "docker-db-%{[beat.version]}-%{+yyyy.MM.dd}"
      when.contains:
        attrs.service: "db"
setup.template.name: "docker"
setup.template.pattern: "docker-*"
setup.template.enabled: false
setup.template.overwrite: true


1.配置filebeat通过服务类型和日志类型多条件创建不同索引目前为止,已经可以按服务来收集日志了,但是错误日志和正确日志混在了一起,不好区分,所以可以进一步进行条件判断,根据服务和日志类型创建不同的索引
filebeat配置文件
[root@elk-176 ~]# cat /etc/filebeat/filebeat.yml
filebeat.inputs:
- type: log
  enabled: true
  paths:
    - /var/lib/docker/containers/*/*-json.log
  json.keys_under_root: true
  json.overwrite_keys: true
output.elasticsearch:
  hosts: ["192.168.47.175:9200"]
  indices:
    - index: "docker-nginx-access-%{[beat.version]}-%{+yyyy.MM.dd}"
      when.contains:
          attrs.service: "nginx"
          stream: "stdout"
    - index: "docker-nginx-error-%{[beat.version]}-%{+yyyy.MM.dd}"
      when.contains:
          attrs.service: "nginx"
          stream: "stderr"
    - index: "docker-db-access-%{[beat.version]}-%{+yyyy.MM.dd}"
      when.contains:
          attrs.service: "db"
          stream: "stdout"
    - index: "docker-db-error-%{[beat.version]}-%{+yyyy.MM.dd}"
      when.contains:
          attrs.service: "db"
          stream: "stderr"
setup.template.name: "docker"
setup.template.pattern: "docker-*"
setup.template.enabled: false
setup.template.overwrite: true


2.验证提交新镜像运行后日志收集情况

1.提交新镜像
[root@elk-176 ~]# docker ps -a
CONTAINER ID        IMAGE               COMMAND                  CREATED              STATUS                      PORTS               NAMES
f92f4d747584        nginx:latest        "nginx -g 'daemon of…"   45 minutes ago       Exited (0) 51 seconds ago                       root_db_1
b2c1f4f7f5a2        nginx:v2            "nginx -g 'daemon of…"   45 minutes ago       Exited (0) 51 seconds ago                       root_nginx_1

[root@elk-176 ~]# docker commit root_nginx_1 nginx:v3
sha256:4457e2b7afc719ef185c75c02031b11c1407efe2e2e57b85f0c9347d04a9ff00
[root@elk-176 ~]# docker commit root_db_1 nginx:v4
sha256:a7e8d8b3290c817194956aa06fc486ef928853121d9c6224fd64fe759c967dda
[root@elk-176 ~]# docker images
REPOSITORY          TAG                 IMAGE ID            CREATED              SIZE
nginx               v4                  a7e8d8b3290c        35 seconds ago       109MB
nginx               v3                  4457e2b7afc7        45 seconds ago       109MB
nginx               v2                  c181c6355cd9        2 hours ago          109MB
nginx               latest              53f3fd8007f7        2 weeks ago          109MB

2.修改并运行docker-compose
[root@elk-176 ~]# cat docker-compose.yml
version: '3'
services:
  nginx:
    image: nginx:v3
    # 设置labels
    labels:
      service: nginx
    # logging设置增加labels.service
    logging:
      options:
        labels: "service"
    ports:
      - "8080:80"
  db:
    image: nginx:v4
    # 设置labels
    labels:
      service: db
    # logging设置增加labels.service
    logging:
      options:
        labels: "service"
    ports:
      - "80:80"

[root@elk-176 ~]# docker-compose up -d
Starting root_nginx_1 ...
Starting root_nginx_1 ... done
Starting root_db_1    ... done
[root@elk-176 ~]# docker ps

CONTAINER ID        IMAGE               COMMAND                  CREATED              STATUS              PORTS                  NAMES
04308aa3928b        nginx:v4            "nginx -g 'daemon of…"   30 seconds ago      Up  1 second         0.0.0.0:80->80/tcp     root_db_1
49d2e2210e6f        nginx:v3            "nginx -g 'daemon of…"   30 seconds ago      Up  1 second         0.0.0.0:8080->80/tcp   root_nginx_1

3.访问并查看是否有新数据生成
curl logcalhost/zhangya.html
curl logcalhost:8080/zhangya.html

4.经过查看发现已经成功收集到了日志,这样我们就做到了不用修改filebeat配置文件也可以持续的收集新镜像的日志并按分类创建不同的索引
修改docker容器内日志类型为json刚才收集的docker内的日志类型为普通格式,如果我们修改为json格式会如何呢?
初学linux,每学到一点东西就写一点,如有不对的地方,恳请包涵!

 浙公网安备 33010602011771号