3.logstash
logstash同样不需要以root身份运行,并且logstash是安装在应用服务器上的程序,负责推送应用服务器的日志到elasticsearch上
- 解压logstash压缩包,将其放到某个目录下,创建logstash用户
[root@localhost ~]# useradd logstash
- logstash的配置文件:config/jvm.options和config/logstash.yml
- 编写日志收集配置文件,将本机的nginx和tomcat日志发送给elastic
- 修改nginx访问日志格式
[root@localhost ~]# vim /etc/nginx/nginx.conf
log_format json '{"@timestamp":"$time_iso8601",'
                           '"@version":"1",'
                           '"client":"$remote_addr",'
                           '"url":"$uri",'
                           '"status":"$status",'
                           '"domain":"$host",'
                           '"host":"$server_addr",'
                           '"size":$body_bytes_sent,'
                           '"responsetime":$request_time,'
                           '"referer": "$http_referer",'
                           '"ua": "$http_user_agent"'
               '}';
access_log  /var/log/nginx/access_json.log  json;
[root@localhost ~]# systemctl reload nginx
-
- 修改tomcat日志格式server.xml
<Valve className="org.apache.catalina.valves.AccessLogValve" directory="logs"
               prefix="localhost_access_log" suffix=".txt"
               pattern="{"clientip":"%h","ClientUser":"%l","authenticated":"%u","AccessTime":"%t","method":"%r","status":"%s","SendBytes":"%b","Query?string":"%q","partner":"%{Referer}i","AgentVersion":"%{User-Agent}i"}"/>
-
- 编写logstash收集日志配置文件,注意日志文件的权限,logstash用户可能会没有权限读取日志
[root@localhost ~]# vim /usr/logstash/config/toes.conf
input {
       file {
       path => "/var/log/nginx/access_json.log"
       codec => "json"
       start_position => "beginning"
       type => "nginx-log"
    }
       file {
       path => "/usr/tomcat/logs/localhost_access_log.*.txt"
       codec => "json"
       start_position => "beginning"
       type => "tomcat-log"
    }
}
output {
  if [type] == "nginx-log"{
        elasticsearch {
           hosts => ["192.168.1.8:9200"]
           index => "nginx-log-%{+YYYY.MM.dd}"
        }
  }
  if [type] == "tomcat-log"{
        elasticsearch {
           hosts => ["192.168.1.77:9200"]
           index => "tomcat-access-%{+YYYY.MM.dd}"
        }
  }
}
-
- 开启logstash
[root@bogon logstash]# su -c '/usr/logstash/bin/logstash -f /usr/logstash/config/toes.conf ' logstash
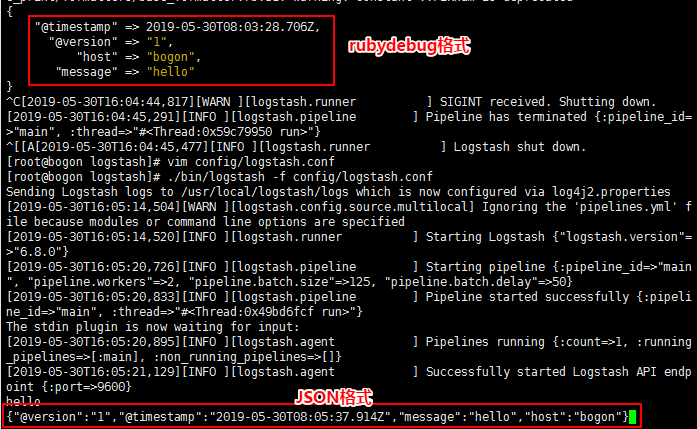
- 默认标准输入标准输出
#从标准输入读取,输出到标准输出,这里指定输出编码格式为json,如不指定默认为rubydebug
logstash -e 'input { stdin{} } output { stdout{codec => json} }'

收集/var/log/messages日志到es里面
[root@bogon logstash]# vim config/logstash.conf
input{
        file{
                path => "/var/log/messages"
                type => "system"
                start_position => "beginning"
    }
}
output{
        elasticsearch{
                hosts => ["192.168.1.75:9200"]
                index => "system-%{+YYYY.MM.dd}"
  }
}
判断类型,使用codec将多行日志规整至一行
input{
        file{
                path => "/var/log/messages"
                type => "system"
                start_position => "beginning"
         }
        file{
                path => "/home/elasticsearch/elasticsearch-6.8.0/logs/elasticsearch.log"
                type => "es-error"
                start_position => "beginning"
                codec => multiline{
                                pattern => "^\["      #正则表达式匹配以[开头的行
                                negate => true        #true或false,如果是true,则与正则不匹配的行将构成多行过滤器。反之亦然
                                what => "previous"    #previous或next,将negate匹配到的行向上或向下合并成一行。
                        }                             #这整段的意思将不是以[开头的行,全都并入上一行,当匹配到[开始新的一行
        }
}
output{
        if [type] == "system" {     #判断类型,分清存放日志
        elasticsearch{
                hosts => ["192.168.1.75:9200"]
                index => "system-%{+YYYY.MM.dd}"
  }
}
        if [type] == "es-error" {
        elasticsearch{
                hosts => ["192.168.1.75:9200"]
                index => "es-error-%{+YYYY.MM.dd}"
}
}
}
初学linux,每学到一点东西就写一点,如有不对的地方,恳请包涵!


 浙公网安备 33010602011771号