NetCore 中 后台任务利器之Hangfire 的使用
什么是Hangfire
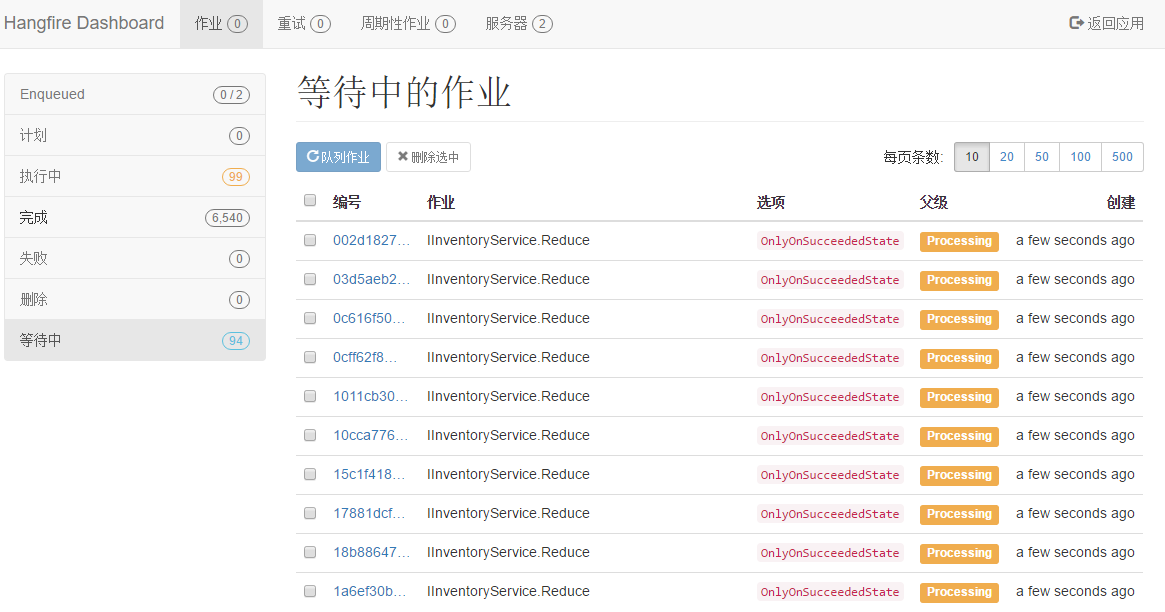
Hangfire 是一个开源的.NET任务调度框架,目前1.6+版本已支持.NET Core。它最大特点在于内置提供集成化的控制台,方便后台查看及监控:

另外,Hangfire包含三大核心组件:客户端、持久化存储、服务端,官方的流程介绍图如下:

从图中可以看出,这三个核心组件是可以分离出来单独部署的,例如可以部署多台Hangfire服务,提高处理后台任务的吞吐量。关于任务持久化存储,支持Sqlserver,MongoDb,Mysql或是Redis等等。
Hangfire可视化界面
1. 新建一个net5 项目,添加nuget 中对hangfire的依赖包

    <PackageReference Include="Hangfire" Version="1.7.18" />
    <PackageReference Include="Hangfire.AspNetCore" Version="1.7.18" />
    <PackageReference Include="Hangfire.Console" Version="1.4.2" />
    <PackageReference Include="Hangfire.Dashboard.BasicAuthorization" Version="1.0.2" />
    <PackageReference Include="Hangfire.HttpJob" Version="3.5.3" />
    <PackageReference Include="Hangfire.SqlServer" Version="1.7.18" />
    <PackageReference Include="Hangfire.Tags.SqlServer" Version="1.7.0" />
2. 在Startup.cs 配置服务及启动服务
ConfigureServices方法
 services.AddHangfire(configura =>
            {
                //指定存储介质
                configura.UseSqlServerStorage("Data Source=ZXL; Database=Hangfire.Sample; User ID=sa; Password=123456; Integrated Security=True;", new SqlServerStorageOptions() //Nuget引入:
                {
                    CommandBatchMaxTimeout = TimeSpan.FromMinutes(5),
                    SlidingInvisibilityTimeout = TimeSpan.FromMinutes(5),
                    QueuePollInterval = TimeSpan.Zero,
                    UseRecommendedIsolationLevel = true,
                    UsePageLocksOnDequeue = true,
                    DisableGlobalLocks = true
                }).UseTagsWithSql()//nuget引入Hangfire.Tags.SqlServer
            .UseConsole(new ConsoleOptions()
            {
                BackgroundColor = "#000079"
            }).UseHangfireHttpJob();

            });
Data Source 电脑机器名
Database 要先去建一个空的Hangfire.Sample的数据库
Configure方法
 app.UseHangfireServer();//启动HangfireServer
            app.UseHangfireDashboard("/hangfire"
            );   //支持可视化界面 ---任何一个用户都能够来访问;所以需要加一道屏障
注释掉
            //app.UseEndpoints(endpoints =>
            //{
            //    endpoints.MapGet("/", async context =>
            //    {
            //        await context.Response.WriteAsync("Hello World!");
            //    });
            //});
4. 在根目录 cmd dotnet run

5. 在网页url上打开 监听端口+/hangfire
http://localhost:5000/hangfire

这时打开了 hangfire的可视化界面

在持久化上,对应的数据库生成了 DB表。——这也表示Hangfire 可以把任务数据持久化到DB上。

Hangfire添加任务
1.这里假设 我们要在Hangfire的可视化页面上,执行一个web任务 (这里是拿我的上一篇建的webapi项目来用)
http://localhost:52216/api/V1/First

2. 在Hangfire的可视化页面上,我们按以下步骤操作,进入到第4步时。

我们修改里面的参数值,像JobName、Url、Method等等一些参数,然后提交即可

任务完成后,它会出现在“完成”, 点击 蓝色的编号,比如 #3、#2、#1,我们可以看到任务执行的一些信息


Hangfire安全性配置:添加登录
 app.UseHangfireDashboard("/hangfire", new DashboardOptions()
            {
                Authorization = new BasicAuthAuthorizationFilter[] {
                      new BasicAuthAuthorizationFilter(new BasicAuthAuthorizationFilterOptions(){
                           SslRedirect=false,
                            RequireSsl=false,
                             Users=new BasicAuthAuthorizationUser[]{
                                  new BasicAuthAuthorizationUser(){
                                      Login="admin",
                                      PasswordClear="test"
                                  }
                             }
                      })
                }

            });  //支持可视化界面 ---任何一个用户都能够来访问;所以需要加一道屏障


Hangfire扩展:HttpJob
大家到这个地址去看 很详细 https://github.com/yuzd/Hangfire.HttpJob

付费内容,请联系本人QQ:1002453261
本文来自博客园,作者:明志德道,转载请注明原文链接:https://www.cnblogs.com/for-easy-fast/p/14512594.html


【推荐】编程新体验,更懂你的AI,立即体验豆包MarsCode编程助手
【推荐】凌霞软件回馈社区,博客园 & 1Panel & Halo 联合会员上线
【推荐】抖音旗下AI助手豆包,你的智能百科全书,全免费不限次数
【推荐】博客园社区专享云产品让利特惠,阿里云新客6.5折上折
【推荐】轻量又高性能的 SSH 工具 IShell:AI 加持,快人一步
· .NET Core 托管堆内存泄露/CPU异常的常见思路
· PostgreSQL 和 SQL Server 在统计信息维护中的关键差异
· C++代码改造为UTF-8编码问题的总结
· DeepSeek 解答了困扰我五年的技术问题
· 为什么说在企业级应用开发中,后端往往是效率杀手?
· 清华大学推出第四讲使用 DeepSeek + DeepResearch 让科研像聊天一样简单!
· 推荐几款开源且免费的 .NET MAUI 组件库
· 实操Deepseek接入个人知识库
· 易语言 —— 开山篇
· Trae初体验