.net core在Ocelot网关中统一配置Swagger
最近在做微服务的时候,由于我们是采用前后端分离来开发的,提供给前端的直接是Swagger,如果Swagger分布在各个API中,前端查看Swagger的时候非常不便,因此,我们试着将Swagger集中放到网关中。
这里我用两个API项目(一个BasicDataApi,一个UsersApi)和一个网关项目(ApiGateway)做示例,下面直接上代码。
首先在BasicDataApi中配置Swagger:
1 2 3 4 5 6 7 8 9 10 11 12 13 14 15 16 17 18 19 20 21 22 23 24 | public void ConfigureServices(IServiceCollection services) { services.AddMvc(); services.AddSwaggerGen(options => { options.SwaggerDoc("BasicDataApi", new Info { Title = "基础数据服务", Version = "v1" }); var basePath = PlatformServices.Default.Application.ApplicationBasePath; var xmlPath = Path.Combine(basePath, "Qka.BasicDataApi.xml"); options.IncludeXmlComments(xmlPath); }); } public void Configure(IApplicationBuilder app, IHostingEnvironment env, ILoggerFactory loggerFactory) { app.UseMvc() .UseSwagger(c => { c.RouteTemplate = "{documentName}/swagger.json"; }) .UseSwaggerUI(options => { options.SwaggerEndpoint("/BasicDataApi/swagger.json", "BasicDataApi"); }); } |
在UsersApi中一样的配置:
1 2 3 4 5 6 7 8 9 10 11 12 13 14 15 16 17 18 19 20 21 22 23 24 25 26 | public void ConfigureServices(IServiceCollection services) { services.AddSwaggerGen(options => { options.SwaggerDoc("UsersApi", new Info { Title = "用户API接口", Version = "v1" }); var basePath = PlatformServices.Default.Application.ApplicationBasePath; var xmlPath = Path.Combine(basePath, "Qka.UsersApi.xml"); options.IncludeXmlComments(xmlPath); }); services.AddMvc(); } public void Configure(IApplicationBuilder app, IHostingEnvironment env, ILoggerFactory loggerFactory) { app.UseMvc() .UseSwagger(c => { c.RouteTemplate = "{documentName}/swagger.json"; }) .UseSwaggerUI(options => { options.SwaggerEndpoint("/UsersApi/swagger.json", "UsersApi"); }); } |
最后在网关项目中修改Ocelot配置,获取两个项目的swagger.json不要授权:

  "ReRoutes": [
    {
      "DownstreamPathTemplate": "/UsersApi/swagger.json",
      "DownstreamScheme": "http",
      "ServiceName": "userapi",
      "LoadBalancer": "RoundRobin",
      "UseServiceDiscovery": true,
      "UpstreamPathTemplate": "/UsersApi/swagger.json",
      "UpstreamHttpMethod": [ "GET", "POST", "DELETE", "PUT" ]
    },
    {
      "DownstreamPathTemplate": "/BasicDataApi/swagger.json",
      "DownstreamScheme": "http",
      "ServiceName": "basedataapi",
      "LoadBalancer": "RoundRobin",
      "UseServiceDiscovery": true,
      "UpstreamPathTemplate": "/BasicDataApi/swagger.json",
      "UpstreamHttpMethod": [ "GET", "POST", "DELETE", "PUT" ]
    },
    {
      "DownstreamPathTemplate": "/UsersApi/{url}",
      "DownstreamScheme": "http",
      "ServiceName": "userapi",
      "LoadBalancer": "RoundRobin",
      "UseServiceDiscovery": true,
      "UpstreamPathTemplate": "/UsersApi/{url}",
      "UpstreamHttpMethod": [ "GET", "POST", "DELETE", "PUT" ] ,
      "AuthenticationOptions": {
        "AuthenticationProviderKey": "qka_api",
        "AllowedScopes": []
      }
    }
  ],
  "GlobalConfiguration": {
    "BaseUrl": "http://localhost:9000",
    "ServiceDiscoveryProvider": {
      "Host": "192.168.2.144",
      "Port": 8500
    }
  }
}
修改StartUp.cs文件的代码,注意在使用中间件的时候,UseMvc一定要在UseOcelot之前。
:
public void ConfigureServices(IServiceCollection services)
        {
            services.AddOcelot();

            var authenticationProviderKey = "qka_api";
            services.AddAuthentication("Bearer")
                .AddIdentityServerAuthentication(authenticationProviderKey, options =>
                {
                    options.Authority = "http://192.168.2.121:9066/";
                    options.RequireHttpsMetadata = false;
                    options.ApiName = "UserApi";
                });

            services.AddMvc();
            services.AddSwaggerGen(options =>
            {
                options.SwaggerDoc("ApiGateway", new Info { Title = "网关服务", Version = "v1" });
            });
        }

        public void Configure(IApplicationBuilder app, IHostingEnvironment env)
        {
            app.UseMetricsAllMiddleware();
            app.UseMetricsAllEndpoints();

            app.UseCors("default");

            var apis = new List<string> { "BasicDataApi", "UsersApi" };
            app.UseMvc()
               .UseSwagger()
               .UseSwaggerUI(options =>
               {
                   apis.ForEach(m =>
                   {
                       options.SwaggerEndpoint($"/{m}/swagger.json", m);
                   });
               });

            app.UseOcelot().Wait();
        }
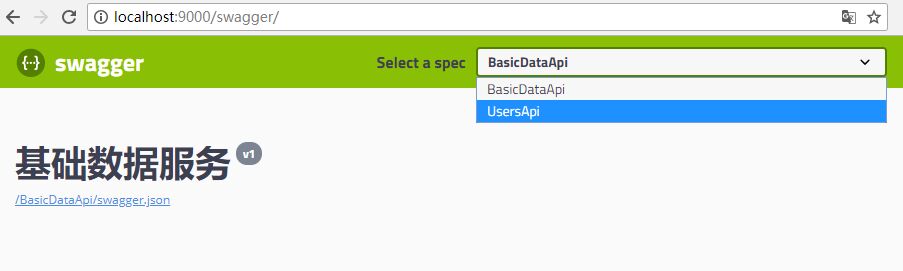
最后上图:


【推荐】国内首个AI IDE,深度理解中文开发场景,立即下载体验Trae
【推荐】编程新体验,更懂你的AI,立即体验豆包MarsCode编程助手
【推荐】抖音旗下AI助手豆包,你的智能百科全书,全免费不限次数
【推荐】轻量又高性能的 SSH 工具 IShell:AI 加持,快人一步
· 10年+ .NET Coder 心语,封装的思维:从隐藏、稳定开始理解其本质意义
· .NET Core 中如何实现缓存的预热?
· 从 HTTP 原因短语缺失研究 HTTP/2 和 HTTP/3 的设计差异
· AI与.NET技术实操系列:向量存储与相似性搜索在 .NET 中的实现
· 基于Microsoft.Extensions.AI核心库实现RAG应用
· TypeScript + Deepseek 打造卜卦网站:技术与玄学的结合
· 阿里巴巴 QwQ-32B真的超越了 DeepSeek R-1吗?
· 【译】Visual Studio 中新的强大生产力特性
· 10年+ .NET Coder 心语 ── 封装的思维:从隐藏、稳定开始理解其本质意义
· 【设计模式】告别冗长if-else语句:使用策略模式优化代码结构