springboot 打印sql执行信息日志
一、mybatis方式
在你的application.yml文件下面加入下面这段代码
mybatis
  configuration:
    log-impl: org.apache.ibatis.logging.stdout.StdOutImpl
项目启动在你的控制台看到上面这种就说明配置成了:

打印出来的形式如下
Creating a new SqlSession
Registering transaction synchronization for SqlSession [org.apache.ibatis.session.defaults.DefaultSqlSession@2e943ddb]
JDBC Connection [HikariProxyConnection@898692052 wrapping com.mysql.jdbc.JDBC4Connection@6a0c5a04] will be managed by Spring
==>  Preparing: DELETE FROM user_info WHERE uid in ( ? , ? , ? )
==> Parameters: 44(Long), 45(Long), 46(Long)
<==    Updates: 0
Releasing transactional SqlSession [org.apache.ibatis.session.defaults.DefaultSqlSession@2e943ddb]
Transaction synchronization committing SqlSession [org.apache.ibatis.session.defaults.DefaultSqlSession@2e943ddb]
Transaction synchronization deregistering SqlSession [org.apache.ibatis.session.defaults.DefaultSqlSession@2e943ddb]
Transaction synchronization closing SqlSession [org.apache.ibatis.session.defaults.DefaultSqlSession@2e943ddb]
二、日志方式
在你的application.yml文件下面加入下面这段代码
logging:
  level:
    com.seamax.bdsearch.dao: DEBUG
注意:com.seamax.bdsearch.dao = 你的mapper包。
打印出来的形式如下:
2019-01-24 08:02:14.245 [http-nio-8060-exec-2] DEBUG c.s.a.m.m.U.getUsernameExistSet 159 - ==>  Preparing: SELECT username FROM user_info WHERE username in ( ? , ? , ? )
2019-01-24 08:02:14.245 [http-nio-8060-exec-2] DEBUG c.s.a.m.m.U.getUsernameExistSet 159 - ==> Parameters: nike16(String), nike14(String), nike15(String)
2019-01-24 08:02:14.307 [http-nio-8060-exec-2] DEBUG c.s.a.m.m.U.getUsernameExistSet 159 - <==      Total: 0
2019-01-24 08:02:14.323 [http-nio-8060-exec-2] DEBUG c.s.a.m.mapper.UserMapper.saveBatch 159 - ==>  Preparing: INSERT INTO user_info ( username, password, email, telphone, birthday, createTime, updateTime ) values ( ?, ?, ?, ?, ?, ?, ? ) , ( ?, ?, ?, ?, ?, ?, ? ) , ( ?, ?, ?, ?, ?, ?, ? )
2019-01-24 08:02:14.323 [http-nio-8060-exec-2] DEBUG c.s.a.m.mapper.UserMapper.saveBatch 159 - ==> Parameters: nike14(String), 4f757a334d69b32b586f3694fbaaa9a9869aee184f98e009b6e02b170f92eb9f(String), hgaha@qq.com(String), null, 2018-03-02 02:01:02.0(Timestamp), 2019-01-24 08:02:14.307(Timestamp), 2019-01-24 08:02:14.307(Timestamp), nike15(String), 18a1c9f3e7a69e3f72ab5d80caea96e5c90f5fada8f9a7e92238dc4242ba03f8(String), hgaha@qq.com(String), null, 2018-03-02 02:01:02.0(Timestamp), 2019-01-24 08:02:14.307(Timestamp), 2019-01-24 08:02:14.307(Timestamp), nike16(String), 5912bd4ff3ae134b15347610b64d9f352dd3c89dd2fb5c495cf4699683b33271(String), hgaha@qq.com(String), null, 2018-03-02 02:01:02.0(Timestamp), 2019-01-24 08:02:14.307(Timestamp), 2019-01-24 08:02:14.307(Timestamp)
2019-01-24 08:02:14.338 [http-nio-8060-exec-2] DEBUG c.s.a.m.mapper.UserMapper.saveBatch 159 - <==    Updates: 3
三、log4jdbc-log4j2使用
有时候我们程序的接口比较耗时,需要优化,这时我们可能需要了解该接口执行了哪些sql语句以及耗时
1.引入jar包
        <!--监控sql日志-->
        <dependency>
            <groupId>org.bgee.log4jdbc-log4j2</groupId>
            <artifactId>log4jdbc-log4j2-jdbc4.1</artifactId>
            <version>1.16</version>
        </dependency>
2.引入配置文件 log4jdbc.log4j2.properties
内容为:
log4jdbc.spylogdelegator.name=net.sf.log4jdbc.log.slf4j.Slf4jSpyLogDelegator
3.logback-spring.xml 里加入如下内容
    <logger name="jdbc.connection" level="OFF"/>
    <logger name="jdbc.resultset" level="OFF"/>
    <logger name="jdbc.resultsettable" level="OFF"/>
    <logger name="jdbc.audit" level="OFF"/>
    <!--ps:sqltiming和sqlonly差别是多打印了sql语句的耗时,如果不想要这个时间可以修改筛选里面的项。-->
    <logger name="jdbc.sqltiming" level="INFO"/>
    <logger name="jdbc.sqlonly" level="OFF"/>
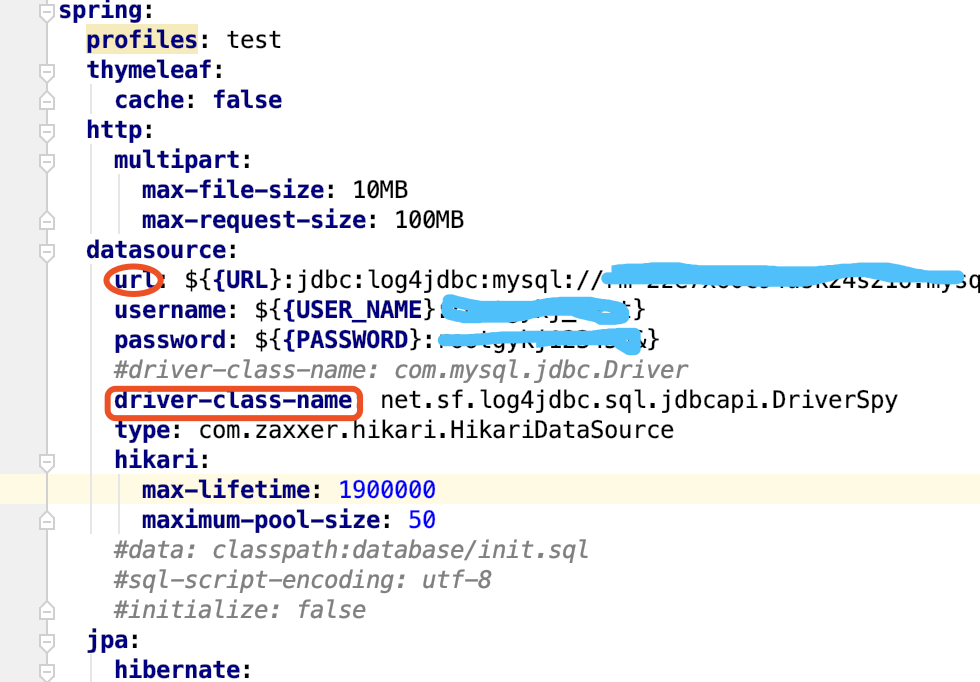
4.配置文件中修改部分属性值
如图:

即:
driver-class-name 修改为:net.sf.log4jdbc.sql.jdbcapi.DriverSpy
url 修改为:jdbc:log4jdbc:mysql:// (在原来的jdbc后面加了:log4jdbc:)
---------------------------------------------------------------------------
以上完成任务,下面看下效果
---------------------------------------------------------------------------
注意:除了打印sql执行时间外,打印的sql语句是包含sql所带的参数的,select语句的话where后面带参数值,insert语句的话插入对象的值都有

四、p6spy使用
1.导入依赖
<dependency>
    <groupId>p6spy</groupId>
    <artifactId>p6spy</artifactId>
    <version>3.8.6</version>
</dependency>
2.修改application.properties中的数据库驱动和url
#spring.datasource.driver-class-name=com.mysql.jdbc.Driver
#spring.datasource.url=jdbc:mysql://localhost:3306/db?serverTimezone=CTT&useUnicode=true&characterEncoding=utf-8&allowMultiQueries=true&useSSL=true
#更换为com.p6spy.engine.spy.P6SpyDriver
spring.datasource.driver-class-name=com.p6spy.engine.spy.P6SpyDriver
spring.datasource.url=jdbc:p6spy:mysql://localhost:3306/data?serverTimezone=CTT&useUnicode=true&characterEncoding=utf-8&allowMultiQueries=true&useSSL=true
spring.datasource.username=root
spring.datasource.password=123456
3.在application.properties同级目录下创建spy.properties配置文件
module.log=com.p6spy.engine.logging.P6LogFactory,com.p6spy.engine.outage.P6OutageFactory
# 自定义日志打印
logMessageFormat=com.fkzd.framework.config.P6spySqlFormatConfig //自定义P6SpyLogger类的地址
# 使用日志系统记录sql
appender=com.p6spy.engine.spy.appender.StdoutLogger
## 配置记录Log例外
excludecategories=info,debug,result,batc,resultset
# 设置使用p6spy driver来做代理
deregisterdrivers=true
# 日期格式
dateformat=yyyy-MM-dd HH:mm:ss
# 实际驱动
driverlist=com.mysql.cj.jdbc.Driver
# 是否开启慢SQL记录
outagedetection=true
# 慢SQL记录标准 秒
outagedetectioninterval=2
4.自定义sql输出
import com.p6spy.engine.spy.appender.MessageFormattingStrategy;
import com.fkzd.common.utils.DateUtils;
import org.apache.commons.lang3.StringUtils;

import java.util.Date;

/**
 * 自定义 p6spy sql输出格式
 *
 */
public class P6spySqlFormatConfig implements MessageFormattingStrategy {

    /**
     * 过滤掉定时任务的 SQL
     */
    @Override
    public String formatMessage(int connectionId, String now, long elapsed, String category, String prepared, String sql, String url) {
        return StringUtils.isNotBlank(sql) ? DateUtils.parseDateToStr("yyyy-MM-dd HH:mm:ss", new Date())
                + " | 耗时 " + elapsed + " ms | SQL 语句:" + StringUtils.LF + sql.replaceAll("[\\s]+", StringUtils.SPACE) + ";" : "";
    }
}
执行效果


