

02 Eureka 注册服务
Eureka 注册服务
Eureka基础知识

服务注册

Eureka两个组件

单机Eureka构建步骤
- 建 module cloud-eureka-server7001
- 在pom中添加
  <dependencies>
      <!-- eureka-server -->
      <dependency>
          <groupId>org.springframework.cloud</groupId>
          <artifactId>spring-cloud-starter-netflix-eureka-server</artifactId>
      </dependency>
      <!-- 引用自己定义的api通用包,可以使用Payment支付Entity -->
      <dependency>
          <groupId>com.angenin.springcloud</groupId>
          <artifactId>cloud-api-commons</artifactId>
          <version>${project.version}</version>
      </dependency>
      <dependency>
          <groupId>org.springframework.boot</groupId>
          <artifactId>spring-boot-starter-web</artifactId>
      </dependency>
      <!--监控-->
      <dependency>
          <groupId>org.springframework.boot</groupId>
          <artifactId>spring-boot-starter-actuator</artifactId>
      </dependency>
      <!-- 一般通用配置 -->
      <dependency>
          <groupId>org.springframework.boot</groupId>
          <artifactId>spring-boot-devtools</artifactId>
          <scope>runtime</scope>
          <optional>true</optional>
      </dependency>
      <dependency>
          <groupId>org.projectlombok</groupId>
          <artifactId>lombok</artifactId>
          <optional>true</optional>
      </dependency>
      <dependency>
          <groupId>org.springframework.boot</groupId>
          <artifactId>spring-boot-starter-test</artifactId>
          <scope>test</scope>
      </dependency>
  </dependencies>
- yml文件
server:
  port: 7001

eureka:
  instance:
    hostname: localhost  #eureka服务端的实例名称
  client:
    #false表示不向注册中心注册自己(想注册也可以,不过没必要)
    register-with-eureka: false
    #false表示自己端就是注册中心,职责就是维护服务实例,并不需要去检索服务
    fetch-registry: false
    service-url:
      #设置与eurekaServer交互的地址查询服务和注册服务都需要依赖这个地址
      defaultZone: http://${eureka.instance.hostname}:${server.port}/eureka/
- 主启动
@EnableEurekaServer //表示此项目是eureka的服务注册中心
@SpringBootApplication
public class EurekaMain7001 {
    public static void main(String[] args) {
        SpringApplication.run(EurekaMain7001.class, args);
    }
}
- 测试
在浏览器输入http://localhost:7001/
将 8001 端口 注册进EurekaServer
- 在 pom 文件中添加
        <!-- eureka-client -->
        <dependency>
            <groupId>org.springframework.cloud</groupId>
            <artifactId>spring-cloud-starter-netflix-eureka-client</artifactId>
        </dependency>
- 修改 yml 文件
eureka:
  client:
    #true表示向注册中心注册自己,默认为true
    register-with-eureka: true
    #是否从EurekaServer抓取已有的注册信息,默认为true。单节点无所谓,集群必须设置为true才能配合ribbon使用负载均衡
    fetch-registry: true
    service-url:
      defaultZone: http://localhost:7001/eureka
- 在主配置类上加上
@EnableEurekaClient注解,表示这个项目是eureka的客户端。 - 启动项目,然后刷新页面,成功注册进注册中心。

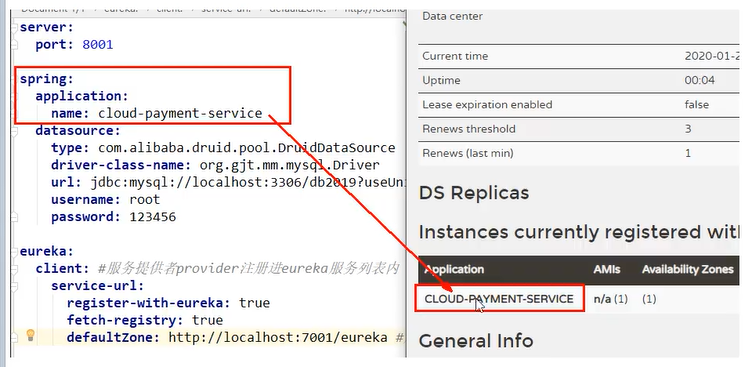
Eureka 中的名称 和 设置的一样
将EurekaClient端80注册进EurekaServer成为服务消费者consumer
- 在 pom 文件中添加
        <!-- eureka-client -->
        <dependency>
            <groupId>org.springframework.cloud</groupId>
            <artifactId>spring-cloud-starter-netflix-eureka-client</artifactId>
        </dependency>
- 修改 yml 文件
eureka:
  client:
    #true表示向注册中心注册自己,默认为true
    register-with-eureka: true
    #是否从EurekaServer抓取已有的注册信息,默认为true。单节点无所谓,集群必须设置为true才能配合ribbon使用负载均衡
    fetch-registry: true
    service-url:
      defaultZone: http://localhost:7001/eureka
- 在主配置类上加上
@EnableEurekaClient注解,表示这个项目是eureka的客户端。 - 启动项目,然后刷新页面,成功注册进注册中心。
搭建Eureka集群步骤
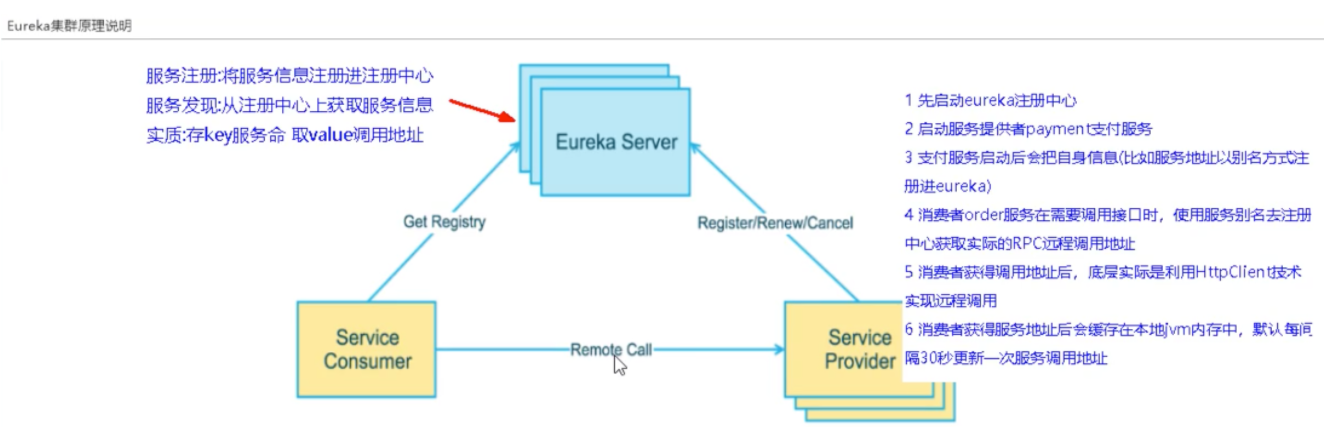
搭建Eureka注册中心集群,实现负载均衡+故障容错。
Eureka集群:相互注册,相互守望。
构建eurekaServer集群环境
- 根据cloud-eureka-server7001新建cloud-eureka-server7002
- 修改hosts文件 在C:\Windows\System32\drivers\etc
127.0.0.1       eureka7001.com
127.0.0.1       eureka7002.com
- 修改7001的yml文件中 hostname 和 defaultZone
server:
  port: 7001

eureka:
  instance:
    hostname: eureka7001.com  #eureka服务端的实例名称
  client:
    #false表示不向注册中心注册自己(想注册也可以,不过没必要)
    register-with-eureka: false
    #false表示自己端就是注册中心,职责就是维护服务实例,并不需要去检索服务
    fetch-registry: false
    service-url:
      #设置与eurekaServer交互的地址查询服务和注册服务都需要依赖这个地址
      #      defaultZone: http://${eureka.instance.hostname}:${server.port}/eureka/
      #集群版  相互注册,相互守望
      defaultZone: http://eureka7002.com:7002/eureka/
-
修改7002的yml文件
server:
  port: 7002

eureka:
  instance:
    hostname: eureka7002.com  #eureka服务端的实例名称
  client:
    #false表示不向注册中心注册自己(想注册也可以,不过没必要)
    register-with-eureka: false
    #false表示自己端就是注册中心,职责就是维护服务实例,并不需要去检索服务
    fetch-registry: false
    service-url:
      #设置与eurekaServer交互的地址查询服务和注册服务都需要依赖这个地址
      #      defaultZone: http://${eureka.instance.hostname}:${server.port}/eureka/
      #集群版  相互注册,相互守望
      defaultZone: http://eureka7001.com:7001/eureka/
启动之后
http://eureka7001.com:7001/ 里看到7002的
支付服务8001和订单服务80微服务发布到集群配置中
在两个项目的yml 文件上加上
    service-url:
      #     单机版 defaultZone: http://localhost:7001/eureka
      defaultZone: http://eureka7001.com:7001/eureka/,http://eureka7002.com:7002/eureka/
启动进行测试:(先启动集群,再启动8001,最后启动80)
就能看到 8001 和 80进入了集群
支付微服务集群配置实现负载均衡
-
按照8001新建8002。
-
修改 yml文件中端口号和主配置类,其他直接复制8001的,yml文件中的应用名不需要改,因为是集群,所以应用名需要一致
-
分别在所有的提供者的PaymentController中加入:(这个@Value是spring的注解)
@Value("${server.port}")
private String serverPort;//获取端口号
- 修改80的OrderController,把写死的url改为服务名称:
public static final String PAYMENT_URL = "http://CLOUD-PAYMENT-SERVICE/";
-
在80的ApplicationContextConfig里的restTemplate方法上加上
@LoadBalanced,开启负载均衡功能。 -
启动eurekaServer集群,启动提供者集群,启动消费者。
浏览器中输入http://localhost/consumer/payment/get/11,多次刷新可以看到,提供服务的应用在不同的切换,实现负载均衡的效果。
服务发现Discovery
对于注册进eureka里面的微服务,可以通过服务发现来获得该服务的信息。
修改提供者集群的controller
- 在主配置类上加上
@EnableDiscoveryClient注解,启用发现客户端。 - 在两个提供者的PaymentController中加入:
    @Resource
    private DiscoveryClient discoveryClient;
    @GetMapping("payment/discovery")
    public Object discovery(){
        List<String> services = discoveryClient.getServices();
        for(String element : services){
            log.info("****element:"+element);
        }

        //这个微服务的名称有几个 实例
        List<ServiceInstance> instances = discoveryClient.getInstances("CLOUD-PAYMENT-SERVICE");
        for (ServiceInstance instance : instances){
            log.info(instance.getServiceId()+"\t"+instance.getHost()+"\t"+instance.getPort()+"\t"+instance.getUri());
        }

        return this.discoveryClient;
    }

Eureka自我保护


只有在一定时间内丢失大量服务的心跳才开启自我保护模式。
禁止自我保护
先把cloud-eureka-server7001和cloud-provider-payment8001都切回单机版测试禁止自我保护。
cloud-eureka-server7001的yml文件:
  server:
#    关闭自我保护机制 保证不可用服务被及时删除
    enable-self-preservation: false
    eviction-interval-timer-in-ms: 2000
cloud-provider-payment8001的yml文件:
#    Eureka 客户端向服务端发送心跳的时间间隔,单位秒(默认是30秒)
    lease-renewal-interval-in-seconds: 1
#    Eureka 客户端在收到最后一次心跳后等待时间上限,单位为秒(默认是90秒) 超时将剔除服务
    lease-expiration-duration-in-seconds: 2
启动注册中心和提供者:

然后关闭提供者(模拟网络延时),提供者直接被剔除。


【推荐】国内首个AI IDE,深度理解中文开发场景,立即下载体验Trae
【推荐】编程新体验,更懂你的AI,立即体验豆包MarsCode编程助手
【推荐】抖音旗下AI助手豆包,你的智能百科全书,全免费不限次数
【推荐】轻量又高性能的 SSH 工具 IShell:AI 加持,快人一步
· 记一次.NET内存居高不下排查解决与启示
· 探究高空视频全景AR技术的实现原理
· 理解Rust引用及其生命周期标识(上)
· 浏览器原生「磁吸」效果!Anchor Positioning 锚点定位神器解析
· 没有源码,如何修改代码逻辑?
· 分享4款.NET开源、免费、实用的商城系统
· 全程不用写代码,我用AI程序员写了一个飞机大战
· MongoDB 8.0这个新功能碉堡了,比商业数据库还牛
· 白话解读 Dapr 1.15:你的「微服务管家」又秀新绝活了
· 上周热点回顾(2.24-3.2)