使用Arduino制作摩尔斯电码收发器

摩尔斯电码通过不同的排列顺序来表达不同的英文字母、数字和标点符号等。在今天,国际摩尔斯电码依然被使用着。比如,摩尔斯电码最广为人知的用法发送求救信号SOS,SOS信号的组合方式为:![]()
![]()
![]() 。再比如,假设我们通过摩尔斯电码发送“Arduino”,组合方式为:“.- .-. -.. ..- .. -. —”。
。再比如,假设我们通过摩尔斯电码发送“Arduino”,组合方式为:“.- .-. -.. ..- .. -. —”。
如何使用Arduino制作摩尔斯电码收发器
电路部分
Arduino到面包板的引脚说明:

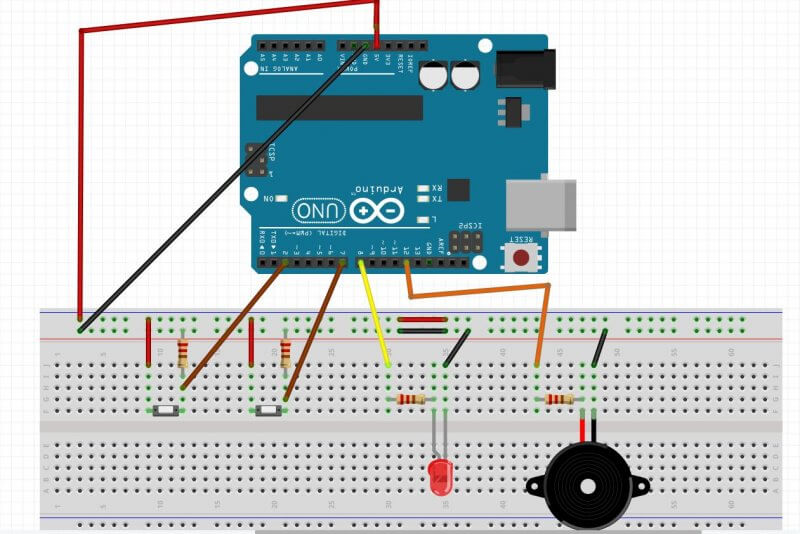
- 引脚D2连接到按钮1的一端,再通过电阻接地,按钮1另一端接5V。
- 引脚D7连接到按钮2的一端,再通过电阻接地,按钮2另一端接5V。
- 引脚D8通过电阻连接到LED正极,负极接地。
- 引脚D12通过电阻与蜂鸣器正极连接,负极接地。
代码部分
文末是完整的代码,将其保存为MorseCode.ino,然后打开Arduino IDE “File->Open->MorseCode.ino”,上传到Arduino。上传完成后,打开串口监视器,你将看到如下的显示内容:
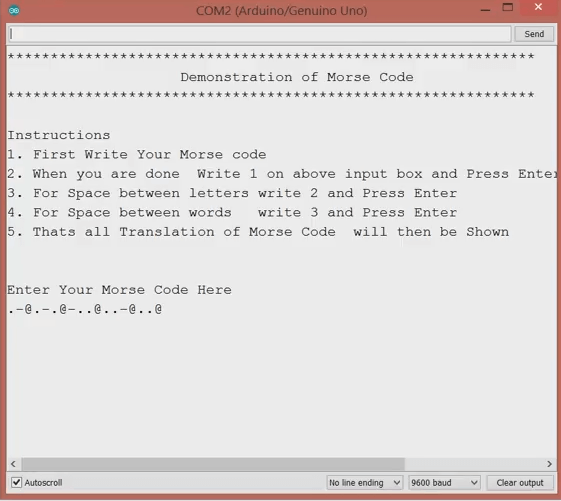
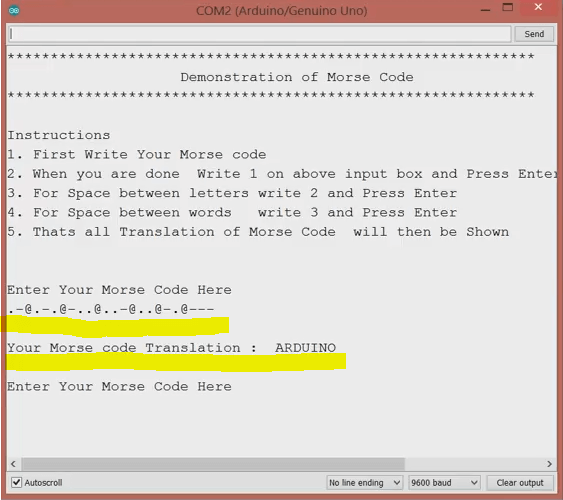
摩尔斯码译码器的操作顺序:首先通过点击按钮1和按钮2来写摩尔斯码;字母之间的空格,可在上面的输入框中填2,然后按回车键。单词之间的空格,在上面的输入框中填3,然后按回车键。所有输入完成后,在上面的输入框中填1,然后按回车键,将会翻译摩尔斯码的内容。翻译后的莫尔斯电码将显示在串口监视器的下面。例如:我们来写“.- .-. -.. ..- .. -. —”,翻译后将显示为“ARDUINO”。
这样,使用Arduino制作的摩尔斯码收发器就算完成了。
完整Arduino代码如下:
/*
  This Program is for demonstration of MORSE CODE Communication
  which was use to send information secretly using codes of combinations dots .  and dashes -
  Thanks to open source community

*/


#define SIZE 26
const int ledPin = 8;
const int speakerPin = 12;
const int dotButton = 2;
const int dashButton = 7;

String morseCode = "";
String text = "";
int characterAscii = 0;
int startPos = 0, endPos = 0;
int startPos1 = 0, endPos1 = 0;
String characterCode = "";
int dashButtonState = 0;
int dotButtonState = 0;


//Array of MorseCode for letters of English Language A to Z
String letters[SIZE] = {

  // A to I
  ".-", "-...", "-.-.", "-..", ".", "..-.", "--.", "....", "..",
  // J to R
  ".---", "-.-", ".-..", "--", "-.", "---", ".--.", "--.-", ".-.",
  // S to Z
  "...", "-", "..-", "...-", ".--", "-..-", "-.--", "--.."
};


void setup() {
  // put your setup code here, to run once:
  //Getting things Ready
  pinMode(ledPin, OUTPUT);
  pinMode(dotButton, INPUT);
  pinMode(dashButton, INPUT);
  Serial.begin(9600);

  Serial.println("*************************************************************");
  Serial.println("                    Demonstration of Morse Code              ");
  Serial.println("************************************************************* ");
  Serial.println("\nInstructions");
  Serial.println("1. First Write Your Morse code");
  Serial.println("2. When you are done  Write 1 on above input box and Press Enter or click Send Button ");
  Serial.println("3. For Space between letters write 2 and Press Enter ");
  Serial.println("4. For Space between words   write 3 and Press Enter ");

  Serial.println("5. Thats all Translation of Morse Code  will then be Shown ");

  Serial.println("\n\nEnter Your Morse Code Here  ");
}


void loop() {
  // put your main code here, to run repeatedly:

  while (Serial.available() > 0) {
    int ascii = Serial.read();

    switch (ascii) {
      case 49:  // 49 is Ascii value of 1

        Serial.print("\n");
        morseCode.concat('#');  // Placeing # at the end of morseCode to simplify further processing

        Serial.print("\nYour Morse code Translation :  ");

        endPos1 = morseCode.indexOf('#');

        while (endPos1 < morseCode.length()) {
          extractLetters(morseCode.substring(startPos1, endPos1));  // This function would extract Letter as name suggest and would convert  code to text SIMPLE!
          startPos1 = endPos1 + 1;
          if (startPos1 == morseCode.length()) {
            break;
          }
          endPos1 = morseCode.indexOf('#', startPos1);
        }
        startPos1 = 0;
        endPos1 = 0;

        text = "";  //  For New Translation
        morseCode = "";
        Serial.println("\n\nEnter Your Morse Code Here ");


        break;

      case 50:  // 50 is Ascii value of 2

        morseCode.concat("@");
        Serial.print("@");
        delay(200);

        break;

      case 51:  // 51 is Ascii value of 3

        morseCode.concat("#");
        Serial.print("#");
        delay(200);

        break;
    }
  }

  process();
}

void turnONLedSpeaker(int du) {
  //Turn ON LED
  digitalWrite(ledPin, HIGH);
  tone(speakerPin, 4699, du);  // tone(speakerPin, frequency, duration in milliSec)
}

void process() {

  dotButtonState = digitalRead(dotButton);
  dashButtonState = digitalRead(dashButton);


  if (dashButtonState == HIGH) {
    turnONLedSpeaker(400);

    morseCode.concat("-");  // Storing code in variable morseCode with the help of concatenation function
    Serial.print("-");      //Prints User entered Code
    delay(200);
  } else if (dotButtonState == HIGH) {
    turnONLedSpeaker(300);

    morseCode.concat(".");
    Serial.print(".");
    delay(200);

  } else {
    //Turn OFF LED
    digitalWrite(ledPin, LOW);
  }
}

char convertIntoText(String characterCode) {
  characterAscii = 65;

  for (int index = 0; index < SIZE; index++) {
    if (characterCode == letters[index]) {
      return characterAscii;
    }
    characterAscii++;
  }
}

void extractLetters(String words) {
  words.concat('@');  // Placeing @ at the end of word to simplify further processing

  endPos = words.indexOf('@');


  //Loop to extracting single character morse Code from string of word
  while (endPos < words.length()) {
    characterCode = words.substring(startPos, endPos);

    //Now CharacterCode will now convert in text

    text.concat(convertIntoText(characterCode));

    startPos = endPos + 1;
    characterCode = "";

    // if condition is just to terminate loop when our extracting single character code is complete thats all
    if (startPos == words.length()) {
      break;
    }

    endPos = words.indexOf('@', startPos);
  }


  Serial.print(text);
  Serial.print(" ");
  startPos = 0;
  endPos = 0;
  text = "";
}
