串口通信模块(SerialPort)
(1)模块简介
使用此模块需要首先包含一些文件IO相关文件
|
using System.IO;
using System.IO.Ports;
|
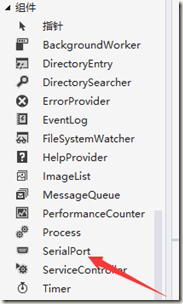
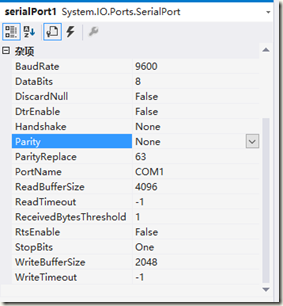
图标如下图1所示,将其拖拽到面板。会显示在最下方,其参数有如下:
| BaudRate |
波特率 |
| DataBits |
数据位 |
| Parity |
奇偶校验位 |
| PortName |
端口号 |
| StopBits |
停止位 |
| ByteToRead |
获取输入缓冲区的 |
| IsOpen |
获取是否开启串口 |
| |
|
| |
|
以上是我们做串口通信上位机需要用到的(如图2所示)。
![image image]()
![image image]()
图1 串口模块图 图2 串口模块参数图
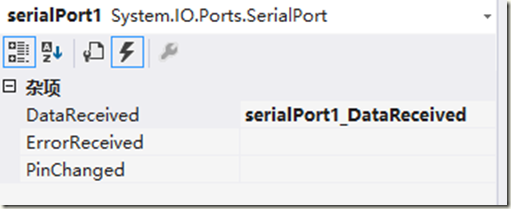
串口通信模块的事件有三个,如图3所示。
DataReceived 串口接收函数
ErrorReceived 串口数据接收错误
PinChanged 串口号发生改变
双击即可建立函数。
![image image]()
常见的方法还有
|
方 法 名 称
|
说 明
|
| Open |
打开串口. |
| Close |
关闭串口 |
| Read |
从SerialPort 输入缓冲区读 |
| ReadByte |
从SerialPort 输入缓冲区读一个字节 |
| ReadChar |
从SerialPort 输入缓冲区读一个字符 |
| Write |
写入到输出缓冲寄存器 |
(2)代码编写
![image image]()
1、串口初始化函数
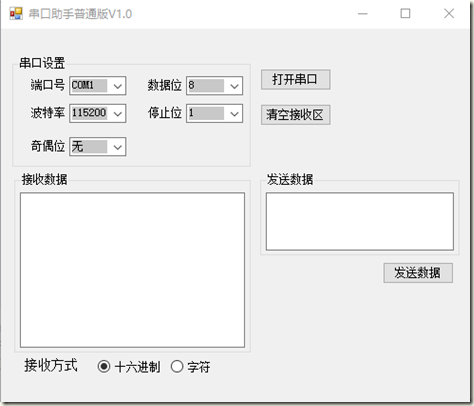
初始化函数以按键点击函数为起点。需要将各控件的参数幅值给串口各项参数,具体代码如下:
|
private void button1_Click(object sender, EventArgs e)
{
// if(Button_on == 1)
if (!serialPort1.IsOpen)//如果串口是开
{
serialPort1.PortName = comboBox1.Text;
serialPort1.BaudRate = Convert.ToInt32(comboBox2.Text, 10);
float f = Convert.ToSingle(comboBox3.Text.Trim());
if (f == 0)//设置停止位
serialPort1.StopBits = StopBits.None;
else if (f == 1.5)
serialPort1.StopBits = StopBits.OnePointFive;
else if (f == 1)
serialPort1.StopBits = StopBits.One;
else if (f == 2)
serialPort1.StopBits = StopBits.Two;
else
serialPort1.StopBits = StopBits.One;
//设置数据位
serialPort1.DataBits = Convert.ToInt32(comboBox4.Text.Trim());
//设置奇偶校验位
string s = comboBox5.Text.Trim();
if (s.CompareTo("无") == 0)
serialPort1.Parity = Parity.None;
else if (s.CompareTo("奇校验") == 0)
serialPort1.Parity = Parity.Odd;
else if (s.CompareTo("偶校验") == 0)
serialPort1.Parity = Parity.Even;
else
serialPort1.Parity = Parity.None;
try
{
serialPort1.Open(); //打开串口
button1.Text = "关闭串口";
comboBox1.Enabled = false;//关闭使能
comboBox2.Enabled = false;
comboBox3.Enabled = false;
comboBox4.Enabled = false;
comboBox5.Enabled = false;
}
catch
{
MessageBox.Show("串口打开失败!");
}
}
else//如果串口是打开的则将其关闭
{
serialPort1.Close();
button1.Text = "打开串口";
comboBox1.Enabled = true;//使能配置
comboBox2.Enabled = true;
comboBox3.Enabled = true;
comboBox4.Enabled = true;
comboBox5.Enabled = true;
}
}
|
2、串口写函数
写函数主要用于发送数据,用到serialPort.write函数
本例以鼠标点击按键触发写函数,代码如下:
|
private void button_send_Click(object sender, EventArgs e)
{//发送数据
if(serialPort1.IsOpen)
{//如果串口开启
if (textBox2.Text.Trim() != "")//如果框内不为空则
{
serialPort1.Write(textBox2.Text.Trim());//写数据
}
else
{
MessageBox.Show("发送框没有数据");
}
}
else
{
MessageBox.Show("串口未打开");
}
}
|
3、串口读函数
串口读函数主要用于读取串口缓冲区的数据。
此处用到post_DataReceived事件
这里增减了两种显示方式:
1十六进制显示 2字符串显示
|
private void post_DataReceived(object sender, SerialDataReceivedEventArgs e)
{
if (!radioButton1.Checked)
{
string str = serialPort1.ReadExisting();//字符串方式读
textBox_receive.AppendText(str);
}
else
{
byte data;
data = (byte)serialPort1.ReadByte();
string str = Convert.ToString(data, 16).ToUpper();//
textBox_receive.AppendText("0x" + (str.Length == 1 ? "0" + str : str) + " ");
}
}
|
未完待续…下一节介绍(C#学习与上位机开发之串口协议接收数据)
源码可以访问我GITHUB下载
https://github.com/Harryjun/Csha_demo
参考博客如下:
1、C#中显现串口通信SerialPort类
http://www.cnblogs.com/BookCode/p/5583853.html


 浙公网安备 33010602011771号