GLUT Tutorials 10: 修改菜单
博客转自:http://www.lighthouse3d.com/tutorials/glut-tutorial/modifying-a-menu/
有些状况下,需要修改菜单。GLUT允许我们修改和删除菜单输入。切换菜单输入
void glutChangeToMenuEntry(int entry, char *name, int value);

Parameters:

entry – the index of the entry, this must be between 1 and the total number of entries
name – the name of the new entry
value – The value that will be return to the callback function when the entry is selected.
切换子菜单
void glutChangeToSubMenu(int entry, char *name, int menu);

Parameters:

entry – the index of the entry, this must be between 1 and the total number of entries
name – the name of the new entry
menu – The menu index to be used.
下面的函数删除一个Item
void glutRemoveMenuItem(int entry);

Parameters:

entry – the index of the entry, this must be between 1 and the total number of entries
最后一件事,你可以在任何时候查询当前菜单的Iterm数量 with glutGet
下面的例子展示了更换菜单功能
void processMenuEvents(int option) {

    red = 0.0;
    green = 0.0;
    blue = 0.0;

    switch (option) {
        case RED :
            red = 1.0; break;
        case GREEN :
            green = 1.0; break;
        case BLUE :
            blue = 1.0; break;
        case WHITE :
            red = 1.0;
            green = 1.0;
            blue = 1.0; break;
    }
}

void processKeys(unsigned char c, int x, int y) {

    int num = glutGet(GLUT_MENU_NUM_ITEMS);
    switch (c) {
        case 'a':
            glutChangeToMenuEntry(1,"Blue",BLUE);
            glutChangeToMenuEntry(3,"Red",RED);
            break;
        case 'b':
            glutChangeToMenuEntry(3,"Blue",BLUE);
            glutChangeToMenuEntry(1,"Red",RED);
            break;
        case 'c':
            if (num > 3)
                glutRemoveMenuItem(num);
            break;
        case 'd': if (num == 3)
                glutAddMenuEntry("White",WHITE);
            break;
    }
    glutSetMenu(menu);
}

void createGLUTMenus() {

    menu = glutCreateMenu(processMenuEvents);
    glutAddMenuEntry("Red",RED);
    glutAddMenuEntry("Green",GREEN);
    glutAddMenuEntry("Blue",BLUE);
    glutAddMenuEntry("White",WHITE);
    glutAttachMenu(GLUT_RIGHT_BUTTON);
}
Note that we changed the menu in the keyboard callback function as opposed to the menu callback function. This is because we shouldn’t do any changes to a menu while it is in use. A menu is in use until the callback is over, so we couldn’t change the menu’s structure inside the menu’s own callback.
As mentioned before, when a menu is in use it can’t, or at least it shouldn’t, be altered. In order to prevent messing up we must make sure if a menu is not in use before we change the menu entries. GLUT allows us to register a callback function that will ba called whenever a menu pops-up, and when it goes away. The function to register the callback is glutMenuStatusFunc.
void glutMenuStatusFunc(void (*func)(int status, int x, int y);

Parameters:

func – the name of the callback function
This function can be called in our main function, so we’ll just add it there.
As seen by the signature of glutMenuStatusFunc the callback function must take three parameters. These are:
- status – one of GLUT_MENU_IN_USE or GLUT_MENU_NOT_IN_USE
- x – The left coordinate of the menu relative to the window client area.
- y – The top coordinate of the menu relative to the window client area.
Bellow an example function is presented where a flag is set when the menu is in use.
void processMenuStatus(int status, int x, int y) {

    if (status == GLUT_MENU_IN_USE)
        flag = 1;
    else
        flag = 0;
}
We can now use this flag when processing keyboard events as in the next example:
void processKeys(unsigned char c, int x, int y) {

    if (!flag) {
        int num = glutGet(GLUT_MENU_NUM_ITEMS);
        switch (c) {
            case 'a':
                glutChangeToMenuEntry(1,"Blue",BLUE);
                glutChangeToMenuEntry(3,"Red",RED);
                break;
            case 'b':
                glutChangeToMenuEntry(3,"Blue",BLUE);
                glutChangeToMenuEntry(1,"Red",RED);
                break;
            case 'c':
                if (num > 3)
                    glutRemoveMenuItem(num);
                break;
            case 'd': if (num == 3)
                    glutAddMenuEntry("White",WHITE);
                break;
        }
    }
}
全部代码如下
#include <stdio.h>
#include <gl/glut.h>

#define RED 1
#define GREEN 2
#define BLUE 3
#define WHITE 4

//所有的变量被初始化为1,表明三角形最开始是白色的。
float red = 1.0, blue = 1.0, green = 1.0;

static float angle = 0.0, angleX = 0.0, ratio;

//initially define the increase of the angle by 0.05;
float deltaAngle = 0.05;

int menu;

int flag = 1;

void renderScene(void)
{
    glClear(GL_COLOR_BUFFER_BIT | GL_DEPTH_BUFFER_BIT);
    glPushMatrix();
    glRotatef(angle, 0.0, 1.0, 0.0);
    glRotatef(angleX, 1.0, 0.0, 0.0);
    glColor3f(red, green, blue);

    glBegin(GL_TRIANGLES);
    glVertex3f(-0.5, -0.5, 0.0);
    glVertex3f(0.5, 0.0, 0.0);
    glVertex3f(0.0, 0.5, 0.0);
    glEnd();
    glPopMatrix();
    // this is the new line
    // previously it was: angle++;
    angle += deltaAngle;
    glutSwapBuffers();
}

void reShape(int w, int h)
{
    // 防止被0除.
    if (h == 0)
        h = 1;

    ratio = 1.0f * w / h;
    //Reset the coordinate system before modifying
    glMatrixMode(GL_PROJECTION);
    glLoadIdentity();

    //设置视口为整个窗口大小
    glViewport(0, 0, w, h);

    //设置可视空间
    gluPerspective(45, ratio, 1, 1000);
    glMatrixMode(GL_MODELVIEW);
    glLoadIdentity();
    gluLookAt(0.0, 0.0, 5.0, 0.0, 0.0, -1.0, 0.0f, 1.0f, 0.0f);
}

void processMenuEvents(int option)
{
    //option,就是传递过来的value的值。
    switch (option) {
    case RED:
        red = 1.0;
        green = 0.0;
        blue = 0.0; break;
    case GREEN:
        red = 0.0;
        green = 1.0;
        blue = 0.0; break;
    case BLUE:
        red = 0.0;
        green = 0.0;
        blue = 1.0; break;
    case WHITE:
        red = 1.0;
        green = 1.0;
        blue = 1.0; break;
    }
}

void createGLUTMenus()
{
    // 创建菜单并告诉GLUT,processMenuEvents处理菜单事件。
    menu = glutCreateMenu(processMenuEvents);

    //给菜单增加条目
    glutAddMenuEntry("Red", RED);
    glutAddMenuEntry("Blue", BLUE);
    glutAddMenuEntry("Green", GREEN);
    glutAddMenuEntry("White", WHITE);

    // 把菜单和鼠标右键关联起来。
    glutAttachMenu(GLUT_RIGHT_BUTTON);
}

/*
void createGLUTMenus()
{
    int menu, submenu;

    submenu = glutCreateMenu(processMenuEvents);
    glutAddMenuEntry("Red", RED);
    glutAddMenuEntry("Blue", BLUE);
    glutAddMenuEntry("Green", GREEN);

    menu = glutCreateMenu(processMenuEvents);
    glutAddMenuEntry("White", WHITE);
    glutAddSubMenu("RGB Menu", submenu);
    glutAttachMenu(GLUT_RIGHT_BUTTON);
}*/

void processKeys(unsigned char c, int x, int y)
{
    if (flag)
    {
        return;
    }

    int num = glutGet(GLUT_MENU_NUM_ITEMS);

    switch (c)
    {
    case 'a':
        glutChangeToMenuEntry(1, "Blue", BLUE);
        glutChangeToMenuEntry(3, "Red", RED);
        break;
    case 'b':
        glutChangeToMenuEntry(3, "Blue", BLUE);
        glutChangeToMenuEntry(1, "Red", RED);
        break;
    case 'c':
        if (num > 3)
            glutRemoveMenuItem(num);
        break;
    case 'd':
        if (num == 3)
        glutAddMenuEntry("White", WHITE);
        break;
    }

    glutSetMenu(menu);
}

void processMenuStatus(int status, int x, int y)
{
    if (status == GLUT_MENU_IN_USE)
    {
        printf("Menu is using\n");
        flag = 1;
    }
    else
    {
        printf("Menu is not using\n");
        flag = 0;
    }
}

void main(int argc, char **argv)
{
    glutInit(&argc, argv);
    glutInitDisplayMode(GLUT_DEPTH | GLUT_DOUBLE | GLUT_RGBA);
    glutInitWindowPosition(100, 100);
    glutInitWindowSize(320, 320);
    glutCreateWindow("GLUT Tutorial Menu");
    glutDisplayFunc(renderScene);
    glutIdleFunc(renderScene);
    glutReshapeFunc(reShape);

    glutKeyboardFunc(processKeys);
    glutMenuStatusFunc(processMenuStatus);

    //调用我们的函数来创建菜单
    createGLUTMenus();

    glutMainLoop();
}
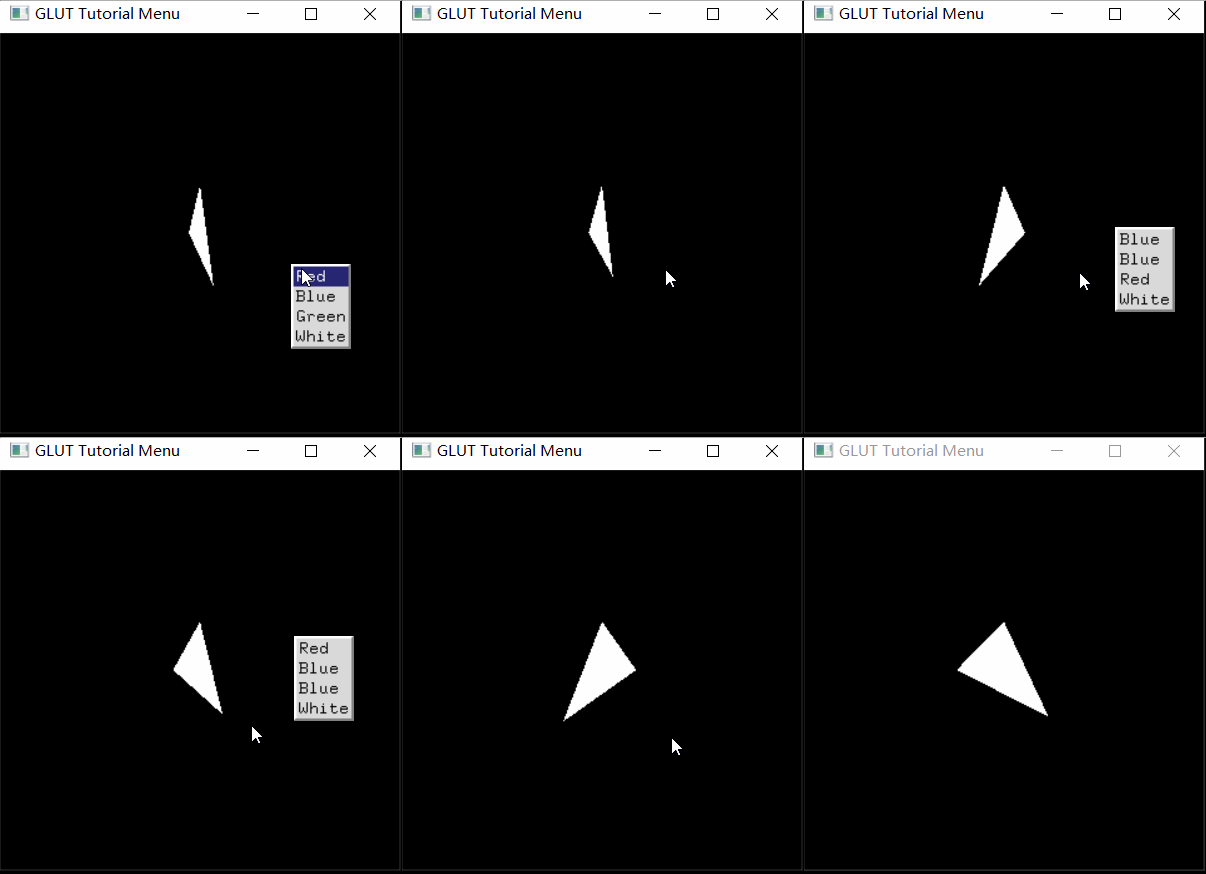
显示效果如下


