【Java基础专题】编码与乱码(05)---GBK与UTF-8之间的转换
原文出自:http://www.blogjava.net/pengpenglin/archive/2010/02/22/313669.html
在很多论坛、网上经常有网友问“ 为什么我使用 new String(tmp.getBytes("ISO-8859-1"), "UTF-8") 或者 new String(tmp.getBytes("ISO-8859-1"), "GBK")可以得到正确的中文,但是使用 new String(tmp.getBytes("GBK"), "UTF-8") 却不能将GBK转换成UTF-8呢?”
参考前面的【Java基础专题】编码与乱码(03)----String的toCharArray()方法测试 一文,我们就知道原因了。因为如果客户端使用GBK、UTF-8编码,编码后的字节经过ISO-8859-1传输,再用原来相同的编码方式进行解码,这个过程是“无损的转换”---- 因为原始和最终的编码方式相同。
但是如果客户端使用GBK编码,到了服务器端要转换成UTF-8,或者相反的过程。想一想,字节还是那些字节,但是编码的规则变了。原来GBK编码后的4个字节要用UTF-8的每个字符3个字节的规则编码,怎么能不乱码呢?
所以从现在开始,不要再犯这种错误了。new String(tmp.getBytes("GBK"), "UTF-8") 这个过程,JVM内部是不会帮你自动对字节进行扩展以适应UTF-8的编码的。正确的方法应该是根据UTF-8的编码规则进行字节的扩充,即手动从2个字节变成3个字节,然后再转换成十六进制的UTF-8编码。
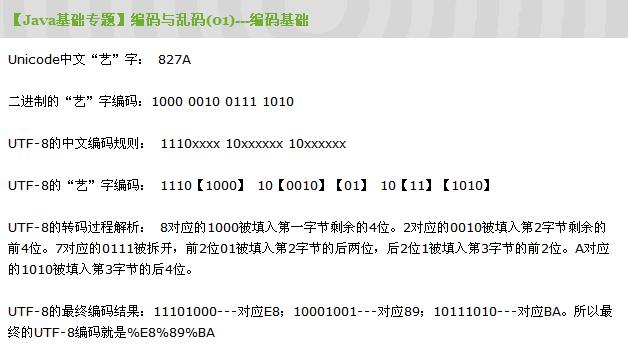
在这个专题的第一篇文章【Java基础专题】编码与乱码(01)---编码基础 开头,我们就已经介绍了这个规则:
①得到每个字符的2进制GBK编码
②将该16进制的GBK编码转换成2进制的字符串(2个字节)
③分别在字符串的首位插入110,在第9位插入10,在第17位插入10三个字符串,得到3个字节
④将这3个字节分别转换成16进制编码,得到最终的UTF-8编码。

下面给出一个从网络上得到的Java转码方法,原文链接见:http://jspengxue.javaeye.com/blog/40781。下面的代码做了小小的修改
 package example.encoding;
 /**
/** * The Class CharacterEncodeConverter.
 */
*/ public class CharacterEncodeConverter {
 /**
/** * The main method.
 *
*  * @param args the arguments
 */
*/ public static void main(String[] args) {
 try {
try { CharacterEncodeConverter convert = new CharacterEncodeConverter();
 byte[] fullByte = convert.gbk2utf8("中文");
 String fullStr = new String(fullByte, "UTF-8");
 System.out.println("string from GBK to UTF-8 byte: " + fullStr);
 } catch (Exception e) {
 e.printStackTrace();
 }
} }
}
 /**
/** * Gbk2utf8.
 *
*  * @param chenese the chenese
 *
*  * @return the byte[]
 */
*/ public byte[] gbk2utf8(String chenese) {
 // Step 1: 得到GBK编码下的字符数组,一个中文字符对应这里的一个c[i]
 char c[] = chenese.toCharArray();
 // Step 2: UTF-8使用3个字节存放一个中文字符,所以长度必须为字符的3倍
 byte[] fullByte = new byte[3 * c.length];
 // Step 3: 循环将字符的GBK编码转换成UTF-8编码
 for (int i = 0; i < c.length; i++) {
 // Step 3-1:将字符的ASCII编码转换成2进制值
 int m = (int) c[i];
 String word = Integer.toBinaryString(m);
 System.out.println(word);
 // Step 3-2:将2进制值补足16位(2个字节的长度)
  StringBuffer sb = new StringBuffer();
 int len = 16 - word.length();
 for (int j = 0; j < len; j++) {
 sb.append("0");
 }
} // Step 3-3:得到该字符最终的2进制GBK编码
 // 形似:1000 0010 0111 1010
 sb.append(word);
 // Step 3-4:最关键的步骤,根据UTF-8的汉字编码规则,首字节
 // 以1110开头,次字节以10开头,第3字节以10开头。在原始的2进制
 // 字符串中插入标志位。最终的长度从16--->16+3+2+2=24。
 sb.insert(0, "1110");
 sb.insert(8, "10");
 sb.insert(16, "10");
 System.out.println(sb.toString());
 // Step 3-5:将新的字符串进行分段截取,截为3个字节
 String s1 = sb.substring(0, 8);
 String s2 = sb.substring(8, 16);
 String s3 = sb.substring(16);
 // Step 3-6:最后的步骤,把代表3个字节的字符串按2进制的方式
 // 进行转换,变成2进制的整数,再转换成16进制值
 byte b0 = Integer.valueOf(s1, 2).byteValue();
 byte b1 = Integer.valueOf(s2, 2).byteValue();
 byte b2 = Integer.valueOf(s3, 2).byteValue();
 // Step 3-7:把转换后的3个字节按顺序存放到字节数组的对应位置
 byte[] bf = new byte[3];
 bf[0] = b0;
 bf[1] = b1;
 bf[2] = b2;
 fullByte[i * 3] = bf[0];
  fullByte[i * 3 + 1] = bf[1];
  fullByte[i * 3 + 2] = bf[2];
 // Step 3-8:返回继续解析下一个中文字符
 }
} return fullByte;
 }
} }
}最终的测试结果是正确的:string from GBK to UTF-8 byte: 中文。
但是这个方法并不是完美的!要知道这个规则只对中文起作用,如果传入的字符串中包含有单字节字符,如a+3中文,那么解析的结果就变成:string from GBK to UTF-8 byte: ?????????中文了。为什么呢?道理很简单,这个方法对原本在UTF-8中应该用单字节表示的数字、英文字符、符号都变成3个字节了,所以这里有9个?,代表被转换后的a、+、3字符。
所以要让这个方法更加完美,最好的方法就是加入对字符Unicode区间的判断
| UCS-2编码(16进制) | UTF-8 字节流(二进制) |
| 0000 - 007F | 0xxxxxxx |
| 0080 - 07FF | 110xxxxx 10xxxxxx |
| 0800 - FFFF | 1110xxxx 10xxxxxx 10xxxxxx |
汉字的Unicode编码范围为\u4E00-\u9FA5 \uF900-\uFA2D,如果不在这个范围内就不是汉字了。
【UTF-8转GBK】
道理和上面的相同,只是一个逆转的过程,不多说了
但是最终的建议还是:能够统一编码就统一编码吧!要知道编码的转换是相当的耗时的工作


