SCSF 系列:利用 Smart Client Software Factory 实现 StopLight (Step By Step)
StopLight 是 Unity QuickStart 中包含的实例,用于展示依赖注入,同时使用了 MVP 模式,本文演示将 StopLight 移植到 SCSF ,本篇及以后的几篇文章会依据 StopLight 实例来详细说明 SCSF 的依赖注入,MVP 模式和面向对象的设计原则。StopLight 的设计当然还不完美,但通过它我们可以体会到面向对象设计的和谐和优雅。
一:需求
依次显示绿、黄、红三种颜色,各种颜色的现实时间可以用户手工输入,用户也可以手动强制显示下一个颜色。将显示信息记入日志。
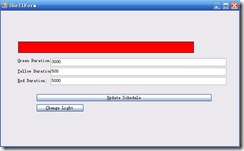
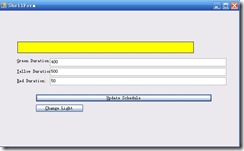
运行界面:
二:简单设计(以后部分会详细讨论为什么这样设计)
1 StoplightView(StopLightForm )
具体的现实窗体,提供用户操作接口。
责任:
1.1 实现IStoplightView接口
public partial class StopLightView : UserControl, IStopLightView
1.2 提供事件处理器声明及辅助的事件触发器
public event PropertyChangedEventHandler PropertyChanged;
1.3 指定Presenter
[Dependency]
public StoplightPresenter Presenter
1.4 触发响应事件
RaisePropertyChanged(StoplightViewProperties.RedDuration);
1.5 通过ErrorProvider提示用户输入错误
errorProvider.SetError(controlsByName[propertyName], errorMessage);
2 IStoplightView
定义每个具体的StoplightView都应该提供的接口,继承自INotifyPropertyChanged。
责任:
2.1 当前颜色
Color CurrentColor { get; set; }
2.2 每种颜色的显示时间
string GreenDuration { get; set; }
string YellowDuration { get; set; }
string RedDuration { get; set; }
2.3 设置错误信息
void SetError(string propertyName, string errorMessage);
2.4 相应的事件处理器
event EventHandler UpdateClicked;
event EventHandler ForceChangeClicked;
3 StoplightPresenter
实现了MVP模式中的Presenter角色。
责任:
3.1 设置Presenter对于的View
public void SetView(IStoplightView view);
3.2 注册View的事件处理程序
view.PropertyChanged += OnViewPropertyChanged;
view.UpdateClicked += OnViewUpdateClicked;
view.ForceChangeClicked += OnViewForceChangeClicked;
3.2 定义View的事件处理程序
从View获取需要的信息,通过IStoplightView接口
更新View,通过IStoplightView接口
ServiceInterfaces层(StopLight.Interface项目)提供服务接口,体现面向接口编程,ServiceImplementations层(StopLight项目)实现具体的接口。接口定义是唯一的,但对接口的实现是不限的。Presenter依赖于抽象的接口而不是具体的服务实现,这样为以后更改具体的服务实现提供了方便。
Logic层(StopLight项目,放在服务中)负责具体的业务逻辑并记录日志。
Stoplight:
获取当前颜色:
public StoplightColors CurrentColor
切换到下一个颜色:
public void Next()
StoplightSchedule:
根据时间或者用户强制调度颜色。
开始定时器:
public void Start()
更改显示间隔:
public void Update(TimeSpan green, TimeSpan yellow, TimeSpan red)
强制改变:
public void ForceChange()
三、利用 Smart Client Software Factory 实现
利用第一篇中的介绍建立框架,建立一个新的解决方案文件夹 StopLight ,并利用 Smart Client Factory 的 Package Guidance 功能建立一个包含接口层的 Business Module 。项目结构如下:
这时 Shell 项目下的 ProfileCatalog.xml 文件自动更新,添加了对 StopLight.dll 的引用:
2 <Section Name="Layout">
3 <Modules>
4 <ModuleInfo AssemblyFile="Infrastructure.Layout.dll" />
5 </Modules>
6 </Section>
7 <Section Name="Services">
8 <Dependencies>
9 <Dependency Name="Layout" />
10 </Dependencies>
11 <Modules>
12 <ModuleInfo AssemblyFile="Infrastructure.Module.dll" />
13 </Modules>
14 </Section>
15 <Section Name="Apps">
16 <Dependencies>
17 <Dependency Name="Layout" />
18 <Dependency Name="Services" />
19 </Dependencies>
20 <Modules>
21 <ModuleInfo AssemblyFile="StopLight.dll" /> <!--注意-->
22 </Modules>
23 </Section>
24 </SolutionProfile>
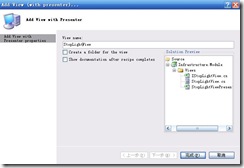
在 View 文件夹上点右键,通过 Add View With Presenter 建立 StopLightView :
生成如下 View 相关文件:
随后我们在 StopLight 项目下的 ModuleController 类的 private void AddViews() 方法中添加:
运行程序就可以将 StopLightView 显示在 LayoutWorkspace 上了,不过这时 StopLightView 还是个空控件。
接下来我们设计 StopLightView 界面,并实现 IStopLightView 接口的方法和事件。
 //-----------------------------------------------------------------------
 // <copyright file="Stoplight.cs" company="FLYabroad Enterprises">
 // Copyright (c) FLYabroad. All rights reserved.
 // </copyright>
 // <author>FLYabroad(http://www.flyabroad111.com)</author>
 //-----------------------------------------------------------------------
 namespace SmartClient系列.StopLight
 {
{ /// <summary>
 /// View 一般继承自 UserControl ,并且实现对于的接口
 /// </summary>
 /// <remarks>
 /// 实现 IStopLightView 接口,提供接口允许外部获取和设置界面上的控件值,设置错误提示,触发相关事件
 /// </remarks>
 public partial class StopLightView : UserControl, IStopLightView
 {
{ public StopLightView()
 {
{ InitializeComponent();
 }
}
 /// <summary>
 /// 在 View 加载时允许 Presenter 注入适当的操作。开发者可以在 Presenter 中重写 OnViewReady() 介入视图加载过程。
 /// </summary>
 /// <param name="e"></param>
 protected override void OnLoad(EventArgs e)
 {
{ _presenter.OnViewReady();
 base.OnLoad(e);
 }
}
 IStoplightView Members
 INotifyPropertyChanged Members
 // Event firing helpers
 protected virtual void RaisePropertyChanged(string propertyName)
 {
{ PropertyChangedEventHandler handlers = PropertyChanged;
 if (handlers != null)
 {
{ handlers(this, new PropertyChangedEventArgs(propertyName));
 }
} }
}
 protected virtual void RaiseUpdateClicked()
 {
{ EventHandler handlers = UpdateClicked;
 if (handlers != null)
 {
{ handlers(this, EventArgs.Empty);
 }
} }
}
 protected virtual void RaiseForceChangeClicked()
 {
{ EventHandler handlers = ForceChangeClicked;
 if (handlers != null)
 {
{ handlers(this, EventArgs.Empty);
 }
} }
}
 private void updateScheduleButton_Click(object sender, EventArgs e)
 {
{ RaiseUpdateClicked();
 }
}

 private void forceChangeButton_Click(object sender, EventArgs e)
 {
{ RaiseForceChangeClicked();
 }
} }
} }
}
这时运行就有效果了,但没有任何逻辑,灯也不亮,也不会变色。
接下来添加业务逻辑和服务,首先在 StopLight.Interface 项目中添加两个接口:
2 {
3 public interface ILogger
4 {
5 void Write(string message);
6 }
7 }
2 {
3 public interface IStoplightTimer
4 {
5 TimeSpan Duration { get; set; }
6 void Start();
7 event EventHandler Expired;
8 }
9 }
然后在 StopLight 项目的 Services 文件夹中实现这些服务还有 StopLight 的业务逻辑:
代码略,需要的可以下载文后提供的整个项目源代码。
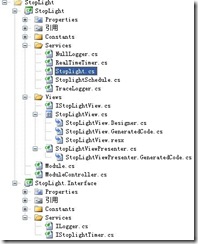
现在形成的项目文件结构如下:
现在我们要做的工作是在 ModuleController 中的 AddServices() 方法中添加服务:
 //ModuleController 类,用于在模块加载时添加服务
 private void AddServices()
 {
{ //TODO: add services provided by the Module. See: Add or AddNew method in
  WorkItem.Services.AddNew<RealTimeTimer, IStoplightTimer>();
 WorkItem.Services.AddNew<TraceLogger, ILogger>();
 }
}至此,基于 StopLight 的项目完成,后面会以该项目为范例介绍 Smart Client Software Factory 中的 MVP 。
基于 SCSF 的 StopLight 源码下载: https://files.cnblogs.com/flyabroad/StopLight-SCSF.7z
基于 Unity 的 StopLight 源码下载: https://files.cnblogs.com/flyabroad/StopLight-unity.7z
posted on 2008-06-18 13:12 FLYabroad 阅读(5880) 评论(1) 编辑 收藏 举报


【推荐】国内首个AI IDE,深度理解中文开发场景,立即下载体验Trae
【推荐】编程新体验,更懂你的AI,立即体验豆包MarsCode编程助手
【推荐】抖音旗下AI助手豆包,你的智能百科全书,全免费不限次数
【推荐】轻量又高性能的 SSH 工具 IShell:AI 加持,快人一步
· 如何编写易于单元测试的代码
· 10年+ .NET Coder 心语,封装的思维:从隐藏、稳定开始理解其本质意义
· .NET Core 中如何实现缓存的预热?
· 从 HTTP 原因短语缺失研究 HTTP/2 和 HTTP/3 的设计差异
· AI与.NET技术实操系列:向量存储与相似性搜索在 .NET 中的实现
· 地球OL攻略 —— 某应届生求职总结
· 周边上新:园子的第一款马克杯温暖上架
· Open-Sora 2.0 重磅开源!
· .NET周刊【3月第1期 2025-03-02】
· [AI/GPT/综述] AI Agent的设计模式综述