Vue学习:17.组件通信案例-记事本
通过上一节的学习,我们了解并掌握了组件通信的定义及一般使用。那么接下来,我们将之前练习过的案例使用组件化思想来实现一下吧。
实例:记事本(组件化)
实现功能
运用组件化思想,实现Vue学习:3.V标签综合3(https://blog.csdn.net/weixin_51416826/article/details/137506921?spm=1001.2014.3001.5501)的功能。
思路
首先,将页面拆分为三个独立的组件:TodoHeader、TodoBody和TodoFooter。在src/components/ 目录下注册这三个组件,并分别开发它们的功能。最后,在根组件 App.vue 中引用这些组件,并根据功能需求实现组件间的通信。
代码
根组件(APP.vue)
<template>
  <div id="app">
    <TodoHeader @AddName="handleAdd"></TodoHeader>
    <TodoBody @del="handleDel" :list="list"></TodoBody>
    <TodoFooter @clearAll="handleClear" :list="list"></TodoFooter>
  </div>
</template>

<script>
import TodoHeader from './components/TodoHeader.vue'
import TodoBody from './components/TodoBody.vue'
import TodoFooter from './components/TodoFooter.vue'
export default {
  data(){
    return{
      list:[
      {id:1, name:'学Vue'},
      {id:2, name:'搞模型'},
      {id:3, name:'吃饭睡觉'},
    ]}
  },
  components:{
    TodoHeader,
    TodoBody,
    TodoFooter
  },
  methods:{
    handleAdd(newName){
      console.log(newName)
      this.list.unshift({
        id: +new Date(),
        name: newName
      })
    },
    handleDel(id){
      console.log(id)
      this.list = this.list.filter(item => item.id !== id)
    },
    handleClear(){
      // console.log('all2')
      this.list = []
    }
  }
}
</script>

<style>
  *{
    box-sizing: border-box;
  }
  #app{
    width: 400px;
    /* height: 600px; */
    text-align: center;
    margin: 0 auto;
  }

</style>
TodoHeader组件
<template>
    <header>
        <h2>记事本</h2>
        <div>
            <input v-focus @keyup.enter="add" v-model="newName" placeholder="请输入任务">
            <button @click="add">添加任务</button>
        </div>
    </header>
</template>

<script>
export default {
    data(){
        return{
            newName: ''
        }
    },
    methods:{
        add(){
            console.log(this.newName)
            this.$emit('AddName',this.newName)
            this.newName = ''
        }
    },
    directives:{
        // 指令名
        focus:{
        // 生命周期钩子-inserted:在相应元素插入后生效
            inserted(el){
            // el:对应元素
            // binding:传值
                el.focus()
            }
        }
    }
}
</script>

<style scoped>
    h2{
        color: red;
    }
    div{
        /* width: 400px; */
        padding: 10px;
        background-color: #ffa;
    }
    input,button{
        height: 50px;
    }
</style> 注意:在该组件中使用了自定义指令v-focus。Vue 中的自定义指令允许我们直接操作 DOM。这在需要对元素进行底层操作或直接与原生 JavaScript API 交互时非常有用。我们可以使用directive 函数来创建自定义指令。
通常自定义指令注册有两种:全局和局部。全局注册是在main.js里使用Vue.directive('指令名', {逻辑操作}),而局部注册是在需求组件内部使用directive:{指令名: {逻辑操作}}。当使用自定义指令时,只需在相应标签上以添加属性的形式添加“v-指令名”即可。
自定义指令也可以接收参数、绑定值和修饰符。例如:
<template>
  <p v-color="'red'">This will be red</p>
</template>

<script>
export default {
  directive:{
    color: {
        inserted(el, binding) {
        // 根据指令参数修改元素的颜色
        el.style.color = binding.value;
        }
    }
 }
}
</script>
TodoBody组件
<template>
    <!-- 列表区域 -->
    <section>
        <ul>
            <li v-for="(item,index) in list"
                :key="item.id"
                @mouseover="handleMouseOver"
                @mouseleave="handleMouseLeave">
                <span>{{ index + 1 }}.</span><label>{{ item.name }}</label>
                <button
                v-show="isHovered"
                @click="del(item.id)">x</button>
            </li>
        </ul>
    </section>
</template>

<script>
export default {
    props:{
        list:Array
    },
    data(){
        return{
            isHovered: false
        }
    },
    methods:{
        del(id){
            // console.log(id)
            this.$emit('del',id)
        },
        handleMouseOver() {
        // 鼠标移入时将 isHovered 设置为 true,使元素显示
            this.isHovered = true;
        },
        handleMouseLeave() {
        // 鼠标移出时将 isHovered 设置为 false,使元素隐藏
            this.isHovered = false;
        }
    }
}
</script>

<style scoped>
    section{
        background-color: #ffd;
        text-align: left;
        position: relative;
        margin-top: -20px;
    }
    ul{
        list-style: none;;
    }
    li{
        height: 50px;
    }
    button{
        width: 50px;
        border: none;
        background-color: #ffd;
        position: absolute;
        right:20px;

    }
</style>
TodoFooter组件
<template>
<!-- 统计和清空 当任务数为0时,不显示-->
<footer>
<span>合计:{{ list.length }}</span>
<button @click="del_all">清空任务</button>
</footer>
</template>
<script>
export default {
props:{
list:Array
},
methods:{
del_all(){
// console.log('all1')
this.$emit('clearAll')
}
}
}
</script>
<style scoped>
footer{
background-color: #ffd;
position: relative;
margin-top: -20px;
}
span{
position: absolute;
left: 10px;
}
button{
background-color: #aab;
border: none;
position: absolute;
right: 20px;
}
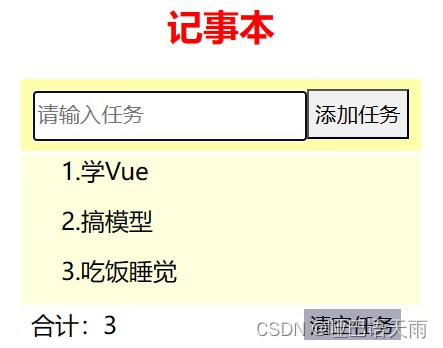
</style>效果展示

 浙公网安备 33010602011771号