从零开始学VUE之Webpack(参数配置化)
webpack的配置
webpack.config.js
上面执行的webpack命令很长,那么有没有什么简化的方式呢,有,那就是配置文件,默认名称为webpack.config.js
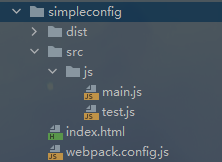
拷贝webpack起步中的目录结构及其文件和内容,从新命名一个文件夹,并在其中新建webpack.config.js

应为index.html,main.js,test.js的内容一样的,我就不粘代码了
webpack.config.js
// 需要从node依赖中引入 需要添加依赖环境
const path = require('path');

module.exports = {
    // 配置源码打包位置
    entry: './src/js/main.js',
    // 配置目标位置
    output: {
        // path 只能写绝对路径 不能写相对路径 但是不要直接写死,需要动态获取文件位置
        // __dirname是nodejs中的变量 会获取到配置文件的绝对路径
        path: path.resolve(__dirname,'dist'),
        filename: 'bundle.js'
    }
}
应为需要动态获取webpack.config.js的位置所以需要引入依赖包,但是这个项目暂时不是使用node管理的所以我们需要使用node初始化管理
npm init
cd 到 simpleconfig的位置,然后开始初始化
D:\zhangyugen@jd.com\vue\day1\html\4.从0开始学VUE\simpleconfig>npm init
This utility will walk you through creating a package.json file.
It only covers the most common items, and tries to guess sensible defaults.

See `npm help init` for definitive documentation on these fields
and exactly what they do.

Use `npm install <pkg>` afterwards to install a package and
save it as a dependency in the package.json file.

Press ^C at any time to quit.
package name: (simpleconfig)
version: (1.0.0)
description:
entry point: (webpack.config.js)
test command:
git repository:
keywords:
author:
license: (ISC)
About to write to D:\zhangyugen@jd.com\vue\day1\html\4.从0开始学VUE\simpleconfig\package.json:

{
  "name": "simpleconfig",
  "version": "1.0.0",
  "description": "",
  "main": "webpack.config.js",
  "scripts": {
    "test": "echo \"Error: no test specified\" && exit 1"
  },
  "author": "",
  "license": "ISC"
}


Is this OK? (yes)
输入命名后开始初始化,然后一致敲击回车就可以了,如果项目中存在中文有问题的话,重新起一个名字就可以
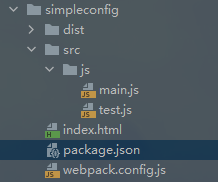
初始化完成后项目结构中多了一个package.json的文件

package.json
{
  "name": "simpleconfig", // 项目名称
  "version": "1.0.0", // 版本
  "description": "", // 描述
  "main": "webpack.config.js", // 主JS
   // 可运行命令
  "scripts": {
    // 测试 不用管,默认初始化是报错的
    "test": "echo \"Error: no test specified\" && exit 1"
  },
   // 创建人
  "author": "",
   // 是不是开源~
  "license": "ISC"
}
现在可以直接运行 webpack,他会找默认的配置文件webpack.config.js

运行结果和webpack起步一致
在开发的时候我们一般期望不要运行过长的命令并且希望命令同一管理,这时我们可以在package.json的scripts对象中进行命令映射,然后我们就可以通过node的npm运行我们的命令了
"scripts": {
    "test": "echo \"Error: no test specified\" && exit 1",
      // 这样写 我们就可以通过 npm run build来执行 webpack命令了
    "build": "webpack"
  },

可以看到,同样可以打包
但是这样映射打包和直接执行webpack还是有一定区别的
直接执行webpack会默认使用全局的webpack,而通过npm run bulid执行会默认先找据局部的webpack
我们期望的就是先使用局部的webpack,应为我们的电脑不可能只有一个项目,但是多个项目使用的webpack的版本是不一致的,所以我们期望使用自己局部的webpack
安装局部webpack
cd 到我们的项目文件夹
npm install webpack@3.6.0 --save-dev
D:\zhangyugen@jd.com\vue\day1\html\4.从0开始学VUE\simpleconfig>npm install webpack@3.6.0 --save-dev
npm WARN deprecated chokidar@2.1.8: Chokidar 2 will break on node v14+. Upgrade to chokidar 3 with 15x less dependencies.
npm WARN deprecated fsevents@1.2.13: fsevents 1 will break on node v14+ and could be using insecure binaries. Upgrade to fsevents 2.
npm WARN deprecated resolve-url@0.2.1: https://github.com/lydell/resolve-url#deprecated
npm WARN deprecated urix@0.1.0: Please see https://github.com/lydell/urix#deprecated

> uglifyjs-webpack-plugin@0.4.6 postinstall D:\zhangyugen@jd.com\vue\day1\html\4.从0开始学VUE\simpleconfig\node_modules\uglifyjs-webpack-plugin
> node lib/post_install.js

npm notice created a lockfile as package-lock.json. You should commit this file.
npm WARN optional SKIPPING OPTIONAL DEPENDENCY: fsevents@~2.3.1 (node_modules\chokidar\node_modules\fsevents):
npm WARN notsup SKIPPING OPTIONAL DEPENDENCY: Unsupported platform for fsevents@2.3.2: wanted {"os":"darwin","arch":"any"} (current: {"os":"win32","arch":"x64"})
npm WARN optional SKIPPING OPTIONAL DEPENDENCY: fsevents@^1.2.7 (node_modules\watchpack-chokidar2\node_modules\chokidar\node_modules\fsevents):
npm WARN notsup SKIPPING OPTIONAL DEPENDENCY: Unsupported platform for fsevents@1.2.13: wanted {"os":"darwin","arch":"any"} (current: {"os":"win32","arch":"x64"})
npm WARN simpleconfig@1.0.0 No description
npm WARN simpleconfig@1.0.0 No repository field.

+ webpack@3.6.0
added 366 packages from 291 contributors and audited 368 packages in 82.811s

6 packages are looking for funding
  run `npm fund` for details

found 2 low severity vulnerabilities
  run `npm audit fix` to fix them, or `npm audit` for details

D:\zhangyugen@jd.com\vue\day1\html\4.从0开始学VUE\simpleconfig>
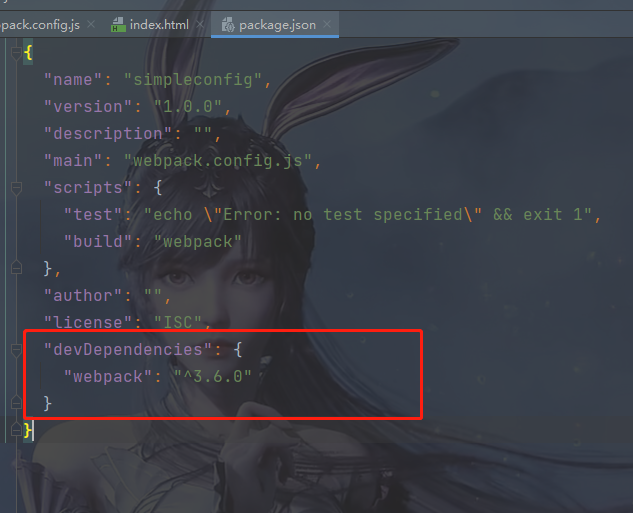
安装成功,然后查看我们项目的package.json

可以发现新多个一个开发时依赖环境,就是我们这个项目需要的webpack 3.6.0,应为他是以dev开头的所以是开发时环境
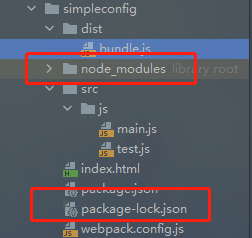
并且在安装后我们的目录结构发生了变化

其中node_modules就是存放我们的依赖的位置
package-lock.json就是存放我们包的下载地址的
作者:彼岸舞
时间:2021\06\07
内容关于:VUE
本文属于作者原创,未经允许,禁止转发


【推荐】国内首个AI IDE,深度理解中文开发场景,立即下载体验Trae
【推荐】编程新体验,更懂你的AI,立即体验豆包MarsCode编程助手
【推荐】抖音旗下AI助手豆包,你的智能百科全书,全免费不限次数
【推荐】轻量又高性能的 SSH 工具 IShell:AI 加持,快人一步
· 从 HTTP 原因短语缺失研究 HTTP/2 和 HTTP/3 的设计差异
· AI与.NET技术实操系列:向量存储与相似性搜索在 .NET 中的实现
· 基于Microsoft.Extensions.AI核心库实现RAG应用
· Linux系列:如何用heaptrack跟踪.NET程序的非托管内存泄露
· 开发者必知的日志记录最佳实践
· winform 绘制太阳,地球,月球 运作规律
· AI与.NET技术实操系列(五):向量存储与相似性搜索在 .NET 中的实现
· 超详细:普通电脑也行Windows部署deepseek R1训练数据并当服务器共享给他人
· 上周热点回顾(3.3-3.9)
· AI 智能体引爆开源社区「GitHub 热点速览」