尚医通 项目实现03
6. 医院列表
-
在医院管理模块,医院列表中显示医院等级, 但数据中并没有医院等级数据, 只有hostype字段, 需要去数据字典中查询对应的表, 获得医院等级数据. 则需要我们通过service-hosp 远程调用 service-cmn中的方法. 则此时引入注册中心和服务调用
-
选取nacos 作为注册中心
-
新建service-cmn-client项目,其中创建DictFeignClient接口供其他项目调用
@FeignClient(value = "service-cmn",path = "/admin/cmn/dict/")
public interface DictFeignClient {

    // 根据dictcode和value查询
    @GetMapping("getName/{dictCode}/{value}")
    public String getName(@PathVariable("dictCode") String dictCode,
                          @PathVariable("value") String value);

    // 根据value查询
    @GetMapping("getName/{value}")
    public String getName(@PathVariable("value") String value);
}
- service-hosp 调用 service-cmn-client, 使用service-cmn 的Controller接口.
6.1 医院列表查看
6.2 医院详情信息展示
6.3 排班信息展示
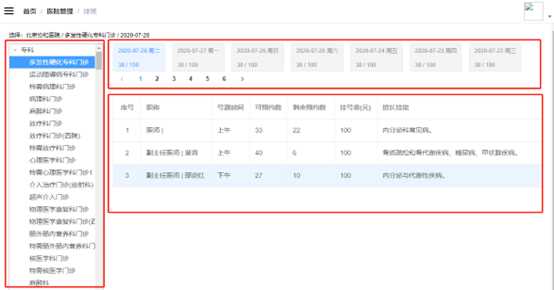
排班分成三部分显示:
-
1、科室信息(大科室与小科室树形展示)
-
2、排班日期,分页显示,根据上传排班数据聚合统计产生
-
3、排班日期对应的就诊医生信息
由上面的排班图可以看出, 左部分框为科室信息, 即根据医院编号,查询医院所有科室列表
6.3.1 树形图查询医院所有科室列表
public List<DepartmentVo> findDepartmentTree(String hoscode) {
        // 创建List集合,最终用于数据封装
        List<DepartmentVo> result = new ArrayList<>();

        // 根据医院编号,查询医院所有科室信息
        Department departmentQuery = new Department();
        departmentQuery.setHoscode(hoscode);
        Example<Department> example = Example.of(departmentQuery);
        List<Department> departmentList = departmentRepository.findAll(example);

        // 根据大科室编号, bigcode 分组, 获取每个大科室的子科室
        Map<String, List<Department>> departmentMap = departmentList.stream().collect(Collectors.groupingBy(Department::getBigcode));
        // 遍历departmentMap
        for(Map.Entry<String,List<Department>> entry : departmentMap.entrySet()){
            String bigcode = entry.getKey();
            List<Department> departmentList1 = entry.getValue();
            // 封装大科室
            DepartmentVo departmentVo = new DepartmentVo();
            departmentVo.setDepcode(bigcode);
            departmentVo.setDepname(departmentList1.get(0).getBigname());

            // 封装小科室
            List<DepartmentVo> children = new ArrayList<>();
            for(Department department: departmentList1){
                DepartmentVo departmentVo2 = new DepartmentVo();
                departmentVo2.setDepname(department.getDepname());
                departmentVo2.setDepcode(department.getDepcode());
                children.add(departmentVo2);
            }
            // 将小科室list结合放到大科室children里面
            departmentVo.setChildren(children);
            result.add(departmentVo);
        }
        return result;
    }
7. 引入网关
API网关出现的原因是微服务架构的出现,不同的微服务一般会有不同的网络地址,而外部客户端可能需要调用多个服务的接口才能完成一个业务需求,如果让客户端直接与各个微服务通信,会有以下的问题:
(1)客户端会多次请求不同的微服务,增加了客户端的复杂性。
(2)存在跨域请求,在一定场景下处理相对复杂。
(3)认证复杂,每个服务都需要独立认证。
(4)难以重构,随着项目的迭代,可能需要重新划分微服务。例如,可能将多个服务合并成一个或者将一个服务拆分成多个。如果客户端直接与微服务通信,那么重构将会很难实施。
(5)某些微服务可能使用了防火墙 / 浏览器不友好的协议,直接访问会有一定的困难。
以上这些问题可以借助 API 网关解决。API 网关是介于客户端和服务器端之间的中间层,所有的外部请求都会先经过API 网关这一层。也就是说,API 的实现方面更多的考虑业务逻辑,而安全、性能、监控可以交由 API 网关来做,这样既提高业务灵活性又不缺安全性
7.1 Spring Cloud Gateway
将Gateway 和 相关的微服务均注册到nacos中, Gateway来进行 路由转发和执行过滤器链
- 新建service-gateway 模块
- 配置application.properties
# 服务端口
server.port=80
# 服务名
spring.application.name=service-gateway

# nacos服务地址
spring.cloud.nacos.discovery.server-addr=127.0.0.1:8848

#使用服务发现路由
spring.cloud.gateway.discovery.locator.enabled=true

#设置路由id
spring.cloud.gateway.routes[0].id=service-hosp
#设置路由的uri lb load balance 使用其可通过服务名去nacos中寻找服务
spring.cloud.gateway.routes[0].uri=lb://service-hosp
#设置路由断言,代理servicerId为auth-service的/auth/路径
spring.cloud.gateway.routes[0].predicates= Path=/*/hosp/**

#设置路由id
spring.cloud.gateway.routes[1].id=service-cmn
#设置路由的uri
spring.cloud.gateway.routes[1].uri=lb://service-cmn
#设置路由断言,代理servicerId为auth-service的/auth/路径
spring.cloud.gateway.routes[1].predicates= Path=/*/cmn/**
填写主函数, 启动该模块
会显示80 端口被占用, 原因是我们前面使用的nginx 占用了80端口, cmd 输入命令 nginx -s stop释放80端口
修改前端dev.env.js 中的 BASE_API: '"http://localhost"' , ip地址后不写端口号, 默认即为80
- 配置跨域
创建config 文件, 并注释掉原项目中controller文件上的@CrossOrigin
@Configuration
public class CorsConfig {
    @Bean
    public CorsWebFilter corsWebFilter(){
        CorsConfiguration config = new CorsConfiguration();
        config.addAllowedMethod("*");
        config.addAllowedOrigin("*");
        config.addAllowedHeader("*");
        UrlBasedCorsConfigurationSource source = new UrlBasedCorsConfigurationSource(new PathPatternParser());
        source.registerCorsConfiguration("/**", config);
        return new CorsWebFilter(source);
    }
}
8. 用户端前台搭建
8.1 引入NUXT
Nuxt.js 是一个基于 Vue.js 的轻量级应用框架,可用来创建服务端渲染 (SSR) 应用,也可充当静态站点引擎生成静态站点应用,具有优雅的代码结构分层和热加载等特性。
npm install
npm run dev
http://localhost:3000
8.2 NUXT 目录结构
- 资源目录 assets
用于组织未编译的静态资源如 LESS、SASS 或 JavaScript。
- 组件目录 components
用于组织应用的 Vue.js 组件。Nuxt.js 不会扩展增强该目录下 Vue.js 组件,即这些组件不会像页面组件那样有 asyncData 方法的特性。
- 布局目录 layouts
用于组织应用的布局组件。
- 页面目录 pages
用于组织应用的路由及视图。Nuxt.js 框架读取该目录下所有的 .vue 文件并自动生成对应的路由配置。
- 插件目录 plugins
用于组织那些需要在 根vue.js应用 实例化之前需要运行的 Javascript 插件。
- nuxt.config.js 文件
nuxt.config.js 文件用于组织Nuxt.js 应用的个性化配置,以便覆盖默认配置。
8.2 用户登录功能
- 使用邮箱验证码登录
8.2.1 jwt认证机制
JWT(Json Web Token)是为了在网络应用环境间传递声明而执行的一种基于JSON的开放标准。
JWT的声明一般被用来在身份提供者和服务提供者间传递被认证的用户身份信息,以便于从资源服务器获取资源。比如用在用户登录上
JWT最重要的作用就是对 token信息的防伪作用。
JWT的原理,一个JWT由三个部分组成:公共部分、私有部分、签名部分。最后由这三者组合进行base64编码得到JWT。
首先用户需要 通过登录等手段向authentication server发送一个认证请求,authentication会返回给用户一个JWT(按照header.payload.signature的格式拼接的字符串,不保证数据泄露)
此后用户向application server发送的所有请求都要捎带上这个JWT,然后application server会验证这个JWT的合法性,验证通过则说明用户请求时来自合法守信的客户端。
8.2.2 邮箱登录
- 向给出的email 发送六位验证码, 在发送成功时, 将其存入redis中
// 发送邮箱验证码
    @GetMapping("send/{email}")
    public Result sendCode(@PathVariable String email){
        // 从redis 获取验证码,如果获取到,返回ok
        // key - email  value - 验证码
        String code = redisTemplate.opsForValue().get(email);
        if(!StringUtils.isEmpty(code)){
            return Result.ok();
        }

        // 若从redis获取不到,生成六位验证码
        code = RandomUtil.getSixBitRandom();
        System.out.println(email + "---" + code);

        // 调用service 方法,通过整合邮箱服务进行发送
        boolean isSend = msmService.send(email,code);
        // 生成验证码放入redis中,设置有效时间
        if(isSend){
            redisTemplate.opsForValue().set(email,code,2,TimeUnit.MINUTES);
            return Result.ok();
        }else{
            return Result.fail().message("发送邮件失败");
        }
- 从前端传入的loginVo中读取email 和 code, 若和redis中的不同 , 则抛出异常HospitalException(ResultCodeEnum.CODE_ERROR)
- 若验证码正确,且当前email 用户为第一次登录, 则将他的信息加入yygh_user中, 并通过userInfo 的id 和name 生成token, 返回前端
//用户邮箱登录接口
    @Override
    public Map<String, Object> loginUser(LoginVo loginVo) {
        //从loginVo获取输入的邮箱号,和验证码
        String email = loginVo.getEmail();
        String code = loginVo.getCode();
        //判断邮箱号和验证码是否为空
        if(StringUtils.isEmpty(email) || StringUtils.isEmpty(code)) {
            throw new HospitalException(ResultCodeEnum.PARAM_ERROR);
        }
        //判断邮箱验证码和输入的验证码是否一致
        String redisCode = redisTemplate.opsForValue().get(email);
        if(!code.equals(redisCode)) {
            throw new HospitalException(ResultCodeEnum.CODE_ERROR);
        }
        //绑定邮箱号码
        UserInfo userInfo = null;
            //判断是否第一次登录:根据邮箱号查询数据库,如果不存在相同邮箱号就是第一次登录
            QueryWrapper<UserInfo> wrapper = new QueryWrapper<>();
            wrapper.eq("email",email);
            userInfo = baseMapper.selectOne(wrapper);
            if(userInfo == null) { //第一次使用这个邮箱号登录
                //添加信息到数据库
                userInfo = new UserInfo();
                userInfo.setName("");
                userInfo.setEmail(email);
                userInfo.setStatus(1);
                baseMapper.insert(userInfo);
            }
        //校验是否被禁用
        if(userInfo.getStatus() == 0) {
            throw new HospitalException(ResultCodeEnum.LOGIN_DISABLED_ERROR);
        }
        //不是第一次,直接登录
        //返回登录信息
        //返回登录用户名
        //返回token信息
        Map<String, Object> map = new HashMap<>();
        String name = userInfo.getName();
        if(StringUtils.isEmpty(name)) {
            name = userInfo.getNickName();
        }
        if(StringUtils.isEmpty(name)) {
            name = userInfo.getEmail();
        }
        map.put("name",name);

        //jwt生成token字符串
        String token = JwtHelper.createToken(userInfo.getId(), name);
        map.put("token",token);
        return map;
    }
8.2.3 微信登录
-
操作模块 : service-user 🍕微信登录二维码我们采用弹出层的形式打开,不是页面形式
-
操作步骤如下
1. 通过接口把对应参数返回页面
2. 在头部启动页面启动打开微信登录二维码
3. 处理登录回调接口
4. 回调返回页面通知微信登陆层回调成功
5. 如果是第一次扫描登陆, 则绑定邮箱,登录成功 -
application.properties配置如下
# 服务端口
server.port=8160
wx.open.app_id=wxed9954c01bb89b47
wx.open.app_secret=a7482517235173ddb4083788de60b90e
wx.open.redirect_url=http://localhost:8160/api/ucenter/wx/callback
yygh.baseUrl=http://localhost:3000
- 添加配置类
import org.springframework.beans.factory.InitializingBean;
import org.springframework.beans.factory.annotation.Value;
import org.springframework.stereotype.Component;

@Component
public class ConstantWxPropertiesUtils implements InitializingBean {

    @Value("${wx.open.app_id}")
    private String appId;

    @Value("${wx.open.app_secret}")
    private String appSecret;

    @Value("${wx.open.redirect_url}")
    private String redirectUrl;

    @Value("${yygh.baseUrl}")
    private String yyghBaseUrl;


    public static String WX_OPEN_APP_ID;
    public static String WX_OPEN_APP_SECRET;
    public static String WX_OPEN_REDIRECT_URL;
    public static String YYGH_BASE_URL;


    @Override
    public void afterPropertiesSet() throws Exception {
        WX_OPEN_APP_ID = appId;
        WX_OPEN_APP_SECRET = appSecret;
        WX_OPEN_REDIRECT_URL = redirectUrl;
        YYGH_BASE_URL = yyghBaseUrl;
    }
}
- controller
//1、生成微信扫描二维码
    //返回生成二维码需要参数
    @GetMapping("getLoginParam")
    @ResponseBody   //这里来做返回数据
    public Result genQrConnect() {
        try {
            Map<String, Object> map = new HashMap<>();
            map.put("appid", ConstantWxPropertiesUtils.WX_OPEN_APP_ID);
            map.put("scope","snsapi_login");
            String wxOpenRedirectUrl = ConstantWxPropertiesUtils.WX_OPEN_REDIRECT_URL;
            wxOpenRedirectUrl = URLEncoder.encode(wxOpenRedirectUrl, "utf-8");
            map.put("redirect_uri",wxOpenRedirectUrl);
            map.put("state",System.currentTimeMillis()+"");
            return Result.ok(map);
        } catch (UnsupportedEncodingException e) {
            e.printStackTrace();
            return null;
        }
    }
-
手机扫描二维码, 点击确认登录后, 进入回调地址 http://localhost:8160/api/ucenter/wx/callback?code=061imLGa1lv7KD0OytGa1dzYjm4imLGo&state=1661225939446, 得到两个参数, code, state
-
Controller // 微信扫描后回调的方法 获取扫描人的信息
- 获取回调返回code值
- 拿着获取code值, 请求微信提供的地址, 得到地址返回两个值 access_token 和 openid
- 拿着 access_token 和openid, 请求微信提供地址,请求地址返回扫描人信息
- 绑定邮箱号, 将邮箱号和微信扫描人信息添加到数据库中
//微信扫描后回调的方法    获取扫描人的信息
    @GetMapping("callback")
    public String callback(String code,String state) {
        //第一步 获取临时票据 code
        System.out.println("code:"+code);
        //第二步 拿着code和微信id和秘钥,请求微信固定地址 ,得到两个值
        //使用code和appid以及appscrect换取access_token
        //  %s   占位符
        StringBuffer baseAccessTokenUrl = new StringBuffer()
                .append("https://api.weixin.qq.com/sns/oauth2/access_token")
                .append("?appid=%s")
                .append("&secret=%s")
                .append("&code=%s")
                .append("&grant_type=authorization_code");
        String accessTokenUrl = String.format(baseAccessTokenUrl.toString(),
                ConstantWxPropertiesUtils.WX_OPEN_APP_ID,
                ConstantWxPropertiesUtils.WX_OPEN_APP_SECRET,
                code);
        //使用httpclient请求这个地址
        try {
            String accesstokenInfo = HttpClientUtils.get(accessTokenUrl);
            System.out.println("accesstokenInfo:"+accesstokenInfo);
            //从返回字符串获取两个值 openid  和  access_token
            JSONObject jsonObject = JSONObject.parseObject(accesstokenInfo);
            String access_token = jsonObject.getString("access_token");
            String openid = jsonObject.getString("openid");

            //判断数据库是否存在微信的扫描人信息
            //根据openid判断
            UserInfo userInfo = userInfoService.selectWxInfoOpenId(openid);
            if(userInfo == null) { //数据库不存在微信信息
                //第三步 拿着openid  和  access_token请求微信地址,得到扫描人信息
                String baseUserInfoUrl = "https://api.weixin.qq.com/sns/userinfo" +
                        "?access_token=%s" +
                        "&openid=%s";
                String userInfoUrl = String.format(baseUserInfoUrl, access_token, openid);
                String resultInfo = HttpClientUtils.get(userInfoUrl);
                System.out.println("resultInfo:"+resultInfo);
                JSONObject resultUserInfoJson = JSONObject.parseObject(resultInfo);
                //解析用户信息
                //用户昵称
                String nickname = resultUserInfoJson.getString("nickname");
                //用户头像
                String headimgurl = resultUserInfoJson.getString("headimgurl");

                //获取扫描人信息添加数据库
                userInfo = new UserInfo();
                userInfo.setNickName(nickname);
                userInfo.setOpenid(openid);
                userInfo.setStatus(1);
                userInfoService.save(userInfo);
            }
            //返回name和token字符串
            Map<String,String> map = new HashMap<>();
            String name = userInfo.getName();
            if(StringUtils.isEmpty(name)) {
                name = userInfo.getNickName();
            }
            if(StringUtils.isEmpty(name)) {
                name = userInfo.getPhone();
            }
            map.put("name", name);

            //判断userInfo是否有手机号,如果手机号为空,返回openid
            //如果手机号不为空,返回openid值是空字符串
            //前端判断:如果openid不为空,绑定手机号,如果openid为空,不需要绑定手机号
            if(StringUtils.isEmpty(userInfo.getPhone())) {
                map.put("openid", userInfo.getOpenid());
            } else {
                map.put("openid", "");
            }
            //使用jwt生成token字符串
            String token = JwtHelper.createToken(userInfo.getId(), name);
            map.put("token", token);
            //跳转到前端页面
            return "redirect:" + ConstantWxPropertiesUtils.YYGH_BASE_URL + "/weixin/callback?token="+map.get("token")+ "&openid="+map.get("openid")+"&name="+URLEncoder.encode(map.get("name"),"utf-8");
        } catch (Exception e) {
            e.printStackTrace();
            return null;
        }
    }
8.3.4 实名认证
-
开通阿里云oss, 并搭建service-oss模块,用于图片上传.(未开通, 不影响后续操作) -
新建用户认证接口: 获取前端用户传入的身份信息,写入数据库user-info中,
-
新建用户id信息接口: 获取当前id下的用户完整信息
//用户认证接口
    @PostMapping("auth/userAuth")
    public Result userAuth(@RequestBody UserAuthVo userAuthVo, HttpServletRequest request) {
        //传递两个参数,第一个参数用户id,第二个参数认证数据vo对象
        userInfoService.userAuth(AuthContextHolder.getUserId(request),userAuthVo);
        return Result.ok();
    }


    //获取用户id信息接口
    @GetMapping("auth/getUserInfo")
    public Result getUserInfo(HttpServletRequest request) {
        Long userId = AuthContextHolder.getUserId(request);
        UserInfo userInfo = userInfoService.getById(userId);
        return Result.ok(userInfo);
    }
8.3.5 就诊人管理
- 实现就诊病人的增删改查
8.3.6 用户管理
- 在service-user中写接口, 提供给管理员前端界面使用
- 前端可通过以下接口, 实现展示用户信息, 锁定/解锁用户, 审批待审批用户的功能
//用户列表(条件查询带分页)
    @GetMapping("{page}/{limit}")
    public Result list(@PathVariable Long page,
                       @PathVariable Long limit,
                       UserInfoQueryVo userInfoQueryVo) {
        Page<UserInfo> pageParam = new Page<>(page, limit); // Page分页从1开始
        IPage<UserInfo> pageModel = userInfoService.selectPage(pageParam, userInfoQueryVo);
        return Result.ok(pageModel);
    }

    //用户锁定状态改变
    @GetMapping("lock/{userId}/{status}")
    public Result lock(@PathVariable Long userId,@PathVariable Integer status) {
        userInfoService.lock(userId,status);
        return Result.ok();
    }

    //用户详情
    @GetMapping("show/{userId}")
    public Result show(@PathVariable Long userId) {
        Map<String,Object> map = userInfoService.show(userId);
        return Result.ok(map);
    }

    //认证审批状态改变
    @GetMapping("approval/{userId}/{authStatus}")
    public Result approval(@PathVariable Long userId,@PathVariable Integer authStatus) {
        userInfoService.approval(userId,authStatus);
        return Result.ok();
    }

 浙公网安备 33010602011771号