前端开发的正确姿势——各种文件的目录结构规划及引用
首先,要说的是我们领导总挂在嘴边的一句话:一入前端深似海。之前没有接触过前端,一直不懂这句话的含义,直到最近写作业改需求的时候才发现,因为web页面是直接面向客户的,所以需求的修改都和前端有关,有时候甚至不需要修改后台的代码就可以满足新的需求。突然对前端工程师的未来表示担忧,于我来说,这些繁琐的细节性工作我希望始终与其保持安全距离,嘻嘻!
不喜归不喜,然而python是一门自动化语言,分工不像java开发那样明确,所以也需要掌握前端的知识,关于前端的知识网上比比皆是,在这里就不多做赘述,今天想说的还是我在学习过程中的一些困扰,面对那些繁琐的js文件,css文件和html文件,你是不是也和我一样蒙圈。。。不知道该往哪里放,不知道目录结构怎么安排?现在就来分享一下我从前端同事那里偷师来的目录结构和引用方式吧~~~
要写好一个web页面,必不可少的是html文件,css文件,和js文件。可是这些东西到底是什么呢?举个栗子:html就是一个赤裸裸的人,css则是人的衣服,而js就是一个人的行为,它支配页面上的所有动作。我们写html,用各种标签、容器来承装不同的文字、图片,总之html做的就是把我们要表达的一股脑的写在页面上。但是它们在什么位置、什么颜色,好看不好看,就不是html的工作了,这个装饰页面的工作就交给了css。有了css和html,我们的页面就可以很好看了,但是再好看的页面,也不过是一张图片而已,要让他们真正动起来,就要依靠js了。好啦,扫盲结束,插播一段广告:Python之路【第十一篇】前端初识之HTML,具体的html相关知识,见我偶像博客!
一直以来,我都乖乖的做普通青年,把所有的东西都写在html文件里,这样的好处是,写着不乱,一个文件的内容、样式和所有的行为都在一起,不需要规划、也不需要引入。我们只需要将js的代码用<script>标签框起来,css代码用<style>标签框起来,html代码还是写在body中,就ok啦~具体格式如下:
|
1
2
3
4
5
6
7
8
9
10
11
12
13
14
15
16
|
<!DOCTYPE html><html><head><meta charset="utf-8" /><title>主页</title></head><script> //js代码</script><style> <!--css代码></style><body> <!--html代码></body></html> |

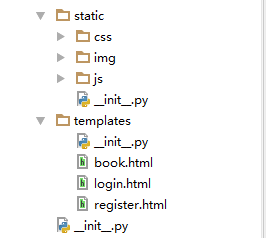
尽管是屌丝程序员,但是我们不能一直low下去呀,感觉同事的这种规划很合理,所以拿来用用。就是这样,我们认为css,js和web页面用到的图片都属于静态文件,统一放在static下对应的文件夹中,所有的html页面都放在templates文件夹下。这样是为了别人看我们的页面清晰,也是为了以后写复杂的页面做准备哦!
那么问题来了,我们写在不同文件中的内容,如何在html中使用呢?快来get新技能吧!栗子如下:
<html>
<head>
<meta charset="utf-8" />
<title>用户登录</title>
<script src="../static/js/jquery-1.11.1.min.js"></script>
<link rel="stylesheet" type="text/css" href="../static/css/sub.css">
</head>
<body>
    <div class="bg">
        <div class="pictrue">
            <img src="../static/img/loginPic.jpg" />
        </div>
        <div class="main">
            <div class="center">
                <div class="administration">用户登录</div>
                  <div class="information">
                      <div class="name"><input type="text" placeholder="用户名" id="name"></div>
                      <div class="password"><input type="password" placeholder="密码" id="password"></div>
                  </div>
                <div class="submit"><div class="button" id = 'login'>登录</div></div>
                <a class="jump" target="_blank"; href = "register.html">立即注册</a>
            </div>
        </div>
    </div>
</body>
</html>
我用了上面目录结构中的login.html文件做栗子,引入的是static/css/文件夹下的sub.css文件,其中link标签起到了最重要的作用,下面我们就来解读一下:
link rel="stylesheet" type="text/css" href="../static/css/sub.css">
link表示链接一个外部样式表,rel 属性指示被链接的文档是一个样式表,type 属性规定被链接文档的MIME 类型,该属性最常见的 MIME 类型是 "text/css",该类型描述样式表。
href就是我们要引入文件的地址。向上面的目录结构,我需要从当前login.html文件所在的templates文件夹向上翻一层,然后再依次找到static/css/下面的sub.css文件。
这样样式文件就被顺利的导入了。
还是用上面目录结构中的login.html文件做栗子,引入的是static/js/文件夹下的jquery-1.11.1.min.js文件,其中script标签起到了最重要的作用,下面就来解读一下:
<script src="../static/js/jquery-1.11.1.min.js"></script>
script 标签用于定义客户端脚本
src属性指向外部脚本文件,与href的用法大致相同。
附上css文件,就可以拥有一个完整的web登录页面啦!
/* CSS Document */
*{padding:0px; margin:0px; list-style:none; font-family:"微软雅黑";}
body{background: #f2f2f2;}
.bg{ width:100%; float:left;}
.main{ margin:0 auto; width:300px;position: absolute;right: 15%; margin-top:15%; height: 300px; background-color:#ffffff; border: 1px solid #cccccc;}
.center{width: 250px; margin: 0 auto;}
.administration{width: 100%; height: 30px; line-height: 30px;color: #3485FB; margin-top: 30px; float: left; font-size: 18px;}
.information{float:left; width:100%;}
.name{background:#fff;width:100%; height:35px; border:2px solid #DCDCDC; border-radius:10px; margin-top:20px;}
.name span{width:45px; height:35px; float:left;}
.name span img{float:left; margin:5px 0 0 8px;}
.name input{ line-height:35px;height:35px;float:left;outline:none; width:201px; border:0; color:#C9C9C9; font-family:"微软雅黑"; text-indent:5px;}

.password{background:#fff;width:100%; height:35px; border:2px solid #DCDCDC; border-radius:10px; margin-top:20px;}
.password span{width:45px; height:35px; float:left;}
.password span img{float:left; margin:5px 0 0 8px;}
.password input{ line-height:35px;height:35px;float:left;outline:none; width:201px; border:0; color:#C9C9C9; font-family:"微软雅黑"; text-indent:5px;}

.main .jump{float:right; width:65px; font-size:13px; margin-top:10px;}
.submit{width:100%; float:left; }
.submit .button{ cursor:pointer;font-size:14px; font-weight:bold;width:100%; margin:12px auto; background:#f7f7f7;height:35px; text-align:center; line-height:35px; border:2px solid #0086E0; border-radius:10px;}
.pictrue{float: left;width:400px;height:400px; margin:180px 100px 50px 200px;}

sub.css Code
.


