

Vue Router_3、replace、编程式导航、缓存路由组件
1.replace属性
<router-link>的replace属性
-
作用:控制路由跳转时操作浏览器历史记录的模式
-
浏览器的历史记录有两种写入方式:分别为
push和replace,push是追加历史记录,replace是替换当前记录。路由跳转时候默认为push -
如何开启
replace模式:<router-link replace .......>News</router-link>
总结:浏览记录本质是一个栈,默认push,点开新页面就会在栈顶追加一个地址,后退,栈顶指针向下移动,改为replace就是不追加,而将栈顶地址替换。
2.编程式路由导航
作用:不借助<router-link> 实现路由跳转,让路由跳转更加灵活。
具体编码:
//$router的两个API
this.$router.push({
	name:'xiangqing',
		params:{
			id:xxx,
			title:xxx
		}
})

this.$router.replace({
	name:'xiangqing',
		params:{
			id:xxx,
			title:xxx
		}
})
this.$router.forward() //前进
this.$router.back() //后退
this.$router.go() //可前进也可后退
src\pages\Message.vue
<template>
    <div>
        <ul>
        <li v-for="m in messageList" :key="m.id">
            <!-- 跳转路由并携带params参数,to的对象写法 -->
            <router-link
            :to="{
                name:'xiangqing',//params写法必须写成name,不能用path
                query:{
                    id:m.id,
                    title:m.title
                }
            }">
            {{m.title}}
            </router-link>

            <button @click="pushShow(m)">push查看</button>
            <button @click="replaceShow(m)">replace查看</button>

        </li>
        </ul>
        <hr>
        <router-view></router-view>
    </div>
</template>

<script>
export default {
    name:"Message",
    data(){
        return{
            messageList:[
                {id:"001",title:"消息001"},
                {id:"002",title:"消息002"},
                {id:"003",title:"消息003"}
            ]
        }
    },
    methods:{
        pushShow(m){
            //console.log(this.$router);
            this.$router.push({
                name:'xiangqing',//params写法必须写成name,不能用path
                query:{
                    id:m.id,
                    title:m.title
                }
            });
        },
        replaceShow(m){
             this.$router.replace({
                name:'xiangqing',//params写法必须写成name,不能用path
                query:{
                    id:m.id,
                    title:m.title
                }
            });
        }
    },


}
</script>
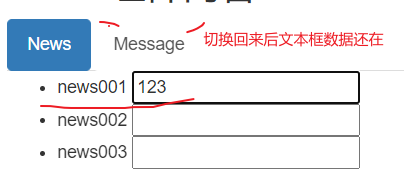
3.缓存路由组件
作用:让不展示的路由组件保持挂载,不被销毁。
具体编码:
<keep-alive include="News">
    <router-view></router-view>
</keep-alive>
缓存多个
<keep-alive :include="['News','News']">
缓存全部
<keep-alive>
注意:该组件在哪个组件的 <router-view>标签里呈现就在对应组件的 <router-view>标签外包一层<keep-alive>标签,不指定include会把里面的所有组件都缓存。
分类:
vue基础


【推荐】国内首个AI IDE,深度理解中文开发场景,立即下载体验Trae
【推荐】编程新体验,更懂你的AI,立即体验豆包MarsCode编程助手
【推荐】抖音旗下AI助手豆包,你的智能百科全书,全免费不限次数
【推荐】轻量又高性能的 SSH 工具 IShell:AI 加持,快人一步
· TypeScript + Deepseek 打造卜卦网站:技术与玄学的结合
· 阿里巴巴 QwQ-32B真的超越了 DeepSeek R-1吗?
· 【译】Visual Studio 中新的强大生产力特性
· 10年+ .NET Coder 心语 ── 封装的思维:从隐藏、稳定开始理解其本质意义
· 【设计模式】告别冗长if-else语句:使用策略模式优化代码结构