

1_axio基本使用和json-server 搭建REST API 服务端
1. 自己创建一个API
1.1 API 的分类
通过链接请求访问服务端进行增删改查等待操作就是api。webApi就是单纯的没有页面,只是一个用来接收请求的后台服务器,根据用户(浏览器)发送的请求进行不同的操作。
-
REST API: restful (Representational State Transfer (资源)表现层状态转化)
(1) 发送请求进行CRUD 哪个操作由请求方式来决定
(2) 同一个请求路径可以进行多个操作
(3) 请求方式会用到GET/POST/PUT/DELETE -
非REST API: restless
(1) 请求方式不决定请求的CRUD 操作
(2) 一个请求路径只对应一个操作
(3) 一般只有GET/POST
1.2 使用json-server 搭建REST API
1.2.1 json-server 是什么?
用来快速搭建REST API 的工具包。
因为需要一个后台服务端环境,用来接收我们前端页面里发送的请求,所以json-server可以很方便为我们搭建一个api服务端。
1.2.2 使用json-server搭建服务端
-
下载: npm install -g json-server
-
目标根目录下创建“数据库” json 文件: db.json。db代表数据库的意思,用json-server创建的后台服务端用来模拟数据库,存放前端用户的数据,不是真的数据库。里面内容格式如下:
{
	"posts": [
		{ "id": 1, "title": "json-server", "author": "typicode" },
		{ "id": 2, "title": "海贼王", "author": "尾田荣一郎" }
	],
	"comments": [
		{ "id": 1, "body": "some comment", "postId": 1 },
		{ "id": 2, "body": "一些xxx评论", "postId": 2 }
	],
	"profile": { "name": "typicode" }
}
- 启动服务器执行命令: json-server --watch db.json 如果启动不了就用管理员身份运行vscode或者在命令前加 npx
1.2.3 使用浏览器访问测试
使用浏览器直接在地址栏输入路由即可。如:
json-server的路由规则如下:
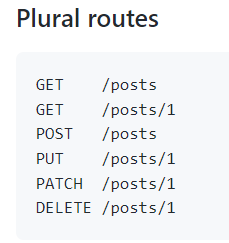
1.2.4 使用axios 访问测试
创建一个网页进行访问测试
<!DOCTYPE html>
<html lang="en">
<head>
  <meta charset="UTF-8">
  <meta name="viewport" content="width=device-width, initial-scale=1.0">
  <meta http-equiv="X-UA-Compatible" content="ie=edge">
  <title>Document</title>
</head>
<body>
  <div>
    <button onclick="testGet()">GET请求</button>
    <button onclick="testPost()">POST请求</button>
    <button onclick="testPut()">PUT请求</button>
    <button onclick="testDelete()">DELETE请求</button>
  </div>

  <script src="https://cdn.bootcdn.net/ajax/libs/axios/0.21.1/axios.js"></script>
  <script>
    function testGet() {
      axios.get('http://localhost:3000/posts') // 返回一个数组,数组里有两个对象
      // axios.get('http://localhost:3000/posts/1') // 返回一个对象
      // axios.get('http://localhost:3000/posts?id=1') // 返回一个数组,数组里有一个对象
      .then(response => {
        console.log('/posts get', response.data)
      })
    }

    function testPost() { // 添加数据
      axios.post('http://localhost:3000/posts', {"title": "json-server3", "author": "typicode" })
      .then(response => {
        console.log('/posts put', response.data)
      })
	  //或者这样写:
	  //发送ajax请求
            // axios({
            //     //请求类型
            //     method:"POST",
            //     //URL
            //     url:"http://127.0.0.1:3000/posts",
            //     //设置请求体
            //     data:{
            //         title:"今天天气真晴朗",
            //         author:"小张"
            //     }
            // }).then(response=>{
            //     console.log(response);
            // });
    }

    function testPut() { // 更新数据
      axios.put('http://localhost:3000/posts/3', {"title": "json-server_put", "author": "typicode" })
      .then(response => {
        console.log('/posts post', response.data)
      })
    }

    function testDelete() { // 删除数据
      axios.delete('http://localhost:3000/posts/3')
      .then(response => {
        console.log('/posts delete', response.data)
      })
    }
  </script>
</body>
</html>
2. XHR 的 ajax 封装 (简单版axios)
2.1 特点
- 函数的返回值为promise, 成功的结果为response, 失败的结果为error
- 能处理多种类型的请求: GET/POST/PUT/DELETE
- 函数的参数为一个配置对象
{
	url: '', // 请求地址
	method: '', // 请求方式GET/POST/PUT/DELETE
	params: {}, // GET/DELETE 请求的 query 参数
	data: {}, // POST/PUT 请求的请求体参数
}
- 响应 json数据 自动解析为 js的对象/数组
2.2 编码实现
function axios({
  url,
  method='GET',
  params={},
  data={}
}){
  // 返回一个promise对象
  return new Promise((resolve, reject) => {

    // 处理method 转大写
    method = method.toUpperCase();

    // 处理 query参数(拼接到url上)id=1&xxx=abc
    let queryString = '';
    Object.keys(params).forEach(key => {
      queryString += `${key}=${params[key]}&`
    });
    if(queryString){
      // 去除最后的'&'
      queryString = queryString.substring(0, queryString.length-1)
      // 接到url
      url += '?' + queryString
    }

    // 1. 执行异步Ajax请求
    // 创建xhr对象
    const request = new XMLHttpRequest();
    // 打开连接(初始化请求,没有请求)
    request.open(method, url, true);
    // 发送请求
    if(method === 'GET' || method === 'DELETE'){
      request.send()// undefined
    } else if (method === 'POST' || method === 'PUT'){
      // 设置请求头,告诉服务器请求体的格式是json
      request.setRequestHeader('Content-Type', 'appliaction/json;charset=utf-8');
      // 发送json格式请求参数
      request.send(JSON.stringify(data)); // 异步执行
    }

    // 绑定状态改变的监听
    request.onreadystatechange = function() { // 同步执行
      // 如果请求没有完成,直接结束
      if (request.readyState !== 4) {
        return;
      }
      // 如果响应状态码在[200, 300)之间代表成功,否则失败
      const {status, statusText} = request
      if( status>= 200 && status<=299) {// 2.1 如果请求成功,调用resolve()
        // 准备结果数据对象response
        const response = {
          data: JSON.parse(request.response),
          status,
          statusText
        };
        resolve(response);
      } else {// 2.2 如果请求失败,调用reject()
        reject(new Error('request error status is ' + status));
      }
    }
  })
}
2.3 使用测试
// 1. GET请求:从服务器端获取数据
function testGet() {
  axios({
    url: 'http://localhost:3000/posts',
    method: 'GET',
    params:{
      id: 1,
      xxx: 'abc'
    }
  }).then(
    response => {
      console.log(response)
    },
    error => {
      alert(error.message)
    }
  )
}

// 2. POST请求:向服务器端添加数据
function testPost() {
  axios({
    url: 'http://localhost:3000/posts',
    method: 'POST',
    data: {
      "title": "json-server_post",
      "author": "typicode_post"
    }
  }).then(
    response => {
      console.log(response)
    },
    error => {
      alert(error.message)
    }
  )
}
// 3. PUT请求:服务器更新数据
function testPut() {
  axios({
    url: 'http://localhost:3000/posts/1',
    method: 'PUT',
    data: {
      "title": "json-server_put",
      "author": "typicode_put"
    }
  }).then(
    response => {
      console.log(response)
    },
    error => {
      alert(error.message)
    }
  )
}

// 3. DELETE请求:服务器删除数据
function testDelete() {
  axios({
    url: 'http://localhost:3000/posts/2',
    method: 'delete'
  }).then(
    response => {
      console.log(response)
    },
    error => {
      alert(error.message)
    }
  )
}
3 axios 的理解和使用
3.1 axios 是什么?
axios是基于promise的http客户端,可以在浏览器和node.js这两个环境去运行。浏览器端借助axios可以向服务端发送ajax请求。axios也可以在nodejs中运行,向远端服务器发送http请求。
简单理解就是一个进化版的ajax。虽然底层还是用的XMLHttpRequest模块。
- 前端最流行的 ajax请求库
- react/vue 官方都推荐使用 axios 发ajax 请求
- 文档: https://github.com/axios/axios
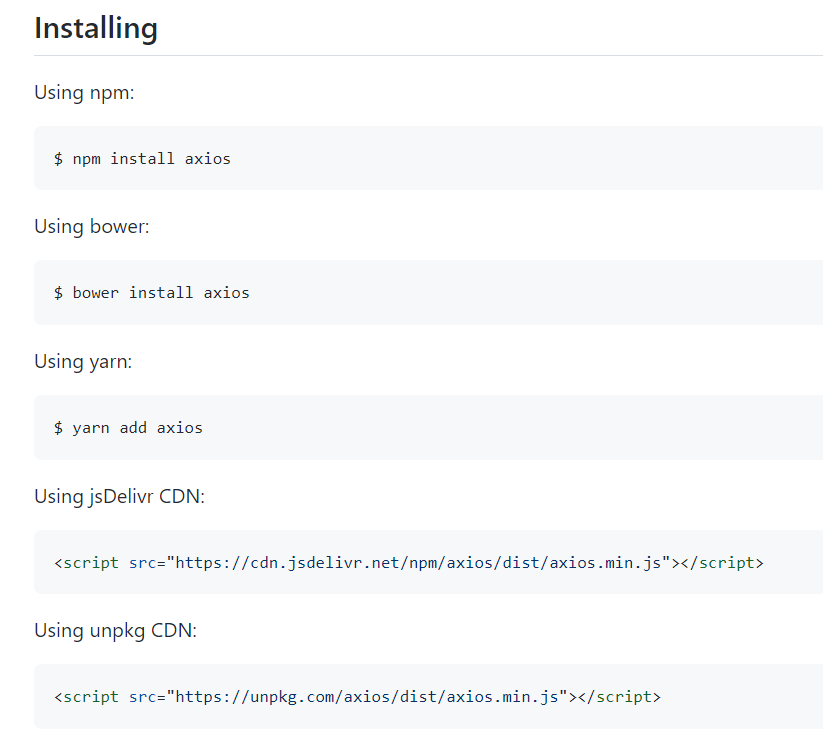
目前axios有如下五种引用方法:
可以下载安装,或者在页面中直接用script标签引用在线包。
3.2 axios 特点
- 基于 xhr + promise 的异步 ajax请求库
- 浏览器端/node 端都可以使用
- 支持请求/响应拦截器
- 支持请求取消
- 请求/响应数据转换
- 批量发送多个请求
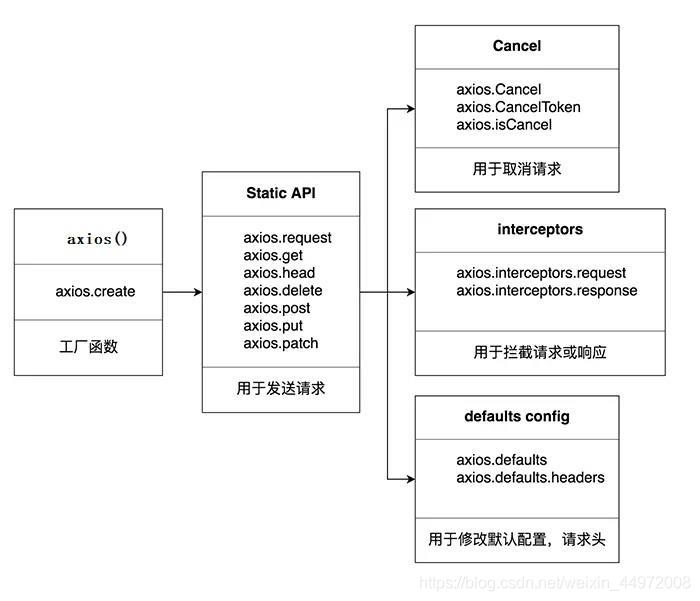
3.3 axios 常用语法
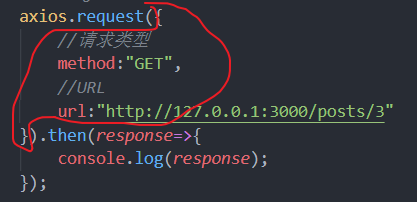
axios(config): 通用/最本质的发任意类型请求的方式
axios(url[, config]): 可以只指定url 发get 请求
axios.request(config): 等同于axios(config)
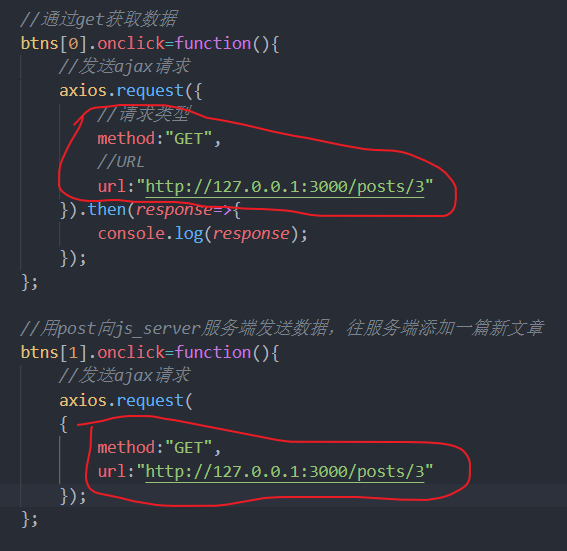
axios.get(url[, config]): 发get 请求
axios.delete(url[, config]): 发delete 请求
axios.post(url[, data, config]): 发post 请求
axios.put(url[, data, config]): 发put 请求
axios.defaults.xxx: 请求的默认全局配置(method\baseURL\params\timeout…)
axios.interceptors.request.use(): 添加请求拦截器
axios.interceptors.response.use(): 添加响应拦截器
axios.create([config]): 创建一个新的axios(它没有下面的功能)
axios.Cancel(): 用于创建取消请求的错误对象
axios.CancelToken(): 用于创建取消请求的 token 对象
axios.isCancel(): 是否是一个取消请求的错误
axios.all(promises): 用于批量执行多个异步请求
axios.spread(): 用来指定接收所有成功数据的回调函数的方法
3.4 axios请求的响应体的结构
可以在控制台输出响应返回的对象包括什么内容:
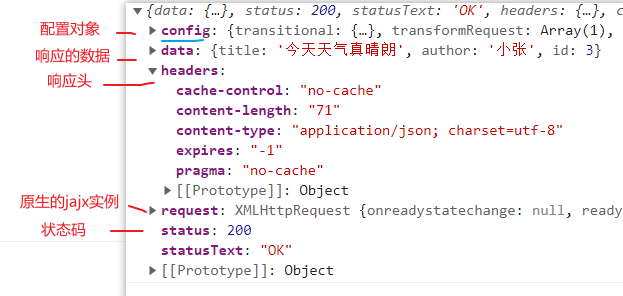
request是原生的ajax请求对象,也就是XMLHttpRequest。request属性所保存的就是axios在发送请求时所创建的ajax对象(XMLHttpRequest的实例)。
3.5 axios请求的配置对象config
也就是下面图的部分:配置属性都包括method、url、data等等,具体可以查看官网。
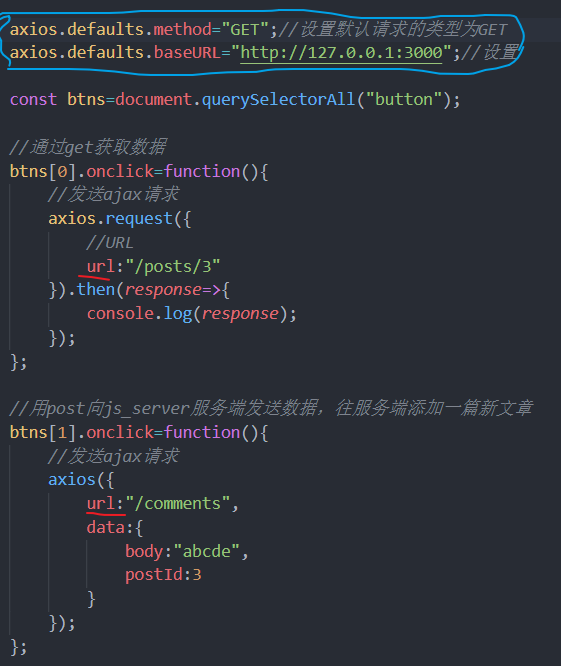
3.6 axios请求的配置对象config的默认配置
通过默认配置就可以设置axios的配置信息,如果不设置,每个都要设置,比较麻烦,如下图:
进行默认设置后就可以省略写每个请求的配置对象的信息了:具体可以查看官网。
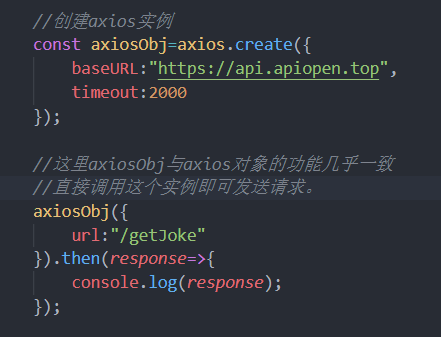
3.7 axios创建实例对象发送请求
3.8 axios拦截器
- 拦截器(过滤器):就是一些函数,拦截器分为请求拦截器和响应拦截器。
- 请求拦截器:在发送请求之前,可以借用一些函数对请求参数和内容进行检测处理。如果过检测未通过可以取消发送这次请求。
- 响应拦截器:当服务器返回响应时,可以通过回调函数处理响应结果。那么,响应拦截器可以在这些回调函数处理结果之前,先对结果进行预处理操作。
- 拦截器原理是Promise的then函数实现的,都是传两个匿名函数作为参数,一个成功的,一个失败的。
拦截器的执行流程:先执行请求拦截器,再执行响应拦截器,最后执行自己自定义的失败的回调。
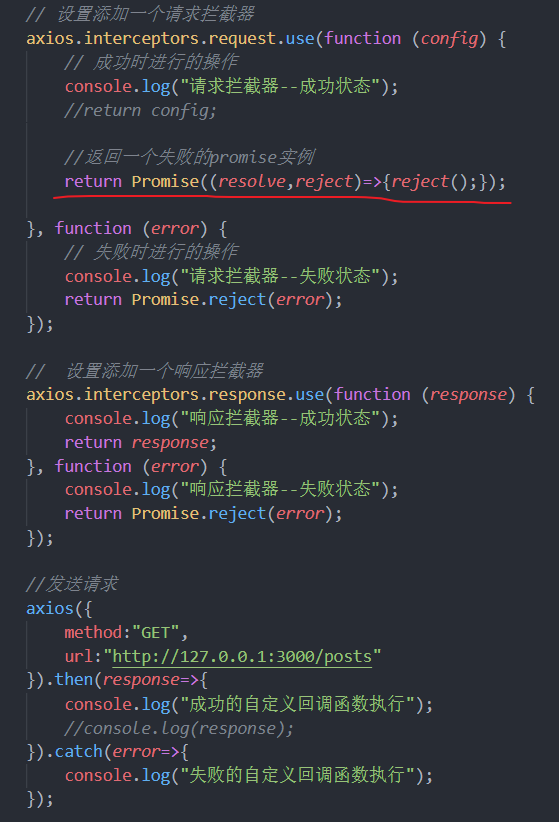
在script里创建一个拦截器:
            // 设置添加一个请求拦截器,config就是请求的配置对象
            axios.interceptors.request.use(function (config) {
                // 成功时进行的操作
                console.log("请求拦截器--成功状态");
                return config;
            }, function (error) {
                // 失败时进行的操作
                console.log("请求拦截器--失败状态");
                return Promise.reject(error);
            });


            //  设置添加一个响应拦截器
            axios.interceptors.response.use(function (response) {
                console.log("响应拦截器--成功状态");
                return response;
            }, function (error) {
                console.log("响应拦截器--失败状态");
                return Promise.reject(error);
            });


            //发送请求
            axios({
                method:"GET",
                url:"http://127.0.0.1:3000/posts"
            }).then(response=>{
                console.log("成功的自定义回调函数执行");
                //console.log(response);

            });
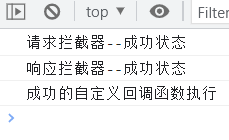
上面代码执行流程:
先执行请求拦截器,服务器响应后执行响应拦截器,最后执行自己的请求的回调函数。
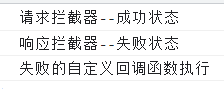
将上面请求拦截器里返回一个失败的promise状态,那么这个拦截器的整体状态就是失败,但是拦截器的回调里面不进行取消请求操作。
上面图的代码运行结果:
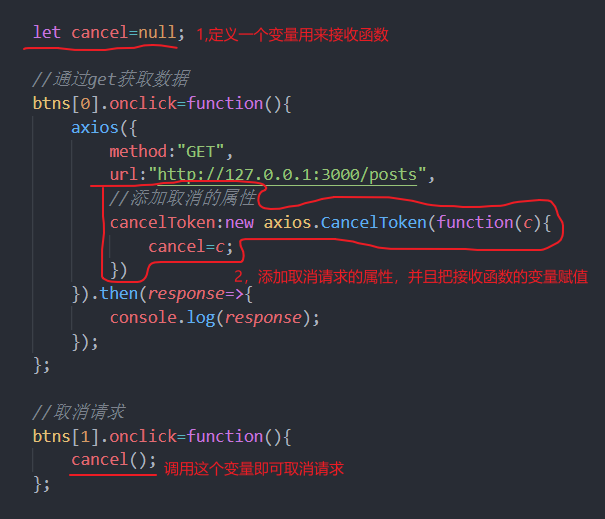
3.9 取消请求
通过给cancelToken属性添加 new axios.CancelToken的实例,外面调用即可取消。
4 难点语法的理解和使用
4.1 axios.create(config)
-
根据指定配置创建一个新的 axios, 也就是每个新 axios 都有自己的配置
-
新 axios 只是没有取消请求和批量发请求的方法, 其它所有语法都是一致的
-
为什么要设计这个语法?
(1) 需求: 项目中有部分接口需要的配置与另一部分接口需要的配置不太一样, 如何处理(比如有多个baseURL需要指定)
(2) 解决: 创建2 个新axios, 每个都有自己特有的配置, 分别应用到不同要求的接口请求中
const instance = axios.create({ // instance是函数类型
	baseURL: 'http://localhost:3000'
})
// 使用instance发Ajax请求
instance({
	url: '/posts'
})
instance.get('/posts')
4.2 拦截器函数/ajax 请求/请求的回调函数的调用顺序
- 说明: 调用axios()并不是立即发送ajax 请求, 而是需要经历一个较长的流程
- 流程: 请求拦截器2 => 请求拦截器1 => 发ajax 请求 => 响应拦截器1 => 响应拦截器2 => 请求的回调
- 注意: 此流程是通过 promise 串连起来的, 请求拦截器传递的是config, 响应拦截器传递的是response
// 添加两个请求拦截器(回调函数)
axios.interceptors.request.use(
  config => {
    console.log('request interceptor1 onResolved()') // -----------2
    return config
  },
  error => {
    console.log('request interceptor1 onRejected()')
    return Promise.reject(error)
  }
)

axios.interceptors.request.use(
  config => {
    console.log('request interceptor2 onResolved()') // -----------1
    return config
  },
  error => {
    console.log('request interceptor2 onRejected()')
    return Promise.reject(error)
  }
)

// 添加两个响应拦截器
axios.interceptors.response.use(
  resopnse => {
    console.log('response interceptor1 onResolved()') // -----------3
    return resopnse
  },
  error => {
    console.log('response interceptor1 onRejected()')
    return Promise.reject(error)
  }
)

axios.interceptors.response.use(
  resopnse => {
    console.log('response interceptor2 onResolved()') // -----------4
    return resopnse
  },
  error => {
    console.log('response interceptor2 onRejected()')
    return Promise.reject(error)
  }
)

axios.get('http://localhost:3000/posts')
  .then(response => {
    console.log('data', response.data) //data Array(4) -------------5
  })
  .catch(error => {
    cosole.log('error', error.message)
  })

// request interceptor2 onResolved()
// request interceptor1 onResolved()
// response interceptor1 onResolved()
// response interceptor2 onResolved()
// data Array(4)
4.3 取消请求
1. 基本流程
- 配置 cancelToken 对象
- 缓存用于取消请求的 cancel 函数
- 在后面特定时机调用 cancel 函数取消请求
- 在错误回调中判断如果 error 是 cancel, 做相应处理
2. 实现功能
用express先搭建一个有延迟的服务器
const express = require('express')
const cors = require('cors')

const app = express()

// 使用cors, 允许跨域
app.use(cors())
// 能解析urlencode格式的post请求体参数
app.use(express.urlencoded())
// 能解析json格式的请求体参数
app.use(express.json())

app.get('/products1', (req, res) => {

  setTimeout(() => {
    res.send([
      {id: 1, name: 'product1.1'},
      {id: 2, name: 'product1.2'},
      {id: 3, name: 'product1.3'}
    ])
  }, 1000 + Math.random()*2000);

})

app.get('/products2', (req, res) => {

  setTimeout(() => {
    res.send([{
        id: 1,
        name: 'product2.1'
      },
      {
        id: 2,
        name: 'product2.2'
      },
      {
        id: 3,
        name: 'product2.3'
      }
    ])
  }, 1000 + Math.random() * 2000);

})

app.listen(4000, () => {
  console.log('server app start on port 4000')
})
- 点击按钮, 取消某个正在请求中的请求
let cancel // 用于保存取消请求的函数
function getProducts1() {
  axios({
    url: 'http://localhost:4000/products1',
    cancelToken: new axios.CancelToken(function executor(c){ // c是用于取消当前请求的函数
      // 保存取消函数,用于之后可能需要取消当前请求
      cancel = c;
    })
  }).then(
    response => {
      cancel = null
      console.log('请求1成功了', response.data)
    },
    error => {
      cancel = null
      console.log('请求1失败了', error.message, error) // 请求1失败了 强制取消请求 Cancel {message: "强制取消请求"}
    }
  )

}

function getProducts2() {
  axios({
      url: 'http://localhost:4000/products2'
  }).then(
    response => {
      console.log('请求2成功了', response.data)
    }
  )
}

function cancelReq() {
  // alert('取消请求')
  // 执行取消请求的函数
  if (typeof cancel === 'function'){
    cancel('强制取消请求')
  } else {
    console.log('没有可取消的请求')
  }
}
- 在请求一个接口前, 取消前面一个未完成的请求
let cancel // 用于保存取消请求的函数
function getProducts1() {
  // 在准备发请求前,取消未完成的请求
  if (typeof cancel === 'function'){
    cancel('取消请求')
  }
  axios({
    url: 'http://localhost:4000/products1',
    cancelToken: new axios.CancelToken(function executor(c){ // c是用于取消当前请求的函数
      // 保存取消函数,用于之后可能需要取消当前请求
      cancel = c;
    })
  }).then(
    response => {

      cancel = null
      console.log('请求1成功了', response.data)
    },
    error => {
      if (axios.isCancel(error)){
        console.log('请求1取消的错误', error.message)
      }else{ // 请求出错了
        cancel = null
        console.log('请求1失败了', error.message, error) // 请求1失败了 强制取消请求 Cancel {message: "强制取消请求"}
      }
    }
  )

}

function getProducts2() {
// 在准备发请求前,取消未完成的请求
  if (typeof cancel === 'function'){
    cancel('取消请求')
  }
  axios({
      url: 'http://localhost:4000/products2',
      cancelToken: new axios.CancelToken(function executor(c){
      cancel = c;
    })
  }).then(
    response => {
      cancel = null
      console.log('请求2成功了', response.data)
    },
    error => {
      if (axios.isCancel(error)){
        console.log('请求2取消的错误', error.message)
      }else{
        cancel = null
        console.log('请求2失败了', error.message, error)
      }
    }
  )
}
function cancelReq() {
  // alert('取消请求')
  // 执行取消请求的函数
  if (typeof cancel === 'function'){
    cancel('强制取消请求')
  } else {
    console.log('没有可取消的请求')
  }
}
使用拦截器改进代码,减少重复代码
// 添加请求拦截器
axios.interceptors.request.use((config) => { // 只写一个成功的回调
  // 在准备发请求前,取消未完成的请求
  if (typeof cancel === 'function'){
    cancel('取消请求')
  }
  // 添加一个cancelToken的配置
  config.cancelToken = new axios.CancelToken(function executor(c){ // c是用于取消当前请求的函数
      // 保存取消函数,用于之后可能需要取消当前请求
      cancel = c;
    })
    return config
})

// 添加响应拦截器
axios.interceptors.response.use(
  response => { // 成功的回调
    cancel = null
    return response
  },
  error => { // 失败的回调
    if (axios.isCancel(error)){ // 请求取消的错误
        console.log('请求取消的错误', error.message)
        // 中断promise链
        return new Promise(() => {})
    }else{ // 请求出错了
      cancel = null
      // 将错误向下传递
      // throw error
      return Promise.reject(error)
    }
  }
)

let cancel // 用于保存取消请求的函数
function getProducts1() {
  axios({
    url: 'http://localhost:4000/products1'
  }).then(
    response => {
      console.log('请求1成功了', response.data)
    },
    error => { // 只用处理请求失败的情况,取消请求的错误不用处理
      console.log('请求1失败了', error.message, error)
    }
  )
}

function getProducts2() {
  axios({
      url: 'http://localhost:4000/products2'
  }).then(
    response => {
      console.log('请求2成功了', response.data)
    },
    error => {
      console.log('请求2失败了', error.message, error)
    }
  )
}
function cancelReq() {
  if (typeof cancel === 'function'){
    cancel('强制取消请求')
  } else {
    console.log('没有可取消的请求')
  }
}


【推荐】国内首个AI IDE,深度理解中文开发场景,立即下载体验Trae
【推荐】编程新体验,更懂你的AI,立即体验豆包MarsCode编程助手
【推荐】抖音旗下AI助手豆包,你的智能百科全书,全免费不限次数
【推荐】轻量又高性能的 SSH 工具 IShell:AI 加持,快人一步
· TypeScript + Deepseek 打造卜卦网站:技术与玄学的结合
· 阿里巴巴 QwQ-32B真的超越了 DeepSeek R-1吗?
· 【译】Visual Studio 中新的强大生产力特性
· 10年+ .NET Coder 心语 ── 封装的思维:从隐藏、稳定开始理解其本质意义
· 【设计模式】告别冗长if-else语句:使用策略模式优化代码结构