istio灰度方案
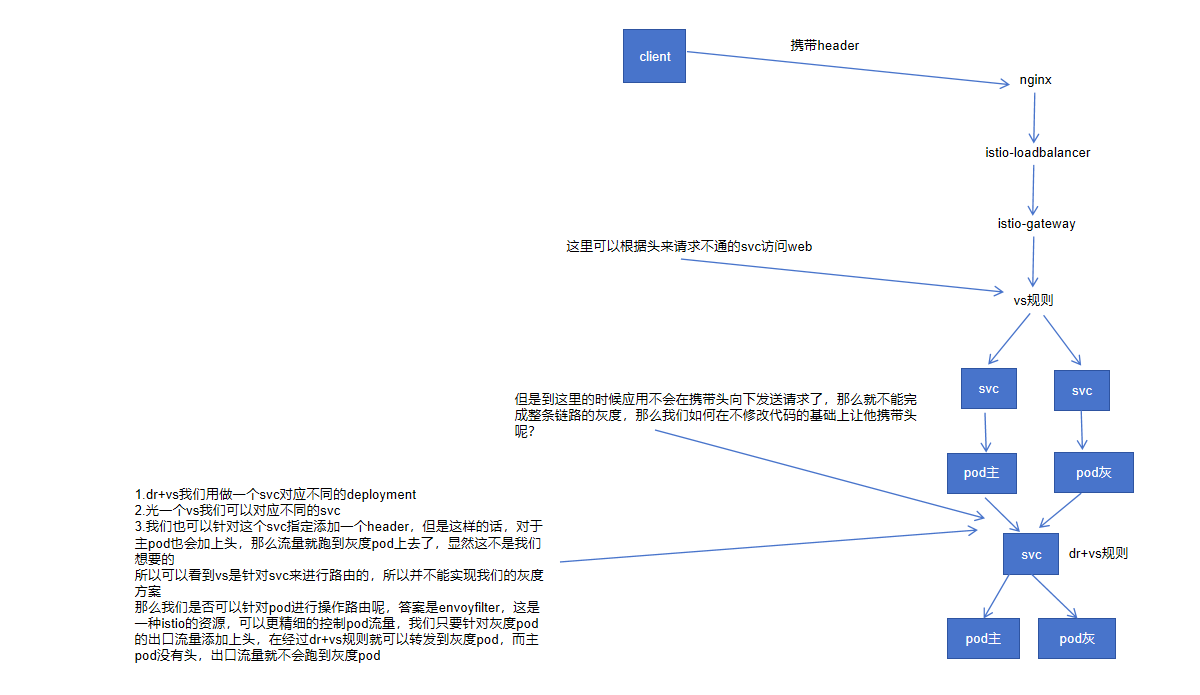
具体实现方式
第一步,安装istio,这里省略
第二步,查看istio的访问地址
[ec2-user@io-jumpserver ~]$ kubectl -n istio-system get svc
NAME                   TYPE           CLUSTER-IP       EXTERNAL-IP                                                                          PORT(S)                                                                        AGE
istio-egressgateway    ClusterIP      172.20.111.185   <none>                                                                               80/TCP,443/TCP                                                                 105d
istio-ingressgateway   LoadBalancer   172.20.28.204    k8s-istiosys-istioing-98f2d2f5fb-xxxxxx.xxxxx.com   15021:30605/TCP,80:31071/TCP,443:32172/TCP,31400:30838/TCP,15443:32000/TCP     105d
第三步,nginx反代,这里一定要注意有些nginx版本比较老需要加 proxy_http_version 1.1这个参数才可以
[root@io-doex-nginx conf.d]# cat gray.doex.io.conf
server {
    listen 80;
    server_name gray-xxxxxx;
    access_log /var/log/nginx/gray-access.log;
    error_log /var/log/nginx/gray-error.log;
    location / {
     proxy_set_header X-Real-IP $remote_addr;
     proxy_set_header X-Forwarded-For $proxy_add_x_forwarded_for;
     proxy_http_version 1.1;
     resolver 10.31.0.2 valid=10s;
     set $backend "http://k8s-istiosys-istioing-xxxx.com";
     proxy_pass $backend;
     proxy_set_header Host $http_host;
    }
}
server {
    listen 443  ssl;
    client_max_body_size 160m;
    ssl_certificate xxx.crt;
    ssl_certificate_key  /xxx.key;
    ssl_stapling                            on;
    ssl_stapling_verify                     on;
    server_name gray-www.doex.io;
    location / {
     proxy_set_header X-Real-IP $remote_addr;
     proxy_set_header X-Forwarded-For $proxy_add_x_forwarded_for;
     proxy_http_version 1.1;
     resolver 10.31.0.2 valid=10s;
     set $backend "http://k8s-istiosys-istioing-9xxxx.com";
     proxy_pass $backend;
     proxy_set_header Host $http_host;
    }
}
第四步,创建istio网关,意思是xxx名称空间下的所有域名都可以走这个网关
apiVersion: networking.istio.io/v1beta1
kind: Gateway
metadata:
  name: xxx-gateway
  namespace: xxx
spec:
  selector:
    istio: ingressgateway
  servers:
  - hosts:
    - '*'
    port:
      name: http
      number: 80
      protocol: HTTP
第五步,创建相应的vs规则(针对对外网提供服务的应用)
意思是如果携带头myheader: gray-sim1并且匹配到相应的路由的时候那么就访问host对应的svc
这里需要注意的是如果/v/和/都需要匹配的时候/v/一定要在/前面,匹配顺序是从上往下
apiVersion: networking.istio.io/v1beta1
kind: VirtualService
metadata:
  name: gray-wwww.xxx-web-all
  namespace: xxx
spec:
  gateways:
  - xxx-gateway
  hosts:
  - gray-xxxx
  http:
  - match:
    - headers:
        myheader:
          exact: gray-sim1
      uri:
        prefix: /v/
    route:
    - destination:
        host: xxxx-svc
        port:
          number: 80
  - match:
    - headers:
        myheader:
          exact: gray-sim1
      uri:
        prefix: /
    route:
    - destination:
        host: xxx-svc
        port:
          number: 80
第六步,创建dr+vs规则(针对于内网服务)
dr规则如下,将xxx-svc分割成2个子服务(subset)
apiVersion: networking.istio.io/v1beta1
kind: DestinationRule
metadata:
  name: xxxx-gray-sim1
  namespace: xxx
spec:
  host: xxx-svc
  subsets:
  - labels:
      app: xxx
      gray: "0"
    name: xxx
  - labels:
      app: xxx
      gray: gray-sim1
    name: xxxx-gray-sim1
vs规则如下,通过dr切分出来的subset进行流量分发
apiVersion: networking.istio.io/v1beta1
kind: VirtualService
metadata:
  name: xxx-gray-sim1
  namespace: xxx
spec:
  hosts:
  - xxx-svc
  http:
  - match:
    - headers:
        myheader:
          exact: gray-sim1
    route:
    - destination:
        host: xxxx
        subset: xxx-gray-sim1
  - route:
    - destination:
        host: xxx
        subset: xxx
第七步,根据pod进行加header操作,envoyfilter
我们通过workloadSelector来关联相关的pod,然后通过lua脚本来对指定的pod在出流量的时候加上请求头myheader,这样的话通过dr+vs规则联合起来就可以实现灰度到指定的服务:
apiVersion: networking.istio.io/v1alpha3
kind: EnvoyFilter
metadata:
  name:xxxx-gray-sim1
  namespace: xxx
spec:
  configPatches:
  - applyTo: HTTP_FILTER
    match:
      context: SIDECAR_OUTBOUND
      listener:
        filterChain:
          filter:
            name: envoy.filters.network.http_connection_manager
            subFilter:
              name: envoy.filters.http.router
    patch:
      operation: INSERT_BEFORE
      value:
        name: envoy.filters.http.lua
        typed_config:
          '@type': type.googleapis.com/envoy.extensions.filters.http.lua.v3.Lua
          inlineCode: |
            function envoy_on_request(request_handle)
              local value = os.getenv("GRAY_HEADER") or "gray-sim1"
              request_handle:headers():add("myheader",value)
            end
  workloadSelector:
    labels:
      app: xxx
      gray: gray-sim1
serviceentry可以把集群外部的服务加入到istio网格里
如果pod访问一个集群外部的服务,那么默么kiali显示的是
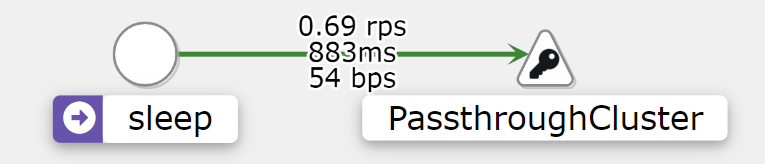
如果创建serviceentry把集群外部服务加入进来,那么kiali将会显示
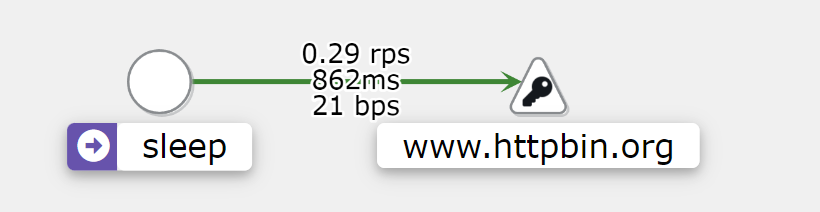
apiVersion: networking.istio.io/v1alpha3
kind: ServiceEntry
metadata:
  name: external-svc-entry
spec:
  hosts:
  - www.httpbin.org
  addresses:
  - 1.1.1.1
  ports:
  - number: 443
    name: https
    protocol: HTTPS
  - number: 80
    name: http
    protocol: HTTP
  location: MESH_EXTERNAL
  resolution: DNS    #DNS|STATIC
  #endpoints:
  #- address: 203.0.113.10
  #  ports:
  #    https: 443
  exportTo:
  - .
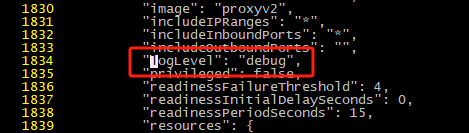
如果要修改istio-proxy代理的日志级别,默认是warning,有两种方式
第一种方式:针对pod修改
1.可以在部署清单文件的时候修改
  template:
    metadata:
      annotations:
        "sidecar.istio.io/logLevel": debug # 可选: trace, debug, info, warning, error, critical, off
2.可以在running的pod中修改
[root@localhost ~]# istioctl proxy-config log --help
Usage:
  istioctl proxy-config log [<type>/]<name>[.<namespace>] [flags]

Aliases:
  log, o

Examples:
  # Retrieve information about logging levels for a given pod from Envoy.
  istioctl proxy-config log <pod-name[.namespace]>

  # Update levels of the all loggers
  istioctl proxy-config log <pod-name[.namespace]> --level none

  # Update levels of the specified loggers.
  istioctl proxy-config log <pod-name[.namespace]> --level http:debug,redis:debug

  # Reset levels of all the loggers to default value (warning).
  istioctl proxy-config log <pod-name[.namespace]> -r
第二种方式:针对全局修改
kubectl -n istio-system edit configmap istio-sidecar-injector
#大概在1834行,原来是warning,修改为debug即可