keepalived+haproxy+apache 实现负载均衡与高可用
2023-04-20 17:36 @学无止境 阅读(51) 评论(0) 编辑 收藏 举报参考体系结构

1、在两台HAProxy服务器上安装Haproxy和keepalived
yum -y install keepalived haproxy
2、修改配置文件:/etc/haproxy/haproxy.cfg
cp /etc/haproxy/haproxy /etc/haproxy/haproxy.cfg.bak
vim /etc/haproxy/haproxy.cfg
#---------------------------------------------------------------------
# Example configuration for a possible web application.  See the
# full configuration options online.
#
#   http://haproxy.1wt.eu/download/1.4/doc/configuration.txt
#
#---------------------------------------------------------------------

#---------------------------------------------------------------------
# Global settings
#---------------------------------------------------------------------
global
    # to have these messages end up in /var/log/haproxy.log you will
    # need to:
    #
    # 1) configure syslog to accept network log events.  This is done
    #    by adding the '-r' option to the SYSLOGD_OPTIONS in
    #    /etc/sysconfig/syslog
    #
    # 2) configure local2 events to go to the /var/log/haproxy.log
    #   file. A line like the following can be added to
    #   /etc/sysconfig/syslog
    #
    #    local2.*                       /var/log/haproxy.log
    #
    log         127.0.0.1 local2

    chroot      /var/lib/haproxy
    pidfile     /var/run/haproxy.pid
    maxconn     4000
    user        haproxy
    group       haproxy
    daemon

    # turn on stats unix socket
    stats socket /var/lib/haproxy/stats


#---------------------------------------------------------------------
# common defaults that all the 'listen' and 'backend' sections will
# use if not designated in their block
#---------------------------------------------------------------------
defaults
    mode                    http
    log                     global
    option                  httplog
    option                  dontlognull
    option http-server-close
    option forwardfor       except 127.0.0.0/8
    option                  redispatch
    retries                 3
    timeout http-request    10s
    timeout queue           1m
    timeout connect         10s
    timeout client          1m
    timeout server          1m
    timeout http-keep-alive 10s
    timeout check           10s
    maxconn                 3000

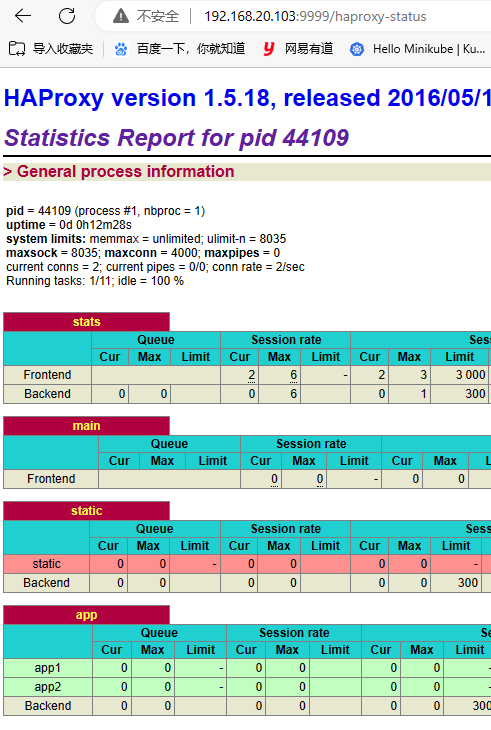
listen stats
    mode http
    bind 0.0.0.0:9999
    stats enable
    log global
    stats uri /haproxy-status
    stats auth admin:123456


#---------------------------------------------------------------------
# main frontend which proxys to the backends
#---------------------------------------------------------------------
frontend  main *:8080
    acl url_static       path_beg       -i /static /images /javascript /stylesheets
    acl url_static       path_end       -i .jpg .gif .png .css .js

    use_backend static          if url_static
    default_backend             app

#---------------------------------------------------------------------
# static backend for serving up images, stylesheets and such
#---------------------------------------------------------------------
backend static
    balance     roundrobin
    server      static 127.0.0.1:4331 check

#---------------------------------------------------------------------
# round robin balancing between the various backends
#---------------------------------------------------------------------
backend app
    balance     roundrobin
    server  app1 192.168.20.101:9000 check
    server  app2 192.168.20.102:9000 check
#    server  app3 127.0.0.1:5003 check
#    server  app4 127.0.0.1:5004 check
3、检测配置文件并启动Haproxy
haproxy -c -f /etc/haproxy/haproxy.cfg
systemctl start haproxy
chkconfig haproxy on
4、修改keepalived 配置文件 /etc/keepalived/keepalived.conf
global_defs {
   notification_email {
        root@localhost
   }
   #notification_email_from keepalived@localhost
   #smtp_server 127.0.0.1
   #smtp_connect_timeout 30
   #router_id haproxy1
}


vrrp_instance ha1 {
    state MASTER
    interface ens33
    virtual_router_id 55
    priority 100
    advert_int 1
    authentication {
        auth_type PASS
        auth_pass 1111
    }
    virtual_ipaddress {
        192.168.20.103
    }
    track_script{
         check_haproxy
    }
}

vrrp_script check_haproxy {
        script "/etc/keepalived/check_haproxy.sh"
        interval 2
        weight 2
}
check_haproxy.sh
#!/bin/bash
A=`ps -C haproxy --no-header |wc -l`
if [ $A -eq 0 ];then
/etc/init.d/keepalived stop
fi
备keepalived.conf只须修改 priority 90

5、在两台webapp服务器上安装并配置apache服务
可参考 lvs+keepalived+apache 实现负载均衡与高可用 - @学无止境 - 博客园 (cnblogs.com)
6、通过网页访问


7、访问统计页面

参考:https://blog.51cto.com/gdutcxh/2109401

