

PyTorch in Action: A Step by Step Tutorial
PyTorch in Action: A Step by Step Tutorial
Installation Guide
Step 1, donwload the Miniconda and installing it on your computer.
The reason why explain installing conda is that some of classmates don`t have a conda environment on their computer.
https://mirrors.tuna.tsinghua.edu.cn/anaconda/miniconda/
Step 2, create a conda virtual envriomment
In this ariticle, we assume that there is a CPU version of PyTorch is going to be installed. To specifically distinguish CPU version and GPU version, we`re going to create a virtual environment named "PyTorch-CPU".
In the Conda Prompt run the following commands:
conda create -n PyTorch-CPU pip
Step 3, install PyTorch
On the website of PyTorch(https://pytorch.org/), there is a guidance on the page. To chose the most appropriate options(e.g. as the follow figure).
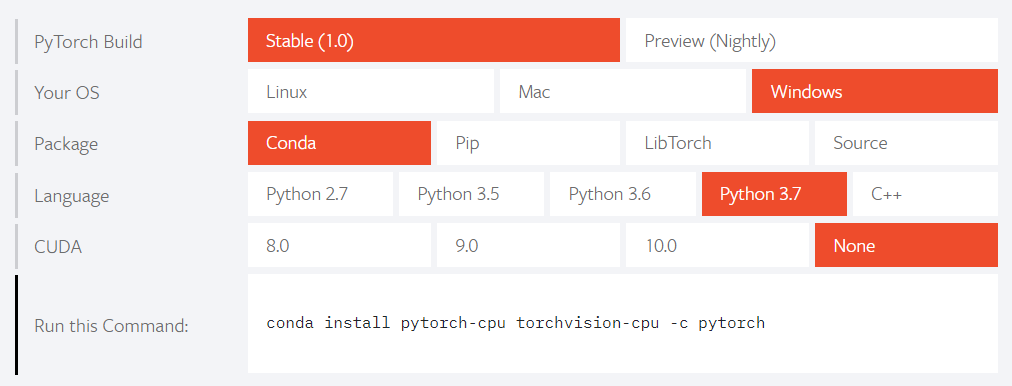
In the Conda Prompt run the following commands:
activate PyTorh-CPU
conda install pytorch-cpu torchvision-cpu -c pytorch
Congratulations, installation of PyTorch is complete!
Data Processing
Before we start ours building. We have to access the dataset and clean it.
Here we have accessed 西瓜数据集3.0. And we convert the character-described features to numeric.
# encoding:utf8
# 西瓜3.0 数据集

waterMelons = [
    # 1
    ['青绿', '蜷缩', '浊响', '清晰', '凹陷', '硬滑', '好瓜'],
    # 2
    ['乌黑', '蜷缩', '沉闷', '清晰', '凹陷', '硬滑', '好瓜'],
    # 3
    ['乌黑', '蜷缩', '浊响', '清晰', '凹陷', '硬滑', '好瓜'],
    # 4
    ['青绿', '蜷缩', '沉闷', '清晰', '凹陷', '硬滑', '好瓜'],
    # 5
    ['浅白', '蜷缩', '浊响', '清晰', '凹陷', '硬滑', '好瓜'],
    # 6
    ['青绿', '稍蜷', '浊响', '清晰', '稍凹', '软粘', '好瓜'],
    # 7
    ['乌黑', '稍蜷', '浊响', '稍糊', '稍凹', '软粘', '好瓜'],
    # 8
    ['乌黑', '稍蜷', '浊响', '清晰', '稍凹', '硬滑', '好瓜'],
    # 9
    ['乌黑', '稍蜷', '沉闷', '稍糊', '稍凹', '硬滑', '坏瓜'],
    # 10
    ['青绿', '硬挺', '清脆', '清晰', '平坦', '软粘', '坏瓜'],
    # 11
    ['浅白', '硬挺', '清脆', '模糊', '平坦', '硬滑', '坏瓜'],
    # 12
    ['浅白', '蜷缩', '浊响', '模糊', '平坦', '软粘', '坏瓜'],
    # 13
    ['青绿', '稍蜷', '浊响', '稍糊', '凹陷', '硬滑', '坏瓜'],
    # 14
    ['浅白', '稍蜷', '沉闷', '稍糊', '凹陷', '硬滑', '坏瓜'],
    # 15
    ['乌黑', '稍蜷', '浊响', '清晰', '稍凹', '软粘', '坏瓜'],
    # 16
    ['浅白', '蜷缩', '浊响', '模糊', '平坦', '硬滑', '坏瓜'],
    # 17
    ['青绿', '蜷缩', '沉闷', '稍糊', '稍凹', '硬滑', '坏瓜']
]

features = list() # [[青绿, 乌黑, 浅白], [蜷缩, 硬挺...], ...]


def numeric(data):
    l = list()
    for i,s in enumerate(data):
        val = features[i].index(s)
        l.append(val)
    return l


if __name__ == '__main__':
    for melon in waterMelons:
        for i, feature in enumerate(melon):
            try:
                if feature not in features[i]:
                    features[i].append(feature)
            except IndexError:
                features.append([feature])

    f = open('data/WaterMelon.txt', encoding='utf8', mode='w')
    for melon in waterMelons:
        val = numeric(melon)
        f.write("%s\n" % val)
Your first Neural Network with PyTorch
Here we implement a neural network with input layer and log softmax layer.
There are 12 parameters need to be trained:
# encoding:utf8

import torch
from sklearn.model_selection import train_test_split


class Model(torch.nn.Module):
    def __init__(self):
        super(Model, self).__init__()
        self.layer = torch.nn.Linear(6, 2)
        self.softmax = torch.nn.LogSoftmax(dim=1)

    def forward(self, x):
        out = self.layer(x)
        out = self.softmax(out)
        return out


if __name__ == '__main__':
    x, y = list(), list()
    with open('data/WaterMelon.txt', encoding='utf8') as f:
        for line in f:
            l = eval(line.strip())
            x.append(l[:-1])
            y.append(l[-1])

    x_train, x_test, y_train, y_test = train_test_split(x, y, test_size=0.25, random_state=33)
    x_train, x_test, y_train, y_test = torch.Tensor(x_train), torch.Tensor(x_test), torch.Tensor(y_train).long(), torch.Tensor(y_test).long()

    model = Model()
    optimizer = torch.optim.SGD(model.parameters(), lr=0.01)
    criticism = torch.nn.CrossEntropyLoss()

    # train
    for epoch in range(500):
        out = model(x_train)
        loss = criticism(out, y_train)
        optimizer.zero_grad()
        loss.backward()
        optimizer.step()

    # test
    y_pred = model(x_test)
    _, predicted = torch.max(y_pred, 1)
    acc = torch.sum(y_test == predicted ).numpy() / len(x_test)
    print(acc)
We got the accuracy 0.8, sometimes we got 1.
LOL!


【推荐】国内首个AI IDE,深度理解中文开发场景,立即下载体验Trae
【推荐】编程新体验,更懂你的AI,立即体验豆包MarsCode编程助手
【推荐】抖音旗下AI助手豆包,你的智能百科全书,全免费不限次数
【推荐】轻量又高性能的 SSH 工具 IShell:AI 加持,快人一步
· 从 HTTP 原因短语缺失研究 HTTP/2 和 HTTP/3 的设计差异
· AI与.NET技术实操系列:向量存储与相似性搜索在 .NET 中的实现
· 基于Microsoft.Extensions.AI核心库实现RAG应用
· Linux系列:如何用heaptrack跟踪.NET程序的非托管内存泄露
· 开发者必知的日志记录最佳实践
· winform 绘制太阳,地球,月球 运作规律
· AI与.NET技术实操系列(五):向量存储与相似性搜索在 .NET 中的实现
· 超详细:普通电脑也行Windows部署deepseek R1训练数据并当服务器共享给他人
· 【硬核科普】Trae如何「偷看」你的代码?零基础破解AI编程运行原理
· 上周热点回顾(3.3-3.9)