PyQt5Day14--输入控件QLineEdit纯文本输入
1、QLineEdit介绍
是一个单行文本编辑器;
允许用户输入和编辑单行纯文本;
自带一组编辑功能:撤销、重做、剪切、粘贴、拖放;
继承于QWidget
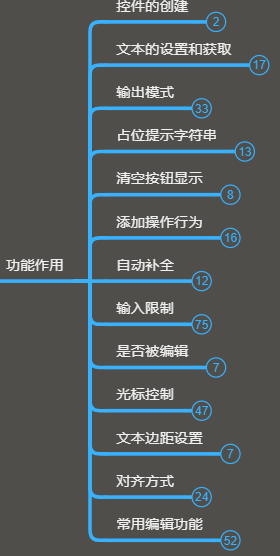

2、控件的创建、文本的设置和获取
(1)框架


(2)功能操作和案例

 1 import sys
 2 from PyQt5.Qt import *
 3
 4 app=QApplication(sys.argv)
 5
 6 window=QWidget()
 7 window.setWindowTitle("QLineEdit")
 8 window.resize(500,500)
 9
10 # le = QLineEdit(window)
11 le = QLineEdit('用户',window) # 文本框里显示“用户”
12
13 # 文本的设置和获取
14 le.setText('哈哈')
15 le.insert('18')  # 在光标处插入
16 print(le.text()) # 获取
17
18 btn = QPushButton(window)
19 btn.setText('按钮')
20 btn.move(100,100)
21 # btn.pressed.connect(lambda :le.insert('明天'))
22 # btn.pressed.connect(lambda :print(le.text()))
23 btn.pressed.connect(lambda :print(le.displayText())) # 获取显示的内容
24
25 window.show()
26 sys.exit(app.exec_())

 1 import sys
 2 from PyQt5.Qt import *
 3
 4 app=QApplication(sys.argv)
 5
 6 window=QWidget()
 7 window.setWindowTitle("QLineEdit")
 8 window.resize(500,500)
 9
10 le_a = QLineEdit(window)
11 le_a.move(100,50)
12
13 le_b = QLineEdit(window)
14 le_b.move(100,100)
15
16 copy_btn = QPushButton(window)
17 copy_btn.setText("复制")
18 copy_btn.move(100,150)
19 copy_btn.pressed.connect(lambda :le_b.setText(le_a.text()))
20
21 window.show()
22 sys.exit(app.exec_())
3、输出模式
(1)框架

(2)功能操作

 1 # *******************输出模式**********************开始
 2 import sys
 3 from PyQt5.Qt import *
 4
 5 app=QApplication(sys.argv)
 6
 7 window=QWidget()
 8 window.setWindowTitle("输出模式")
 9 window.resize(500,500)
10
11 le_a = QLineEdit(window)
12 le_a.move(100,50)
13
14 le_b = QLineEdit(window)
15 le_b.move(100,100)
16
17 # le_b.setEchoMode(QLineEdit.NoEcho)  # 正常输入,但不显示
18 # le_b.setEchoMode(QLineEdit.Normal)  # 默认显示
19 # le_b.setEchoMode(QLineEdit.Password)  # 密文模式
20 le_b.setEchoMode(QLineEdit.PasswordEchoOnEdit)  # 编辑时明文,结束时密文
21
22 window.show()
23 sys.exit(app.exec_())
24 # *******************输出模式**********************结束
(3)案例:模拟用户登录
创建一个窗口,添加两文本框和一个按钮;
一个用作账号,一个用作密码;
点击登录按钮,获取账号和密码信息;
进行比对账号密码信息;

  1 # *********登录案例***********begin
  2 from PyQt5.Qt import *
  3
  4 class AccountTool:
  5     ACCOUNT_ERROR = 1
  6     PWD_ERROR = 2
  7     SUCCESS = 3
  8     @staticmethod
  9     def check_login(account,pwd):
 10         if account != 'XB':
 11             return AccountTool.ACCOUNT_ERROR
 12         if pwd != 'likeit123':
 13             return AccountTool.PWD_ERROR
 14         return AccountTool.SUCCESS
 15
 16 class Window(QWidget):
 17     def __init__(self):
 18         super().__init__()
 19         self.setWindowTitle("登录案例")
 20         self.resize(500, 500)
 21         self.setMinimumSize(400,400)  # 设置窗口的最小尺寸
 22         self.setMaximumSize(800,800)  # 设置窗口的最大尺寸
 23         self.setup_ui()
 24
 25     def setup_ui(self):
 26         # 添加三个控件
 27         self.account_le = QLineEdit(self)
 28         self.pwd_le = QLineEdit(self)
 29         self.pwd_le.setEchoMode(QLineEdit.Password)
 30         self.login_btn = QPushButton(self)
 31         self.login_btn.setText('登录')
 32
 33         # 添加两个标签
 34         self.label1 = QLabel(self)
 35         self.label1.setText('账号输入错误')
 36         self.label2 = QLabel(self)
 37         self.label2.setText('密码输入错误')
 38
 39         # 设置标签默认不可见
 40         self.label1.setVisible(False)
 41         self.label2.setVisible(False)
 42
 43         # 如没有输入账号,登录按钮不可用
 44         self.login_btn.setEnabled(False)
 45
 46         self.account_le.textChanged.connect(self.text_change)
 47
 48         self.login_btn.clicked.connect(self.login_cao)
 49
 50     def text_change(self,text):
 51         self.login_btn.setEnabled(len(text) > 0)
 52
 53     def login_cao(self):
 54         # print('xxx',self)
 55         # 获取账号和密码信息
 56         account = self.account_le.text().upper()
 57         pwd = self.pwd_le.text()
 58
 59         state = AccountTool.check_login(account,pwd)
 60         if state == AccountTool.ACCOUNT_ERROR:
 61             print('账号错误')
 62             self.label1.setVisible(True)
 63             self.account_le.setText('')
 64             self.pwd_le.setText('')
 65             self.account_le.setFocus()  # 设置获取焦点
 66             return None
 67         if state == AccountTool.PWD_ERROR:
 68             print('密码错误')
 69             self.label2.setVisible(True)
 70             self.pwd_le.setText('')
 71             self.pwd_le.setFocus()  # 设置获取焦点
 72             return None
 73         if state == AccountTool.SUCCESS:
 74             print('登陆成功')
 75
 76
 77     def resizeEvent(self, evt):
 78         widget_w = 150
 79         widget_h = 40
 80         margin = 60
 81         label_h = 10
 82
 83         self.account_le.resize(widget_w,widget_h)
 84         self.pwd_le.resize(widget_w,widget_h)
 85         self.login_btn.resize(widget_w,widget_h)
 86         # 标签大小
 87         self.label1.resize(widget_w,widget_h)
 88         self.label2.resize(widget_w,widget_h)
 89
 90         x = (self.width() - widget_w)/2
 91
 92         self.account_le.move(x,self.height()/4)
 93         self.pwd_le.move(x,self.account_le.y()+widget_h+margin)
 94         self.login_btn.move(x,self.pwd_le.y()+widget_h+margin)
 95         # 标签位置
 96         self.label1.move(x,self.account_le.y()+widget_h+label_h)
 97         self.label2.move(x,self.pwd_le.y()+widget_h+label_h)
 98
 99 if __name__ == '__main__':
100     import sys
101
102     app=QApplication(sys.argv)
103
104     window=Window()
105     window.show()
106     sys.exit(app.exec_())
107 # *********登录案例***********end
4.占位提示字符串
(1)框架
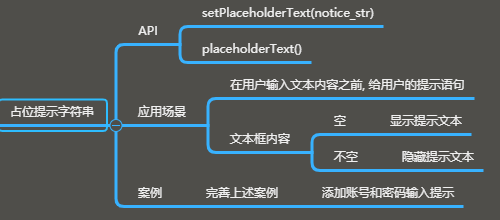
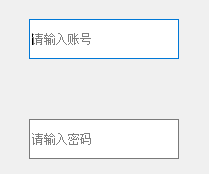
(2)功能操作与结果展示
1 # 占位文本的提示
2 self.account_le.setPlaceholderText("请输入账号")
3 self.pwd_le.setPlaceholderText("请输入密码")
5、清空按钮显示
(1)框架‘’

(2)功能操作及结果显示
# 设置密码文本框,自动现实是清空按钮
self.pwd_le.setClearButtonEnabled(True)

6、添加操作行为
(1)框架
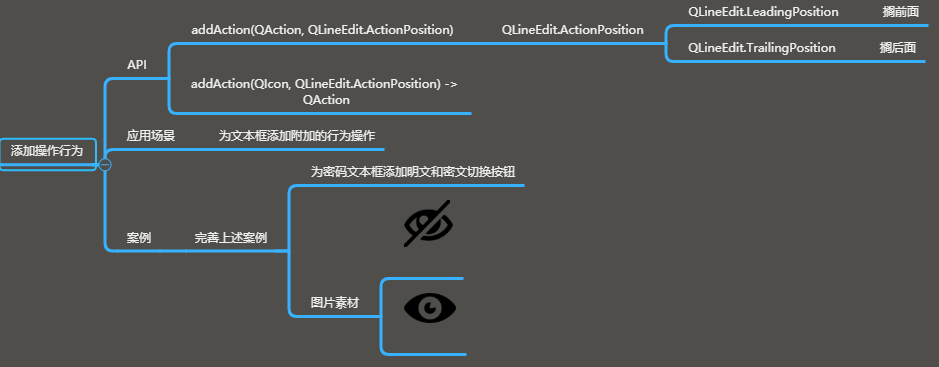
(2)功能操作及结果显示
 1 # 添加自定义行为操作(明文和密文切换)
 2         action = QAction(self.pwd_le)
 3         action.setIcon(QIcon('close.png'))
 4
 5         def change():
 6             print('改变明文和密文')
 7             if self.pwd_le.echoMode() == QLineEdit.Normal: # 判断输出模式
 8                 self.pwd_le.setEchoMode(QLineEdit.Password)
 9                 action.setIcon(QIcon('close.png'))
10             else:
11                 self.pwd_le.setEchoMode(QLineEdit.Normal)
12                 action.setIcon(QIcon('open.png'))
13
14         action.triggered.connect(change)
15
16         self.pwd_le.addAction(action,QLineEdit.TrailingPosition) # 添加在末尾处
17         # self.pwd_le.addAction(action,QLineEdit.LeadingPosition) # 添加在开

7、自动补全
(1)框架

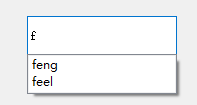
(2)功能操作及结果展示
1 # 自动补全
2 completer = QCompleter(['xb','feng','xing','feel'],self.account_le)
3 self.account_le.setCompleter(completer)
8、输入限制
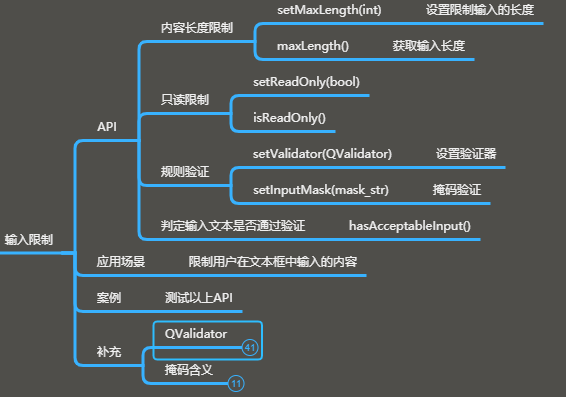
(1)框架

(2)功能操作及结果展示
①长度限制与只读限制
1 # 最大长度限制
2 le_a.setMaxLength(5)
3 print(le_a.maxLength())
4
5 # 只读限制
6 le_a.setReadOnly(True)
7 le_a.setText("王炸,要不起!")

② 验证器
 1 # *******************验证器的使用**********************开始
 2 from PyQt5.Qt import *
 3
 4 class AgeValidator(QValidator):
 5     def validate(self, input_str, pos_int):
 6         print(input_str,pos_int)
 7         # 判定字符串,应该全部都是由一些数字组成
 8         try:
 9             if 18 <= int(input_str) <= 180:
10                 return (QValidator.Acceptable,input_str,pos_int) # 验证通过
11             elif 1 <= int(input_str) <= 17:
12                 return (QValidator.Intermediate,input_str, pos_int) # 暂时不判断
13             else:
14                 return (QValidator.Invalid, input_str, pos_int) # 验证不通过
15         except:
16             if len(input_str) == 0:
17                 return (QValidator.Intermediate, input_str, pos_int)
18             return (QValidator.Invalid,input_str,pos_int)
19
20     def fixup(self, p_str):
21         print('xxx',p_str)
22         try:
23             if int(p_str) <18:
24                 return '18'
25             return '180'
26         except:
27             return '18'
28
29 class MyValidator(QIntValidator):
30     def fixup(self, p_str):
31         if len(p_str) == 0 or int(p_str) < 18:
32             return '18'
33         return '180'
34
35
36 class Window(QWidget):
37     def __init__(self):
38         super().__init__()
39         self.setWindowTitle("验证器的使用")
40         self.resize(500, 500)
41         self.setup_ui()
42
43     def setup_ui(self):
44         le = QLineEdit(self)
45         le.move(100,100)
46
47         le2 = QLineEdit(self)
48         le2.move(200,200)
49
50         # 只能输入18 - 180才能显示
51         # 法一
52         # validator = AgeValidator()
53
54         # 法二
55         validator = MyValidator(18,180)
56
57         le.setValidator(validator)
58
59 if __name__ == '__main__':
60     import sys
61
62     app=QApplication(sys.argv)
63
64     window=Window()
65     window.show()
66     sys.exit(app.exec_())
67 # *******************验证器的使用**********************结束
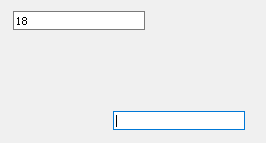
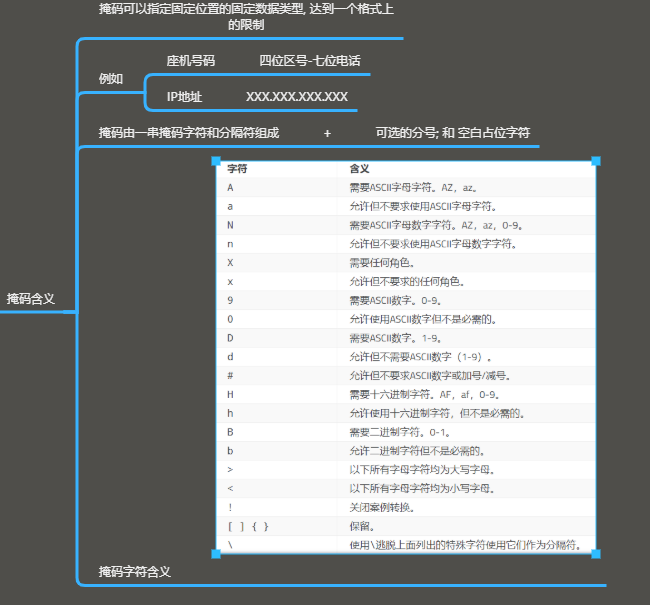
③ 掩码
1 # le_b 设置掩码
2 # 总共输入5位, 左边2(必须是大写字母)- 右边2(必须是数字)
3 le_b.setInputMask(">AA-99;#") # 改为#,默认是空格

9、是否被编辑
(1)框架
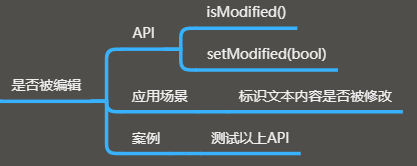
(2)功能操作与展示
1  print(le_b.isModified())  # 文本未编辑:False  编辑后:True
2  le_b.setModified(False)
10、光标控制
(1)框架

(2)功能操作及展示
 1 le.cursorBackward(False,2) # 光标向左2个字符且不选中
 2 le.cursorBackward(True,2) # 光标向左2个字符且选中
 3 le.cursorForward(True,2) # 光标向右2个字符且选中
 4 le.cursorWordBackward(True) # 向左移动一个单词(空格区分)
 5 le.cursorWordForward(True) # 向右移动一个单词(空格区分)
 6 le.home(True)  # 光标移到开头并选中
 7 le.end(False) # 光标移到末尾且不选中
 8 le.setCursorPosition(len(le.text())/2) # 设置光标位置
 9 print(le.cursorPosition())
10 print(le.cursorPositionAt(QPoint(55,5))) # 获取指定坐标位置对应文本光标位置
11 le.setFocus() # 焦点,方便观察上述操作
11、文本边距设置
(1)框架
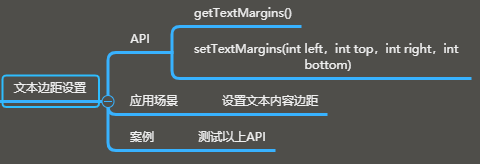
(2)功能操作及展示
1 le = QLineEdit(window)
2 le.move(100,100)
3 le.resize(300,300)
4 # le.setContentsMargins(100,0,0,0) # 内容外边距
5 le.setStyleSheet('background-color:cyan')
6 le.setTextMargins(100,200,0,0) # 设置文本外边距(可视区域内移动文本)
12、对齐方式
(1)框架
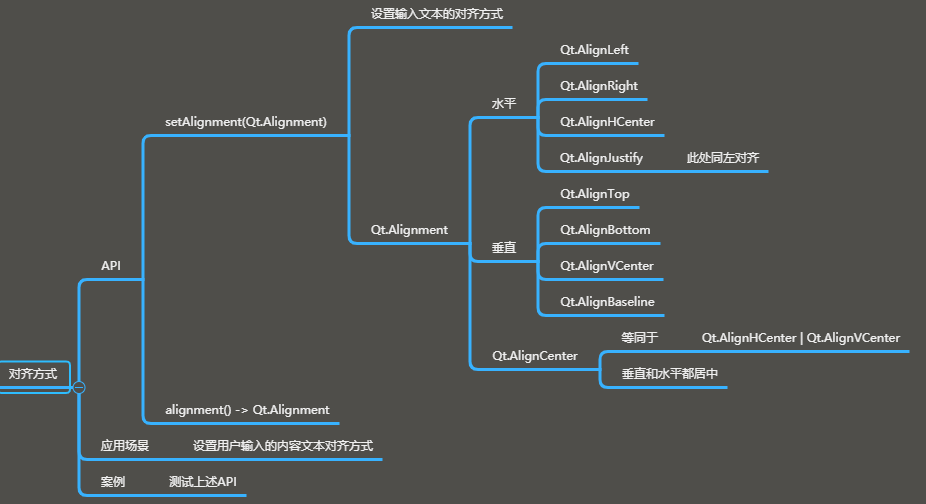
(2)功能操作及展示
1 # 文本水平靠右,垂直方向靠下
2  le.setAlignment(Qt.AlignRight | Qt.AlignBottom)
3 # 文本水平居中
4 le.setAlignment(Qt.AlignCenter)
13、常用编辑功能
(1)框架

(2)功能操作及展示
① 退格、删除、清空、复制、剪切、粘贴、撤销、拖放
 1 # le.backspace() # 删除
 2 # le.del_()  # 删除选中文本或删除光标右侧的一个字符
 3 # le.clear()  #
 4 le.cursorBackward(True,3)
 5 # le.copy()                   # 复制
 6 le.cut()                    # 剪切
 7 le.setCursorPosition(0)
 8 le.paste()                  # 粘贴
 9
10 le.setFocus() # 焦点,方便观察上述操作
11
12 le.setDragEnabled(True)  # 支持拖拽
① 文本选中
1 # le.setSelection(2,10) # 选中第2个字符到第10个字符
2 le.selectAll()  # 等同于  le.setSelection(0,len(le.text()))
3 # le.deselect()  # 取消选中
4 print(le.hasSelectedText()) # 判断是否选中
5 print(le.selectedText())  # 获取选中的内容
6 print(le.selectionStart()) # 获取选中的开始位置
7 print(le.selectionEnd()) # 获取选中的末尾位置
8 print(le.selectionLength()) # 获取选中的长度
14.信号
(1)框架
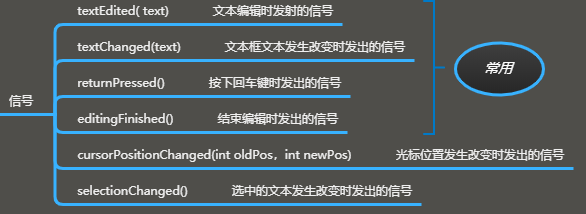
(2)信号操作及显示
 1 # *******************信号**********************开始
 2 import sys
 3 from PyQt5.Qt import *
 4
 5 app=QApplication(sys.argv)
 6
 7 window=QWidget()
 8 window.setWindowTitle("信号")
 9 window.resize(500,500)
10
11 le = QLineEdit(window)
12 le.move(200,50)
13 le.resize(100,100)
14
15 le1 = QLineEdit(window)
16 le1.move(200,300)
17
18 le.textEdited.connect(lambda val:print('文本框编辑的时候:',val)) # 指用户编辑的时候
19 le.textChanged.connect(lambda val:print('文本框内容发生改变的时候:',val)) # 无论用户还是开发者,都发生
20 # le.returnPressed.connect(lambda :le1.setFocus()) # 切换焦点到文本框le1中
21 # le.editingFinished.connect(lambda :print('结束编辑'))
22 le.cursorPositionChanged.connect(lambda old_Pos, new_Pos:print(old_Pos,new_Pos)) # 监听光标的移动位置
23 le.selectionChanged.connect(lambda :print("选中文本发生改变",le.selectedText()))
24
25 window.show()
26 sys.exit(app.exec_())
27 # *******************信号**********************结束


