httpd.2.4 配置文件相关指令详解
1、Listen指令 及 PidFile 指令
Listen指令是为了设置监听套接字 。PidFile指令是为了指定httpd的PidFile文件。
语法:Listen [IP-address:]portnumber [protocol]
语法2:PidFile filename
Listen 80      # 设置侦听端口
Listen 127.0.0.1:80    # 设置侦听ip 及 端口
Listen 192.168.4.150:8000
Listen  192.168.4.150:8443  https    # 侦听 ip 192.168.4.150 8443端口 https 协议

<IfModule !mpm_netware_module>
    PidFile "/var/run/httpd/httpd.pid"    # 指定PidFile文件为 /var/run/httpd/httpd.pid
</IfModule>
2、ServerRoot指令
该指令设置httpd的安装位置,编译安装时可通过"--prefix"选项指定,如--prefix=/usr/local/apache  ;
不建议安装完成后,变更不同的路径 :因为在配置文件中,部分指令路径是依赖该httpd的根路径的相对路径。

语法:ServerRoot directory-path
ServerRoot "/usr/local/apache" # httpd 安装目录
3、DocumentRoot 指令及根目录页面访问属性
指定server站点的根目录。使用rpm包安装的httpd的DocumentRoot默认值为"/var/www/html";编译安装的httpd时,其DocumentRoot默认为"$ServerRoot/htdocs"
语法:DocumentRoot directory-path
-
Options指令选项:
Indexes:缺少指定的页面时,允许将目录中的所有文件列举出来;除非是提供文件下载,否则出于安全考虑,这个选项是强烈建议关闭的
FollowSymLinks :允许跟随符号链接所指向的原始文件;出于安全考虑,这个选项建议关闭
ExecCGI:允许使用mod_cgi 模块执行CGI脚本
Includes:允许使用mod_include模块实现服务器端包含(SGI)
MultiViews:允许使用mod_negotiation实现内容协商
SymLinksIfOwnerMatch:在链接文件属主属组域原始文件属主属组相同时,允许跟随符号链接所指向的原始文件
-
AllowOverride 指令选项:用于控制是否读取".htaccess"配置文件。
all:启用AllowOverride特性
none:禁用AllowOverride特性。
AuthConfig:基于用户认证时设置该值,此时将可以使用AuthGroupFile, AuthName, AuthType, AuthUserFile,Require等认证相关指令。
FileInfo: 控制文档类型时使用该值,此时将可以使用ErrorDocument, SetHandler,以及一些URL重写的指令。
Indexes:控制目录索引时使用该值,此时可以使用AddIcon, DirectoryIndex。
Limit:是否允许使用order、allow、deny指令,这三个指令已经废弃,目前还存在是为了兼容老版本。
-
Require指令选项:实现对用户访问限制
Require all granted :所有用户允许访问
Require all dined :所有用户禁止访问
Require Valid-user :仅允许有效用户进行访问
Require user userid [userid] ... 仅允许userid用户进行访问
Require group Group-name [group-name] ... 仅允许Group-name组内用户进行访问
-
Order 指令: 实现对用户的访问限制
Order Allow,Deny # 定义权限,先允许 ,后拒绝 ;在规则中,若二者都匹配或二者都不匹配,则以Order 命令中的第二项为准;否则,则匹配到相关项为准
Allow From IP | network # 允许的ip 或 network
Deny From IP | network # 拒绝的ip 或 network
-
实现用户访问限制方法:以下两个选项二选一 ,不建议同时使用
1、Require all [ granted | dined ] 允许 或 拒绝 所有用户访问
2、通过Order 与 Allow 或Deny 的指令组合来实现。
DocumentRoot "/usr/local/apache/htdocs"
#指定server 站点的根目录 ,可改变该路径地址,实现把其他目录作为server根目录

<Directory "/usr/local/apache/htdocs">    #  定义目录属性
    Options Indexes FollowSymLinks
    # 配置目录中可用的功能,包括Indexes ,FollowSymLinks ,None ,All ,ExecCGI等

    AllowOverride None    # 不允许存在于.htaccess文件中的指令类型

    Require all granted | denied    # 允许或拒绝 所有用户访问

    Order allow,deny    # 先允许,在禁止 顺序匹配 ,定义限制用户
    Allow from IP | network
    Deny from IP | network

</Directory>
4、DirectoryIndex指令
httpd服务器端将DorectoryIndex指令所指定的文件响应给客户端。如访问 http://www.itwish.cn/ ,将自动把$Document下的index.html 文件内容返回给客户端 。
语法:DirectoryIndex disabled | local-url [local-url]
<IfModule dir_module>
    DirectoryIndex index.html index.php  /cgi-bin/index.pl
    #从左至右依次查找 ,先查找index.html 文件 ,若没有就查找index.php 文件 ,再没有就查找/cgi-bin/index.pl 文件

</IfModule>
5、Keepalive指令
KeepAlive指令用于开启和关闭持久连接功能。在没有开启持久连接时,客户端每请求一个资源都需重新建立一次TCP连接,而使用了持久连接后,客户端只需在最初请求一次TCP连接,之后就可以使用同一个TCP连接发送其他的http请求;但长连接自身的缺陷是会一直占用着连接不释放,所以必须得给出一个长连接的超时时间,这个超时时间由KeepAliveTimeout指令控制;还可以通过指令MaxKeepAliveRequests控制每个长连接下的TCP连接的能接受的最大请求数。无疑,这个值应该设置的大一些,设置为0表示无限制。
语法1:KeepAlive On|Off
语法2:KeepAliveTimeout num[ms]
语法3:MaxKeepAliveRequests number
[root@VM httpd]# vi /etc/httpd/httpd.conf
# Various default settings
Include /etc/httpd/extra/httpd-default.conf    # 启用扩展配置文件httpd-default.conf

[root@VM extra]# vi httpd-default.conf
KeepAlive On   # 启用HTTP持久连接功能
KeepAliveTimeout  5     # 关闭连接之前等待后续请求的秒数 ,通过添加ms的后缀,表示可设置为毫秒
MaxKeepAliveRequests 50    # 限制打开时每个连接允许的请求数,若为0 ,则不限制
6、DSO 动态共享库加载指令
Apache HTTP Server是一个模块化程序,管理员可以通过加载不同的模块组来选择要包含在服务器中的功能。在编译安装时,通过选项--enable-so 来加载DSO(动态共享对象)功能。通过LoadModule命令来实现关闭或开启功能模块 。
语法:LoadModule status_module "modules/mod_status.so"
[root@vm ~]# vi /etc/httpd/httpd.conf
#LoadModule mpm_event_module modules/mod_mpm_event.so
LoadModule mpm_prefork_module modules/mod_mpm_prefork.so
#LoadModule mpm_worker_module modules/mod_mpm_worker.so
LoadModule authn_file_module modules/mod_authn_file.so
#LoadModule authn_dbm_module modules/mod_authn_dbm.so
#LoadModule authn_anon_module modules/mod_authn_anon.so
#LoadModule authn_dbd_module modules/mod_authn_dbd.so
#LoadModule authn_socache_module modules/mod_authn_socache.so
LoadModule authn_core_module modules/mod_authn_core.so
LoadModule authz_host_module modules/mod_authz_host.so
LoadModule authz_groupfile_module modules/mod_authz_groupfile.so
LoadModule authz_user_module modules/mod_authz_user.so
7、MPM多道处理模块配置指令 及 Include 指令
Apache HTTP 服务器 2.0 扩展此模块化设计到最基本的 web 服务器功能,它提供了可以选择的多处理模块(MPM),可在编译时使用--with-mpm选项来决定apache的工作模式。MPM 很像其它 Apache httpd 模块,主要是区别是任何时间内必须有一个且只能有一个 MPM 模块需加载到服务器中,可用的MPM模块包括prefork ,event ,worker等。可以通过httpd -M命令列出apache的所有模块,查看相应其工作方式。
Include 指令是用于在httpd启动时,使用include指令来包含其他配置文件,在解析配置文件时会把主配置文件httpd.conf 与include 包含的文件进行配置合并 ,实现整体对 httpd 的配置调节。
语法:Include file-path|directory-path|wildcard
[root@vm ~]# vi /etc/httpd/httpd.conf
    LoadModule mpm_event_module modules/mod_mpm_event.so    # 手动加载的mod_mpm模块
    #LoadModule mpm_prefork_module modules/mod_mpm_prefork.so    # 若更改mpm_prefork或mpm_worker模块,其余两种模块行注释
    #LoadModule mpm_worker_module modules/mod_mpm_worker.so

# Server-pool management (MPM specific)
Include /etc/httpd/extra/httpd-mpm.conf    # 启动httpd-mpm.conf 扩展配置文件

[root@vm ~]# vi /etc/httpd/extra/httpd-mpm.conf

<IfModule mpm_prefork_module>
    StartServers             5    # 开机启动的工作进程数
    MinSpareServers          5    # 保留备用的最小工作进程数
    MaxSpareServers         10    # 保留备用的最大工作进程数
    MaxRequestWorkers      250    # httpd启动时开启的最大工作进程数
    MaxConnectionsPerChild   0    # 服务器进程所服务的最大连接数,0代表不限制
</IfModule>


<IfModule mpm_worker_module>
    StartServers             3    # 启动的子进程的个数
    MinSpareThreads         75    # 保留备用的最小工作线程数
    MaxSpareThreads        250    # 保留备用的最大工作线程数
    ThreadsPerChild         25    # 服务器进程的工作线程数
    MaxRequestWorkers      400    # 服务器最大工作线程数
    MaxConnectionsPerChild   0    # 服务器的最大进程连接数 ,0代表不做限制
</IfModule>

<IfModule mpm_event_module>
    StartServers             3    # 启动的子进程的个数
    MinSpareThreads         75    # 保留备用的最小工作线程数
    MaxSpareThreads        250    # 保留备用的最大工作线程数
    ThreadsPerChild         25    # 服务器进程的工作线程数
    MaxRequestWorkers      400    # 服务器最大工作线程数
    MaxConnectionsPerChild   0    # 服务器的最大进程连接数 ,0代表不做限制
</IfModule>
</IfModule>
8、ServerName,ServerAdmin及ServerAlias
ServerName用于唯一标识提供web服务的主机名,只有在基于名称的虚拟主机中该指令才是必须的 。ServerAlias用于定义ServerName的别名。 ServerAdmin 是用于定义管理邮箱地址。
语法1:ServerName [scheme://]domain-name|ip-address[:port]
语法2:ServerAdmin email-address|URL
语法3:ServerAlias hostname [hostname]
[root@VM httpd]# vi httpd.conf
# ServerAdmin: Your address, where problems with the server should be
# e-mailed.  This address appears on some server-generated pages, such
# as error documents.  e.g. admin@your-domain.com
#
ServerAdmin web@itwish.cn      # 定义Server管理员邮箱地址
#
# ServerName gives the name and port that the server uses to identify itself.
# This can often be determined automatically, but we recommend you specify
# it explicitly to prevent problems during startup.
#
# If your host doesn't have a registered DNS name, enter its IP address here.
#
ServerName www.itwish.cn:80      # 定义主机名称


[root@VM httpd]# vi extra/httpd-vhosts.conf
<VirtualHost *:80>
    ServerAdmin webmaster@itwish.cn     # 定义Server管理员邮箱地址
    ServerName www.itwish.cn      # 定义主机名称
    ServerAlias  www     # 定义主机别名
</VirtualHost>
9、Userdir指令,配置用户目录
允许每个用户使用该UserDir指令在其主目录中拥有一个网站。可通过http://example.com/~username/ 进行访问 ,注:务必要为用户的家目录赋予运行httpd进程的用户daemon拥有执行权限
语法:UserDir directory-filename [directory-filename] ...
[root@VM httpd]# vi /etc/httpd/httpd.conf
    LoadModule authz_host_module modules/mod_authz_host.so # 加载userdir 依赖的动态DSO文件 ,取消注释“#” 即可实现加载。
    LoadModule authz_core_module modules/mod_authz_core.so
    LoadModule userdir_module modules/mod_userdir.so

# User home directories
    Include /etc/httpd/extra/httpd-userdir.conf        # 包含扩展文件 httpd-userdir.conf

[root@VM httpd]# vi extra/httpd-userdir.conf

# Required module: mod_authz_core, mod_authz_host, mod_userdir
# 该功能依赖DSO 动态模块 mod_authz_core,mod_authz_host, mod_userdir

UserDir public_html # 定义用户访问目录名称
# public_html是用户家目录下的目录名称,所有位于此目录中的文件均可通过url http://example.com/~username进行访问

<Directory "/home/*/public_html">    # 定义目录页面属性
    AllowOverride FileInfo AuthConfig Limit Indexes     # 配置AllowOverride 指令
    Options  Indexes FollowSymlinks                 # 配置Options 指令
    Require all granted          # 配置Require 指令
</Directory>

[root@VM httpd]# useradd itwish       # 添加用户及配置密码
[root@VM httpd]# passwd itwish


[root@VM itwish]# mkdir /home/itwish/public_html   # 在用户家目录下创建Userdir 定义的目录文件
[root@VM itwishl]# touch /home/itwish/public_html/{a,b,c}

[root@VM itwish]# setfacl -m  u:daemon:x /home/itwish/  # 注:务必要为用户家目录配置httpd启动用户daemon的执行权限
测试itwish用户的个人网站:
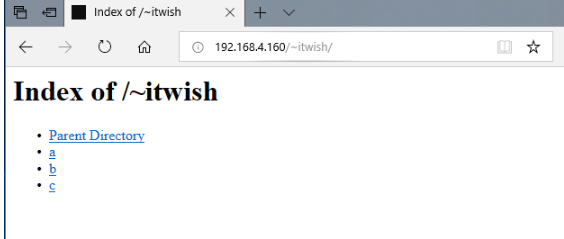
10、ScriptAlias 指令,配置脚本执行目录
将URL映射到文件系统位置,并将目标指定为CGI脚本。例:Script Alias "cgi-bin" "/usr/local/apache/cgi-bin/" 表示访问 http://www.itwish.cn/cgi-bin/test 时,目录映射地址为 /usr/local/apache/cgi-bin/test
语法1:ScriptAlias [URL-path] file-path|directory-path
# 定义/cgi-bin/ 目录映射到 /web/cgi-bin/ 目录 ,1)功能等同于2) ,注意结尾的"/"
1)
ScriptAlias "/cgi-bin/" "/web/cgi-bin/"
2)
Alias "/cgi-bin/" "/web/cgi-bin/"
<Location "/cgi-bin">
    SetHandler cgi-script
    Options +ExecCGI
</Location>
[root@VM httpd]# vi extra/httpd-vhosts.conf    # 调整配置文件
<IfModule alias_module>
    #
    ScriptAlias /cgi-bin/ "/usr/local/apache/cgi-bin/"
    # 定义目录/cgi-bin/ 目录映射到 /usr/local/apache/cgi-bin/ 目录
</IfModule>

<Directory "/usr/local/apache/cgi-bin">    # 定义目录属性
    AllowOverride none
    Options none
    Require all granted
</Directory>

[root@VM cgi-bin]# vi   test1      # 在cgi-bin目录中创建test1 bash 脚本
#!/bin/bash
cat << EOF
Content-Type: text/html
                            # 注意改行为空行
<pre>
<h1>The hostname is `hostname`. </h1>     # 显示主机名 ,使用bash命令 hostname 实现
The time is `date`.                    # 显示当前访问日期 ,使用bash命令 date 实现
</pre>
                            # 改行为空行
EOF

[root@VM cgi-bin]# vi test2           # 在cgi-bin目录中创建test2   perl 脚本
#!/usr/bin/perl
print "content-type: text/html","\n\n";
print "<HTML>","\n";
print "<HEAD>","\n";
print "<TITLE>Perl</TITLE>","\n";
print "</HEAD>","\n";
print "<BODY>","\n";
print "<H1>Hello World</H1>","\n";
print "</BODY>","\n";
print "</HTML>","\n";

[root@VM ]# chmod o+x /usr/local/apache/cgi-bin/{test1,test2}     # 注意 ,一定要给与脚本执行权限

[root@VM cgi-bin]# curl http://192.168.4.160/cgi-bin/test1            # 测试 test1 脚本执行状况
<pre>
<h1>The hostname is VM. </h1>
The time is Wed Aug 15 19:26:56 CST 2018.
</pre>

[root@VM cgi-bin]# curl http://192.168.4.160/cgi-bin/test2      #  测试test2  perl脚本执行状况
<HTML>
<HEAD>
<TITLE>Perl</TITLE>
</HEAD>
<BODY>
<H1>Hello World</H1>
</BODY>
</HTML>
windows测试:
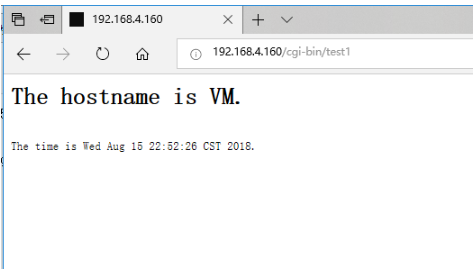
11、VirtualHost指令 ,虚拟主机配置
<VirtualHost>及</VirtualHost>用于包含一组仅适用于特定虚拟主机的指令。当服务器在特定虚拟主机上收到对文档的请求时,它将使用该<VirtualHost> 部分中包含的配置指令。
语法:<VirtualHost addr[:port] [addr[:port]] ...> ... </VirtualHost>
-
addr可以是以下任何一个,可选地后跟冒号和端口号(或*):
虚拟主机的IP地址 ;
虚拟主机IP地址的完全限定域名(不推荐);
字符 * ,充当通配符并匹配任何IP地址;
字符串"_default_",是"*"的别名
[root@VM httpd]# vi /etc/httpd/httpd.conf     # 调整httpd.conf 主配置文件
   #DocumentRoot "/usr/local/apache/htdocs"    # 注释掉web站点的根目录 ,行首加 “#”。
   Include /etc/httpd/extra/httpd-vhosts.conf     # 取消行首的注释“#” ,使能httpd-vhosts.conf 文件

[root@VM httpd]# vi extra/httpd-vhosts.conf

<VirtualHost 192.168.4.160:80>    # 定义虚拟主机的访问ip为 192.168.4.160:80 ,访问主机名 www.itwish.cn
    ServerAdmin webmaster@itwish.cn         # 定义主机管理邮箱地址
    DocumentRoot "/usr/local/apache/htdocs/itwish.cn"      # 定义该虚拟主机的根目录
    ServerName  www.itwish.cn                # 定义虚拟主机名称
    ServerAlias www.itwish.cn                   # 定义Servername 的别名
    ErrorLog "logs/itwish.cn-error_log"     # 定义错误日志路径
    CustomLog "logs/itwish.cn-access_log" common      # 定义访问日志目录
        <Directory "/usr/local/apache/docs/itwish.cn"> # 对根目录设置页面访问属性 ,定义Directory 指令开始范围
                Options Indexes FollowSymlinks
                AllowOverride None
                Require all granted
        </Directory>                # 定义Directory 指令结束范围
</VirtualHost>         # 定义VirtualHost 指令的结束范围

<VirtualHost 192.168.4.170:80>  # 定义虚拟主机的访问ip为 192.168.4.160:80 ,访问主机名 www.itwish.cn
    ServerAdmin webmaster@itwish.org
    DocumentRoot "/usr/local/apache/htdocs/itwish.org"
    ServerName  www.itwish.org
    ServerAlias www.itwish.org
    ErrorLog "logs/itwish.org-error_log"
    CustomLog "logs/itwish.org-access_log" common
        <Directory "/usr/local/apache/docs/itwish.org">
                Options Indexes FollowSymlinks
                AllowOverride None
                Require all granted
        </Directory>
</VirtualHost>

[root@VM httpd]# mkdir /usr/local/apache/htdocs/{itwish.cn,itwish.org}    # 创建虚拟主机的根目录

[root@VM httpd]# cd /usr/local/apache/htdocs/

[root@VM htdocs]# ls
index.html  itwish.cn  itwish.org

[root@VM htdocs]# vi itwish.cn/index.html        # 编辑虚拟主机 www.itwish.cn 访问主页
<html><body><h1>www.itwish.cn   works!</h1></body></html>
[root@VM htdocs]# vi itwish.org/index.html        # 编辑虚拟主机 www.itwish.org  访问主页
<html><body><h1>itwish.org   works!</h1></body></html>
[root@VM httpd]# vi /etc/hosts        # 添加以下虚拟主机域名解析 地址
192.168.4.160 vm.itwish.cn vm www.itwish.cn
192.168.4.170 www.itwish.org

 [root@VM htdocs]# curl http://www.itwish.cn     # 测试 ,主页面显示正常
<html><body><h1>www.itwish.cn  works!</h1></body></html>

[root@VM htdocs]# curl http://www.itwish.org  # 测试 ,主页面显示正常
<html><body><h1>itwish.org   works!</h1></body></html>
windows 主机测试,简要实现 ,未配置域名解析 ,直接通过ip进行访问:
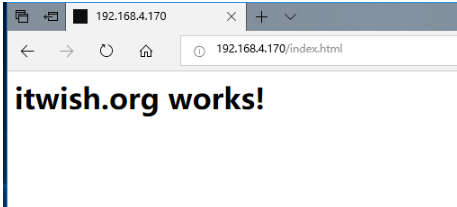
12、ErrorLog 与 LogFormat 指令,定义web访问 Log日志
定义web访问日志路径及日志格式
语法1:ErrorLog file-path|syslog[:[facility][:tag]]
语法2:LogFormat format|nickname [nickname]
语法3:CustomLog file|pipe format|nickname [env=[!]environment-variable| expr=expression]
-
定义日志格式各项参数涵义,请参考官网文档:https://httpd.apache.org/docs/2.4/mod/mod_log_config.html#formats
%h:客户端地址
%l:远程的登录名,通常为-
%u:认证时的远程用户名,通常为-
%t:接收到的请求时的时间,为标准英文格式时间+时区
\" :斜杠时为后面内容做转义
%r:请求报文的起始行
%>s:响应状态码,
%b:以字节响应报文的长度,不包含http报文
%{Header_Name}i:记录指定请求报文首部的内容(value)
%u:请求的URL
-
常用日志格式:
通用日志格式(CLF): "%h %l %u %t \"%r\" %>s %b"
虚拟主机的通用日志格式:"%v %h %l %u %t \"%r\" %>s %b"
NCSA扩展/组合日志格式 :"%h %l %u %t \"%r\" %>s %b \"%{Referer}i\" \"%{User-agent}i\""
引用日志格式 :"%{Referer}i -> %U"
代理(浏览器)日志格式: "%{User-agent}i"
[root@VM httpd]# vi /etc/httpd/httpd.conf     # 调整httpd.conf 主配置文件
ErrorLog "logs/error_log"        # 错误日志路径
LogLevel warn        # 日志等级warn
<IfModule log_config_module>
    #
    LogFormat "%h %l %u %t \"%r\" %>s %b \"%{Referer}i\" \"%{User-Agent}i\"" combined
    # 定义日志格式,格式名称定义为变量 combined
    LogFormat "%h %l %u %t \"%r\" %>s %b" common
    # 定义日志格式,格式名称定义为变量 common

    <IfModule logio_module>
      # You need to enable mod_logio.c to use %I and %O
      LogFormat "%h %l %u %t \"%r\" %>s %b \"%{Referer}i\" \"%{User-Agent}i\" %I %O" combinedio
    </IfModule>
       CustomLog "logs/access_log"  common
       # 该CustomLog指令用于将请求记录到服务器。指定了日志路径,并且选择使用环境变量common作为日志的显示格式。

</IfModule>
[root@VM httpd]# vi extra/httpd-vhosts.conf
<VirtualHost 192.168.4.160:80>
    ErrorLog "logs/itwish.cn-error_log"
    CustomLog "logs/itwish.cn-access_log" combined    # 把日志格式变量从common 改为 combined
 或者
    CustomLog "logs/itwish.cn-access_log"  "%v %h %l %u %t \"%r\" %>s %b"
</VirtualHost>

[root@VM httpd]# vi /usr/local/apache/logs/itwish.cn-access_log
# 查看访问日志 ,通过日志显示内容对比 common变量格式 与 combined 变量格式的不同
192.168.4.160 - - [15/Aug/2018:15:56:40 +0800] "HEAD / HTTP/1.1" 200 -
192.168.4.160 - - [15/Aug/2018:15:56:52 +0800] "GET / HTTP/1.1" 200 105
192.168.4.201 - - [15/Aug/2018:16:00:13 +0800] "GET /favicon.ico HTTP/1.1" 404 209
192.168.4.201 - - [15/Aug/2018:16:00:17 +0800] "GET /favicon.ico HTTP/1.1" 404 209
192.168.4.201 - - [15/Aug/2018:17:20:01 +0800] "GET / HTTP/1.1" 304 - "-" "Mozilla/5.0 (Windows NT 10.0; Win64; x64) AppleWebKit/537.36 (KHTML, like Gecko) Chrome/67.0.3
396.99 Safari/537.36"
192.168.4.201 - - [15/Aug/2018:17:20:06 +0800] "GET / HTTP/1.1" 200 57 "-" "Mozilla/5.0 (Windows NT 10.0; Win64; x64) AppleWebKit/537.36 (KHTML, like Gecko) Chrome/64.0.
3282.140 Safari/537.36 Edge/17.17134"
13、httpd网页认证
httpd对web身份认证的支持很丰富,提供的控制也非常细致。见http://httpd.apache.org/docs/2.4/mod/
-
认证方式
httpd服务器支持使用摘要认证(Digest)和基本认证(Basic)两种方式
Digest:使用摘要认证需要在编译httpd之前添加"--enable-auth-digest"选项,但并不是所有的浏览器都支持摘要认证,不推荐使用;
Basic:基本认证是htpd服务的基本功能,不需要预先配置特别的选项(安全性没有摘要认证高,但支持所有的浏览器)
-
通过用户名和密码形式限制访问方式:
AllowOverride Authconfig # 启用用户认证
AuthName "Auth Direcrory" # 指定认证名称,登录的时候会通过登录窗口显示
AuthType Basic | Digest # 指定认证方式 Basic 或 Digest
AuthUserFile /usr/local/apache/.htpasspwd # 指定授权用户数据文件,由htpasswd命令生成。
AuthGroupFile file-path # 指定组认证文件,文件中分组格式为"mygroup: Jon Bob "。如果文件路径为相对路径,则相对于ServerRoot
Require valid-user # 授权给合法用户,合法用户在.htpasspwd文件中
[root@VM httpd]# vi /etc/httpd/httpd.conf     # 调整httpd.conf 主配置文件
   #DocumentRoot "/usr/local/apache/htdocs"    # 注释掉web站点的根目录 ,行首加 “#”。
   Include /etc/httpd/extra/httpd-vhosts.conf     # 取消行首的注释“#” ,使能httpd-vhosts.conf 文件

[root@VM httpd]# vi extra/httpd-vhosts.conf

<VirtualHost 192.168.4.170:80>           # 定义虚拟主机的访问ip为 192.168.4.160:80 ,访问主机名 www.itwish.cn
    ServerAdmin webmaster@itwish.org
    DocumentRoot "/usr/local/apache/htdocs/itwish.org"      # 定义该虚拟主机的根目录
    ServerName  www.itwish.org
    ServerAlias www.itwish.org
    ErrorLog "logs/itwish.org-error_log"     # 定义错误日志路径
    CustomLog "logs/itwish.org-access_log" common      # 定义web访问日志目录及日志格式
        <Directory "/usr/local/apache/htdocs/itwish.org"> # 对根目录设置页面访问属性 ,定义Directory 指令开始范围
                Options Indexes FollowSymlinks
                AllowOverride Authconfig   # 定义用户访问认证
                AuthType  Basic
                AuthName "Input Your name and password"
                AuthUserFile   "/usr/local/apache/.htpasspwd" # 用户认证文件
                AuthGroupFile  "/usr/local/apache/.group"   # 组认证文件
                Require Valid-user     # 或者直接使用  Require user itwish,tom
                Require group Auth   # 允许
        </Directory>                # 定义Directory 指令结束范围
</VirtualHost>         # 定义VirtualHost 指令的结束范围

[root@VM httpd]# htpasswd -cb /usr/local/apache/.htpasspwd itwish itwish   # 添加认证用户并指定认证文件
Adding password for user itwish

[root@VM httpd]# htpasswd -b /usr/local/apache/.htpasspwd tom tom   # 添加认证用户
Adding password for user tom

[root@VM httpd]# echo "Auth:tom" >> /usr/local/apache/.groupname    # 添加用户到认证组Auth
[root@VM httpd]# vi /usr/local/apache/.groupname
Auth:tom
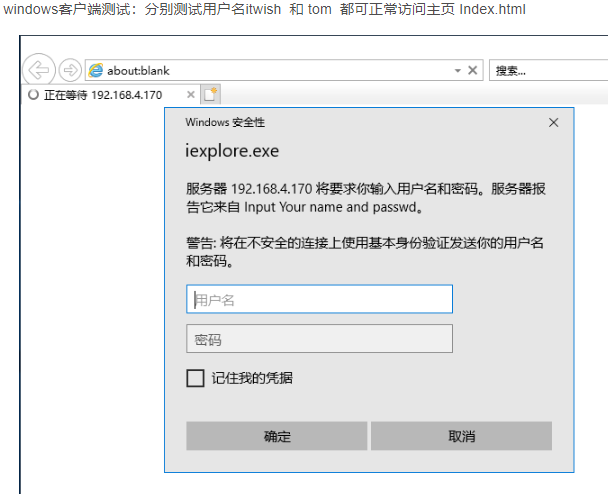
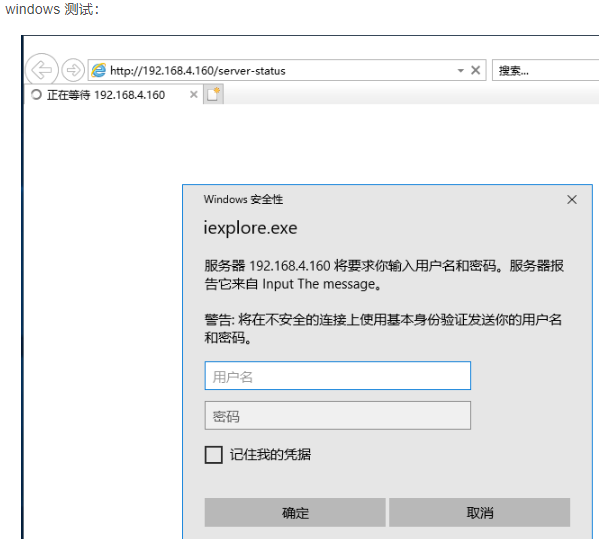
14、<Location> 指令 ,SetHandler 指令 ,配置主页stauts 页面
该<Location>指令通过URL限制所附指令的范围。它与<Directory> 指令类似 ,并启动一个以</Location>指令终止的子节 .
[root@VM httpd]# vi httpd.conf    # 配置httpd.conf主文件,并加载以下DSO模块
LoadModule authz_host_module modules/mod_authz_host.so
LoadModule authz_core_module modules/mod_authz_core.so
LoadModule status_module modules/mod_status.so
LoadModule info_module modules/mod_info.so

# Real-time info on requests and configuration
Include /etc/httpd/extra/httpd-info.conf     # 启用扩展文件

[root@VM extra]# vi httpd-info.conf # 配置httpd-info.conf文件,建议指定用户访问。
#
# Get information about the requests being processed by the server
# and the configuration of the server.
#
# Required modules: mod_authz_core, mod_authz_host,    # 依赖指定的模块
#                   mod_info (for the server-info handler),
#                   mod_status (for the server-status handler
<Location /server-status>
    SetHandler server-status
        AllowOverride Authconfig        # 配置用户认证
        Authtype Basic
        AuthName "Input The message"
        AuthUserFile "/usr/local/apache/.htpasspwd"
        Require Valid-user
</Location>
摘: https://blog.csdn.net/sinat_32596537/article/details/91528913


 浙公网安备 33010602011771号