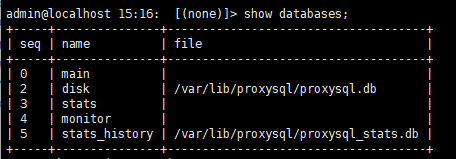
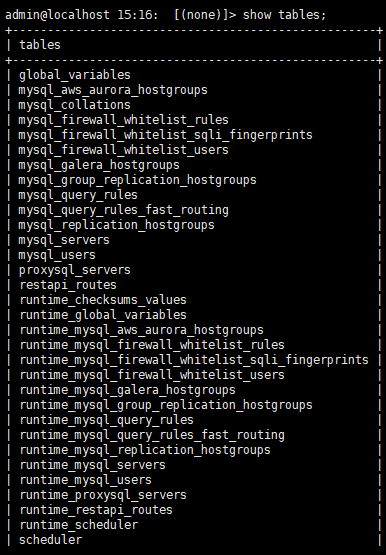
mysql8.0 MGR + proxysql 部署
1. proxysql 作用以及架构
1.连接池功能
2. 读写分离(端口号, 用户, 正则, 某个sql)
3. 缓存功能
4. sql改写
5. 监控诊断系统
6. sql防火墙
7. sql审计 && query log (proxysql 2.5)
proxy安装:
配置yum源:

cat <<EOF | tee /etc/yum.repos.d/proxysql.repo
[proxysql_repo]
name= ProxySQL YUM repository
baseurl=https://repo.proxysql.com/ProxySQL/proxysql-2.1.x/centos/\$releasever
gpgcheck=1
gpgkey=https://repo.proxysql.com/ProxySQL/repo_pub_key
EOF
安装proxysql
yum  -y  install proxysql

配置文件在 : /etc/proxysql.conf

启动/关闭 proxysql
service proxysql  start
service proxysql stop

查看安装版本
proxysql --version

proxysql 需要的监听端口
6032  管理端口
6033  对外服务端口

默认管理用户名密码:   admin/admin

登陆proxysql
mysql -u admin  -padmin  -h 127.0.0.1 -P 6032

启动proxysql
systemctl start proxysql
systemctl enable  proxysql
proxysql 重要概念:
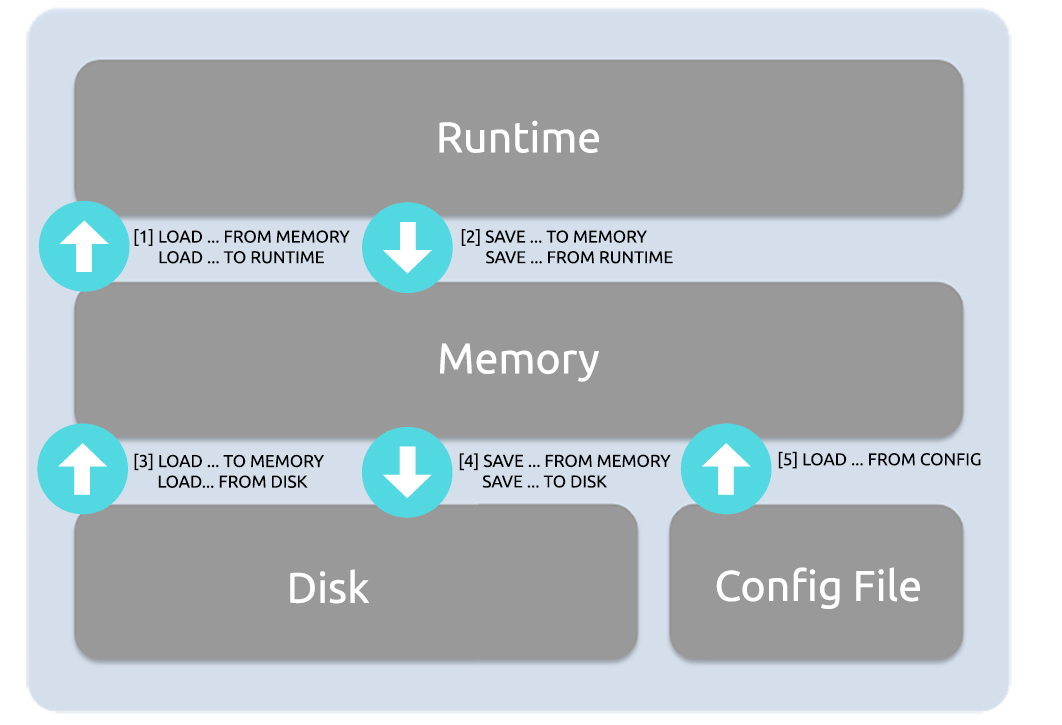
配置文件:  proxysql中的配置文件可以动态的更改生效

# 提供正在运行的程序应用
1. runtime

#提供管理者修改
2. memory

#持久化存储, 下次重启后还可以生效
3. disk(sqlite, configle)


[1] LOAD <item> FROM MEMORY/LOAD <item> TO RUNTIME
将配置项从内存数据库加载到运行时数据结构
[2] SAVE <item> TO MEMORY/SAVE <item> FROM RUNTIME
将配置项从运行时保存到内存数据库中
[3] LOAD <item> TO MEMORY/LOAD <item> FROM DISK
将持久性配置项目从磁盘数据库加载到内存数据库
[4] SAVE <item> FROM MEMORY/SAVE <item> TO DISK
将配置项从内存数据库保存到磁盘数据库
[5] LOAD <item> FROM CONFIG
将配置项从配置文件加载到内存数据库中


重要说明:在将更改加载到RUNTIME之前,它们不会被激活,并且未保存到DISK的任何更改在ProxySQL重新启动后将不可用。
# Active current in-memory MySQL User configuration
LOAD MYSQL USERS TO RUNTIME;

# Save the current in-memory MySQL User configuration to disk
SAVE MYSQL USERS TO DISK;

# Active current in-memory MySQL Server and Replication Hostgroup configuration
LOAD MYSQL SERVERS TO RUNTIME;

# Save the current in-memory MySQL Server and Replication Hostgroup configuration to disk
SAVE MYSQL SERVERS TO DISK;

# Active current in-memory MySQL Query Rule configuration
LOAD MYSQL QUERY RULES TO RUNTIME;

# Save the current in-memory MySQL Query Rule configuration to disk
SAVE MYSQL QUERY RULES TO DISK;

# Active current in-memory MySQL Variable configuration
LOAD MYSQL VARIABLES TO RUNTIME;

# Save the current in-memory MySQL Variable configuration to disk
SAVE MYSQL VARIABLES TO DISK;

# Active current in-memory ProxySQL Admin Variable configuration
LOAD ADMIN VARIABLES TO RUNTIME;

# Save the current in-memory ProxySQL Admin Variable configuration to disk
SAVE ADMIN VARIABLES TO DISK;
Hg-> HostGroupp
机器分组:  writer_hg(read_only=0), read_hg(read_only=1), max_writers

Query digest
每一个类型的Query形成一个唯一的Hash Code

Query Rule
通过正则或者 Hash Code 指定查询到不同的Hg

proxysql 用户
链接proxysql 的用户(frontend,backup同时为1)
核心表
1. mysql_users
2. mysql_servers
3. mysql_replication_hostgroups
4. mysql_query_rules
实现 一主两从的节点读写分离
| 角色 | ip | port | database | 数据库状态 | user/password |
| master | 172.16.230.53 | 3306 | t1 | read_only=0 | fengjian/123456 |
| slave1 | 172.16.230.51 | 3306 | t1 | read_only=1 | fengjian/123456 |
| slave2 | 172.16.230.52 | 3306 | t1 | read_only=1 | fengjian/123456 |
| proxy | 172.16.230.54 |
6032 6033 |
t1 | fengjian/123456 |
启动proxysql并且登陆
systemctl start proxysql
systemctl enable proxysql

mysql -u admin -padmin  -h 127.0.0.1 -P 6032
PXC集群使用的 mysql_galera_hostgroups
MGR集群使用的 mysql_group_replication_hostgroups
配置复制(半同步) mysql_replication_hosgroups
注意: 账号必须用 with mysql_native_password 认证方式.
登陆从库 设置数据库为可读状态:
# 登陆到172.16.230.151 mysql从库
[root@mysql1 ~]#   mysql -u root -p
# 设置为可读
root@localhost 15:49:  [(none)]> set global read_only=1;
root@localhost 15:49:  [(none)]> show global variables like '%read_only%';
+-----------------------+-------+
| Variable_name         | Value |
+-----------------------+-------+
| innodb_read_only      | OFF   |
| read_only             | ON    |


# 登陆到172.16.230.152 mysql从库
[root@mysql1 ~]#   mysql -u root -p
# 设置为可读
root@localhost 15:49:  [(none)]> set global read_only=1;
root@localhost 15:49:  [(none)]> show global variables like '%read_only%';
+-----------------------+-------+
| Variable_name         | Value |
+-----------------------+-------+
| innodb_read_only      | OFF   |
| read_only             | ON    |
创建monitor用户名, 用于监控
admin@localhost 15:18:  [(none)]> select * from global_variables;
| mysql-monitor_username                                       | monitor                     |
| mysql-monitor_password                                       | monitor                     |


create user 'monitor'@'%' identified with mysql_native_password by 'monitor';
grant replication client on *.* to 'monitor'@'%';
1. 创建分组
admin@localhost 16:25: [(none)]> insert into mysql_replication_hostgroups(writer_hostgroup,reader_hostgroup,comment) values(100,101,'senyint3306')

2. 添加数据库到server中
admin@localhost 16:27:  [(none)]> show create table mysql_servers;

| mysql_servers | CREATE TABLE mysql_servers (
    hostgroup_id INT CHECK (hostgroup_id>=0) NOT NULL DEFAULT 0,
    hostname VARCHAR NOT NULL,
    port INT CHECK (port >= 0 AND port <= 65535) NOT NULL DEFAULT 3306,
    gtid_port INT CHECK ((gtid_port <> port OR gtid_port=0) AND gtid_port >= 0 AND gtid_port <= 65535) NOT NULL DEFAULT 0,
    status VARCHAR CHECK (UPPER(status) IN ('ONLINE','SHUNNED','OFFLINE_SOFT', 'OFFLINE_HARD')) NOT NULL DEFAULT 'ONLINE',
    weight INT CHECK (weight >= 0 AND weight <=10000000) NOT NULL DEFAULT 1,
    compression INT CHECK (compression IN(0,1)) NOT NULL DEFAULT 0,
    max_connections INT CHECK (max_connections >=0) NOT NULL DEFAULT 1000,
    max_replication_lag INT CHECK (max_replication_lag >= 0 AND max_replication_lag <= 126144000) NOT NULL DEFAULT 0,
    use_ssl INT CHECK (use_ssl IN(0,1)) NOT NULL DEFAULT 0,
    max_latency_ms INT UNSIGNED CHECK (max_latency_ms>=0) NOT NULL DEFAULT 0,
    comment VARCHAR NOT NULL DEFAULT '',
    PRIMARY KEY (hostgroup_id, hostname, port) ) |


admin@localhost 16:27:  [(none)]> insert into mysql_servers(hostgroup_id,hostname,port,max_connections) values(100,'172.16.230.53',3306,200);
Query OK, 1 row affected (0.00 sec)

admin@localhost 16:29:  [(none)]> insert into mysql_servers(hostgroup_id,hostname,port,max_connections) values(101,'172.16.230.51',3306,200);
Query OK, 1 row affected (0.00 sec)

admin@localhost 16:29:  [(none)]> insert into mysql_servers(hostgroup_id,hostname,port,max_connections) values(101,'172.16.230.52',3306,200);
Query OK, 1 row affected (0.00 sec)

3. 加载到runtime 并保存
load mysql servers  to runtime;
save mysql servers to  disk;
4. 配置账号:
admin@localhost 16:32:  [(none)]> show create table mysql_users;


| mysql_users | CREATE TABLE mysql_users (
    username VARCHAR NOT NULL,
    password VARCHAR,
    active INT CHECK (active IN (0,1)) NOT NULL DEFAULT 1,
    use_ssl INT CHECK (use_ssl IN (0,1)) NOT NULL DEFAULT 0,
    default_hostgroup INT NOT NULL DEFAULT 0,
    default_schema VARCHAR,
    schema_locked INT CHECK (schema_locked IN (0,1)) NOT NULL DEFAULT 0,
    transaction_persistent INT CHECK (transaction_persistent IN (0,1)) NOT NULL DEFAULT 1,
    fast_forward INT CHECK (fast_forward IN (0,1)) NOT NULL DEFAULT 0,
    backend INT CHECK (backend IN (0,1)) NOT NULL DEFAULT 1,
    frontend INT CHECK (frontend IN (0,1)) NOT NULL DEFAULT 1,
    max_connections INT CHECK (max_connections >=0) NOT NULL DEFAULT 10000,
    attributes VARCHAR CHECK (JSON_VALID(attributes) OR attributes = '') NOT NULL DEFAULT '',
    comment VARCHAR NOT NULL DEFAULT '',
    PRIMARY KEY (username, backend),
    UNIQUE (username, frontend)) |
admin@localhost 16:40: [(none)]> insert into mysql_users(username,password,default_hostgroup,default_schema,max_connections) values('fengjian','123456',100,'t1',1000)

admin@localhost 16:40: [(none)]> load mysql users to runtime;
admin@localhost 16:40: [(none)]> save mysql users to disk;
查看runtime 是否为online状态

设置读写规则
admin@localhost 17:06: [(none)]> insert into mysql_query_rules(rule_id,active,match_digest,destination_hostgroup,apply) values(1,1,'^SELECT.*FOR UPDATE$',100,1),(2,1,'SELECT',101,1);

保存
load mysql query rules to runtime;
save mysql query rules to disk
登陆测试
[root@proxysql ~]# mysql -h 172.16.230.54 -P 6033 -u fengjian -p123456

#select 查询在slave2上, 查询总是查到一台机器上, 退出再登陆后,会切换到另一台机器上.
fengjian@localhost 17:17: [(none)]> select @@hostname;
+------------+
| @@hostname |
+------------+
| mysql2 |
+------------+
1 row in set (0.01 sec)
# select for update 写在了master上
fengjian@localhost 17:17: [(none)]> select @@hostname for update;
+------------+
| @@hostname |
+------------+
| mysql3 |
+------------+
1 row in set (0.00 sec)


https://proxysql.com/documentation/proxysql-read-write-split-howto/
路由规则
高级路由规则, 通过使用 stats_mysql_query_digest 查询 执行时间最长的select语句,
Admin> SELECT digest,SUBSTR(digest_text,0,25),count_star,sum_time FROM stats_mysql_query_digest WHERE digest_text LIKE 'SELECT%' ORDER BY sum_time DESC LIMIT 5;
+--------------------+--------------------------+------------+---------------+
| digest             | SUBSTR(digest_text,0,25) | count_star | sum_time      |
+--------------------+--------------------------+------------+---------------+
| 0x037C3E6D996DAFE2 | SELECT a.ip_id as ip_id, | 2030026798 | 1479082636017 |
| 0xB081A85245DEA5B7 | SELECT a.ip_id as ip_id, | 2025902778 | 1206116187539 |
| 0x38BE36BDFFDBE638 | SELECT instance.name as  | 59343662   | 1096236803754 |
| 0xB4233552504E43B8 | SELECT ir.type as type,  | 1362897166 | 488971769571  |
| 0x4A131A16DCFFD6C6 | SELECT i.id as id, i.sta | 934402293  | 475253770301  |
+--------------------+--------------------------+------------+---------------+
5 rows in set (0.01 sec)
查询数最多的sql语句
Admin> SELECT digest,SUBSTR(digest_text,0,25),count_star,sum_time FROM stats_mysql_query_digest WHERE digest_text LIKE 'SELECT%' ORDER BY count_star DESC LIMIT 5;
+--------------------+--------------------------+------------+---------------+
| digest             | SUBSTR(digest_text,0,25) | count_star | sum_time      |
+--------------------+--------------------------+------------+---------------+
| 0x037C3E6D996DAFE2 | SELECT a.ip_id as ip_id, | 2030040688 | 1479092529369 |
| 0xB081A85245DEA5B7 | SELECT a.ip_id as ip_id, | 2025916528 | 1206123010791 |
| 0x22E0A5C585C53EAD | SELECT id as instanceid, | 1551361254 | 426419508609  |
| 0x3DB4B9FA4B2CB36F | SELECT i.id as instancei | 1465274289 | 415565419867  |
| 0xB4233552504E43B8 | SELECT ir.type as type,  | 1362906755 | 488974931108  |
+--------------------+--------------------------+------------+---------------+
5 rows in set (0.00 sec)
路由规则变成
INSERT INTO mysql_query_rules (rule_id,active,digest,destination_hostgroup,apply)
VALUES(1,1,'0x38BE36BDFFDBE638',101,1);
Query cache
对查询语句进行cache 缓存, 还是使用 mysql_query_rules表
admin@localhost 10:18: [(none)]> show create table mysql_query_rules;
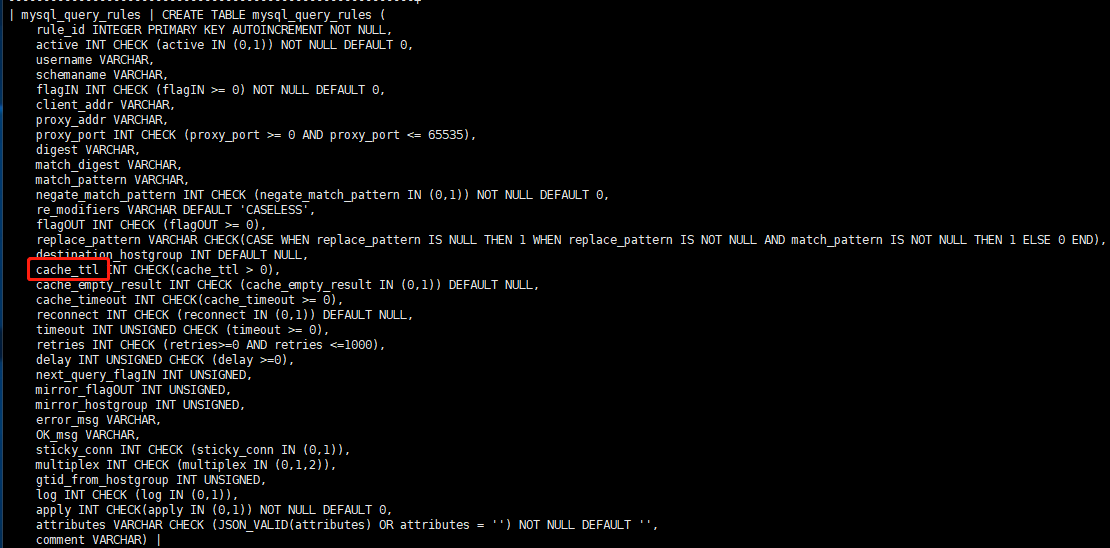

设置 cache_ttl 缓存时间
admin@localhost 10:21:  [(none)]> update mysql_query_rules set cache_ttl=10000 where rule_id=2;
Query OK, 1 row affected (0.00 sec)

load mysql query rules to runtime;
save mysql query rules to disk;

查看缓存
admin@localhost 10:33: [(none)]> select hostgroup, digest_text, digest, first_seen, last_seen, count_star from stats_mysql_query_digest order by count_star desc;
2. 利用proxysql 实现透明读写分离以及最佳实践
proxysql firewall
proxysql 审计
proxysql + MGR 使用
mysql router 与 proxysql 对比

mysql router 提供MGR的高可用, 节点故障自动处理
只能提供基于端口号的读写分离

proxysql:  功能丰富的中间件
更丰富的sql 路由规则,  更丰富的sql控制以及监控分析方法.
1. MGR mysql8.0 集群
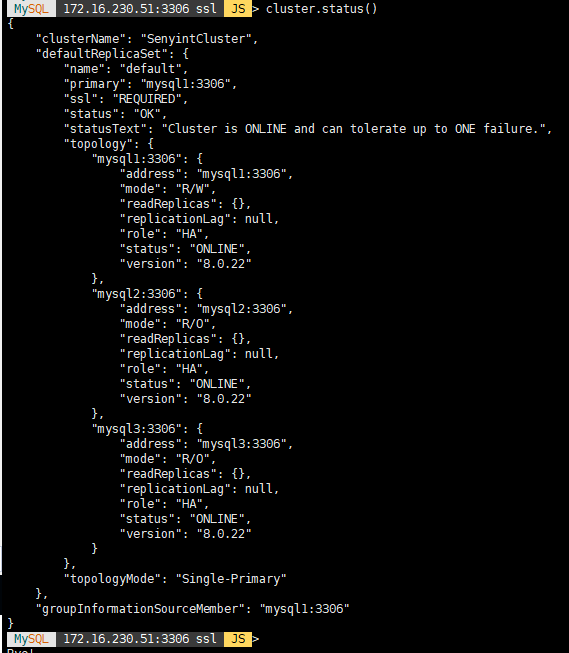
2. 初始化proxysql(好像不好用)
service proxysql-initial start
3. 在 mysql 主上 准备监控脚本
vim sys8_new.sql
USE sys;

DELIMITER $$

CREATE FUNCTION my_id() RETURNS TEXT(36) DETERMINISTIC NO SQL RETURN (SELECT @@global.server_uuid as my_id);$$

CREATE FUNCTION gr_member_in_primary_partition()
    RETURNS VARCHAR(3)
    DETERMINISTIC
    BEGIN
      RETURN (SELECT IF( MEMBER_STATE='ONLINE' AND ((SELECT COUNT(*) FROM
    performance_schema.replication_group_members WHERE MEMBER_STATE NOT IN ('ONLINE', 'RECOVERING')) >=
    ((SELECT COUNT(*) FROM performance_schema.replication_group_members)/2) = 0),
    'YES', 'NO' ) FROM performance_schema.replication_group_members JOIN
    performance_schema.replication_group_member_stats USING(member_id) where member_id=my_id());
END$$

CREATE VIEW gr_member_routing_candidate_status AS SELECT
sys.gr_member_in_primary_partition() as viable_candidate,
IF( (SELECT (SELECT GROUP_CONCAT(variable_value) FROM
performance_schema.global_variables WHERE variable_name IN ('read_only',
'super_read_only')) != 'OFF,OFF'), 'YES', 'NO') as read_only,
Count_Transactions_Remote_In_Applier_Queue as transactions_behind, Count_Transactions_in_queue as 'transactions_to_cert'
from performance_schema.replication_group_member_stats where member_id=my_id();$$

DELIMITER ;
查看各个节点状态:
mysql1 主节点, read_only 为NO

mysql2 只读节点

mysql3 只读节点

4 . 创建账号: mysql主上创建程序链接账号
create user 'feng'@'%' identified with mysql_native_password by '123456';
grant all on  *.* to 'feng'@'%';

create user 'monitor'@'%' identified with mysql_native_password  by '123456';
grant replication client,select on *.*  to 'monitor'@'%';

grant  select on  sys.* to 'monitor'@'%';
5. 登陆proxysql
[root@proxysql ~]# mysql -h 127.0.0.1 -P 6032 -u admin -padmin
6. 配置proxysql mysql_group_replication_hostgroups 建立分组

insert into mysql_group_replication_hostgroups(writer_hostgroup,backup_writer_hostgroup,reader_hostgroup,offline_hostgroup,max_writers)
values(100,200,300,400,1);

注释:
#该组中用于写操作的分组ID, 一般也是mysql_users中指定为用户的默认节点, 且要求read_only=0
writer_hostgroup : 100

#组中如果有多个 read_only=0 的节点, 其他成员放置的节点
backup_writer_hostgroup : 200
# 该组用户只读组
reader_hostgroup: 300
# 该组为离线组
offline_hostgroup: 400

#设置最多几个成员可以writer_hostgroup中
max_writers: 1

#写组成员是否担任读的工作
writer_is_also_reader

#节点事物延迟情况
max_transactions_behind
7. 添加用户名密码 使用 proxysql mysql_users
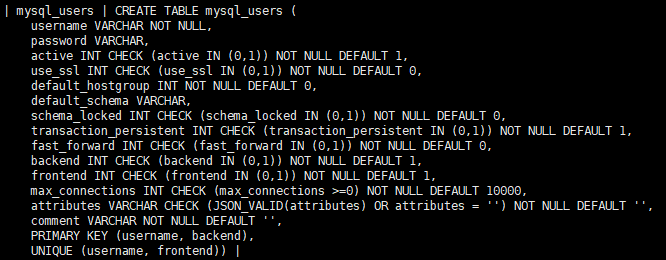
admin@localhost 17:43:  [(none)]> insert into mysql_users(username,password,active,default_hostgroup,max_connections)
values('feng','123456',1,100,1000);

8.配置后端数据库地址 使用 proxysql mysql_servers
#插入集群的各节点地址,HG=100代表 backup_writer_hostgroup,后期通过自动检测让其自动再分配组。

admin@localhost 17:47:  [(none)]> insert into mysql_servers(hostgroup_id,hostname,port,max_connections)
values(400,'172.16.230.51',3306,1000),(400,'172.16.230.52',3306,1000),(400,'172.16.230.53',3306,1000);

9. 修改监控用户名
#set mysql-monitor_username='mon';

#load mysql variables to run;
# save mysql variables to disk;
10. 保存配置
load  mysql  users to  runtime;
load  mysql  servers to runtime;

save mysql users to disk;
save mysql servers to disk;
11. 配置读写分离
INSERT INTO mysql_query_rules(rule_id,active,match_digest,destination_hostgroup,apply)
VALUES(101,1,'^SELECT.*FOR UPDATE$',100,1),(102,1,'^SELECT',300,1);

LOAD MYSQL QUERY RULES TO RUNTIME;
SAVE MYSQL QUERY RULES TO DISK;

12. proxysql上校验:
select * from mysql_server_read_only_log;

select * from mysql_server_connect_log;
select * from mysql_server_ping_log;
13. 检查分组
select * from runtime_mysql_servers;

14. proxysql测试
mysql -h 172.16.230.54 -P 6033 -u fengjian  -p12345

#查询

#update

java JDBC 链接mysql
jdbc:mysql//172.16.230.54:6033,172.16.230.55:6033,172.16.230.56:6033/fengjian?failOverReadOnly=false

failOverReadOnly  = true   连接第一个节点 write/read
failOverReadOnly  = false   所有节点都是: write/read
读写分离
https://dev.mysql.com/doc/connector-j/8.0/en/connector-j-source-replica-replication-connection.html
三. proxysql 可以提供的有可用的metric
官方文档:
https://proxysql.com/Documentation/


