mysql8.0 学习
mysql 8.0.18 手工安装记录
为了日常方便,特记录如下。
一、安装系统依赖包
#1、系统依赖包安装
yum -y install make gcc-c++ cmake bison-devel ncurses-devel  readline-devel  libaio-devel perl libaio wget lrzsz vim libnuma* bzip2 xz
二、关闭防火墙和selinux
#2、关闭selinux
sed -i 's/SELINUX=enforcing/SELINUX=disabled/' /etc/selinux/config
setenforce  0
#3、修改系统限制参数
cat >> /etc/security/limits.conf << EOF
#
###custom
#
*           soft   nofile       20480
*           hard   nofile       65535
*           soft   nproc        20480
*           hard   nproc        65535
EOF
三、修改系统限制参数
修改系统限制参数
cat >>/etc/sysctl.conf <<"EOF"

##################################
vm.swappiness=0
#增加tcp支持的队列数
net.ipv4.tcp_max_syn_backlog = 65535
#减少断开连接时 ,资源回收
net.ipv4.tcp_max_tw_buckets = 8000
net.ipv4.tcp_tw_reuse = 1
#net.ipv4.tcp_tw_recycle = 1
net.ipv4.tcp_fin_timeout = 10
#改变本地的端口范围
net.ipv4.ip_local_port_range = 1024 65535
#允许更多的连接进入队列
net.ipv4.tcp_max_syn_backlog = 4096
#对于只在本地使用的数据库服务器
net.ipv4.tcp_fin_timeout = 30
#端口监听队列
net.core.somaxconn=65535
#接受数据的速率
net.core.netdev_max_backlog=65535
net.core.wmem_default=87380
net.core.wmem_max=16777216
net.core.rmem_default=87380
net.core.rmem_max=16777216
EOF

sysctl -p
四、修改系统参数限制
# 修改系统限制参数
cat >>/etc/sysctl.conf <<"EOF"

##################################
vm.swappiness=0
#增加tcp支持的队列数
net.ipv4.tcp_max_syn_backlog = 65535
#减少断开连接时 ,资源回收
net.ipv4.tcp_max_tw_buckets = 8000
net.ipv4.tcp_tw_reuse = 1
#net.ipv4.tcp_tw_recycle = 1
net.ipv4.tcp_fin_timeout = 10
#改变本地的端口范围
net.ipv4.ip_local_port_range = 1024 65535
#允许更多的连接进入队列
net.ipv4.tcp_max_syn_backlog = 4096
#对于只在本地使用的数据库服务器
net.ipv4.tcp_fin_timeout = 30
#端口监听队列
net.core.somaxconn=65535
#接受数据的速率
net.core.netdev_max_backlog=65535
net.core.wmem_default=87380
net.core.wmem_max=16777216
net.core.rmem_default=87380
net.core.rmem_max=16777216
EOF

sysctl -p
五、下载安装包
# 下载安装包:社区版 8.0.18
cd /opt/
wget https://dev.mysql.com/get/Downloads/MySQL-8.0/mysql-8.0.18-linux-glibc2.12-x86_64.tar.xz
六、解压安装包
# 解压安装包
tar -xJf mysql-8.0.18-linux-glibc2.12-x86_64.tar.xz
cd /usr/local/
ln -s /opt/mysql-8.0.18-linux-glibc2.12-x86_64 mysql
七、创建用户
#7、创建用户
groupadd mysql
useradd -g mysql -d /usr/local/mysql -s /sbin/nologin -MN mysql
八、创建对应的目录
#创建对应的目录
mkdir -p /data/mysql/mysql_3306/{data,logs,tmp,undolog}
九、创建配置文件
[client]
port    = 3306
#tee     = "/data/mysql/mysql_3306/logs/mysql_output.log"
socket  = /data/mysql/mysql_3306/tmp/mysql_3306.sock

[mysql]
prompt="\u@\h \R:\m:\s [\d]> "
no-auto-rehash

[mysqld]
user    = mysql
port    = 3306
admin_address = 127.0.0.1
basedir    = /usr/local/mysql
datadir    = /data/mysql/mysql_3306/data
socket    = /data/mysql/mysql_3306/tmp/mysql_3306.sock
pid-file = mysql_3306.pid
character-set-server = utf8mb4
skip_name_resolve = 1#忽略大小写, 初始化时也必须加添加
lower-case-table-names=1

#replicate-wild-ignore-table=mysql.%
#replicate-wild-ignore-table=test.%
#replicate-wild-ignore-table=information_schema.%

# Two-Master configure
#server-1
#auto-increment-offset = 1
#auto-increment-increment = 2

#server-2
#auto-increment-offset = 2
#auto-increment-increment = 2

# semi sync replication settings #
#plugin_dir = /usr/local/mysql/lib/mysql/plugin
#plugin_load = "validate_password.so;rpl_semi_sync_master=semisync_master.so;rpl_semi_sync_slave=semisync_slave.so"
plugin_dir = /usr/local/mysql/lib/plugin #官方版本的路径
plugin_load = "rpl_semi_sync_master=semisync_master.so;rpl_semi_sync_slave=semisync_slave.so" #官方版本的路径

#rpl_semi_sync_master_enabled=1
#rpl_semi_sync_slave_enabled=1
#rpl_semi_sync_master_timeout=2147483648

#
slave_parallel_workers = 8
slave_parallel_type = LOGICAL_CLOCK
binlog_transaction_dependency_tracking=writeset
binlog_transaction_dependency_history_size=25000
transaction_write_set_extraction=XXHASH64

open_files_limit    = 65535
back_log = 1024
max_connections = 1024
max_connect_errors = 1000000
table_open_cache = 1024
table_definition_cache = 1024
table_open_cache_instances = 64
thread_stack = 512K
external-locking = FALSE
max_allowed_packet = 32M
sort_buffer_size = 4M
join_buffer_size = 4M
thread_cache_size = 1536
interactive_timeout = 600
wait_timeout = 600
tmp_table_size = 32M
max_heap_table_size = 32M
slow_query_log = 1
log_timestamps = SYSTEM
slow_query_log_file = /data/mysql/mysql_3306/logs/slow.log
log-error = /data/mysql/mysql_3306/logs/error.log
long_query_time = 0.1
log_queries_not_using_indexes =1
log_throttle_queries_not_using_indexes = 60
min_examined_row_limit = 100
log_slow_admin_statements = 1
log_slow_slave_statements = 1
log-bin = /data/mysql/mysql_3306/logs/mysql-bin
sync_binlog = 1
binlog_cache_size = 4M
max_binlog_cache_size = 2G
max_binlog_size = 1G
# binlog_expire_logs_seconds=2592000
master_info_repository = TABLE
relay_log_info_repository = TABLE
gtid_mode = on
enforce_gtid_consistency = 1
log_slave_updates
#slave-rows-search-algorithms = 'INDEX_SCAN,HASH_SCAN'
binlog_format = row
binlog_row_image=FULL
binlog_checksum = 1
relay_log_recovery = 1
relay-log-purge = 1
key_buffer_size = 32M
read_buffer_size = 8M
read_rnd_buffer_size = 8M
bulk_insert_buffer_size = 64M
myisam_sort_buffer_size = 128M
myisam_max_sort_file_size = 10G
myisam_repair_threads = 1
lock_wait_timeout = 3600
explicit_defaults_for_timestamp = 1
innodb_thread_concurrency = 0
innodb_sync_spin_loops = 100
innodb_spin_wait_delay = 30

#transaction_isolation = REPEATABLE-READ
transaction_isolation = READ-COMMITTED
#innodb_additional_mem_pool_size = 16M
innodb_buffer_pool_size = 2048M
innodb_buffer_pool_instances = 4
innodb_buffer_pool_load_at_startup = 1
innodb_buffer_pool_dump_at_shutdown = 1
innodb_data_file_path = ibdata1:1G:autoextend
innodb_flush_log_at_trx_commit = 1
innodb_log_buffer_size = 32M
innodb_log_file_size = 2G
innodb_log_files_in_group = 3
innodb_max_undo_log_size = 4G
innodb_undo_directory = /data/mysql/mysql_3306/undolog

# 根据您的服务器IOPS能力适当调整
# 一般配普通SSD盘的话,可以调整到 10000 - 20000
# 配置高端PCIe SSD卡的话,则可以调整的更高,比如 50000 - 80000
innodb_io_capacity = 4000
innodb_io_capacity_max = 8000
innodb_flush_sync = 0
innodb_flush_neighbors = 0
innodb_write_io_threads = 8
innodb_read_io_threads = 8
innodb_purge_threads = 4
innodb_page_cleaners = 4
innodb_open_files = 65535
innodb_max_dirty_pages_pct = 50
innodb_flush_method = O_DIRECT
innodb_lru_scan_depth = 4000
innodb_checksum_algorithm = crc32
innodb_lock_wait_timeout = 10
innodb_rollback_on_timeout = 1
innodb_print_all_deadlocks = 1
innodb_file_per_table = 1
innodb_online_alter_log_max_size = 4G
innodb_stats_on_metadata = 0

# some var for MySQL 8
log_error_verbosity = 3
innodb_print_ddl_logs = 1
binlog_expire_logs_seconds = 2592000
#innodb_dedicated_server = 0

server-id = 1
innodb_status_file = 1
# 注意: 开启 innodb_status_output & innodb_status_output_locks 后, 可能会导致log-error文件增长较快
innodb_status_output = 0
innodb_status_output_locks = 0


#performance_schema
performance_schema = 1
performance_schema_instrument = '%memory%=on'
performance_schema_instrument = '%lock%=on'


#innodb monitor
innodb_monitor_enable="module_innodb"
innodb_monitor_enable="module_server"
innodb_monitor_enable="module_dml"
innodb_monitor_enable="module_ddl"
innodb_monitor_enable="module_trx"
innodb_monitor_enable="module_os"
innodb_monitor_enable="module_purge"
innodb_monitor_enable="module_log"
innodb_monitor_enable="module_lock"
innodb_monitor_enable="module_buffer"
innodb_monitor_enable="module_index"
innodb_monitor_enable="module_ibuf_system"
innodb_monitor_enable="module_buffer_page"
innodb_monitor_enable="module_adaptive_hash"

[mysqldump]
quick
max_allowed_packet = 64M

[mysqld_safe]
#malloc-lib=/usr/local/mysql/lib/jmalloc.so
nice=-19
open-files-limit=65535
十、修改目录权限
# 修改目录权限
chown -R mysql.mysql /data/mysql/mysql_3306
chown -R mysql.mysql /usr/local/mysql/
十一、初始化数据库
#11、初始化数据库
/usr/local/mysql/bin/mysqld --defaults-file=/data/mysql/mysql_3306/my_3306.cnf --initialize
十二、查看日志
#12、查看日志, 并且查看密码
tail -f /data/mysql/mysql_3306/logs/error.log
十三、启动mysql
mysqld --defaults-file=/etc/my.cnf &
十四、初次修改密码
#13、初次修改密码方法
/usr/local/mysql/bin/mysql  -u root -p

#修改root密码
alter user user() identified by '123456';

ALTER USER 'root'@'localhost' IDENTIFIED WITH mysql_native_password BY 'GJjumB6g4FcwdF3R6AZc' PASSWORD EXPIRE NEVER ;
create user 'root'@'127.0.0.1' identified WITH mysql_native_password by 'GJjumB6g4FcwdF3R6AZc' PASSWORD EXPIRE NEVER ;
grant all privileges on *.* to 'root'@'127.0.0.1' with grant option;

create user 'test_r'@'%' identified with mysql_native_password by 'EeCrfUDO6wRzn72BBQ52' PASSWORD EXPIRE NEVER ;
grant insert,delete,update,select on db144.* to 'test_r'@'%' ;
create user '111_prod'@'%' identified with mysql_native_password by '1111111111111111' PASSWORD EXPIRE NEVER ;
grant all on db.* to '111_prod'@'%';
grant XA_RECOVER_ADMIN ON *.* TO '111_prod'@'%';
十五、mysqldump 数据库
/usr/local/mysql8/bin/mysqldump --defaults-file=/etc/my.cnf --column-statistics=0 -u root -p --all-databases > all.sql
mysql8关键配置项
server 启动相关的:
port        =    3306
socket     =    /tmp/mysql3306.sock
datadir    =    /data/mysql/mysql3306/data
tmpdir     =    /data/mysql/mysql3306/tmp
log-bin    =    /data/mysql/mysql3306/logs/mysql-bin
server_id    =    1013306
mysqlx_port    =    33060
admin_port    =    33062
admin_address    =    '127.0.0.1'
create_admin_listener_thread    =    on
max_connections    =    500
max_user_connections    =    400
max_connect_errors    =    300
mysqlx_max_connections    =    300
mysql 关键配置项
日志相关(log)
#binlog
log-bin    =    /data/mysql/mysql3306/logs/mysql-bin
binlog_format    =    row
log_slave_updates
gitd_mode    =    on
enforce_gtid_consistency    =    on
binlog_cache_size    =    512M
binlog_rows_query_log_events    =    on
sync_binlog    =    1
binlog_group_commit_sync_delay    =     100
binlog_group_commit_sync_no_delay_count    =    10
binlog_order_commits    =     off
expire_logs_days    =    5
log_long_query_time    =    0.5
log_slave_updates    =    on
slow_query_log_file    =    slow.log

#error log
log_error    =    error.log
log_error_verbosity    =    3
查看权限
root@localhost 16:58:  [(none)]> show privileges;
+----------------------------+---------------------------------------+-------------------------------------------------------+
| Privilege                  | Context                               | Comment                                               |
+----------------------------+---------------------------------------+-------------------------------------------------------+
| Alter                      | Tables                                | To alter the table                                    |
| Alter routine              | Functions,Procedures                  | To alter or drop stored functions/procedures          |
| Create                     | Databases,Tables,Indexes              | To create new databases and tables                    |
| Create routine             | Databases                             | To use CREATE FUNCTION/PROCEDURE                      |
| Create role                | Server Admin                          | To create new roles                                   |
| Create temporary tables    | Databases                             | To use CREATE TEMPORARY TABLE                         |
| Create view                | Tables                                | To create new views                                   |
| Create user                | Server Admin                          | To create new users                                   |
| Delete                     | Tables                                | To delete existing rows                               |
| Drop                       | Databases,Tables                      | To drop databases, tables, and views                  |
| Drop role                  | Server Admin                          | To drop roles                                         |
| Event                      | Server Admin                          | To create, alter, drop and execute events             |
| Execute                    | Functions,Procedures                  | To execute stored routines                            |
| File                       | File access on server                 | To read and write files on the server                 |
| Grant option               | Databases,Tables,Functions,Procedures | To give to other users those privileges you possess   |
| Index                      | Tables                                | To create or drop indexes                             |
| Insert                     | Tables                                | To insert data into tables                            |
| Lock tables                | Databases                             | To use LOCK TABLES (together with SELECT privilege)   |
| Process                    | Server Admin                          | To view the plain text of currently executing queries |
| Proxy                      | Server Admin                          | To make proxy user possible                           |
| References                 | Databases,Tables                      | To have references on tables                          |
| Reload                     | Server Admin                          | To reload or refresh tables, logs and privileges      |
| Replication client         | Server Admin                          | To ask where the slave or master servers are          |
| Replication slave          | Server Admin                          | To read binary log events from the master             |
| Select                     | Tables                                | To retrieve rows from table                           |
| Show databases             | Server Admin                          | To see all databases with SHOW DATABASES              |
| Show view                  | Tables                                | To see views with SHOW CREATE VIEW                    |
| Shutdown                   | Server Admin                          | To shut down the server                               |
| Super                      | Server Admin                          | To use KILL thread, SET GLOBAL, CHANGE MASTER, etc.   |
| Trigger                    | Tables                                | To use triggers                                       |
| Create tablespace          | Server Admin                          | To create/alter/drop tablespaces                      |
| Update                     | Tables                                | To update existing rows                               |
| Usage                      | Server Admin                          | No privileges - allow connect only                    |
| XA_RECOVER_ADMIN           | Server Admin                          |                                                       |
| SHOW_ROUTINE               | Server Admin                          |                                                       |
| RESOURCE_GROUP_USER        | Server Admin                          |                                                       |
| PERSIST_RO_VARIABLES_ADMIN | Server Admin                          |                                                       |
| ROLE_ADMIN                 | Server Admin                          |                                                       |
| BACKUP_ADMIN               | Server Admin                          |                                                       |
| CONNECTION_ADMIN           | Server Admin                          |                                                       |
| CLONE_ADMIN                | Server Admin                          |                                                       |
| SET_USER_ID                | Server Admin                          |                                                       |
| SESSION_VARIABLES_ADMIN    | Server Admin                          |                                                       |
| RESOURCE_GROUP_ADMIN       | Server Admin                          |                                                       |
| INNODB_REDO_LOG_ARCHIVE    | Server Admin                          |                                                       |
| BINLOG_ENCRYPTION_ADMIN    | Server Admin                          |                                                       |
| REPLICATION_SLAVE_ADMIN    | Server Admin                          |                                                       |
| SYSTEM_VARIABLES_ADMIN     | Server Admin                          |                                                       |
| GROUP_REPLICATION_ADMIN    | Server Admin                          |                                                       |
| SYSTEM_USER                | Server Admin                          |                                                       |
| APPLICATION_PASSWORD_ADMIN | Server Admin                          |                                                       |
| TABLE_ENCRYPTION_ADMIN     | Server Admin                          |                                                       |
| SERVICE_CONNECTION_ADMIN   | Server Admin                          |                                                       |
| AUDIT_ADMIN                | Server Admin                          |                                                       |
| BINLOG_ADMIN               | Server Admin                          |                                                       |
| ENCRYPTION_KEY_ADMIN       | Server Admin                          |                                                       |
| INNODB_REDO_LOG_ENABLE     | Server Admin                          |                                                       |
| REPLICATION_APPLIER        | Server Admin                          |                                                       |
+----------------------------+---------------------------------------+-------------------------------------------------------+
58 rows in set (0.00 sec)
mysql8.0 用户安全的增强
使用 roles 管理用户
create role 'app_developer','app_read','app_write'

grant all on app_db.* to 'app_developer'

grant select on app_db.* to 'app_read';

grant insert,update,delete on app_db.* to 'app_write';

################

create user  'dev1'@'localhost' identified with  mysql_native_password by '123456';
create user  'read_user1'@'localhost' identified with mysql_native_password by '123456';
create user 'read_user2'@'localhost' identified with mysql_native_password by '123456';
create user 'rw_user1'@'localhost' identified with mysql_native_password  by '123456';

####################################
grant 'app_developer' to   'dev1'@'localhost';
grant 'app_read' to  'read_user1'@'localhost' ,'read_user2'@'localhost'
grant 'app_read','app_write' to  'rw_user1'@'localhost'

##########################
drop role 'app_read','app_write'; ---删除role, 将会从所有的账号上删除
mysql8.0 用户管理增强
密码过期:
alter user 'senyint'@'%'  password  expire;

alter user 'senyint'@'%' password expire interval 90 day;

密码重用
[mysqld]
password_history = 3
password_reuse_interval=365
-----

alter user 'senyint'@'%'  password history 3 password reuse_interval 365 day;


密码校验:
[mysqld]
password_require_current=on
#登陆后修改旧密码
alter user user() identified by 'new_password' replace 'old_pass';

双密码:
alter user 'test'@'%' identified  by 'new_password' retain current password;  #添加一个新密码
alter user 'zst'@'%' discard old password  # 删除老密码

随机密码
create  user 'test'@'%' identified by random  password;
alter user 'zst'@'%' identified by random password;
+------+------+----------------------+
| user | host | generated password |
+------+------+----------------------+
| test | % | Q@8cCE8Hv<7%N/841G2q |
+------+------+----------------------+
失败锁定:
create user 'test'@'%' identified by 'authpass' failed_login_attempts 3 password_lock_times 3;
alter user 'test2'@'%' failed_login_attempts 3 password_lock_time unbounded;
其中 password_lock_times N | unbounded, N表示单位天, unbounded 永远, 需要管理员解锁.
LSN : 表示mysql写过多少字节Redo, redo建议单个文件可以保存一个小时的大小 :
show engine innodb status\G;

log sequence number   169061713  #current lsn-->next
log buffer assigned up to  169061713  #max assigned lsn 当前分配出去最大的LSn
log buffer completed up to  169061713  #开始向log buffer 中写入LSN
log written up to  169061713  #已经写入log buffer中的最大LSN
log flushed up to 169061713   #写入到logfile(disk) 中最大的LSN
Added dirty pages up to 169061713  #IBP中脏页最大LSN
Pages flush up to 169061713   # 脏页中持有化的最大LSN
Last checkpoint at  169061713  # 已经持久化到  Datafile, 小于这个LSN的可以被覆盖


last_checkpoint_lsn = log.last_checkpoint_lsn.load();
dirty_pages_added_up_to_lsn = log_buffer_drity_pages_added_up_to_lsn(log);
ready_for_write_lsn = log_buffer_reday_for_write_lsn(log)
write_lsn=log.write_lsn.load();
flush_lsn=log.flushed_to_disk_lsn.load();
间隔5秒获取LSN号:

  redo_logfile_size=(t2.LSN - t1.LSN) * (60/5) * 60
  总 redo 大小建议在 4-32G之间

  total_redo = innodb_log_file  * ib_logfile_in_group
xtrabackup 8.0 备份
安装:
yum localinstall percona-xtrabackup-80.x.x.x.x.rpm
yum install libdbi-dbd-mysql
备份还原命令
xtrabackup  --defaults-file=/etc/my.cnf -S /data/mysql/mysql_3306/tmp/mysql_3306.sock -u root -p --lock-ddl --backup --target-dir=/data/backup/db3306_full
#应用redo日志
xtrabackup --prepare  --target-dir=/data/backup/db3306_full


1. 关闭数据库
2. 备份 data 和 logs 目录
mv data data.bak
mv logs logs.bak
3. 还原到当前位置, 需要保持datadir, logs 下为空
mkdir -p {data,logs}
chown mysql.mysql {data,logs}
4. 恢复
xtrabackup --defaults-file=/etc/my.cnf --copy-back --target-dir=/data/backup/db3306_full/
mysql8.0 xtrabackup 增量备份恢复流程
1. 相对于全量做增量备份
xtrabackup  --defaults-file=/etc/my.cnf -S /data/mysql/mysql_3306/tmp/mysql_3306.sock -u root -p --backup --target-dir=/data/backup/db3306_full_incr1  --incremental-basedir=/data/backup/db3306_full2. 相对于增量做增量的备份
xtrabackup  --defaults-file=/etc/my.cnf -S /data/mysql/mysql_3306/tmp/mysql_3306.sock -u root -p --backup --target-dir=/data/backup/db3306_full_incr2  --incremental-basedir=/data/backup/db3306_full_incr1

#3. 基本全量的增量
#xtrabackup  --defaults-file=/etc/my.cnf -S /data/mysql/mysql_3306/tmp/mysql_3306.sock -u root -p --backup --target-dir=/data/backup/db3306_full_incr2  --incremental-basedir=/data/backup/mysql3306_full
xtrabackup 增量备份恢复流程
增量恢复:

/data/backup/db3306_full
/data/backup/db3306_full_incr1
/data/backup/db3306_full_incr2

xtrabackup --prepare  --apply-log-only --target-dir=/data/backup/db3306_full


xtrabackup --prepare --apply-log-only --target-dir=/data/backup/db3306_full --incremental-basedir=/data/backup/db3306_full_incr1

xtrabackup --prepare --apply-log-only --target-dir=/data/backup/db3306_full --incremental-basedir=/data/backup/db3306_full_incr2
恢复:
[root@docker mysql_3306]# cd /data/backup/db3306_full
[root@docker db3306_full]# xtrabackup --defaults-file=/etc/my.cnf --copy-back --target-dir=/data/backup/db3306_full
xtrabackup 备份是否有效?
1 .备份可以prepare 成功
2. mysqld 是否能启动
3. 随机抽查50-10张表,可以select
4. 抽查表是不是可以更新.
xtrabackup 增量备份恢复流程
备份压缩:
  文件压缩:  xtrabackup --backup --compress --target-dir=/data/compressed/

   解压缩:  xtrabackup --decompress --target-dir=/data/compressed

   打包成一个压缩包:
    xtrabackup  --backup  --stream=xbstream --target-dir=./ > backup.xbstream

    xtrabackup --backup --stream=xbstram --compress --target-dir=./ > backup.xbstream

   解压缩:  xbstream -x < backup.xbstream
mysql 增量备份以及恢复到任意时间点实战
配置文件中 binlog格式使用row格式
binlog_format = row

mysqlbinlog -v --base64-output=decode-rows   mysqlbin-log-0001
理解 binlog 在备份中的作用
position: binlog文件中偏移量, 单位字节.  例如 at 653 是指文件的从653 个字节开始.

GTID : 事物的一个唯一编号, 由两部分组成: server本身的uuid, 和事物的全局编号, 例如:

   SET @@SESSION.GTID_NEXT='3234234-xxxdddd-ddd342-dfa'
   GTIDs: asdfa-234-215d-zcfdf

 事务在binlog的组成:
   DML 操作包含:  begin; table_map, 事务本身
   DDL 只有语句本身
首先备份
mysqldump --defaults-file=/etc/my.cnf -u root -p --master-data=2 --single-transaction fengjian > fengjian.sql
压测:
sysbench /usr/local/share/sysbench/oltp_read_write.lua --mysql-host=172.16.230.21 --mysql-port=3306 --mysql-user=feng --mysql-password=123456 --mysql-db=fengjian --tables=10 --table_size=1000 --mysql_storage_engine=Innodb prepare
破坏操作
mysql -u root -p
use fengjian;
truncate table sbtest1 ;
恢复操作
1. 首先进行 强制切换binlog
    flush logs

2. 避免其他操作,修改表名
 rename table t1 to t1.bak

3. 拷贝binlog
cp /data/mysql/mysql_3306/logs/mysql-bin.0005  /data/tool/backup/

4. 解析binlogs
mysqlbinlog -v --base64-output=decode-rows  mysql-bin.0005 > 05.sql

5. vim  05.sql 打开文件

6. 查找truncate 关键字 ,查看gtid


7. 新建一个从库, 设置从主库同步

 mysql --defaults-file=/data/mysql/mysql_3307/etc/my_3307.cnf  -u root -p fengjian < fengjian_first.sq

8. 把恢复的库作为从库, 同步数据,  注意要添加master_ssl=1
root@localhost 18:22: [fengjian]> CHANGE MASTER TO MASTER_HOST='172.16.230.21', MASTER_USER='replic', MASTER_PASSWORD='replic', MASTER_PORT=3306, master_ssl=1, get_master_public_key=1 MASTER_AUTO_POSITION=1;
9. 启动从库的 io_thread
start slave io_thread;
10. 启动sql_thread 恢复到 truncate之前的 GITD
start slave sql_thread until SQL_BEFORE_GTIDS='507f0e59-604d-11eb-be2b-0050568408f0:65';
11. 恢复完成后, mysqldump 导出从库表
mysqldump --defulats-file=/etc/my.cnf  --set-gtid-purged=off  fengjian  sbtest1 > sbtest1.sql

12. 主库导入从库的恢复表
mysql8.0 主从复制
root@localhost 18:22:  [fengjian]> CHANGE MASTER TO
                                            MASTER_HOST='172.16.230.21',
                                            MASTER_USER='replic',
                                            MASTER_PASSWORD='replic',
                                            MASTER_PORT=3306,
                                            get_master_public_key=1,
                                            MASTER_AUTO_POSITION=1;
利用clone plugin 方式搭建从库
主库实例
INSTALL PLUGIN clone  SONAME 'mysql_clone.so';
create user 'fengjian'@'%'  identified with mysql_native_password by '123456';
grant backup_admin  on  *.* to 'fengjian'@'%' ;
从库实例
INSTALL PLUGIN clone SONAME 'mysql_clone.so';

set global clone_valid_donor_list='172.16.230.21:3306';

create user 'fengjian'@'%' identified with mysql_native_password by '123456';

grant clone_admin on *.* to   'fengjian'@'%' ;

set global log_error_verbosity=3;

clone instance from 'fengjian'@172.16.230.21:3306 identified by '123456';
my.cnf 中添加配置插件
[mysqld]
plugin-load-add=mysql_clone.so
clone=FORCE_PLUS_PERMANENT
mysql clone plugin 安装失败的参数有:
sql_require_primary_key = on
read_only=1
explicit_defaults_for_timestamp=off

这几个参数会导致clone 安装失败.
mysql主从复制:
主库要求
server_id
gitd_mode
log_bin
binglog_format
复制账号:
create user 'repl'@'%' identified with mysql_native_password by '123456';
grant replication slave on *.* to 'repl'@'%';
-------------------------------------------

create user 'repl'@'%' identified with mysql_native_password by  '123456';


master:   dump_thread
从库:
io_thread
-> 保证binlog 获取本地 -> relay log

sql_thread (并行复制)
增强半同步配置
从库挂掉, 主库无法写入, 原因是主库要等待 rpl_semi_sync_master_timeout超时, 为什么要配置无限大,
我们使用了半同步的承诺是,必须写到从库,如果达不到这个要求, 我们的策略是宁可不写.
配置好主从后, 在配置半同步
主从需要安装plugin插件
INSTALL PLUGIN rpl_semi_sync_master SONAME 'semisync_master.so';
INSTALL PLUGIN rpl_semi_sync_slave SONAME 'semisync_slave.so';
主库:
set global rpl_semi_sync_master_enabled=1;
set global rpl_semi_sync_master_timeout=2147483648;
从库:
set global rpl_semi_sync_slave_enabled=1;
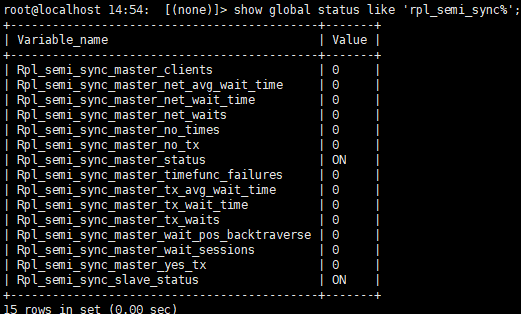
查看 半同步状态
启动半同步:

root@localhost 14:54:  [(none)]>   stop slave io_thread;
root@localhost 14:54:  [(none)]>   start slave io_thread;

再查查看状态
![]()
mysql 复制原理以及应用场景
storage commit
就是把redo 的日志打一个 commit标记 ---mysql5.7 写入了 fileename,postion, mysql8.0 写入了 GTID
并没有把数据持久化到 datafile文件中去, 只是把数据持久化到redo文件中, redo中怎么看数据是完整的, 把数据打一个 commit标志, 打了标记数据是有效的,
如果redo中没有打commit标志, 需要在redo文件中,对应了一个xid, 我们要在binlog中xid 存不存在, 如果xid存在, binlog中 xid 对应了一个commit, 就是已经提交到的.
1. 从库 crash后, 为什么start slave 不能继续(mysql replication crash recovery)
2. 为什么启用了并行复制还是慢 (parallel replication)
3. 复制过滤会有什么坑 (replication filter)
4. 如何将多个数据源复制到同一个节点实例
主从复制:
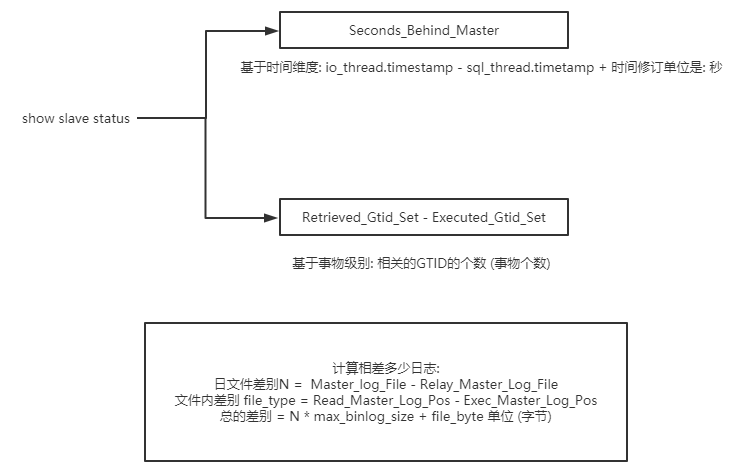
从库的位置
sql_thread
Relay_Master_Log_File: mysql-bin:000002
Exec_Master_Pos: 196

io_thread
Master_Log_File: mysql-bin.00009
Read_Master_Log_Pos: 188510291
从库crash后, 为什么 start slave 不能继续
如果使用GTID,  auto position 这个功能基本上可以不用管了

配置上处理
sync_binlog=1
binlog_gtid_simple_recovery=on   #启动gtid特性后,从新拉取一份
relay_log_recovery=1(默认没有开启) #  开启这个特性, relay_log_info_repository 必须 为table.
   relay_log_info_repository=table
relay_log_purge=1

并行复制:
slave_parallel_workers > 0  && relay_log_recovery=1
stop slave ;
start slave until sql_after_mts_gaps
start slave;
为什么启用了并行复制还是慢?
开启并行复制:
slave_parallel_worker  = N (默认为0) cpu的核数
slave_parallel_type=LOGICAL_CLOCK
如果是mysql5.7
slave_parallel_worker  = N (默认为0) cpu的核数
slave_parallel_type=LOGICAL_CLOCK
强依赖的两个功能
binlog_group_commit_sync_delay=0
binlog_group_commit_sync_no_delay_count=0

在同一时间进行提交, 这个值在20-100之间,  不是使用blackhole, 会改变日志的last_committed
配置WriteSet
slave_parallel_worker  = N (默认为0) cpu的核数
slave_parallel_type=LOGICAL_CLOCK
binlog_transaction_dependency_tracking=writeset
binlog_transaction_dependency_history_size=25000
transaction_write_set_extraction=XXHASH64
为什么要启动writeset
1. 希望slave最快速的应用 relay log
2. 在MGR集群中, 新节点加入集群, 希望尽可能快的吧日志应用完

限制:
        1. 该表有主键
        2. 使用GTID
万恶之源
设置 参数登陆0
innodb_thread_concurrency=0

现象是:
            1. 机器不是很忙
            2. 但是连接数非常多, thread_running 非常高
            3. 一个简单的insert 可能也慢
严格按照主库顺序执行
master:
binlog_order_commits=1

slave:
binlog_order_commits=1
binlog_log enable
log_slave_updates enable
slave_preserve_commit_order=1 enable(8.0.19)
参考:
https://www.cnblogs.com/bjx2020/p/11800135.html

 浙公网安备 33010602011771号