springboot整合shiro认证授权
前言
shiro是一个权限框架,主要包括认证和授权两大部分。
认证指的就是登录,授权指的就是指定权限。
同类框架有springsecurity。
他们的区别在于springsecurity功能较多,但依赖于spring,shiro不强依赖spring。
一、准备
1、版本
springboot2.2.1.RELEASE
其他maven依赖
        <dependency>
            <groupId>org.apache.shiro</groupId>
            <artifactId>shiro-spring-boot-web-starter</artifactId>
            <version>1.9.0</version>
        </dependency>

        <dependency>
            <groupId>org.springframework.boot</groupId>
            <artifactId>spring-boot-starter-web</artifactId>
        </dependency>

        <dependency>
            <groupId>org.projectlombok</groupId>
            <artifactId>lombok</artifactId>
        </dependency>

        <dependency>
            <groupId>com.baomidou</groupId>
            <artifactId>mybatis-plus-boot-starter</artifactId>
            <version>3.0.5</version>
        </dependency>

        <dependency>
            <groupId>mysql</groupId>
            <artifactId>mysql-connector-java</artifactId>
            <version>5.1.46</version>
        </dependency>

        <dependency>
            <groupId>org.springframework.boot</groupId>
            <artifactId>spring-boot-starter-thymeleaf</artifactId>
        </dependency>
2、配置文件
mybatis-plus:
  configuration:
    log-impl: org.apache.ibatis.logging.stdout.StdOutImpl
  mapper-locations: classpath:mapper/*.xml
spring:
  datasource:
    type: com.zaxxer.hikari.HikariDataSource
    driver-class-name: com.mysql.jdbc.Driver
    url: jdbc:mysql://localhost:3306/shiro?characterEncoding=utf-8&useSSL=false
    username: root
    password: root
  jackson:
    date-format: yyyy-MM-dd HH:mm:ss
    time-zone: GMT+8
shiro:
  loginUrl: /shiro/login
3、代码
启动类mapper包扫描
@MapperScan("com.example.shirodemo.mapper")
@SpringBootApplication
public class ShiroDemoApplication {

    public static void main(String[] args) {
        SpringApplication.run(ShiroDemoApplication.class, args);
    }

}
实体类
@AllArgsConstructor
@NoArgsConstructor
@ToString
@Data
public class User {
    private Integer id;
    private String name;
    private String pwd;
    private Integer rid;
}
mapper层
public interface UserMapper extends BaseMapper<User> {
}
service接口
public interface UserService {

  /**
   * 用户登录
   *
   * @param name
   * @return
   */
  User getUserInfoByName(String name);
}
service实现
@Service
public class UserServiceImpl implements UserService {

  @Autowired private UserMapper userMapper;

  @Override
  public User getUserInfoByName(String name) {
    QueryWrapper<User> wrapper = new QueryWrapper<>();
    wrapper.lambda().eq(User::getName, name);
    User user = userMapper.selectOne(wrapper);
    return user;
  }
}4、数据库表
user表
CREATE TABLE `user` (
  `id` int(11) NOT NULL AUTO_INCREMENT,
  `name` varchar(255) DEFAULT NULL,
  `pwd` varchar(255) DEFAULT NULL,
  `rid` int(11) DEFAULT NULL,
  PRIMARY KEY (`id`)
) ENGINE=InnoDB DEFAULT CHARSET=utf8mb4;

# 插入数据

INSERT INTO `shiro`.`user` (`id`, `name`, `pwd`) VALUES (1, 'zhangsan', '7174f64b13022acd3c56e2781e098a5f')
二、登录认证实现
1、自定义认证授权
@Component
public class MyRealm extends AuthorizingRealm {

  @Autowired private UserService userService;

  /**
   * 自定义登录认证
   *
   * @param authenticationToken
   * @return
   * @throws AuthenticationException
   */
  @Override
  protected AuthenticationInfo doGetAuthenticationInfo(AuthenticationToken authenticationToken)
      throws AuthenticationException {

    // step.1 获取用户身份信息
    String name = authenticationToken.getPrincipal().toString();
    // step.2 调用业务逻辑层获取用户信息(数据库)
    User user = userService.getUserInfoByName(name);
    // step.3 非空判断,将数据封装返回
    if (user != null) {
      SimpleAuthenticationInfo info =
          new SimpleAuthenticationInfo(
              authenticationToken.getPrincipal(),
              user.getPwd(),
              ByteSource.Util.bytes("salt"),
              authenticationToken.getPrincipal().toString());
      return info;
    }
    return null;
  }
}
2、配置类
@Configuration
public class ShiroConfig {

  @Autowired private MyRealm myRealm;

  /**
   * 配置SecurityManager
   *
   * @return
   */
  @Bean
  public DefaultWebSecurityManager defaultWebSecurityManager() {
    // step.1 创建defaultWebSecurityManager 对象
    DefaultWebSecurityManager defaultWebSecurityManager = new DefaultWebSecurityManager();
    // step.2 创建加密对象,设置相关属性
    HashedCredentialsMatcher matcher = new HashedCredentialsMatcher();
    // step.2.1 采用md5加密
    matcher.setHashAlgorithmName("md5");
    // step.2.2 迭代加密次数
    matcher.setHashIterations(3);
    // step.3 将加密对象存储到myRealm中
    myRealm.setCredentialsMatcher(matcher);
    // step.4 将myRealm存入defaultWebSecurityManager 对象
    defaultWebSecurityManager.setRealm(myRealm);
    // step.5 返回
    return defaultWebSecurityManager;
  }

  /**
   * 配置shiro内置过滤器拦截范围
   *
   * @return
   */
  @Bean
  public DefaultShiroFilterChainDefinition defaultShiroFilterChainDefinition() {
    DefaultShiroFilterChainDefinition definition = new DefaultShiroFilterChainDefinition();
    // 设置不认证可以访问的请求地址
    definition.addPathDefinition("/shiro/userLogin", "anon");
    definition.addPathDefinition("/login", "anon");
    // 设置需要进行登录认证的拦截范围
    definition.addPathDefinition("/**", "authc");
    return definition;
  }
}
3、接口类
@Controller
@RequestMapping("/shiro")
public class UserController {

  /**
   * 跳转登录页面
   *
   * @return
   */
  @GetMapping("/login")
  public String login() {
    return "login";
  }

  /**
   * 登录
   *
   * @param name
   * @param pwd
   * @return
   */
  @GetMapping("/userLogin")
  public String userLogin(String name, String pwd, HttpSession session) {
    // step.1 获取subject对象
    Subject subject = SecurityUtils.getSubject();
    // step.2 封装请求数据到token
    UsernamePasswordToken token = new UsernamePasswordToken(name, pwd);
    // step.3 调用login方法进行登录认证
    try {
      subject.login(token);
//      return "登录成功";
      session.setAttribute("user", token.getPrincipal().toString());
      return "main";
    } catch (AuthenticationException e) {
      e.printStackTrace();
      System.out.println("登录失败");
      return "登录失败";
    }
  }
}
4、前端页面
login页面
<!DOCTYPE html>
<html lang="en">
<head>
    <meta charset="UTF-8">
    <title>登录页面</title>
</head>
<body>
<form action="/shiro/userLogin">
    <div>用户名:<input type="text" name="name"/></div>
    <div>密码:<input type="password" name="pwd"/></div>
    <div><input type="submit" value="登录"/></div>
</form>
</body>
</html>
登录成功页面
<!DOCTYPE html>
<html lang="en" xmlns:th="http://www.thymeleaf.org">
<head>
    <meta charset="UTF-8">
    <title>登录成功</title>
</head>
<body>
<h1>Shiro登录认证后主页面</h1>
登录用户为:<span th:text="${session.user}"></span>
</body>
</html>
5、测试

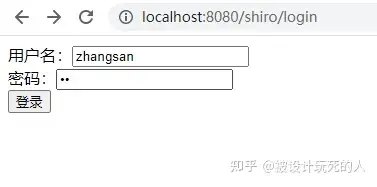
登录页面,密码为z3

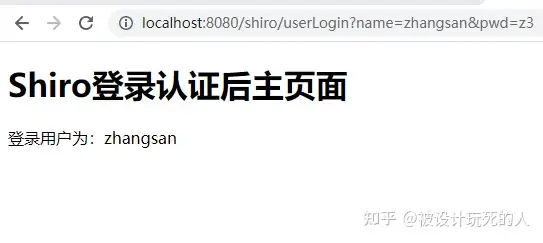
登录成功页面,因为是测试使用get请求方便查看传参,实际应用post


