scrapy解析与数据库
Scrapy功能学习
1 scrapy数据提取
Scrapy 还提供了自己的数据提取方法,即 Selector(选择器)。Selector 是基于 lxml 来构建的,支持 XPath 选择器、CSS 选择器以及正则表达式,功能全面,解析速度和准确度非常高
1.1. 直接使用
Selector 是一个可以独立使用的模块。我们可以直接利用Selector这个类来构建一个选择器对象,然后调用它的相关方法如 xpath、css等来提取数据。
例如,针对一段 HTML 代码,我们可以用如下方式构建 Selector 对象来提取数据:
1.2 xpath选择器
1.2.1 测试代码
html = ''' <html> <head> <base href='http://example.com/' /> <title>Example website</title> </head> <body> <div id='images'> <a href='image1.html'>Name: My image 1 <br /><img src='image1_thumb.jpg' /></a> <a href='image2.html'>Name: My image 2 <br /><img src='image2_thumb.jpg' /></a> <a href='image3.html'>Name: My image 3 <br /><img src='image3_thumb.jpg' /></a> <a href='image4.html'>Name: My image 4 <br /><img src='image4_thumb.jpg' /></a> <a href='image5.html'>Name: My image 5 <br /><img src='image5_thumb.jpg' /></a> </div> </body> </html> '''
构建对象
response = Selector(text=html)
节点提取
result = response.xpath('//a')
注:这里面的话就使用常规xpath语法就好拉
1.3 正则匹配
Scrapy 的选择器还支持正则匹配。比如,在示例的 a 节点中的文本类似于Name: My image 1,现在我们只想把 Name: 后面的内容提取出来,这时就可以借助re方法
response.xpath('//a/text()').re('Name:\s(.*)')
给 re() 方法传了一个正则表达式,其中 (.*) 就是要匹配的内容
print(response.xpath('//a/text()').re('(.*?):\s(.*)'))
提取返回的第一个值
extract_first() extract()
from scrapy import Selector # Selector 框架的一个解析模块 html = ''' <html> <head> <base href='http://example.com/' /> <title>Example website</title> </head> <body> <div id='images'> <a href='image1.html'>Name: My image 1 <br /><img src='image1_thumb.jpg' /></a> <a href='image2.html'>Name: My image 2 <br /><img src='image2_thumb.jpg' /></a> <a href='image3.html'>Name: My image 3 <br /><img src='image3_thumb.jpg' /></a> <a href='image4.html'>Name: My image 4 <br /><img src='image4_thumb.jpg' /></a> <a href='image5.html'>Name: My image 5 <br /><img src='image5_thumb.jpg' /></a> </div> </body> </html> ''' response = Selector(text=html) # response.css() # response.xpath() # response.re() # from lxml import etree # etree.HTML(response.text) title = response.xpath('//title/text()').extract() title1 = response.xpath('//title/text()').extract_first() print(title) print(title1) # extract() 返回多组数据 # extract_first() 返回单条数据 第一次被匹配的数据 # 正则语法结构 print(response.xpath('//a/text()').re('Name:\s(.*)')) # 先定位数据 在使用正则分割 print(response.xpath('//a/text()').re('(.*?):\s(.*)'))
执行结果
['Example website'] Example website ['My image 1 ', 'My image 2 ', 'My image 3 ', 'My image 4 ', 'My image 5 '] ['Name', 'My image 1 ', 'Name', 'My image 2 ', 'Name', 'My image 3 ', 'Name', 'My image 4 ', 'Name', 'My image 5 ']
2 scrapy中间件

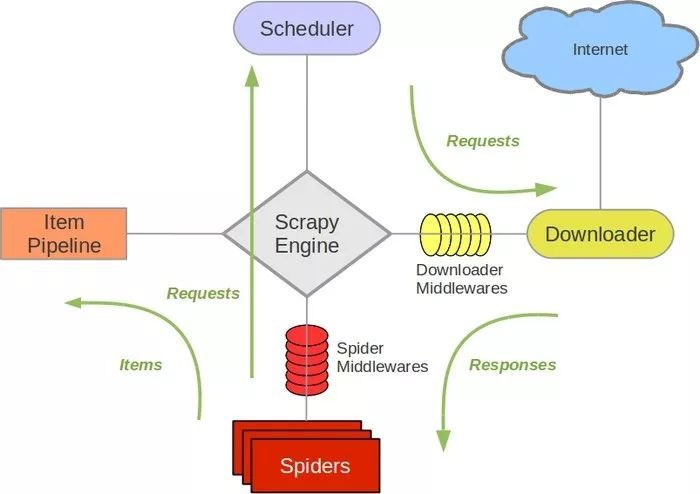
Scheduler 从队列中拿出一个 Request 发送给 Downloader 执行下载,这个过程会经过 Downloader Middleware 的处理。另外,当 Downloader 将 Request 下载完成得到 Response 返回给 Spider 时会再次经过 Downloader Middleware 处理。
也就是说,Downloader Middleware 在整个架构中起作用的位置是以下两个。
- 在
Scheduler调度出队列的Request发送给Downloader下载之前,也就是我们可以在Request执行下载之前对其进行修改。 - 在下载后生成的
Response发送给Spider之前,也就是我们可以在生成Resposne被Spider解析之前对其进行修改。
2.1 目的
Downloader Middleware 的功能十分强大,修改 User-Agent、处理重定向、设置代理、失败重试、设置 Cookies 等功能都需要借助它来实现。下面我们来了解一下 Downloader Middleware 的详细用法
注:如果没有中间件的话,就是一个光光的请求了
2.2 中间件介绍
可以看到里面主要有五个方法:
-
from_crawler:类方法,用于初始化中间件
-
process_request:每个request通过下载中间件时,都会调用该方法
-
process_response:处理下载器返回的响应内容
-
process_exception:当下载器或者处理请求异常时,调用此方法
-
spider_opened:内置的信号量回调方法
2.2.1 中间件激活
DOWNLOADER_MIDDLEWARES参数用来设置下载器中间件。其中,Key为中间件路径,Value为中间件执行优先级,「数字越小,越先执行」,当Value为「None」时,表示禁用。
2.3 自定义中间件
import random class RandomUserAgentMiddleware(): def __init__(self): self.user_agents = [ 'Mozilla/5.0 (Windows; U; MSIE 9.0; Windows NT 9.0; en-US)', 'Mozilla/5.0 (Windows NT 6.1) AppleWebKit/537.2 (KHTML, like Gecko) Chrome/22.0.1216.0 Safari/537.2', 'Mozilla/5.0 (X11; Ubuntu; Linux i686; rv:15.0) Gecko/20100101 Firefox/15.0.1' ] def process_request(self, request, spider): request.headers['User-Agent'] = random.choice(self.user_agents)
2.3.1 激活配置
DOWNLOADER_MIDDLEWARES = { 'scrapydownloadertest.middlewares.RandomUserAgentMiddleware': 543, }
2.3.3 拓展专题-配置自动化
地址:https://phantomjs.org/download.html
from selenium import webdriver from logging import getLogger from scrapy.http import HtmlResponse class SeleniumMiddleware(): def __init__(self): self.logger = getLogger(__name__) self.timeout = random.randint(1,3) self.browser =webdriver.Chrome() self.browser.set_window_size(1400, 700) self.browser.set_page_load_timeout(self.timeout) def process_request(self, request, spider): self.logger.debug('PhantomJS is Starting') self.browser.get(request.url) body = self.browser.page_source return HtmlResponse(url=request.url, body=body, request=request, encoding='utf-8',status=200) def __del__(self): self.browser.close()
测试python代码
import scrapy from pydispatch import dispatcher from scrapy import cmdline, signals class TestSpider(scrapy.Spider): name = 'test' start_url = 'https://careers.tencent.com/tencentcareer/api/post/Query?timestamp=1630663331818&countryId=&cityId=&bgIds=&productId=&categoryId=&parentCategoryId=&attrId=&keyword=python&pageIndex={}&pageSize=10&language=zh-cn&area=cn' def start_requests(self): for i in range(1,3): yield scrapy.Request(url=self.start_url.format(i),callback=self.parse) def parse(self, response): self.logger.info(response.text) if __name__ == '__main__': cmdline.execute('scrapy crawl test'.split())
3 scrapy数据存储
3.1 基于mongo存储
- 首页:https://hot.online.sh.cn/node/node_65634.htm
- 需求:使用框架采集
3.1.1 爬虫文件编写
from urllib.parse import urljoin import scrapy from scrapy import cmdline from news.items import NewsItem class HotSpider(scrapy.Spider): name = 'hot' start_urls = ['https://hot.online.sh.cn/node/node_65634.htm'] def parse(self, response): news_list = response.css('div.list_thread') for news in news_list: items = NewsItem() items['title'] = news.xpath('.//h2/a/text()').extract_first() items['times'] = news.xpath('.//h3/text()').extract_first() items['info'] = news.xpath('.//p/text()').extract_first() yield items # 处理翻页 next = response.xpath('//center/a[text()="下一页"]/@href').extract_first() if next: # https://movie.douban.com/top250?start=25&filter= url = 'https://hot.online.sh.cn/node/' print(url + next) yield scrapy.Request(urljoin(url, next), callback=self.parse) if __name__ == '__main__': cmdline.execute('scrapy crawl hot'.split())
3.1.2 管道文件编写
# Define your item pipelines here # # Don't forget to add your pipeline to the ITEM_PIPELINES setting # See: https://docs.scrapy.org/en/latest/topics/item-pipeline.html # useful for handling different item types with a single interface from itemadapter import ItemAdapter import pymongo class NewsPipeline: def open_spider(self,spider): self.client = pymongo.MongoClient() self.db = self.client.news # 指令库 def process_item(self, item, spider): items = dict(item) if isinstance(items,dict): self.db['xl'].insert(items) return item else: return '数据格式有误'
3.2 基于MySQL存储
3.2.1 配置编写
DATA_CONFIG = { 'config' : { 'host':'127.0.0.1', 'port':3306, 'user':'root', 'password':'', 'db':'yy', 'charset':'utf8' } }
3.2.2 存储文件编写
class NewsPipeline_mysql: def open_spider(self,spider): data_config = spider.settings['DATA_CONFIG'] self.conn = pymysql.connect(**data_config['config']) self.cursor = self.conn.cursor() def close_spider(self,spider): # 关闭游标和连接 self.cursor.close() self.conn.close() def process_item(self, item, spider): # 插入数到数据库 if isinstance(item, items.NewsItem_hot): try: sql = 'insert into info (title,crate_time,info) values (%s,%s,%s)' self.cursor.execute(sql, ( item['title'], item['times'], item['info'], )) # 提交 self.conn.commit() except Exception as e: self.conn.rollback() print('信息写入错误%s-%s' % (item['url'], e))


【推荐】国内首个AI IDE,深度理解中文开发场景,立即下载体验Trae
【推荐】编程新体验,更懂你的AI,立即体验豆包MarsCode编程助手
【推荐】抖音旗下AI助手豆包,你的智能百科全书,全免费不限次数
【推荐】轻量又高性能的 SSH 工具 IShell:AI 加持,快人一步
· 地球OL攻略 —— 某应届生求职总结
· 周边上新:园子的第一款马克杯温暖上架
· Open-Sora 2.0 重磅开源!
· 提示词工程——AI应用必不可少的技术
· .NET周刊【3月第1期 2025-03-02】
2020-09-16 Python自动化之pytest常用插件
2017-09-16 Jmeter四种关联方法讲解