GIT
######################
######################
https://blog.csdn.net/p10010/article/details/51336332
首先,你需要注册一个 github账号,最好取一个有意义的名字,比如姓名全拼,昵称全拼,如果被占用,可以加上有意义的数字.
本文中假设用户名为 chuaaqiCSDN(我的博客名的全拼)
一、gihub账号注册与仓库创建
1. 注册账号:
地址: https://github.com/
输入账号、邮箱、密码,然后点击注册按钮.
2. 初始设置
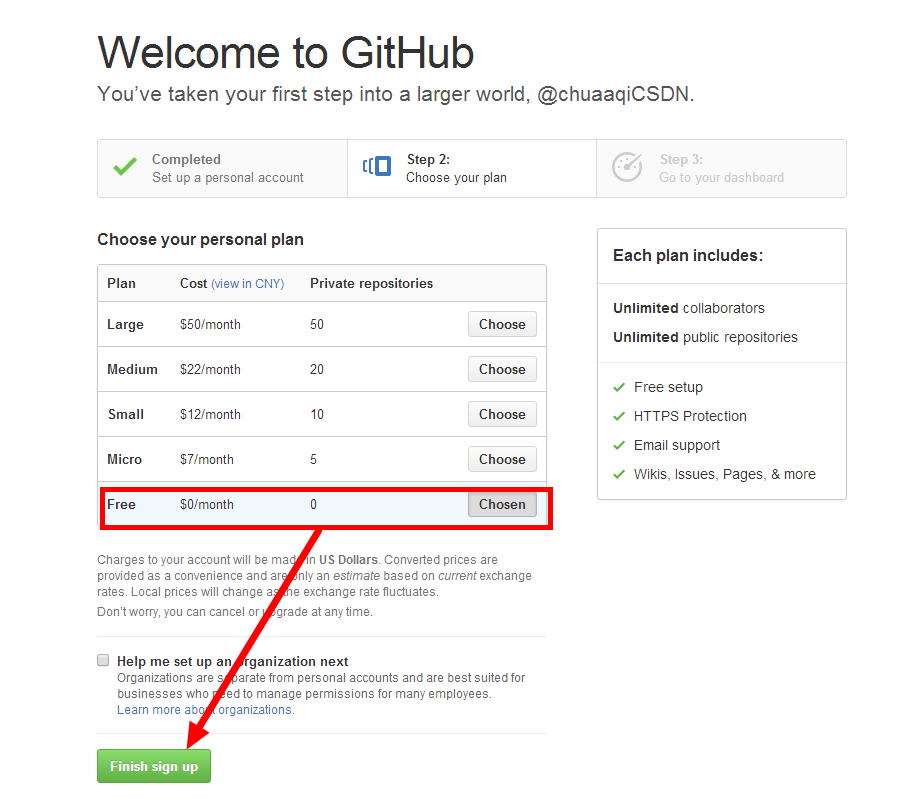
注册完成后,选择Free免费账号完成设置。
3.验证账号
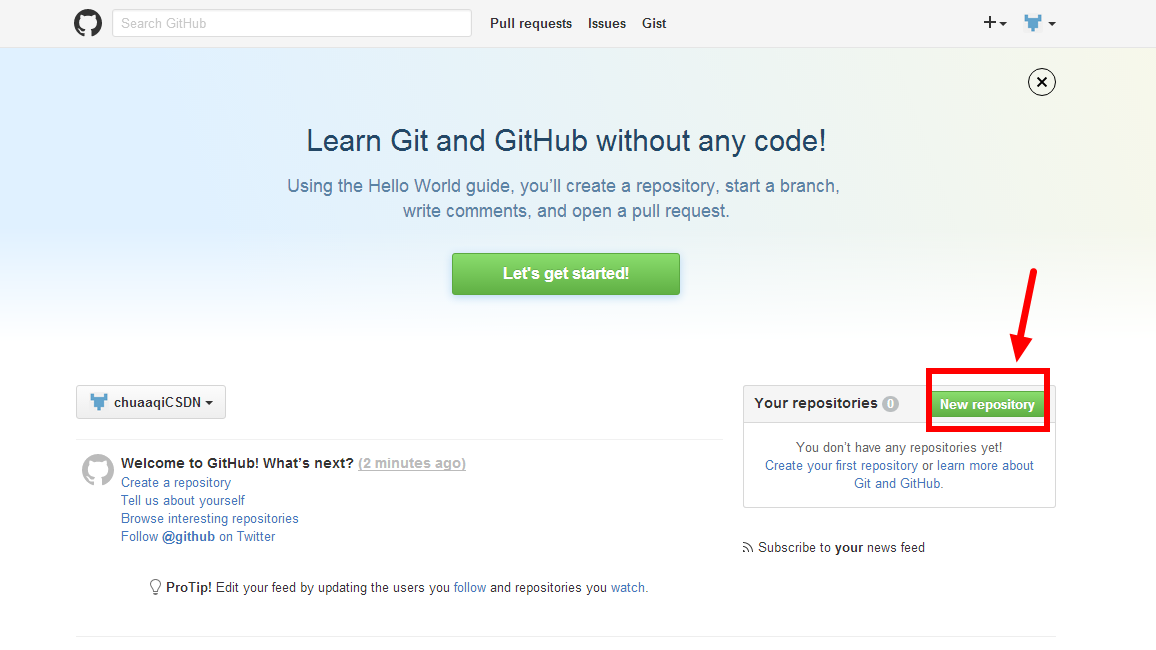
新建一个仓库
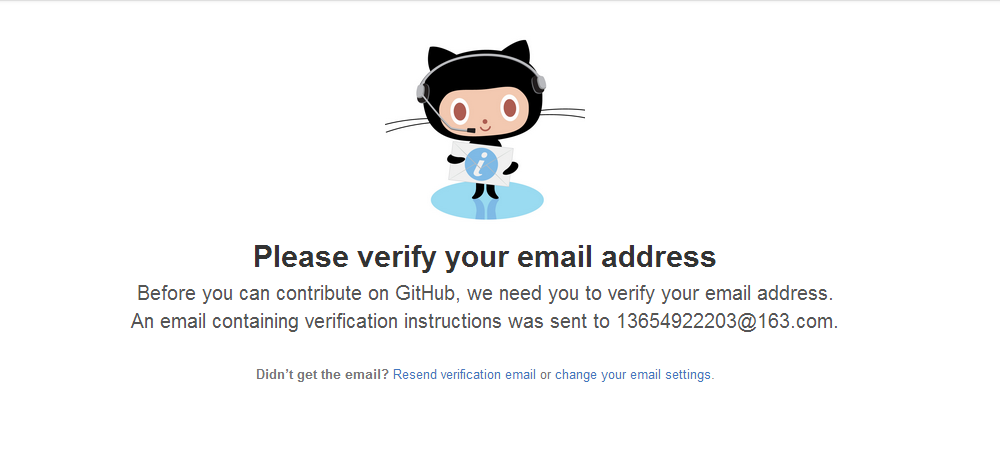
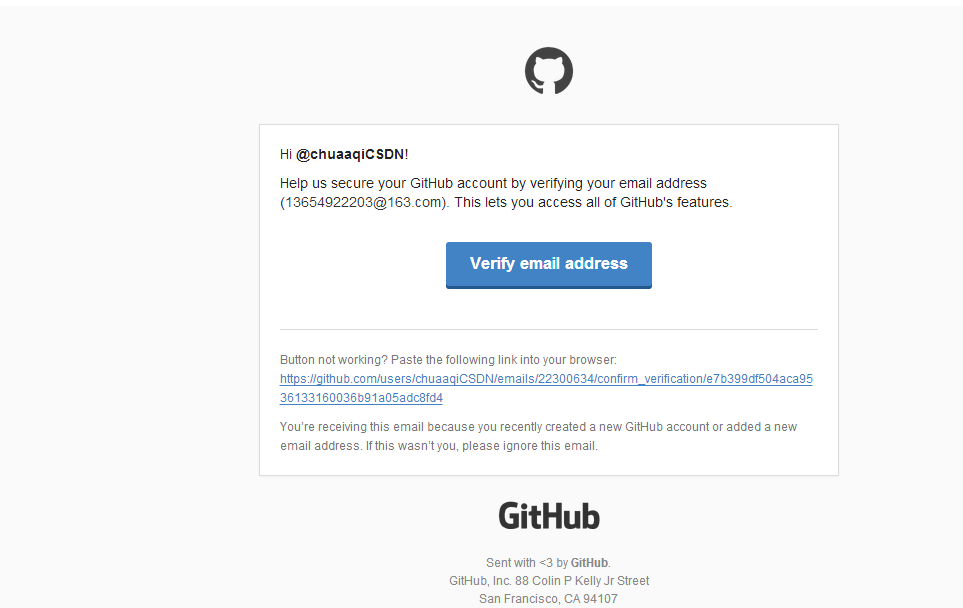
发现邮箱地址未验证
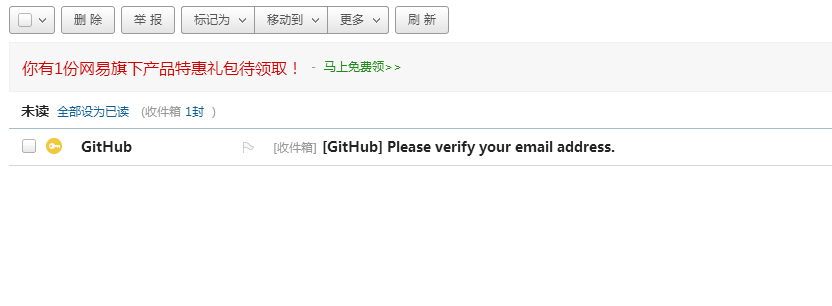
登录你注册时的邮箱,验证
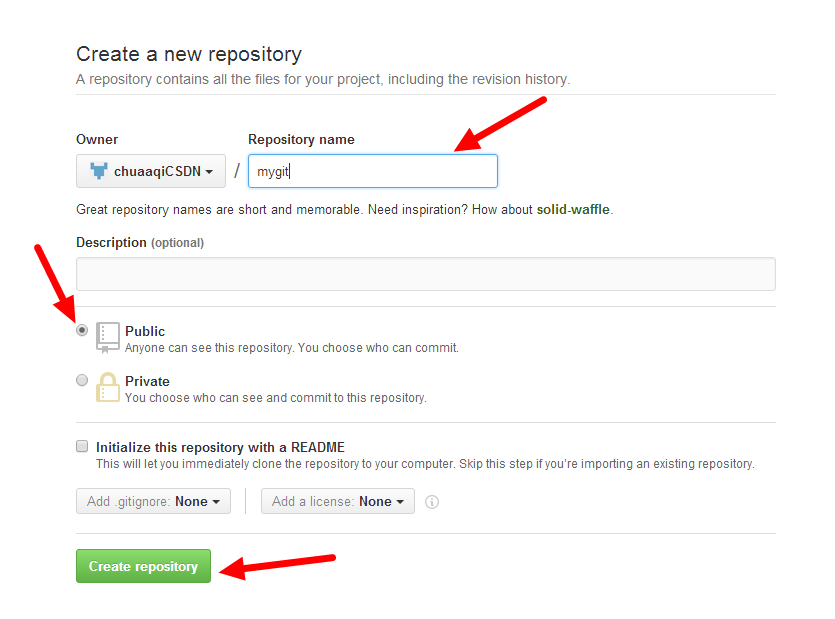
4、新建仓库
输入仓库名,点击创建
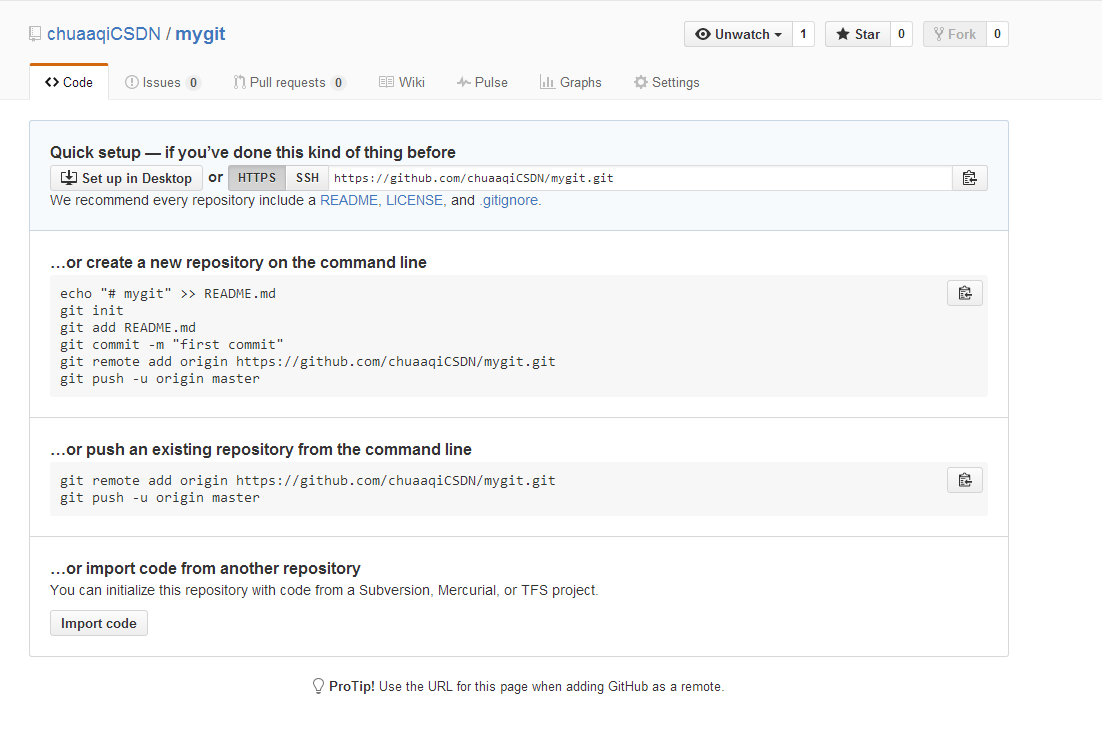
仓库创建成功
二、本地仓库上传到github仓库
在F盘下mygit2016仓库中有一个hello.txt文件,现在要讲hello.txt文件上传至github中
1、文件保存至本地仓库
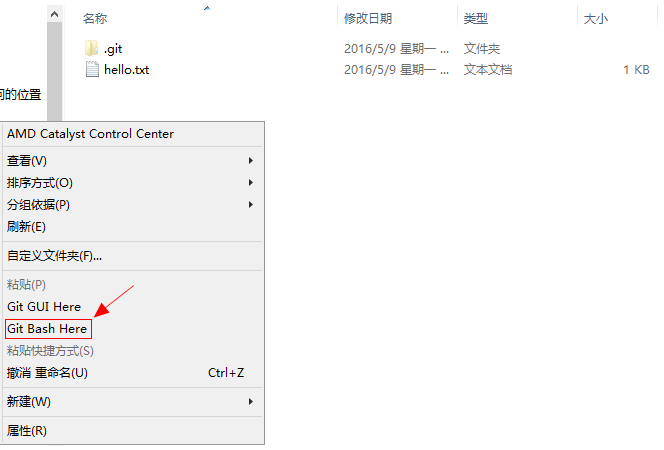
鼠标右击选择 Git Bash Here
配置用户名和邮箱
添加和提交
提交成功
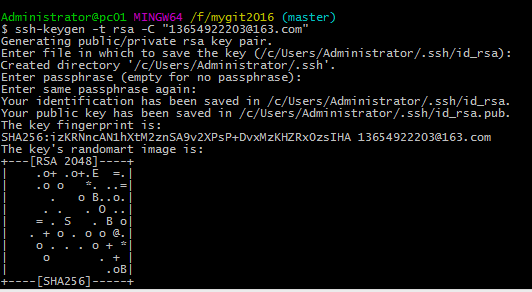
2、生成SSH密钥
$ ssh-keygen -t rsa -C "13654922203@163.com"
按3个回车,密码为空。
在C:\Users\Administrator\.ssh目录下找到id_rsa.pub复制里面所有内容
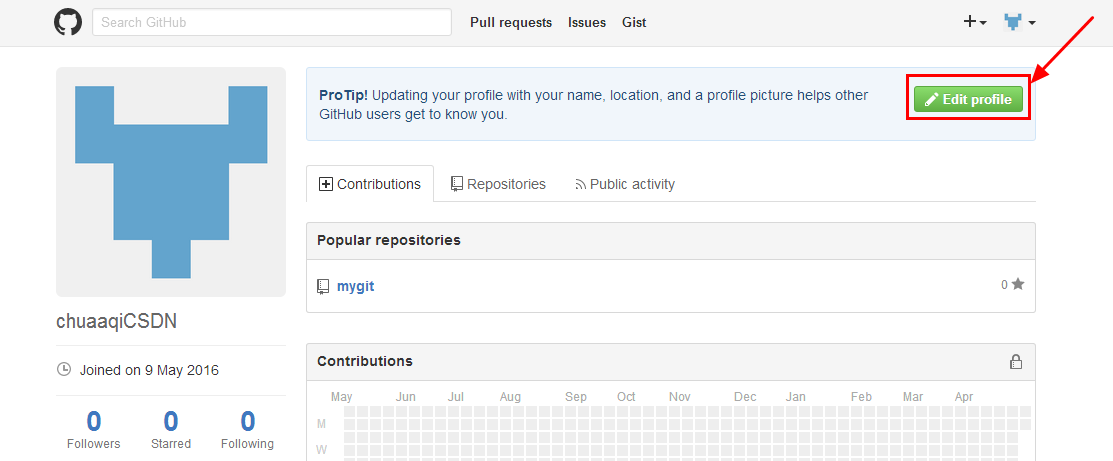
登录你的gihub账号,点击Your profile
然后点击Edit profile
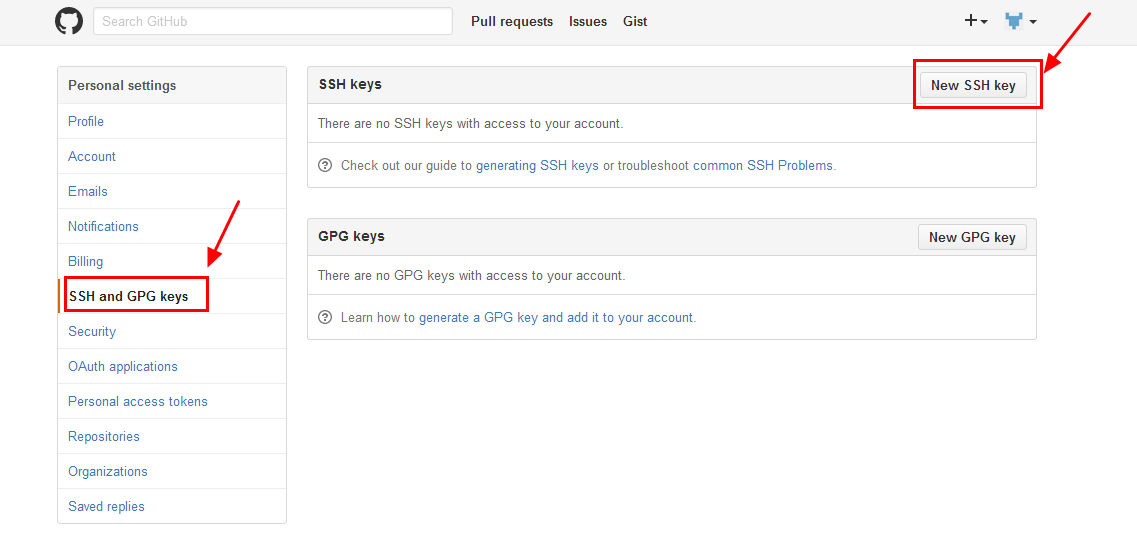
选择SSH并新建一个SSH Key
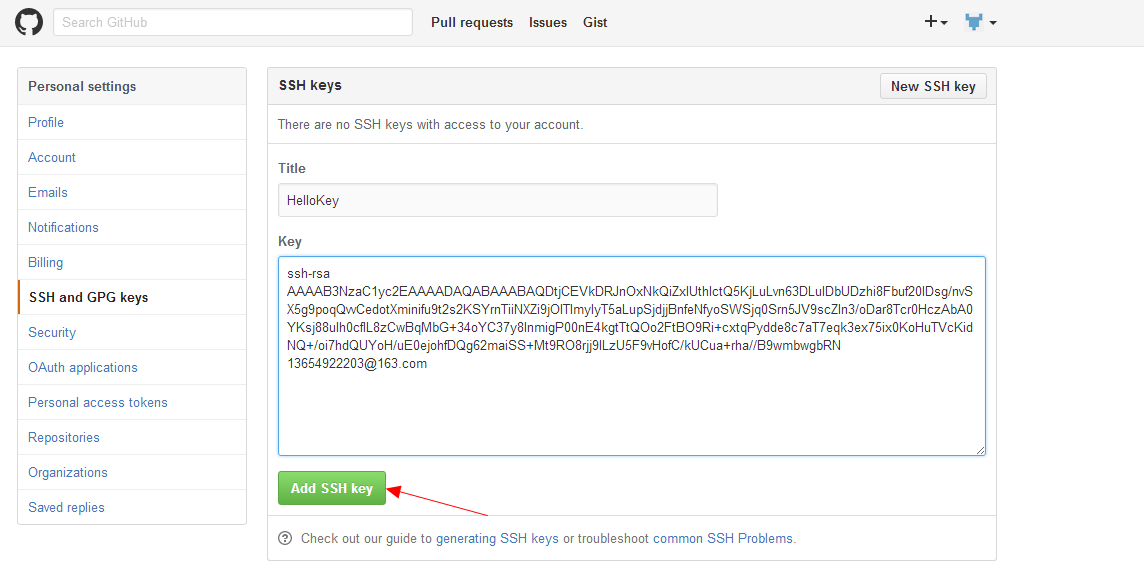
其中Title中的名称可以任意填写,将C:\Users\Administrator\.ssh目录下id_rsa.pub复制的所有内容粘贴到Key中,点击Add SSH Key,SSH密钥完成
3、远程提交
添加新的远程仓库
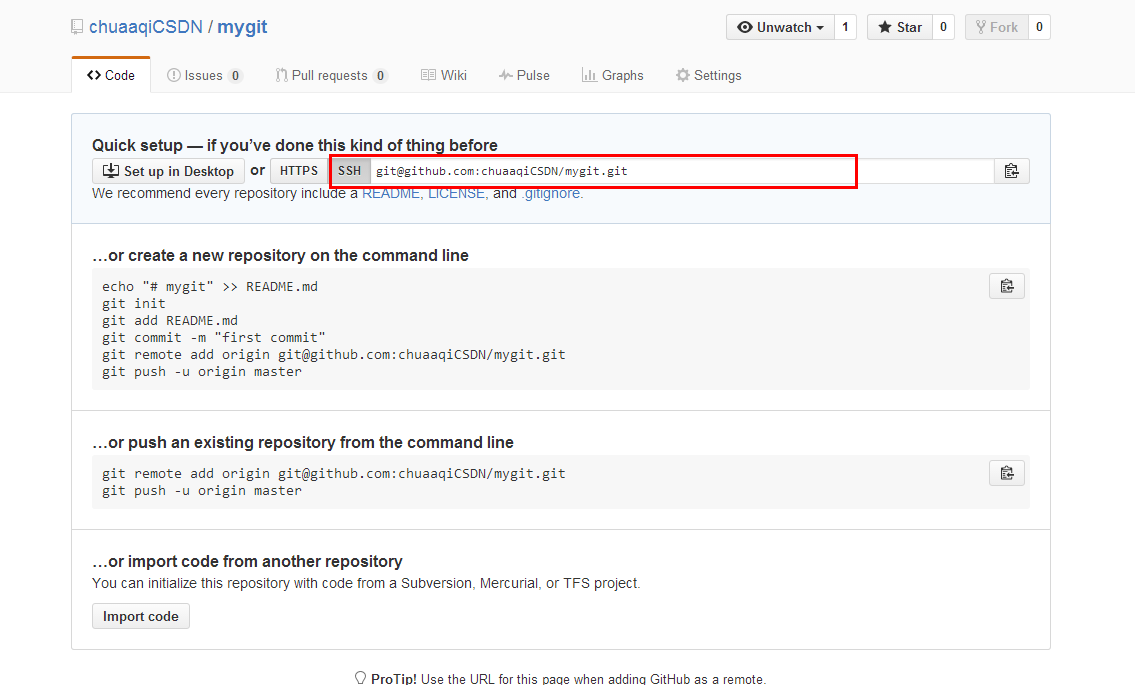
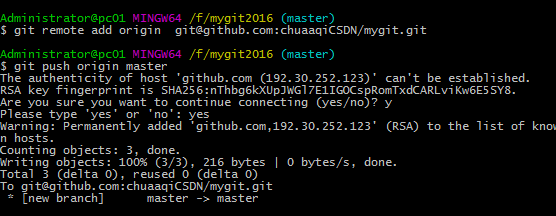
$ git remote add origin git@github.com:chuaaqiCSDN/mygit.git其中红色部分的URL时是gihub中的SSH
远程提交 git push origin master
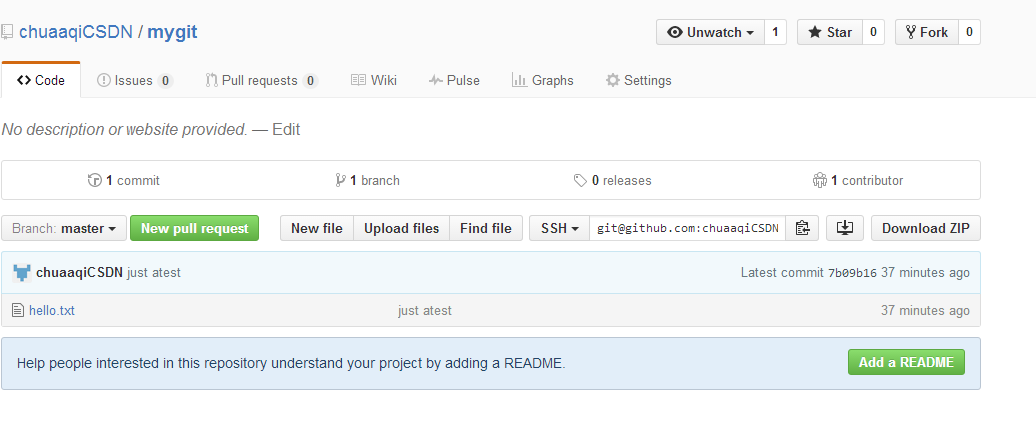
这时再看gihub中的mygit仓库,发现多了一个hello.txt文件
远程提交完成!!!!!
######################
https://jingyan.baidu.com/article/414eccf67600a56b431f0af5.html
Git是一个开源的分布式版本控制系统,用以有效、高速的处理从很小到非常大的项目版本管理。Git 是 Linus Torvalds 为了帮助管理 Linux 内核开发而开发的一个开放源码的版本控制软件。
本文介绍的是windows下使用git并创建一个代码库
注意事项
-
此文是windows下的git
sampe 2:
GIT是一款分布式的版本控制系统,最初是为Linux内核版本控制而开发的,在团队协作上比CVS等集中式的版本控制管理更有优势。经过多年的发现,目前,GIT可以运行在Linux/Windows/MAC等操作系统上。以Windows为例,介绍GIT的常规使用方法。
方法/步骤
-
下载MSYSGIT
从https://git-for-windows.github.io/中下载MSYSGIT并安装。安装完毕后,在开始菜单中就出现了GIT,可以看到有三种运行方式:GIT Bash、GIT CMD、GIT GUI,其中Bash和CMD都是命令行的运行方式,比较直接,但是要求熟悉GIT命令,推荐采用GUI的运行方式,比较直观,容易上手操作。
-
创建新仓库 (一般使用文字bash 创建代码仓库)
点击“Create New Repository”菜单,按照提示选择要创建仓库的路径,点击“Create”按钮就创建了一个新仓库。新仓库在本地机器上原本就是一个独立的目录,建立为仓库后,新增了一个.git文件夹,用于保存版本等信息。
-
新建一个文件
进入本地仓库目录,新建一个文本文件testGIT.txt。在GIT中单击Rescan按钮,在UnstagedChanges列表中就出现了该文件。
-
增加到版本库 (这一步可以图形化操作)
单击“StageChanged”按钮,将文件增加到版本库的暂存区。
-
提交新文件 (这一步可以图形化操作)
输入提交版本信息,单击“Commit”按钮,提交新文件,这样就在GIT库中增加了一个新文件。
-
浏览库中的文件 (这一步可以图形化操作) (这一步可以图形化操作)
选择Repositroy菜单中的“Browse Master’s Files”,可以浏览库中的文件列表。
-
修改文件 (这一步可以图形化操作)
在本地文件夹中打开testGIT.txt文件,编辑后再保存。点击GIT GUI中的Rescan按钮,可以看到该文件又进入“Unstaged Changes”列表。在Modified Not Staged列表中显示出了变更内容。与增加文件操作一样,先后点击“StageChanged”和“Commit”按钮,将变更内容追加到仓库中。
-
查看本地仓库的修改历史 (这一步可以图形化操作)
点击“Repositroy”菜单中的“Visualize Master’s History”,显示本地仓库的修改历史。
-
连接远程仓库服务器
在GitHub上申请一个GIT仓库,通过“Remote”菜单中的“Add”功能,连接到GitHub上的仓库,同时初始化远程仓库并将本地仓库数据上传到远程仓库。
END
注意事项
-
GIT之所以称之为分布式版本管理软件,就在于每一台GIT仓库都是一个完整的副本,其运行不需要与服务器连接。也可以自己建立一台GIT服务器,让团队成员都从这台服务器上拷贝文件,也利于分工协作的开展。
#####sample 2.2 如何打开已有的仓库
1.如何打开已有的仓库
选择git gui . 然后打开已经有仓库吗,然后选择 程序所在的目录即可
##sample 3 git 要处理的问题和常见命令
https://blog.csdn.net/Jiangtagong/article/details/122863400
https://blog.csdn.net/m0_62336865/article/details/127102424
########6.6 解决协同开发冲突问题
场景:
开发者1:小李 开发者2:小王
git pull xsbc master(main) git pull xsbc master(main)
在Hello在HelloWorld.java新增内容“bbb”
在Hello在HelloWorld.java新增内容“aaa”
git add .
git commit -m ''
git push xsbc master
git add .
git commit -m ''
git push xsbc master【会失败!】
原因分析:
在小李pull之后,push之前被其他开发人员push过
如何解决?
git pull xsbc master 【将小王修改的内容拉取到小李本地】,此时HelloWorld.java
<<<<<<< HEAD
aaa
=======
bbb
>>>>>>> c17dc45c80272240fb02467d9be937238b6efb2b
对文件进行冲突合并
git add .
git commit -m ''
git push xsbc master
七、分支管理
7.1 何为分支
分支就是版本库中记录版本位置(支线),分支之间项目会影响,使用分支可以对项目起到保护作用;
分支就是一条时间线,每次提交就在这条时间线上形成一个版本;
#####GIT 常见命令:
Git基本使用
4.1 创建版本库
在工作空间的目录中,右键“Git Bash Here”
输入git init指令,创建版本库(就是一个.git目录)
4.2 查看版本库状态
git status
4.3 将工作空间的修改add添加到暂存区
git add a.txt 表示只将工作空间中的某个文件add到暂存区
git add . 表示将工作空间中所有文件都add到暂存区
如果加不成功,可以考虑加入-f 参数
git add -f .
git add -f a.txt
4.4 将暂存区内容提交到版本库(仓库)
git commit -m '版本说明'
4.5 查看版本库中的历史版本
git log --oneline # oneline表示每个版本信息只显示一行
get log # 显示每个版本的详细信息
4.6 设置用户信息
将暂存区的内容提交到版本时,会记录当前版本提交的用户信息,因此在版本提交之前需先绑定用户的信息。
git config --global user.name '名字'
git config --global user.email '邮箱'
4.7 同步历史版本到工作空间
换言之,将工作空间同步到哪个版本!这样工作空间的项目就会更新!其中Head表示当前的版本。
git checkout 版本号
###git 分支管理
分支管理
7.1 何为分支
分支就是版本库中记录版本位置(支线),分支之间项目会影响,使用分支可以对项目起到保护作用;
分支就是一条时间线,每次提交就在这条时间线上形成一个版本;
7.2 分支特性
创建一个新的版本库,默认创建一个主分支(master/main分支)
每个分支可以进行单独管理(常规分支、保护分支、只读分支)
分支是可以合并的
7.3 分支操作
查看分支:git branch
创建分支:git branch branch_name
切换分支:git checkout branch_name
剪出分支(创建一个新分支并切换到此分支):git checkout 项目版本 -b branch_name
合并分支:git merge branch_name(将branch_name合并到当前分支上)
删除本地分支:git branch -d localBranchName
删除远程分支:git push origin(远程仓库名称) --delete remoteBranchName(分支名字)
————————————————
版权声明:本文为CSDN博主「路上的追梦人」的原创文章,遵循CC 4.0 BY-SA版权协议,转载请附上原文出处链接及本声明。
原文链接:https://blog.csdn.net/Jiangtagong/article/details/122863400
————————————————
版权声明:本文为CSDN博主「路上的追梦人」的原创文章,遵循CC 4.0 BY-SA版权协议,转载请附上原文出处链接及本声明。
原文链接:https://blog.csdn.net/Jiangtagong/article/details/122863400
————————————————
版权声明:本文为CSDN博主「路上的追梦人」的原创文章,遵循CC 4.0 BY-SA版权协议,转载请附上原文出处链接及本声明。
原文链接:https://blog.csdn.net/Jiangtagong/article/details/122863400
##### sample git 上传 到远程仓库
https://blog.csdn.net/qq_58389625/article/details/132015394
简易的命令行入门教程:
-》Git 全局设置:
git config --global user.name "dddd"
git config --global user.email "dddd_cn@sina.com"
创建 git 仓库:
mkdir ak
cd ak
git init
touch README.md
git add README.md
git add -f .
git commit -m "first commit"

git remote add origin https://gitee.com/dddd/ak.git

说明:
dddd : username
ak: 仓库名
fei ->username/ aksh ->仓库名
git push -u origin "master"
已有仓库?
cd existing_git_repo
git remote add origin https://gitee.com/dddd/ak.git
git push -u origin "master"


-》
后继每次本地仓库更新完成后,都可以使用如下方式更新到远程代码库,
如果弹出gitee的登录窗口登录即可
回到gitee仓库页面刷新一下即可看到代码已经上传完成了
git push -u origin "master"
7.强制推送(远程仓库为空可跳过)
将远程仓库拉到本地仓库git版本控制,如果根据此贴创建的仓库可以不执行
git pull --rebase origin master
###sample 5 Git二多次上传代码到代码仓库
https://blog.csdn.net/m0_63031112/article/details/133125241
简写版本:
##再次将更新记录,更新到GIT
git config user.name
git config user.email
git add -f .
或者
git add -f step0_open.py
git commit -m "1107commit"
git pull origin master
git push -u origin master
详细版本:
使用终端或命令行界面,进入你的项目目录。你可以使用 cd 命令切换到项目目录,例如:
cd /path/to/your/project
确保你已经配置好了 Git,包括设置了用户名和邮箱。你可以使用以下命令来配置,如果已经配置这一步,就忽略:
git config --global user.name "Your Name"
git config --global user.email "youremail@example.com"
获取当前配置信息
git config user.name
git config user.email
使用 git status 命令检查当前项目的修改状态,确保你要提交的修改已经添加到暂存区。如果有未添加的修改,可以使用 git add 命令将它们添加到暂存区,例如:
2. git add .
这将添加所有未跟踪和已修改的文件。使用 git commit 命令提交你的修改,例如:
3. git commit -m "添加了新功能"
现在,你可以使用 git pull 命令拉取远程仓库的最新更改,以确保你的本地仓库是最新的:
4.git pull origin master
这里假设你的远程仓库分支是 main,如果不是,请替换成你的分支名称。
最后,使用 git push 命令将你的修改推送到远程仓库:
5. git push origin master
同样,这里的 main 是你要推送的分支名称,确保替换成你的分支名称。
这样就完成了将项目代码更新并上传到代码仓库的过程。注意,具体的命令可能会因项目的配置和远程仓库的设置而有所不同,所以请根据你的项目和仓库的实际情况进行调整。
————————————————
版权声明:本文为CSDN博主「南城余coding」的原创文章,遵循CC 4.0 BY-SA版权协议,转载请附上原文出处链接及本声明。
原文链接:https://blog.csdn.net/m0_63031112/article/details/133125241
报错1:如果遇到上面报错:
rror: failed to push some refs to 'https://gitee.com/feiyun8616/akshare.git'
hint: Updates were rejected because the remote contains work that you do
hint: not have locally. This is usually caused by another repository pushing
hint: to the same ref. You may want to first integrate the remote changes
hint: (e.g., 'git pull ...') before pushing again.
hint: See the 'Note about fast-forwards' in 'git push --help' for details.
解决办法: (1-4 已经跑了,只需要跑5,6)
1.git init //初始化仓库
2.git add .(文件name) //添加文件到本地
3.git commit -m "first commit" //添加文件描述信息
4.git remote add origin 远程仓库地址 //链接远程仓库
5.git pull origin master // 把本地仓库的变化连接到远程仓库master/main分支
6.git push -u origin master //把本地仓库的文件推送到远程仓库master/main分支
报错2:
fatal: refusing to merge unrelated histories
转载来自:https://www.educative.io/edpresso/the-fatal-refusing-to-merge-unrelated-histories-git-error
在“fatal: refusing to merge unrelated histories”(即,不知道彼此的存在,并已不匹配的项目提交历史)。
解决方案
通过切换allow-unrelated-histories开关可以解决该错误。在git pull或git merge命令之后,添加以下标记:
git pull origin master --allow-unrelated-histories
更多信息可以找到这里,在Git的官方文档。
报错3:
【git报错】hint: Updates were rejected because the tip of your current branch is behind
有时候作为非master权限的项目参与者
在push的时候会遇到这样的报错:
hint: Updates were rejected because the tip of your current branch is behind
由于push的操作,本质上是用本地的最新版本,去覆盖远程仓库中某个分支的上一个版本,一般默认是master分支
此时就会由于不具备操作master分支的权限而报这个错误
解决方法很简单:
1)像很多帖子说的一样加一个强制参数-f
git push -u origin master -f
但这个是很危险的,因为会覆盖掉受保护的master分支
所以推荐以下做法
2)新建一个分支
git branch [new_branch_name]
然后push给这个新的branch
###报错4
解决error: Committing is not possible because you have unmerged files.
番茄牛腩不吃番茄
于 2021-04-01 11:26:24 发布
提交代码时发现已经 git merge了,执行提交操作却报:error: Committing is not possible because you have unmerged files ( 错误:由于未合并文件,无法提交文件。).
lifeng@zx-047 MINGW64 /f/project_gitee/Test (master|MERGING)
$ git commit -m'文件整合合并'
error: Committing is not possible because you have unmerged files.
hint: Fix them up in the work tree, and then use 'git add/rm <file>'
hint: as appropriate to mark resolution and make a commit.
fatal: Exiting because of an unresolved conflict.
U djangoProject/hello_django/hello_django/asgi.py
U djangoProject/hello_django/hello_django/settings.py
U djangoProject/hello_django/hello_django/urls.py
U djangoProject/hello_django/hello_django/wsgi.py
U djangoProject/hello_django/manage.py
解决方案如下:
首先 git status 查看下哪些没合并
lifeng@zx-047 MINGW64 /f/project_gitee/Test (master|MERGING)
$ git status
On branch master
Your branch is up to date with 'origin/master'.
You have unmerged paths.
(fix conflicts and run "git commit")
(use "git merge --abort" to abort the merge)
Changes to be committed:
new file: djangoProject/hello_django/hello_apps/__init__.py
new file: djangoProject/hello_django/hello_apps/admin.py
new file: djangoProject/hello_django/hello_apps/apps.py
new file: djangoProject/hello_django/hello_apps/migrations/__init__.py
new file: djangoProject/hello_django/hello_apps/models.py
new file: djangoProject/hello_django/hello_apps/tests.py
new file: djangoProject/hello_django/hello_apps/views.py
new file: djangoProject/hello_django/hello_django/__init__.py
new file: "document/testSpecification/\344\272\247\345\223\201\346\265\213\350\257\225\350\247\204\350\214\203.xlsx"
new file: document/testUseCaseDefectLibrary/case_library.md
new file: document/testUseCaseDefectLibrary/defects_library.md
new file: document/testUseCaseDefectLibrary/flowchart_template.md
new file: performance/locustProject/common/__init__.py
new file: performance/locustProject/common/auth.py
new file: performance/locustProject/common/config.py
new file: performance/locustProject/locustfile.py
new file: performance/locustProject/requirements.txt
new file: requirements.txt
Unmerged paths:
(use "git add <file>..." to mark resolution)
added by them: djangoProject/hello_django/hello_django/asgi.py
added by them: djangoProject/hello_django/hello_django/settings.py
added by them: djangoProject/hello_django/hello_django/urls.py
added by them: djangoProject/hello_django/hello_django/wsgi.py
added by them: djangoProject/hello_django/manage.py
其次执行下 git add 从新添加下;其次再 git commit -m' 注释信息 ';最后再 git push
lifeng@zx-047 MINGW64 /f/project_gitee/Test (master|MERGING)
$ git add *
The following paths are ignored by one of your .gitignore files:
venv
hint: Use -f if you really want to add them.
hint: Turn this message off by running
hint: "git config advice.addIgnoredFile false"
lifeng@zx-047 MINGW64 /f/project_gitee/Test (master|MERGING)
$ git commit -m'解决冲突文件'
[master 50712fc] 解决冲突文件
lifeng@zx-047 MINGW64 /f/project_gitee/Test (master)
$ git push origin master
Enumerating objects: 1, done.
Counting objects: 100% (1/1), done.
Writing objects: 100% (1/1), 248 bytes | 248.00 KiB/s, done.
Total 1 (delta 0), reused 0 (delta 0), pack-reused 0
remote: Powered by GITEE.COM [GNK-5.0]
To gitee.com:lifeng0402/Test.git
6673675..50712fc master -> master
————————————————
版权声明:本文为CSDN博主「番茄牛腩不吃番茄」的原创文章,遵循CC 4.0 BY-SA版权协议,转载请附上原文出处链接及本声明。
原文链接:https://blog.csdn.net/LIFENG0402/article/details/115369241
##### sample 6 生成一个新仓库,并初始化,然后更新本地仓库和远程仓库
###首先在GIT 网站生成一个新的远程仓库project1,,然后在window 本地做如下操作
git config --global user.name "AAA"
git config --global user.email "AAA_cn@sina.com"
git config user.name
git config user.email
##本地创建新的仓库镜像,并且第一次同步到远程 ()
mkdir finreport_anlyst
cd finreport_anlyst
git init
touch README.md
git add README.md
git add -f step2_parase_data_tt.py
git commit -m "first commit"
git remote add origin https://gitee.com/AAA/anlyst.git
git push -u origin "master"
##再次第二次 将最新更新脚本程序,更新到GIT,还可以用GIT GUI版本进行管理
1.打开GUI 界面
2.依次 点击 rescan , statechange ,commit, push 既可上传到远程仓库
##再次第二次 将最新更新脚本程序,更新到GIT (文字版本)
git config user.name
git config user.email
git add -f .
或者
git add -f step0_open.py
git commit -m "1107commit"
git pull origin master
git push -u origin master
######
已有仓库?( 此段还没有用)
cd existing_git_repo
git remote add origin https://gitee.com/AAA/finreport_anlyst.git
git push -u origin "master"


