转 LINUX操作系统如何启动HTTPD服务
https://blog.csdn.net/apple_llb/article/details/50727255
LINUX下启动HTTPD服务的方法
查看本机Linux是否安装了httpd

查看httpd命令放在何处

用命令
cat /etc/httpd/conf/httpd.conf | more
查看httpd.conf配置文件的内容

这里的DocumentRoot "/var/www/html"
指的是网页的存放路径

这里的双引号中的路径要与DocumentRoot "/var/www/html"的双引号中的路径一样

这里的listen80就是指http使用的默认端口
搜索listen可以快速找到

使用命令service httpd status可以查看httpd的运行状态
可以看到这里的httpd正在运行。

使用命令 service httpd stop可以停止http服务

使用service httpd start可以启动httpd服务

只用service httpd restart可以重新启动httpd服务。

以上就是学习啦小编为大家提供的解决方法,希望能帮助到大家!!!最后希望大家2016过得越好,新年快乐!!
日志目录为:
cd /etc/httpd/logs
#####
查看Linux 、Apache 、 MySQL 、 PHP 版本的方法
原创fanxiangdaili 最后发布于2017-08-07 10:54:47 阅读数 39504 收藏
展开
1. 查看linux的内核版本,系统信息,常用的有三种办法:
uname -a;
more /etc/issue;
cat /proc/version;
2. 查看apache的版本信息
如果是通过yum,或者是rpm安装的,可以使用rpm -qa |gerp httpd 来查看;
还可以通过httpd -v来查询;
当然,安装好apache后,可以直接elink回环查看apache的信息。
3.查看php的版本信息
如果是通过yum,或者是rpm包安装的,可以使用rpm -qa |grep php来查看;
同样,也可以使用php -v来查看php的版本信息;
一般情况下,大多是通过安装lamp后,使用phpinfo的测试页来查看安装的php的信息;
具体办法为在/var/www/下新建index.php文件,具体内容即
<?
php phpinfo();
?>
即可。然后在/etc/httpd/conf/httpd.conf文件中添加index.php类型,然后重启httpd,即可得到如下结果。
4. 查看mysql的版本信息
如果是通过yum安装的,或者是rpm包安装的,可以使用rpm -qa |grep mysql 来查看;
也可以使用mysql -V 或者是--help|grep Distrib来查看;
也可以进入mysql,然后通过命令select version();来查看;
或者是status;命令查看。
5.总结
linux 下查看Apache版本 httpd -v
linux 下查看PHP版本 php -v
linux 下查看mysql版本 mysql -V (大写的V)
————————————————
版权声明:本文为CSDN博主「fanxiangdaili」的原创文章,遵循 CC 4.0 BY-SA 版权协议,转载请附上原文出处链接及本声明。
原文链接:https://blog.csdn.net/fanxiangdaili/article/details/76822336
###apache 启动报错,可能原因:
感谢
- 新网/感谢Satish
主机 Apache 启动报错:Starting httpd: httpd: bad user name apache
问题现象
启动 Apache 的时候(例如使用命令“:/etc/init.d/httpd start”)出现错误 :Starting httpd: httpd: bad user name apache(如下图)

问题原因
造成该问题的原因是系统中不存在用户 apache,因此导致启动失败。
验证是否存在 apache 用户,可执行命令:
id apache
如提示 “id: apache: No such user”,则说明 apache 用户不存在
解决方案
Run config test
[root@9001 conf_0.d]# /etc/init.d/httpd configtest
Syntax OK
Check what users and group set in httpd.conf
User apache
Group apache
Disable SELinux if its enabled.
用以下命令:
useradd apache
新创建一个 Apache 用户,然后再启动 httpd。
主机 Apache 启动告警:Could not reliably... qualified domain name
问题现象
Apache 启动报错如下:

问题原因
这是 Apache 的提示信息,因为在配置文件 httpd.conf 中没有绑定域名,这个提示信息就是告诉用户,需要给 Apache 绑定域名。
解决方案
修改 Apache 的配置文件
1.找到 Apache 配置文件的路径,例如一键安装脚本的路径是:/alidata/server/httpd/conf/ 目录
2.编辑 Apache的 配置文件:httpd.conf
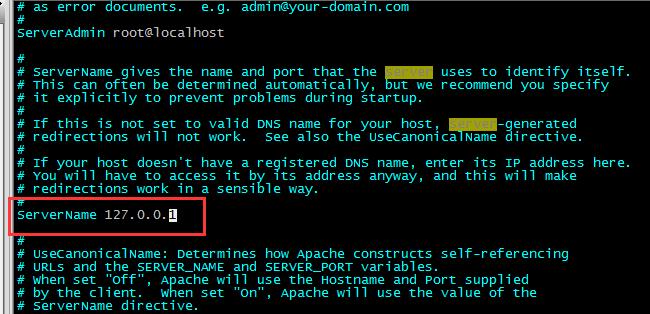
找到 ServerName 一行,将默认的
#ServerName www.example.com:80
取消#号修改为
ServerName 127.0.0.1

注意:也可以自定义域名
3.启动 Apache 服务

###sample apache 日志过大
感谢 Davide、
https://stackoverflow.com/questions/2832743/access-log-is-huge-not-being-archived-how-to-reset-it
https://serverfault.com/questions/507569/how-to-control-error-log-file-size
方法1 disable apache 日志
A simple solution is to disable access_log, commenting only one line on the configuration file.
Source: https://www.mydigitallife.info/how-to-disable-and-turn-off-apache-httpd-access-and-error-log/
In order to disable and turn off the Apache logging, just comment out the log lines in the Apache configuration file, httpd.conf, which normally located in /etc/httpd/conf, /etc/apache/conf, /etc/apache2/conf, \usr\local\apache\conf or \usr\local\apache2\conf directory.
In httpd.conf, the logging is defined by a CustomLog directive for access logs and an ErrorLog directive for error logs. For example,
CustomLog /usr/local/apache/logs/access_log common
ErrorLog “logs/error_log”
Commenting out the line by adding # (hash, pound or number sign) to the front of the line. To disable logging of access log, comment the line of CustomeLog, and likewise, comment the line of ErrorLog to disable logging of error log. Restart the Apache web server for the change to take effect.
Note: CustomLog and ErrorLog are also been defined within VirtualHost declaration too for logging the activity of particular virtual host. Disabling logging for virtual hosts only may cause the log information been written to main Apache log files.
方法2: 使用rotate 循环方法
As Jonathan says, the default size is over 1MB, but you can configure Apache for a bigger size. For example, the Apache Documentation shows:
CustomLog "|bin/rotatelogs /var/logs/logfile 5M" common
This configuration will rotate the logfile whenever it reaches a size of 5 megabytes.
ErrorLog "|bin/rotatelogs /var/logs/errorlog.%Y-%m-%d-%H_%M_%S 5M"
This other will rotate the error logfile whenever it reaches a size of 5 megabytes, and the suffix to the logfile name will be created of the form errorlog.YYYY-mm-dd-HH_MM_SS.
###sample
prod is 5.5, we need install php 5.5 in linux
PHP 5.5.38 (cli) (built: Aug 28 2018 18:26:41)
Copyright (c) 1997-2015 The PHP Group
Zend Engine v2.5.0, Copyright (c) 1998-2015 Zend Technologies
诉我说我从zabbix配置里cp过来的文件有语法错误,呵呵了,折腾了我好几个小时,最后终于解决了。
解决方法::原来是我的php版本过低,好像是不能解析这个东西,要换成5.4以上的版本才行,然后我就重装了php-5.5.38,又重新复制zabbix的zabbix-3.0.16/frontends/php/* 到/application/nginx/html/zabbix/,重启Nginx,好了。
2.2升级PHP
php建议>=5.4,如果小于这个版本会出现以下报错:
PHP Parse error: syntax error, unexpected '[' in /var/www/html/zabbix/index.php on line 29,我第一次安装就是没有升级PHP,查看apache日志一直报这个错误,所以这里要进行升级PHP。
2.2.1 卸载PHP5.3.3
|
1
|
php -V |
查看已经安装的php的包:
|
1
|
yum list installed | grep php |
可以看到如下原有的安装包:
php-common.x86_64 0:5.3.3-38.el6
php-gd.x86_64 0:5.3.3-38.el6
php-ldap.x86_64 0:5.3.3-38.el6
php-mysql.x86_64 0:5.3.3-38.el6
php-odbc.x86_64 0:5.3.3-38.el6
php-pdo.x86_64 0:5.3.3-38.el6
php-pear.noarch 1:1.9.4-4.el6
php-pecl-apc.x86_64 0:3.1.9-2.el6
php-pecl-memcache.x86_64 0:3.0.5-4.el6
php-pgsql.x86_64 0:5.3.3-38.el6
php-soap.x86_64 0:5.3.3-38.el6
php-xml.x86_64 0:5.3.3-38.el6
php-xmlrpc.x86_64 0:5.3.3-38.el6
全都是5.3.3-38.el6版本的。
使用rpm -e --nodeps ph-xxx依次删掉上面的5.3.3版本
2.2 安装PHP5.6.x
现在我们就可以进行安装5.6.x版本的PHP了。
|
1
2
3
|
rpm -Uvh http://download.Fedoraproject.org/pub/epel/6/x86_64/epel-release-6-8.noarch.rpm;rpm -Uvh http://rpms.famillecollet.com/enterprise/remi-release-6.rpm;yum install --enablerepo=remi,remi-php56 php php-opcache php-pecl-apcu php-devel php-mbstring php-mcrypt php-mysqlnd php-phpunit-PHPUnit php-pecl-xdebug php-pecl-xhprof php-pdo php-pear php-fpm php-cli php-xml php-bcmath php-process php-gd php-common; |
之后再来编辑php.ini
2.3 配置php.ini
编辑PHP相关的 /etc/php.ini 文件。(这里必须做相应的修改,否则在之后的web初始化过程中会报错。)
|
1
|
vim /etc/php.ini |
修改如下条目或者通过 sed 命令进行内容替换
|
1
2
3
4
5
6
|
date.timezone = Asia/Shanghaimax_execution_time = 300post_max_size = 16M #有时候这里会被设置32Mmax_input_time=300memory_limit = 128Mmbstring.func_overload = 2 |
或通过 sed 方式进行内容替换:
|
1
2
3
4
5
6
|
sed -i "s/;date.timezone =/date.timezone = Asia\/Shanghai/g" /etc/php.inised -i "s#max_execution_time = 30#max_execution_time = 300#g" /etc/php.inised -i "s#post_max_size = 8M#post_max_size = 32M#g" /etc/php.inised -i "s#max_input_time = 60#max_input_time = 300#g" /etc/php.inised -i "s#memory_limit = 128M#memory_limit = 128M#g" /etc/php.inised -i "/;mbstring.func_overload = 0/ambstring.func_overload = 2\n" /etc/php.ini |
最后开启httpd并设置开机自启动
|
1
2
|
chkconfig httpd onservice httpd start |


