如何在Centos7安装rabbitmq的PHP扩展
1.先安装rabbitmq-c,
wget https://github.com/alanxz/rabbitmq-c/releases/download/v0.8.0/rabbitmq-c-0.8.0.tar.gz

tar -zxvf rabbitmq-c-0.8.0.tar.gz

cd rabbitmq-c-0.8.0

./configure --prefix=/usr/local/rabbitmq-c

make && make install
2.接下来安装amqp的php扩展
cd amqp-1.9.3

phpize

./configure --with-php-config=/usr/local/php/bin/php-config

./configure --with-php-config=/usr/local/php/bin/php-config --with-librabbitmq-dir=/usr/local/rabbitmq-c

make && make install
3.重新php-fpm服务,查看php对应版本中是否AMQP扩展
systemctl restart php-fpm
MQ一些基本的概念:
- 消息生产者:就是提供消息的一方,这一方主要是面向业务或者用户的一方。
- 消息消费者:就是接收消息并进行处理的一方,这一方一般都是在后端轮询的运行着,时刻准备接收新的消息并处理。
- 信道(Channel):用一个形象的比喻就是,有了光纤,我们能够在光纤上进行打座机电话、看电视、上网等等,一个链接能够提供多种方式的通讯。
- 消息队列(Message Queue):就是RabbitMQ对消息生产者生产的消息进行一定的排队从而形成队列以供消费者处理。
- 消息队列创建者:消息队列是由消费者申请创建的,因为只有消费者知道怎么处理消息,而不是消息生产者创建的。
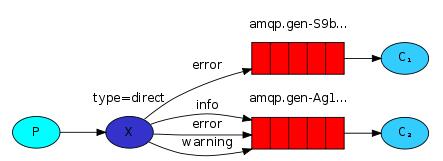
- 消息路由转发:一个消费者可能会申请创建多个消息队列,那么生产者的消息应该传递到那个队列呢?这主要由Exchange来进行指定。

PHP版Demo:
消费者端: mq_server.php
function mq_server(){
    set_time_limit(0);
    //1.创建AMQP对象
    $connnection = new \AMQPConnection(array(
        'host'      =>  'localhost',
        'posrt'     =>  5672,
        'virtual'   =>  '/',
        'login'     =>  "",
        'password'  =>  ""
    ));
    $connnection->connect();

    //2.创建信道channel,信道就像光纤,类似上面可以绑定个组件
    $channelObj = new \AMQPChannel($connnection);

    //3.创建消息路由转发
    $exchangeObj = new \AMQPExchange($channelObj);
    $exchangeObj->setName('first');
    $exchangeObj->setType(AMQP_EX_TYPE_DIRECT);

    //4.创建消息队列
    $queueObj = new \AMQPQueue($channelObj);
    $queueObj->setName('firstqueue');

    //5.消息队列绑定exchange交换路由
    $queueObj->bind('first','queue_route');
    while(true){
        $queueObj->consume(function (\AMQPEnvelope $envelope,\AMQPQueue $queue){
                $msg = $envelope->getBody();
                echo $msg;
                $queue->ack($envelope->getDeliveryTag());
        });
    }
}

mq_server();
生产者端:client.php
function mq_client(){
    $connection = new \AMQPConnection(array(
        "host"          =>  "localhost",
        "port"          =>  5672,
        "virtual"       =>  "/",
        "login"         =>  "",
        "password"  =>  ""
    ));
    $connection->connect();

    //创建信道channel
    $channelObj     = new \AMQPChannel($connection);
    $exchangeObj    = new \AMQPExchange($channelObj);
    //信道channel
    $exchangeObj->setName("first");
    $exchangeObj->setType(AMQP_EX_TYPE_DIRECT);

    $messageBodoy = "welcome to RabbitMQ";

    $exchangeObj->publish($messageBodoy,'queue_route');

    $connection->disconnect();
}

mq_client();


