[整理] 一个简单版本的秒杀系统设计
简单版本的,只用于并发比较小的场景。
常用的三种设计策略:1.写入内存而不是写入硬盘;2.异步处理而不是同步处理;3.分布式处理;这里只用了1。
另外不涉及前端,也不涉及机器秒杀和安全策略。
秒杀系统的难点
- 高并发、负载压力大
- 竞争资源有限
- 对其它业务有影响
- 提防黄牛党
秒杀系统的场景
- 商品抢购
- 群红包
- 优惠券领取
- 抢火车票
- 在线预约
设计原则
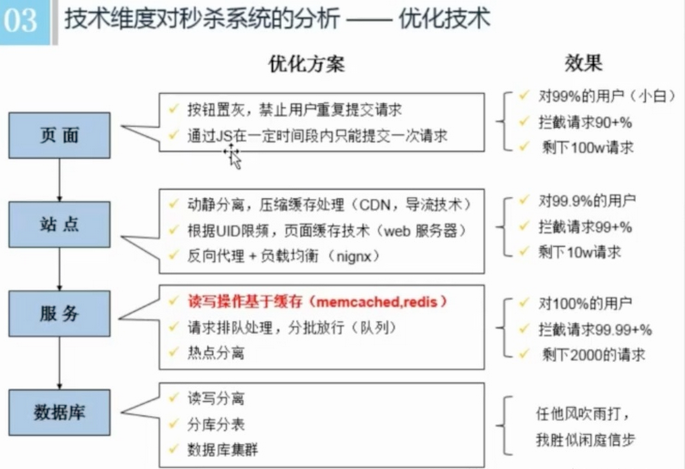
页面 -> 站点 -> 服务 -> 数据库
-
尽量将压力拦截在上游
系统的瓶颈往往在数据库,数据库并发能力有限。 -
充分利用缓存
读多写少意味着必须充分利用缓存 -
热点隔离
-
业务隔离(预售报名、分时段)
将秒杀业务独立出来,尽量不与其他业务关联,以减少对其他业务的依赖性。譬如秒杀业务只保留用户id,商品id,数量等重要属性,通过中间件发送给业务系统,完成后续的处理。 -
系统隔离
将秒杀业务单独部署,以减少对其他业务服务器的压力。 -
数据隔离
由于秒杀对DB的压力很大,将DB单独部署,不与其他业务DB放一起,避免对DB的压力。
-
使用DB完成秒杀系统
1. 初始化项目
以Springboot,mysql,jpa为技术方案。
新建Springboot项目,pom如下
<?xml version="1.0" encoding="UTF-8"?>
<project xmlns="http://maven.apache.org/POM/4.0.0" xmlns:xsi="http://www.w3.org/2001/XMLSchema-instance"
	xsi:schemaLocation="http://maven.apache.org/POM/4.0.0 http://maven.apache.org/xsd/maven-4.0.0.xsd">
	<modelVersion>4.0.0</modelVersion>

	<groupId>com.tianyalei</groupId>
	<artifactId>common</artifactId>
	<version>0.0.1-SNAPSHOT</version>
	<packaging>jar</packaging>

	<name>common</name>
	<description>Demo project for Spring Boot</description>

	<parent>
		<groupId>org.springframework.boot</groupId>
		<artifactId>spring-boot-starter-parent</artifactId>
		<version>1.5.2.RELEASE</version>
		<relativePath/> <!-- lookup parent from repository -->
	</parent>

	<properties>
		<project.build.sourceEncoding>UTF-8</project.build.sourceEncoding>
		<project.reporting.outputEncoding>UTF-8</project.reporting.outputEncoding>
		<java.version>1.8</java.version>
	</properties>

	<dependencies>
		<dependency>
			<groupId>org.springframework.boot</groupId>
			<artifactId>spring-boot-devtools</artifactId>
			<optional>true</optional><!-- optional=true,依赖不会传递,该项目依赖devtools;之后依赖myboot项目的项目如果想要使用devtools,需要重新引入 -->
		</dependency>
		<dependency>
			<groupId>org.springframework.boot</groupId>
			<artifactId>spring-boot-starter-data-jpa</artifactId>
		</dependency>
		<dependency>
			<groupId>org.springframework.boot</groupId>
			<artifactId>spring-boot-starter-data-redis</artifactId>
		</dependency>
		<dependency>
			<groupId>mysql</groupId>
			<artifactId>mysql-connector-java</artifactId>
			<scope>runtime</scope>
		</dependency>
		<dependency>
			<groupId>com.alibaba</groupId>
			<artifactId>druid</artifactId>
			<version>1.0.18</version>
		</dependency>
		<dependency>
			<groupId>org.springframework.boot</groupId>
			<artifactId>spring-boot-starter-test</artifactId>
			<scope>test</scope>
		</dependency>
	</dependencies>

	<build>
		<plugins>
			<plugin>
				<groupId>org.springframework.boot</groupId>
				<artifactId>spring-boot-maven-plugin</artifactId>
			</plugin>
		</plugins>
	</build>
</project>
avaBean
import javax.persistence.*;

@Entity
public class GoodInfo {
    @Id
    @GeneratedValue(strategy = GenerationType.AUTO)
    private Integer id;
    //数量
    private int amount;
    //商品编码
    @Column(unique = true)
    private String code;

    public Integer getId() {
        return id;
    }

    public void setId(Integer id) {
        this.id = id;
    }

    public int getAmount() {
        return amount;
    }

    public void setAmount(int amount) {
        this.amount = amount;
    }

    public String getCode() {
        return code;
    }

    public void setCode(String code) {
        this.code = code;
    }
}
dao层,注意一下sql语句,where条件中的amount - count >= 0是关键,该语句能严格保证不超卖。
import org.springframework.data.jpa.repository.Modifying;
import org.springframework.data.jpa.repository.Query;
import org.springframework.data.repository.CrudRepository;

public interface GoodInfoRepository extends CrudRepository<GoodInfo, Integer> {
    @Query("update GoodInfo set amount = amount - ?2 where code = ?1 and amount - ?2 >= 0")
    @Modifying
    int updateAmount(String code, int count);
}
service接口
public interface GoodInfoService {
    void add(GoodInfo goodInfo);
    void delete(GoodInfo goodInfo);
    int update(String code, int count);
}
Service实现类
import org.springframework.beans.factory.annotation.Autowired;
import org.springframework.stereotype.Service;
import org.springframework.transaction.annotation.Transactional;

@Service("db")
public class GoodInfoDbService implements GoodInfoService {

    @Autowired
    private GoodInfoRepository goodInfoRepository;

    @Transactional
    public int update(String code, int count) {
        return goodInfoRepository.updateAmount(code, count);
    }

    public void add(GoodInfo goodInfo) {
        goodInfoRepository.save(goodInfo);
    }

    public void delete(GoodInfo goodInfo) {
        goodInfoRepository.deleteAll();
    }
}
yml配置文件
pring:
  jpa:
    database: mysql
    show-sql: true
    hibernate:
      ddl-auto: update
  datasource:
      type: com.alibaba.druid.pool.DruidDataSource
      driver-class-name: com.mysql.jdbc.Driver
      url: jdbc:mysql://localhost:3306/test
      username: root
      password:
  redis:
        host: localhost
        port: 6379
        password:
        pool:
          max-active: 8
          max-idle: 8
          min-idle: 0
          max-wait: 10000
  profiles:
    active: dev
server:
  port: 8080
以上即是基本配置。
2. 模拟并发访问抢购
新建junit测试类
import org.junit.After;
import org.junit.Before;
import org.junit.Test;
import org.junit.runner.RunWith;
import org.springframework.boot.test.context.SpringBootTest;
import org.springframework.test.context.junit4.SpringRunner;
import javax.annotation.Resource;
import java.util.ArrayList;
import java.util.List;
import java.util.concurrent.CountDownLatch;
@RunWith(SpringRunner.class)
@SpringBootTest
public class MyTest {
@Resource(name = "db")
private GoodInfoService service;
private String goodCode = "iphone7";
/**
* 机器总数量
*/
private int goodAmount = 100;
/**
* 并发量
*/
private int threadNum = 200;
//销售量
private int goodSale = 0;
//买成功的数量
private int accountNum = 0;
//买成功的人的ID集合
private List<Integer> successUsers = new ArrayList<>();
private GoodInfo goodInfo;
/*当创建 CountDownLatch 对象时,对象使用构造函数的参数来初始化内部计数器。每次调用 countDown() 方法,
CountDownLatch 对象内部计数器减一。当内部计数器达到0时, CountDownLatch 对象唤醒全部使用 await() 方法睡眠的线程们。*/
private CountDownLatch countDownLatch = new CountDownLatch(threadNum);
@Test
public void contextLoads() {
for (int i = 0; i < threadNum; i++) {
new Thread(new UserRequest(goodCode, 7, i)).start();
countDownLatch.countDown();
}
//让主线程等待200个线程执行完,休息2秒,不休息的话200条线程还没执行完,就打印了
try {
Thread.sleep(2000);
} catch (InterruptedException e) {
e.printStackTrace();
}
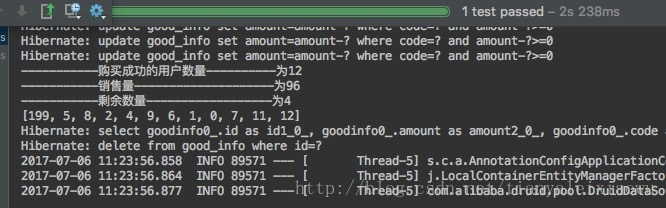
System.out.println("-----------购买成功的用户数量----------为" + accountNum);
System.out.println("-----------销售量--------------------为" + goodSale);
System.out.println("-----------剩余数量------------------为" + (goodAmount - goodSale));
System.out.println(successUsers);
}
private class UserRequest implements Runnable {
private String code;
private int buyCount;
private int userId;
public UserRequest(String code, int buyCount, int userId) {
this.code = code;
this.buyCount = buyCount;
this.userId = userId;
}
@Override
public void run() {
try {
//让线程等待,等200个线程创建完一起执行
countDownLatch.await();
} catch (InterruptedException e) {
e.printStackTrace();
}
//如果更新数据库成功,也就代表购买成功了
if (service.update(code, buyCount) > 0) {
//对service加锁,因为很多线程在访问同一个service对象,不加锁将导致购买成功的人数少于预期,且数量不对,可自行测试
synchronized (service) {
//销售量
goodSale += buyCount;
accountNum++;
//收录购买成功的人
successUsers.add(userId);
}
}
}
}
@Before
public void add() {
goodInfo = new GoodInfo();
goodInfo.setCode(goodCode);
goodInfo.setAmount(goodAmount);
service.add(goodInfo);
}
@After
public void delete() {
service.delete(goodInfo);
}
}
注意,由于是模拟并发,需要保证200个线程同时启动去访问数据库,所以使用了CountDownLatch类,在调用UserRequest线程的start方法后,会先进入await状态,等待200个线程创建完毕后,一起执行。
注意,由于是多线程操作service,必然导致数据不同步,所以需要对service加synchronize锁,来保证service的update方法能够正确执行。如果不加,可以自行测试,会导致少卖。
运行该测试类,看打印的结果。
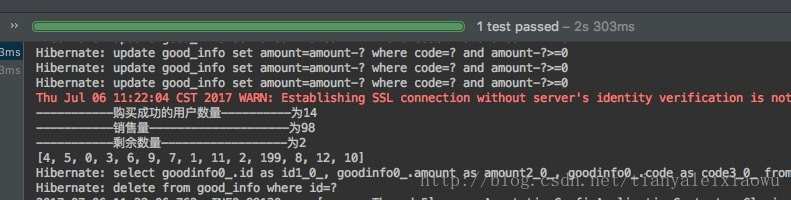
可以多次运行,并修改每个人的购买数量、总商品数量、线程数,看看结果是否正确。
如修改为每人购买8个
mysql支持的并发访问量有限,倘若并发量较小,可以采用上面的update的sql就能控制住,否则要使用nosql。
使用Redis完成秒杀系统
1. 修改代码
新建一个redis的service实现类
import org.springframework.beans.factory.annotation.Autowired;
import org.springframework.data.redis.core.StringRedisTemplate;
import org.springframework.stereotype.Service;

@Service("redis")
public class GoodInfoRedisService implements GoodInfoService {
    @Autowired
    private StringRedisTemplate redisTemplate;

    @Override
    public void add(GoodInfo goodInfo) {
        redisTemplate.opsForValue().set(goodInfo.getCode(), goodInfo.getAmount() + "");
    }

    @Override
    public void delete(GoodInfo goodInfo) {
        redisTemplate.delete(goodInfo.getCode());
    }

    @Override
    public int update(String code, int count) {
        if (redisTemplate.opsForValue().increment(code, -count) < 0) {
            return -1;
        }
        return 1;
    }
}
我们使用RedisTemplate的increment来保证操作的原子性。
注意一下update方法,如果剩余数量小于0,则返回失败。
由于使用了RedisTemplate,需要先配置一下。
import org.springframework.boot.SpringApplication;
import org.springframework.boot.autoconfigure.SpringBootApplication;
import org.springframework.context.annotation.Bean;
import org.springframework.data.redis.connection.jedis.JedisConnectionFactory;
import org.springframework.data.redis.core.RedisTemplate;
import org.springframework.data.redis.core.StringRedisTemplate;

@SpringBootApplication
public class CommonApplication {

	@Bean
	public RedisTemplate getRedisTemplate(JedisConnectionFactory jedisConnectionFactory) {
		RedisTemplate redisTemplate = new StringRedisTemplate();
		redisTemplate.setConnectionFactory(jedisConnectionFactory);
		return redisTemplate;
	}

	public static void main(String[] args) {
		SpringApplication.run(CommonApplication.class, args);
	}
}
2. 测试
将MyTest中的Service接口填充为redis
@Resource(name = "redis")
    private GoodInfoService service;
其他的不用变,直接运行即可。
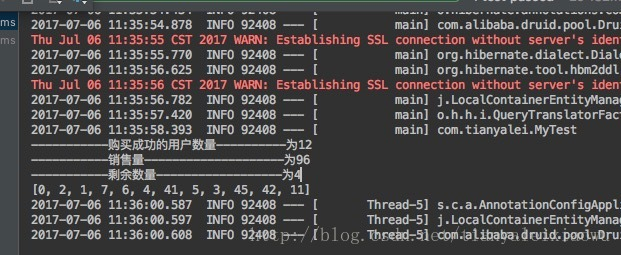
可以看到redis同样完成了抢购资格的分配。

 浙公网安备 33010602011771号