
SpringBoot - 04 对接SpringMVC
1、对接JSP
springBoot提供的thymeleaf用不惯,做数据维护程序,没有JSP里边的标签库好用。
1.1、pom.xml
导入需要的包
1 2 3 4 5 6 7 8 9 10 11 | <!--集成JSP页面--><!-- 添加jstl标签库依赖模块 --><dependency> <groupId>javax.servlet</groupId> <artifactId>jstl</artifactId></dependency><!-- 使用jsp引擎,springboot内置tomcat没有此依赖 --><dependency> <groupId>org.apache.tomcat.embed</groupId> <artifactId>tomcat-embed-jasper</artifactId></dependency> |
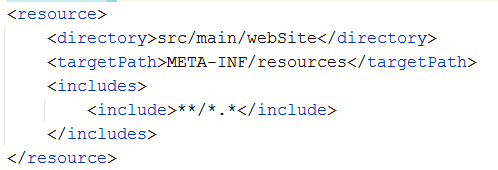
在Build标签内配置打包资源
1 2 3 4 5 6 7 8 9 10 11 12 13 14 15 16 17 18 19 20 21 | <resources> <resource> <directory>src/main/java</directory> <includes> <include>**/*.*</include> </includes> </resource> <resource> <directory>src/main/resources</directory> <includes> <include>**/*.*</include> </includes> </resource> <resource> <directory>src/main/webSite</directory> <targetPath>META-INF/resources</targetPath> <includes> <include>**/*.*</include> </includes> </resource></resources> |
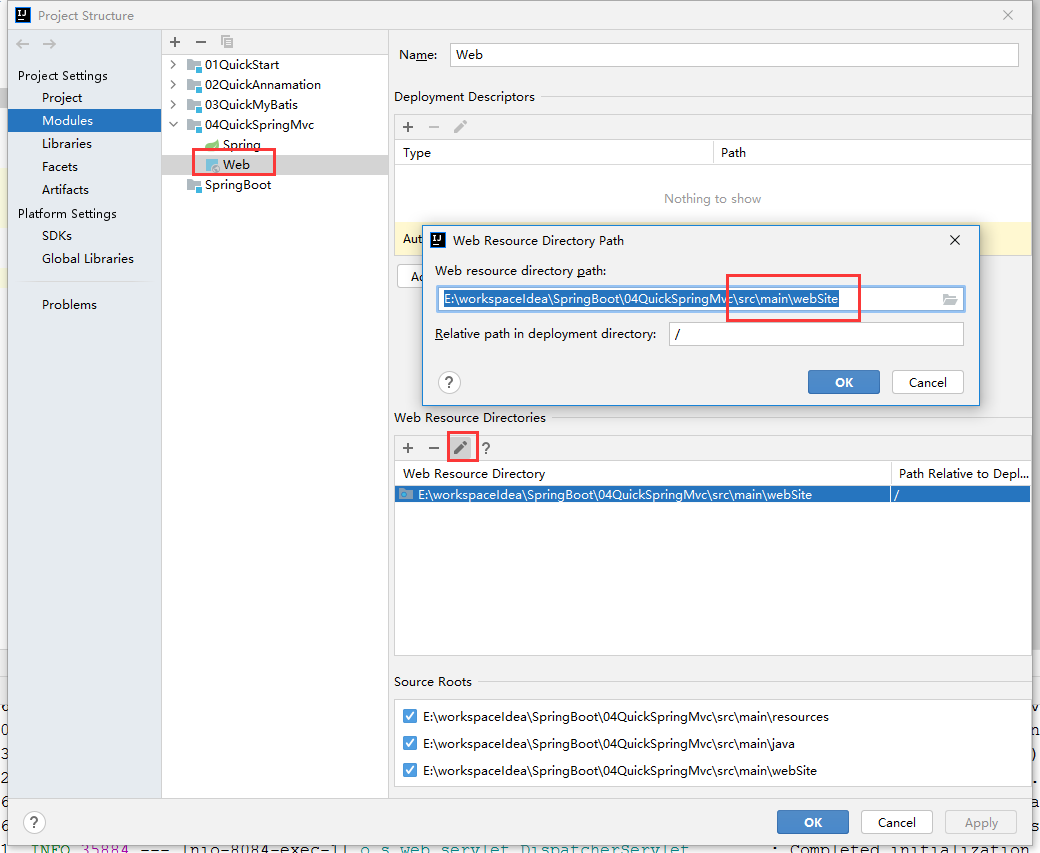
1.2、创建Web目录
无需创建Artifacts
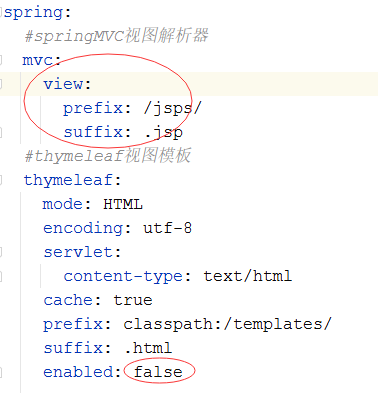
1.3、application.yml配置
需要把thymeleaf禁用掉,否则会去找模板视图。
1 2 3 4 5 6 7 8 9 10 11 12 13 14 15 16 | spring: #springMVC视图解析器 mvc: view: prefix: /jsps/ suffix: .jsp #thymeleaf视图模板 thymeleaf: mode: HTML encoding: utf-8 servlet: content-type: text/html cache: true prefix: classpath:/templates/ suffix: .html enabled: false |
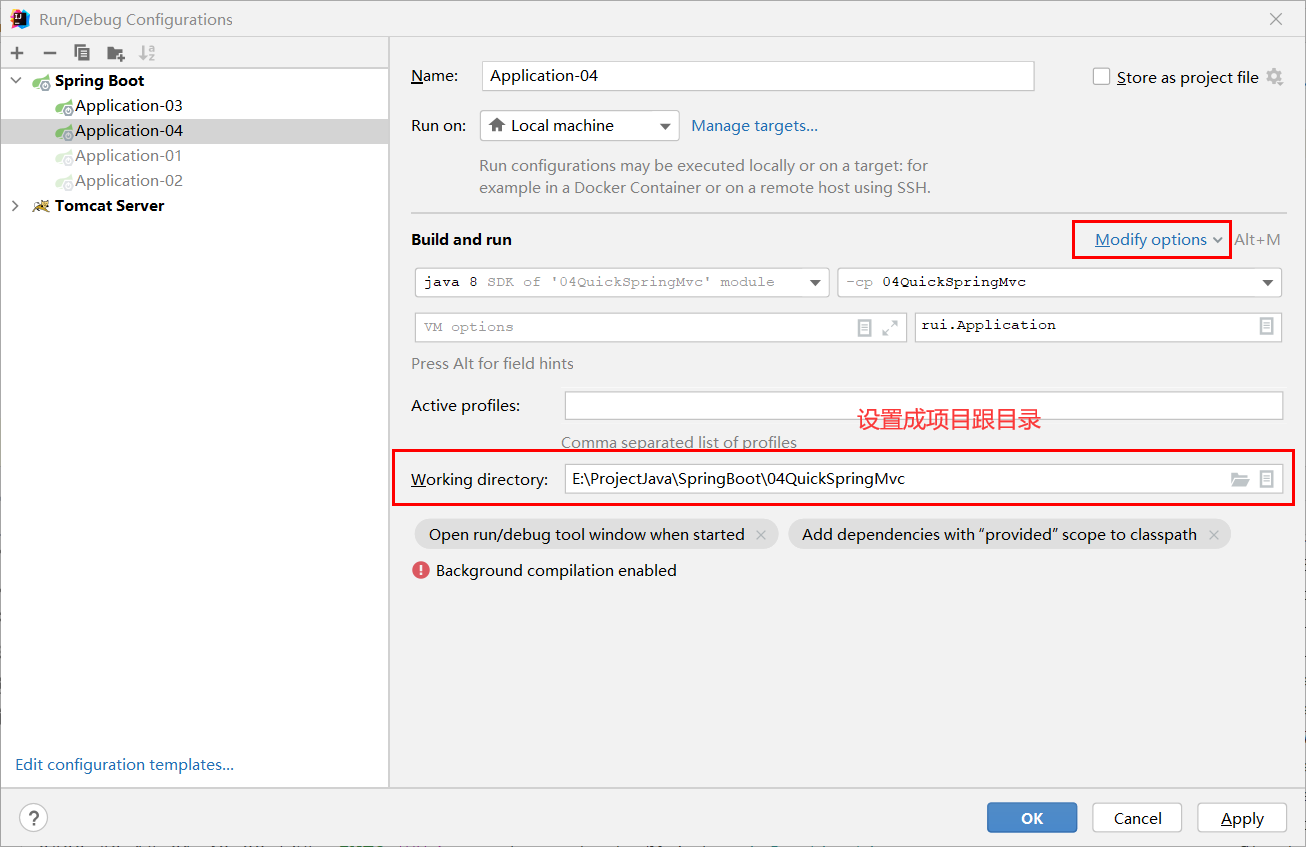
1.4、运行工作目录配置
1.5、测试例子
1)创建控制器方法
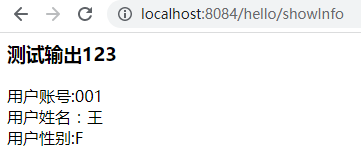
1 2 3 4 5 6 7 8 9 10 11 12 13 14 15 16 | /*用户注册表单*/@RequestMapping(value = "showInfo")public String showInfo(){ Mdl_User u = new Mdl_User(); u.setLoginId("001"); u.setUserName("王"); u.setSex("F"); u.setTelephone("123456789"); u.setDepartmentId("D01"); u.setLoves(Arrays.asList("足球", "篮球")); model.addAttribute("user", u); return "hello/showInfo";} |
2)创建视图文件
/webSite/jsps/hello/showInfo.jsp
1 2 3 4 5 6 7 8 9 10 11 12 13 14 15 16 17 | <%@ page contentType="text/html;charset=UTF-8" language="java" %><%--jstl--%><%@ taglib prefix="c" uri="http://java.sun.com/jsp/jstl/core"%><%--标签库--%><%@ taglib prefix="f" uri="http://www.springframework.org/tags/form" %><html><head> <title>测试页面</title></head><body> <h3>测试输出123</h3> <div>用户账号:${user.loginId}</div> <div>用户姓名:${user.userName}</div> <div>用户性别:${user.sex}</div></body></html> |
3)运行效果
2、参数传递和返回
和SpringMVC用法一样,就是JSON方法更加的方便了。
在SpringBoot中,url参数绑定时,参数是区分大小写的,浏览器地址栏的字符默认小写,因此定义参数接受url参数是,参数需要都用小写方式。
3、文件上传与下载
文件上传和SpringMVC写法一样。
文件下载有点不同,主要是:FileUtils.readFileToByteArray(downFile); 这个方法没有了,需要通过流处理读取数据。
1 2 3 4 5 6 7 8 9 10 11 12 13 14 15 16 17 18 19 20 | //文件下载@RequestMapping(value = "download")public ResponseEntity<byte[]> downloadFile(String fileName, HttpServletRequest request, HttpServletResponse response) throws Exception { String downLoadPath = request.getServletContext().getRealPath("downloadFiles"); System.out.println(downLoadPath); File downFile = new File(downLoadPath + File.separator + fileName); if (downFile.exists()) { HttpHeaders headers = new HttpHeaders(); //解决中文乱码 String downFileName = new String(downFile.getName().getBytes(StandardCharsets.UTF_8), StandardCharsets.ISO_8859_1); headers.setContentDispositionFormData("attachment", downFileName); //设置要下载文件的MIME类型,这句话可以省略 byte[] buffer = FileUtils.readFileToByteArray(downFile); ResponseEntity<byte[]> entity = new ResponseEntity<byte[]>(buffer, headers, HttpStatus.OK); return entity; } return null;} |
4、类型转换/格式化
定义方法和SpringMVC一样,注入方法不同,注入方法如下:
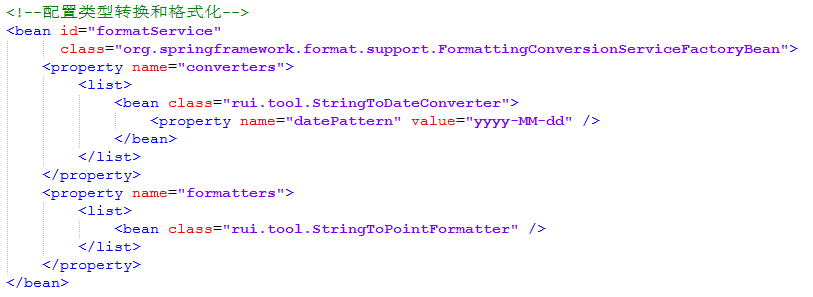
类型转换定义和格式化定义代码在SpringMVC系列文章中。
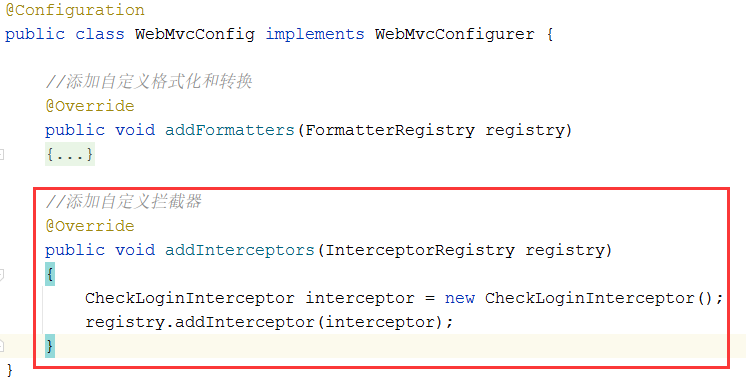
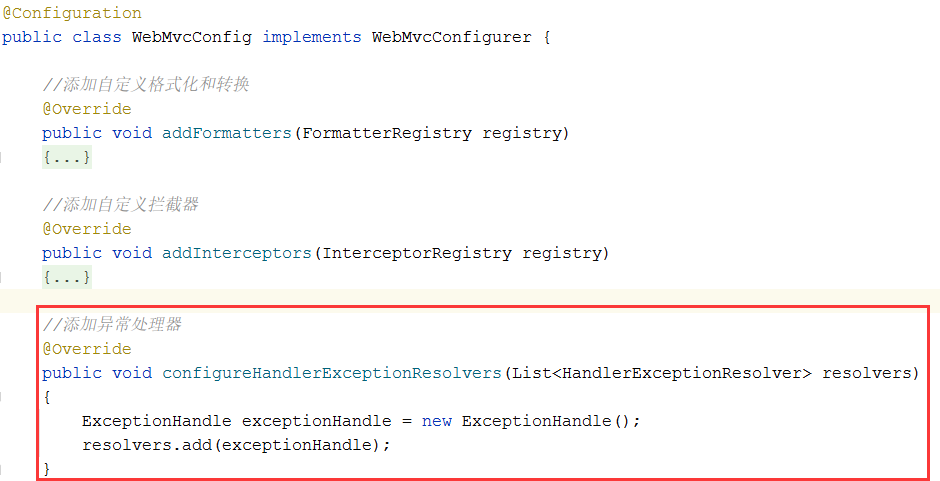
1 2 3 4 5 6 7 8 9 10 11 12 13 14 15 16 17 18 19 20 21 22 23 24 | package rui.helper;import org.springframework.context.annotation.*;import org.springframework.format.FormatterRegistry;import org.springframework.web.servlet.config.annotation.WebMvcConfigurer;@Configurationpublic class WebMvcConfig implements WebMvcConfigurer { //添加自定义格式化和转换 @Override public void addFormatters(FormatterRegistry registry) { //添加自定义格式化 StringToPointFormatter formatter = new StringToPointFormatter(); registry.addFormatter(formatter); //添加自定义转换 StringToDateConverter converter = new StringToDateConverter(); converter.setDatePattern("yyyy-MM-dd"); registry.addConverter(converter); }} |
里边内置了很多SpringMvc注入的方法,只需要重载即可。
等价于以前的
5、数据验证
和SpringMVC用户一样,starter-web没有默认引入hibernate-validator,需要自己单独引入。
1 2 3 4 5 | <!--验证组件--><dependency> <groupId>org.hibernate.validator</groupId> <artifactId>hibernate-validator</artifactId></dependency> |
6、拦截器
定义方法和SpringMvc一样,注入方法和类型转换一样。
拦截器定义代码在SpringMVC系列文章中。
7、异常处理
定义方法和SpringMVC一样,注入方法和类型转换一样。
8、对接测试
鼠标放在要编写测试的类上方,安装鼠标:ctrl+shift+T,弹出测试生成窗口。
需要在测试方法上方增加两个标准。
1 2 3 4 5 6 7 8 9 10 11 12 13 14 | @RunWith(SpringRunner.class)@SpringBootTestclass Bll_employeeTest { @Autowired private Bll_employee bll_employee; @Test void findByKey() { //填写测试代码 Mod_employee empl = bll_employee.findByKey("001"); System.out.println(empl.toString()); }} |
欢迎阅读,有错误请留言指正。


【推荐】国内首个AI IDE,深度理解中文开发场景,立即下载体验Trae
【推荐】编程新体验,更懂你的AI,立即体验豆包MarsCode编程助手
【推荐】抖音旗下AI助手豆包,你的智能百科全书,全免费不限次数
【推荐】轻量又高性能的 SSH 工具 IShell:AI 加持,快人一步
· 25岁的心里话
· 闲置电脑爆改个人服务器(超详细) #公网映射 #Vmware虚拟网络编辑器
· 零经验选手,Compose 一天开发一款小游戏!
· 因为Apifox不支持离线,我果断选择了Apipost!
· 通过 API 将Deepseek响应流式内容输出到前端