06 Spring AOP
1、AOP概念
AOP就是面向切面编程,在原有方法的前边或者后边增加一些业务逻辑代码。
相关术语:
1、连接点:程序执行过程中的某个时间点。
2、切入点:就是需要切面编程的连接点。
3、通知:是在切入点前边或者后边要执行的一段代码,通知有分为:前置通知,后置通知,异常通知,最终通知和环绕通知等。
4、切面:指封装切入点和通知的一个类。
5、目标对象:被增强的对象。
2、通知类型说明
1、前置通知:在目标方法执行前实施增强。
2、后置返回通知:在目标方法执行后执行,如果产生了异常,则不会被执行。
3、后置最终通知:在目标方法执行后执行,有异常,也会被执行的通知。
4、异常通知:当目标方法执行过程中产生异常,则执行的通知。
5、环绕通知:在目标方法执行前和目标方法执行后执行的通知。
6、引入通知:在目标类中增加一些新的方法和属性,用来对目标类进行扩展。
3、AspectJ切入表表达式
基本语法:
@Pointcut(value="execution(modifiers-pattern? ret-type-pattern declaring-type-pattern.methodName-pattern(param-pattern) throws-pattern?)")
1)末尾有?的代表可以省略。
2)modifiers-pattern? 目标方法的修饰符匹配符,如public , private
3)ret-type-pattern 目标方法返回值匹配符,如void、string等,* 代表所有类型。
4)declaring-type-pattern 目标方法类路径匹配符,如cn.sjxy.service.UserService,*代表所有类型
5)methodName-pattern 目标方法名称匹配符,例如Insert,Update,*代表所有方法名。
6)param-pattern 目标方法参数匹配符,(..)代表所有的参数,包含无参方法。
7)throws-pattern? 目标方法抛出的异常类型
例如:
//定义切入点,设定切入点表达式,方法名是切入点名称
@Pointcut(value="execution(* cn.sjxy.Service.ProductService.*(..))")
@Pointcut(value="execution(* cn.sjxy.Service.ProductService.addProduct(..))")
4、AspectJ框架的使用 - 注解
1、pom.xml引入依赖包
<project xmlns="http://maven.apache.org/POM/4.0.0" xmlns:xsi="http://www.w3.org/2001/XMLSchema-instance" xsi:schemaLocation="http://maven.apache.org/POM/4.0.0 https://maven.apache.org/xsd/maven-4.0.0.xsd">
  <modelVersion>4.0.0</modelVersion>
  <groupId>cn.sjxy</groupId>
  <artifactId>chapter02Maven</artifactId>
  <version>0.0.1-SNAPSHOT</version>

  <dependencies>

  	<!-- https://mvnrepository.com/artifact/org.springframework/spring-context -->
  	<dependency>
    	<groupId>org.springframework</groupId>
    	<artifactId>spring-context</artifactId>
    	<version>5.3.0</version>
	</dependency>

	<!-- https://mvnrepository.com/artifact/org.springframework/spring-aop -->
	<dependency>
    	<groupId>org.springframework</groupId>
    	<artifactId>spring-aop</artifactId>
    	<version>5.3.0</version>
	</dependency>

    <!-- https://mvnrepository.com/artifact/org.springframework/spring-aspects -->
	<dependency>
    	<groupId>org.springframework</groupId>
    	<artifactId>spring-aspects</artifactId>
    	<version>5.3.0</version>
	</dependency>

  </dependencies>
</project>
2、applicationContext.xml 开启AspectJ注解使用方式
<?xml version="1.0" encoding="UTF-8"?>
<beans xmlns="http://www.springframework.org/schema/beans"
       xmlns:xsi="http://www.w3.org/2001/XMLSchema-instance"
       xmlns:context="http://www.springframework.org/schema/context"
       xmlns:aop="http://www.springframework.org/schema/aop"
       xsi:schemaLocation="http://www.springframework.org/schema/beans
           http://www.springframework.org/schema/beans/spring-beans-2.5.xsd
           http://www.springframework.org/schema/context
           http://www.springframework.org/schema/context/spring-context-2.5.xsd
           http://www.springframework.org/schema/aop
           http://www.springframework.org/schema/aop/spring-aop-3.1.xsd">

	<!-- 开启扫包 -->
    <context:component-scan base-package="cn.sjxy"/>

	<!-- 开启AspectJ 注解 -->
    <aop:aspectj-autoproxy />

</beans>
3、业务类代码
package cn.sjxy.Service;

import org.springframework.stereotype.Service;

@Service(value = "productService")
public class ProductService {

	public void addProduct() {
		System.out.println(">>>添加商品");
		int a=1,b=0,c;
		c=a/b;
	}

	public String findProduct()
	{
		System.out.println(">>>查看商品");
		return "SSM框架";
	}

	public void modifyProduct()
	{
		System.out.println(">>>修改商品");
	}

	public void deleteProduct()
	{
		System.out.println(">>>删除商品");
	}
}
4、切面类代码
package cn.sjxy.Aspect;

import org.aspectj.lang.JoinPoint;
import org.aspectj.lang.ProceedingJoinPoint;
import org.aspectj.lang.annotation.After;
import org.aspectj.lang.annotation.AfterReturning;
import org.aspectj.lang.annotation.AfterThrowing;
import org.aspectj.lang.annotation.Around;
import org.aspectj.lang.annotation.Aspect;
import org.aspectj.lang.annotation.Before;
import org.aspectj.lang.annotation.Pointcut;
import org.springframework.stereotype.Component;

@Component
@Aspect
public class MyAnnotationAspect {

	//定义切入点,设定切入点表达式,方法名是切入点名称
	@Pointcut(value="execution(* cn.sjxy.Service.ProductService.addProduct(..))")
	private void myPointCut() {}

	//前置通知
	@Before(value="myPointCut()")
	public void beforeAdvice(JoinPoint jp)
	{
		System.out.println("2前置通知");
		System.out.println("被通知的方法名:"+jp.getSignature().getName());
	}

	//后置返回通知,能够获取到方法的返回值,有异常,则不执行
	@AfterReturning(value="myPointCut()",returning = "obj")
	public void afterReturningAdvice(JoinPoint jp,Object obj)
	{
		System.out.println("3后置返回通知");
		System.out.println("被通知的方法名:"+jp.getSignature().getName());
		System.out.println("方法返回结果:"+obj);
	}

	//环绕通知,在方法的前边和后边执行,有异常,则后边不再执行
	@Around(value="myPointCut()")
	public Object roundAdvice(ProceedingJoinPoint pjp) throws Throwable{

		System.out.println("1=======begin========");
		Object resultValue = pjp.proceed();
		System.out.println("6=======end========");
		return resultValue;
	}

	//异常通知,产生异常时执行
	@AfterThrowing(pointcut="myPointCut()",throwing="ex")
	public void exceptionAdvice(Throwable ex)
	{
		System.out.println("4异常通知:程序的运行异常为:"+ex.getMessage());
	}

	//最终通知,有异常也执行
	@After("myPointCut()")
	public void afterAdvice()
	{
		System.out.println("5最终通知,产生异常也执行");
	}
}
5、测试类代码:
public class SpringTest {
	public static void main(String[] args)
	{
		 ApplicationContext context = new ClassPathXmlApplicationContext("applicationContext.xml");

		 ProductService s = (ProductService)context.getBean("productService");
		 s.addProduct();
	}
}
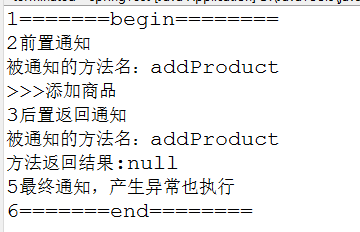
6、执行结果截图 - 无异常
7、执行结果截图 - 有异常

3和6的通知不会被执行到。

 浙公网安备 33010602011771号