Django入门
1、Django与python的版本支持情况

2、安装Django
pip install django==1.10.3

#或者
pip3 install django==1.10.3

#或者
python3 -m pip install django==1.10.3

#或者(推荐)从豆瓣源进行下载,国内用户下载快
pip install -i https://pypi.douban.com/simple/ django=1.10.3
3、开始第一个demo (django命令:https://docs.djangoproject.com/en/1.10/ref/django-admin/)
(1)在终端中输入django-admin,查看所有django的命令;

Available subcommands:

[django]
    check
    compilemessages
    createcachetable
    dbshell
    diffsettings
    dumpdata
    flush
    inspectdb
    loaddata
    makemessages
    makemigrations
    migrate
    runserver
    sendtestemail
    shell
    showmigrations
    sqlflush
    sqlmigrate
    sqlsequencereset
    squashmigrations
    startapp
    startproject
    test
    testserver
(2)创建项目
django-admin startproject firstDemo #创建项目,firstDemo为要创建的项目名称
目录结构如下:
__init__.py:一个空的文件,用它标识一个目录为 Python 的标准包。
settings.py:Django 项目的配置文件,包括 Django 模块应用配置,数据库配置,模板配置等。
urls.py:Django 项目的 URL 声明。
wsgi.py:为 WSGI 兼容的 Web 服务器服务项目的切入点。
manage.py:一个命令行工具,可以让你在使用 Django 项目时以不同的方式进行交互。
(3)创建应用

Available subcommands:

[auth]
    changepassword
    createsuperuser

[contenttypes]
    remove_stale_contenttypes

[django]
    check
    compilemessages
    createcachetable
    dbshell
    diffsettings
    dumpdata
    flush
    inspectdb
    loaddata
    makemessages
    makemigrations
    migrate
    sendtestemail
    shell
    showmigrations
    sqlflush
    sqlmigrate
    sqlsequencereset
    squashmigrations
    startapp
    startproject
    test
    testserver

[sessions]
    clearsessions

[staticfiles]
    collectstatic
    findstatic
    runserver
python3 manage.py startapp test1 #创建test1应用
目录结果如下:

migrations/:用于记录 models 中数据的变更。
admin.py:映射 models 中的数据到 Django 自带的 admin 后台。
apps.py:在新的 Django 版本中新增,用于应用程序的配置。 models.py:创建应用程序数据表模型(对应数据库的相关操作)。
tests.py:创建 Django 测试。
views.py:控制向前端显示哪些数据。
(4)运行应用
python3 manage.py runserver #访问域名即可,Django 默认会通过本机的 8000 端口来启动项目,如果你的当前环境该端口号被占用了,也可以在启动时指定 IP 地址和端口号。


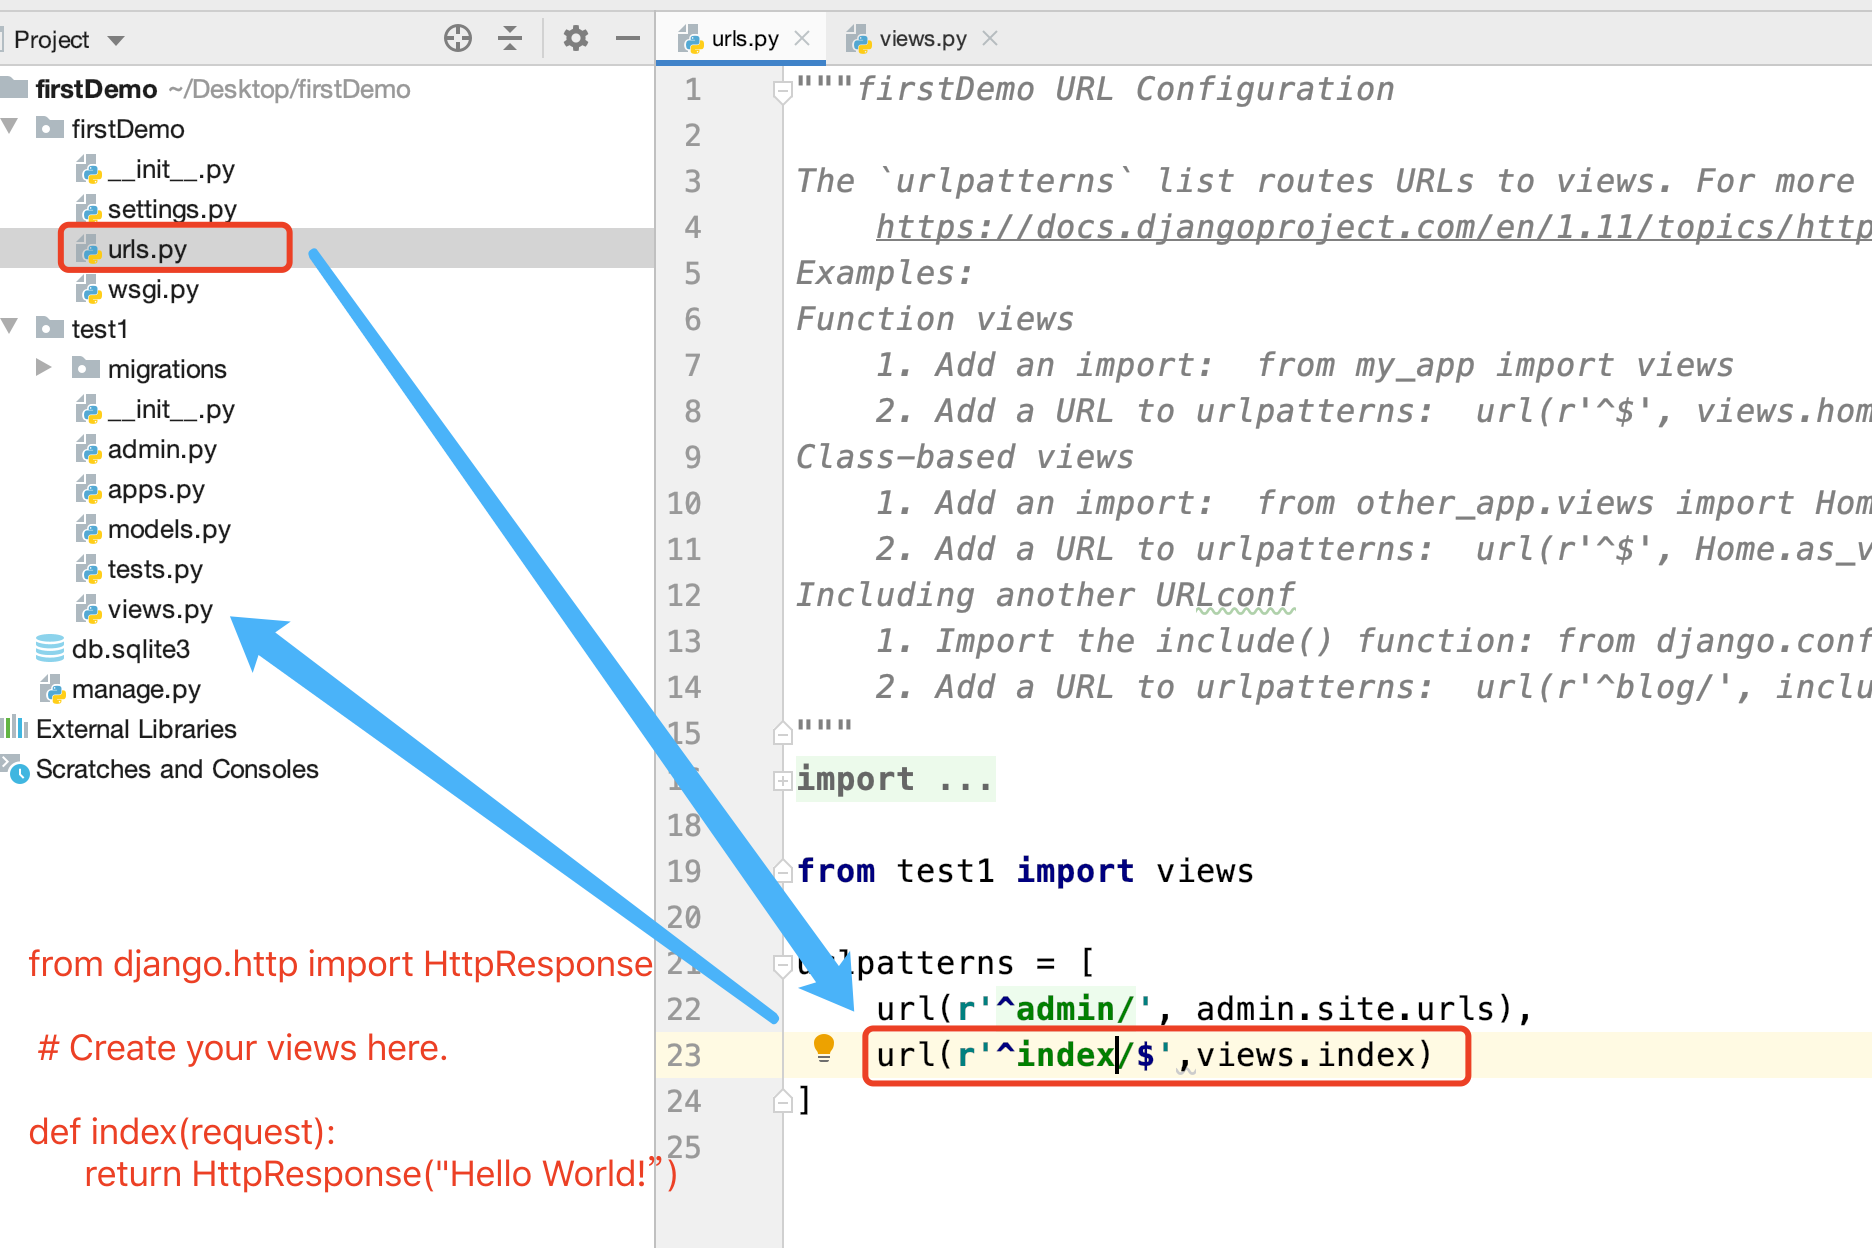
(5) 显示hello world
1、修改firstDemo/settings.py中的这段代码
INSTALLED_APPS = [
    'django.contrib.admin',
    'django.contrib.auth',
    'django.contrib.contenttypes',
    'django.contrib.sessions',
    'django.contrib.messages',
    'django.contrib.staticfiles',
    'test1'   #添加test1应用名称
]

2、在firstDemo/urls.py中增加 url(r'^index/$',views.index)
3、在test1/views.py中增加
from django.http import HttpResponse
from django.shortcuts import render

# Create your views here.
def index(request):
    return HttpResponse("Hello World!")

4、网页上访问:http://127.0.0.1:8000/index/

(6)使用模板
在应用 test1/目录下创建 templates/index.html 文件
<html>
<head>
	<title>Django Page</title>
</head>
<body>
	<h1>Hello Django!</h1>
</body>
</html>
#修改test1下面的views.py
from django.http import HttpResponse
from django.shortcuts import render

# Create your views here.
def index(request):
    # return HttpResponse("Hello World!")
    return render(request,"index.html")

4、django工作流

本文来自博客园,作者:Yi个人,转载请注明原文链接:https://www.cnblogs.com/feifei-cyj/p/11029307.html


