ABP-VNEXT 学习笔记(四)自动API 控制器
官方文档地址:https://docs.abp.io/en/abp/latest/API/Auto-API-Controllers
详细的请阅读官方文档,这边侧重简化说明怎么应用和一些注意要点。
自动API,即代码端只需要定义服务层即可,无需每一个服务层方法都对应在控制器中编写一个action。
这个可以大大节省我们的时间和省略大量控制器端的代码。
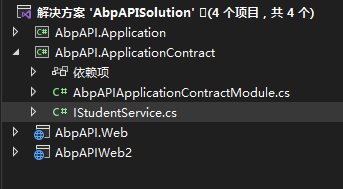
该示例项目,我们建了一个ApplicationContract 接口层,一个Application 服务层,两个web项目。

接口层如下:
我们定义了2个接口,分别是获取姓名和年龄。
using System;
using System.Collections.Generic;
using System.Text;
using System.Threading.Tasks;
using Volo.Abp.Application.Services;

namespace AbpAPI
{
    public interface IStudentService:IApplicationService
    {

        Task<string> GetNameAsync();

        Task<int> GetAgeAsync();


    }
}
服务层实现:
using Microsoft.AspNetCore.Http;
using System;
using System.Collections.Generic;
using System.Linq;
using System.Text;
using System.Threading.Tasks;
using Volo.Abp;
using Volo.Abp.Application.Services;

namespace AbpAPI
{

    public class StudentService : ApplicationService, IStudentService
    {


        [RemoteService(IsEnabled =false)]  //该设置表示该方法不自动生成api,但不影响直接调用。
        public async Task<int> GetAgeAsync()
        {
            return await Task.FromResult(18);
        }

        public async Task<string> GetNameAsync()
        {
            return await Task.FromResult("李四");
        }
    }
}
下面是web层的注入:
using Microsoft.OpenApi.Models;
using Volo.Abp;
using Volo.Abp.AspNetCore.Mvc;
using Volo.Abp.Autofac;
using Volo.Abp.Modularity;
using Volo.Abp.Swashbuckle;

namespace AbpAPI.Web
{
    [DependsOn(typeof(AbpAPIApplicationModule))]
    [DependsOn(typeof(AbpAspNetCoreMvcModule))]
    [DependsOn(typeof(AbpSwashbuckleModule))]
    [DependsOn(typeof(AbpAutofacModule))]
    public class AbpAPIWebModule : AbpModule
    {
        public override void ConfigureServices(ServiceConfigurationContext context)
        {
            base.ConfigureServices(context);
            //注入自动API
            Configure<AbpAspNetCoreMvcOptions>(options =>
            {
                options
                    .ConventionalControllers
                    .Create(typeof(AbpAPIApplicationModule).Assembly);  //设置哪个类库要自动API,可配置多个服务实现层
            });

            //下面是自动生成swaggerUI
            var services = context.Services;
            services.AddAbpSwaggerGen(options =>
        {
            options.SwaggerDoc("v1", new OpenApiInfo { Title = "动态API", Version = "v1" });
            options.DocInclusionPredicate((docName, description) => true);
            options.CustomSchemaIds(type => type.FullName);

        }
    );

        }

        public override void OnApplicationInitialization(ApplicationInitializationContext context)
        {

            var app = context.GetApplicationBuilder();

            //应用swaggerUI
            app.UseSwagger();
            app.UseAbpSwaggerUI(options =>
            {
                options.SwaggerEndpoint("/swagger/v1/swagger.json", "动态API");
            });

            base.OnApplicationInitialization(context);
        }
    }
}
这里面做了2个配置
若单单配置自动API,只需要
  //注入自动API
            Configure<AbpAspNetCoreMvcOptions>(options =>
            {
                options
                    .ConventionalControllers
                    .Create(typeof(AbpAPIApplicationModule).Assembly);  //设置哪个类库要自动API,可配置多个服务实现层
            });
配置swaggerUI是方便我们查看api内容和模拟请求。
这样,就完成了自动API的配置。
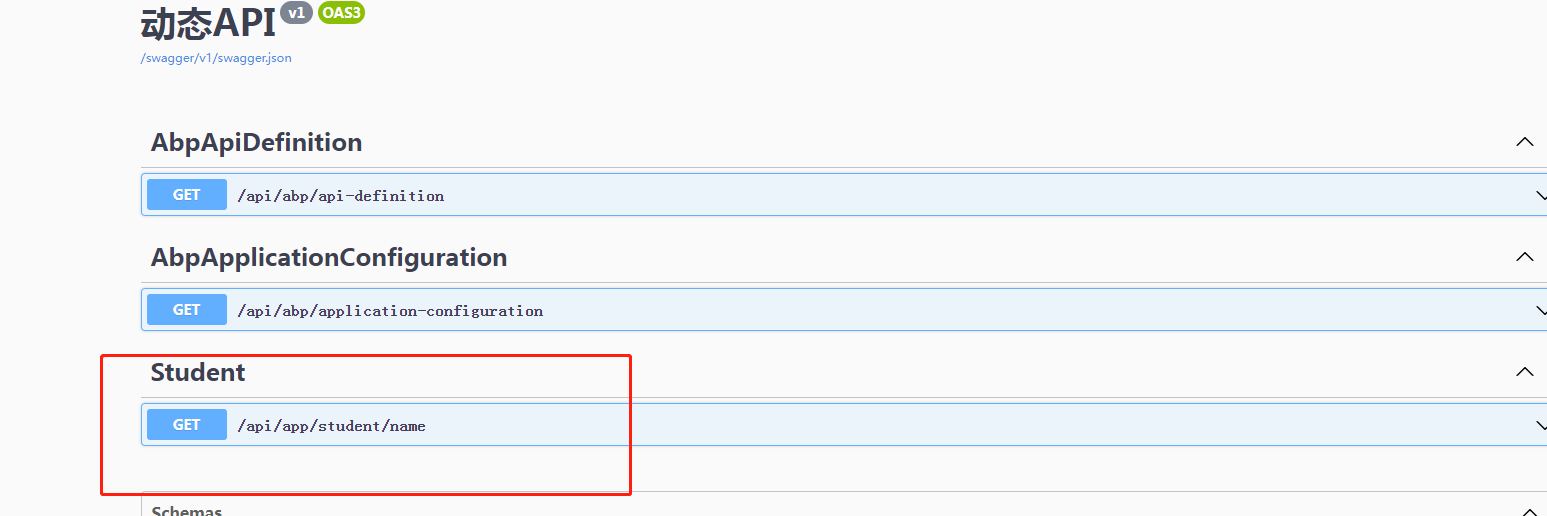
有个点需要注意看官方文档的, 就是关于请求方式和url路径。官方文档做了详细说明。在路径默认固定以 /api/app/开头,方法名中的Get和async,service都会被清掉。
比如StudentService下的GetName方法,最终请求的url是 /api/app/student/name
下面我们运行起来,看swagger

可以看到,这时候只有getname方法是有生成API,GetAge是没有的。
至此,自动生成API的应用就这么简单。
更多分享,请大家关注我的个人公众号:


