ABP-VNEXT 学习笔记(二)数据库连接
在上一章中,我们介绍了如何注入和使用,这都是我们平常用的最多技术点。
这一章呢,我们接着来讲讲,数据库连接。这也是最实用的。 先不管啥DDD的,ABP只是个基础框架,想怎么用都行。
示例环境:
数据库:mysql
ORM:EFCORE
这里的数据库表结构我是手动创建的,没有用dbfirst模式进行迁移。
开始
首先我们新建一个类库,叫TestModel,然后创建一个实体Users
using System.ComponentModel.DataAnnotations.Schema;
using Volo.Abp.Domain.Entities;

namespace TestModel
{
    [Table("Users")]
    public class Users: Entity<string>
    {
        public string Name { get; set; }


    }
}
类库需要引用下面的包:

这个包里提供聚合根Entity<string>。
在ABP中,一般我们实体都会继承一个聚合根,比如ABP中规范的Entity<string>,这个实体包含一个 固定字段,Id,string为指定的类型,也可以指定为Guid。
数据库中的字段如下图:

简单示例,就2个字段。
然后,按照常规3层 ,我们建一个服务层类库TestService,专门处理业务逻辑的,当然要引用实体层,实现对实体操作。
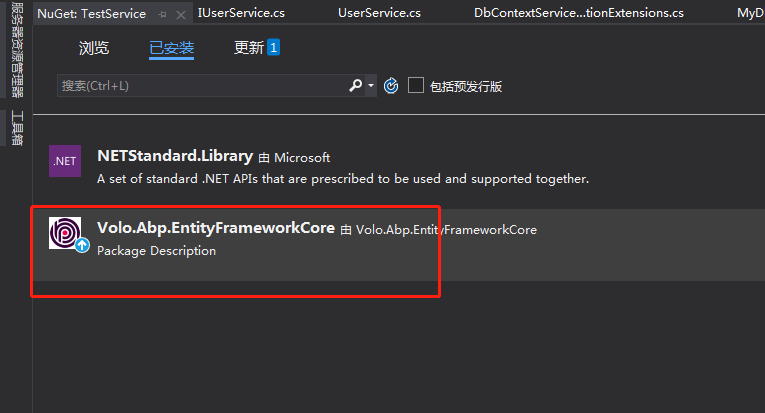
因为我们是使用EF框架的,所以需要引入ABP的EFcore包。在这里需要明白的是,我们服务层是只引入了EFCORE,而EFCORE本身是支持sqlserver,mysql等多种数据库的。也就是说我们服务层也是支持的。至于具体使用什么数据,在web层去选择。

我们把数据层上下文对象也放到这里来定义,定义一个MyDbContext 上下文对象
using Microsoft.EntityFrameworkCore;
using TestModel;
using Volo.Abp.EntityFrameworkCore;

namespace TestService
{
    //[ConnectionStringName("Default")] //这里可以自定义连接的字符串,对应appsetting.json中ConnectionStrings的子节点,不指定会默认查找Default节点的配置
    public class MyDbContext : AbpDbContext<MyDbContext>
    {
        public DbSet<Users> users { get; set; }

        public MyDbContext(DbContextOptions<MyDbContext> options) : base(options)
        {
        }
    }
}
然后创建 IUserService 接口
namespace TestService
{
    public  interface IUserService
    {
        string GetName(string id);
    }
}
再创建一个实现:
using System.Linq;
using System.Linq.Dynamic.Core;
using TestModel;
using Volo.Abp.DependencyInjection;
using Volo.Abp.Domain.Repositories;

namespace TestService
{
    public class UserService : IUserService, IScopedDependency
    {
        private readonly MyDbContext _dbContext;
        private readonly IRepository<Users, string> _users;
        public UserService(MyDbContext dbContext, IRepository<Users, string> users)
        {
            _dbContext = dbContext;
            _users = users;
        }
        public string GetName(string id)
        {
            // return _dbContext.users.FirstOrDefault(m => m.Id == id)?.Name;
            return _users.FirstOrDefault(m => m.Id == id)?.Name;
        }
    }
}
在这个实现里面,我们有2种方式获取数据
1:通过注册的数据库上下文来实现
2:通过abp默认的仓储来实现。
当然,以上都需要对应注册了,才能使用。接下来我们还要创建一个继承AbpModule 模块的类。
每个需要注入的类库都需要一个,用于依赖到启动模块,实现该类库的注入。代码如下:
using Volo.Abp.Modularity;

namespace TestService
{
    public class TestServiceModule: AbpModule
    {

    }
}
所有的注入工作,都在AbpModule模块中实现。所以类库需要增加这个继承,再根据每个类自己依赖的IScopedDependency等类型进行注入。
OK,至此,我们服务层的工作已经完成了。
接下来,Web层。
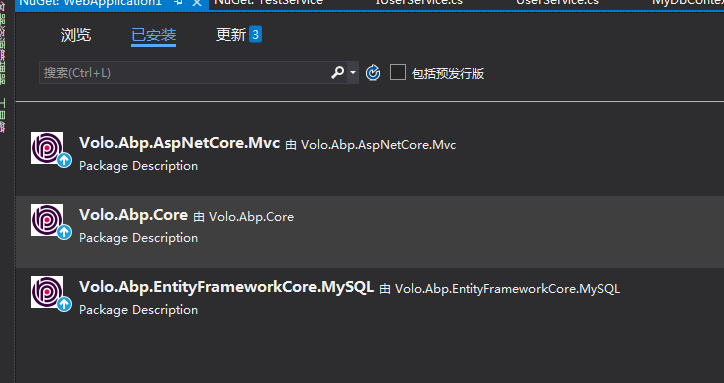
创建一个MVC的应用,引用如下模块包
其中,
Volo.Abp.AspNetCore.Mvc:模块是MVC项目需要
Volo.Abp.Core:是ABP的核心库
Volo.Abp.EntityFrameworkCore.MySQL:这个是我们需要连接的数据库类型。 如果是sqlserver,那就选择安装Volo.Abp.EntityFrameworkCore.SqlServer
同时,还要引入实体层和服务层两个项目。
接下来,跟上一章节类似,我们创建一个AppModule的启动类:
using Microsoft.AspNetCore.Builder;
using Microsoft.Extensions.DependencyInjection;
using Microsoft.Extensions.Hosting;
using TestService;
using Volo.Abp;
using Volo.Abp.AspNetCore.Mvc;
using Volo.Abp.EntityFrameworkCore;
using Volo.Abp.Modularity;

namespace WebApplication1.Models
{
    [DependsOn(
        typeof(AbpAspNetCoreMvcModule), //启动MVC模块
        typeof(AbpEntityFrameworkCoreModule), //启动EFCODE模块
        typeof(TestServiceModule) //启动服务层模块
        )]
    public class AppModule:AbpModule
    {
        public override void ConfigureServices(ServiceConfigurationContext context)
        {
            context.Services.AddAbpDbContext<MyDbContext>(options => { //注入上下文对象
            options.AddDefaultRepositories(includeAllEntities: true);//自动为DbContext中的实体创建默认仓储,默认是为继承了Entity<Guid>的实体创建仓储,如果其他实体也要创建,必须设置includeAllEntities: true


            }); //配置注入
            Configure<AbpDbContextOptions>(options => {
                options.UseMySQL(); //选择使用mysql数据库
            });


        }


        /// <summary>
        /// 在启动模块初始化中,我们就可以把startup中的配置都搬过来
        /// </summary>
        /// <param name="context"></param>
        public override void OnApplicationInitialization(ApplicationInitializationContext context)
        {
            var app = context.GetApplicationBuilder();
            var env = context.GetEnvironment();
            if (env.IsDevelopment())
            {
                app.UseDeveloperExceptionPage();
            }
            else
            {
                app.UseExceptionHandler("/Home/Error");
            }


            app.UseRouting();


            app.UseConfiguredEndpoints();
        }
    }
}
这个启动模块类,我们需要依赖3个
1、mvc是必须的,由abp框架提供
2、AbpEntityFrameworkCoreModule是使用EF必须的,由abp框架提供
3、TestServiceModule 这个是实现我们服务层的注入,由我们自己定义。
然后通过下面代码实现上下文注入
 context.Services.AddAbpDbContext<MyDbContext>(options => { //注入上下文对象
            options.AddDefaultRepositories(includeAllEntities: true);//自动为DbContext中的实体创建默认仓储,默认是为继承了Entity<Guid>的实体创建仓储,如果其他实体也要创建,必须设置includeAllEntities: true


            }); //配置注入
然后配置我们的数据库类型:
  Configure<AbpDbContextOptions>(options => {
                options.UseMySQL(); //选择使用mysql数据库
            });
如果是其他类型,那需要引用对应的包,这边才能使用对应的数据库。
完成启动类注入后,appsetting.json 进行配置我们的连接字符串,
使用默认配置的话,ConnectionStrings名称不能变。
{
  "Logging": {
    "LogLevel": {
      "Default": "Information",
      "Microsoft": "Warning",
      "Microsoft.Hosting.Lifetime": "Information"
    }
  },
  "AllowedHosts": "*",
  "ConnectionStrings": {
    "Default": "server=192.168.20.134;port=3306;database=eftest;uid=root;pwd=3BIW#lP211HkB4Yq;CharSet=utf8;"
    //"AbpIdentityServer": "Server=localhost;Database=MyIdsDb;Trusted_Connection=True;",
    //"AbpPermissionManagement": "Server=localhost;Database=MyPermissionDb;Trusted_Connection=True;"
  }
}
然后,startup中一样实现启动模块
     public void ConfigureServices(IServiceCollection services)
        {
            services.AddApplication<AppModule>();
        }

        // This method gets called by the runtime. Use this method to configure the HTTP request pipeline.
        public void Configure(IApplicationBuilder app, IWebHostEnvironment env)
        {
            app.InitializeApplication();
        }
OK,至此就完成了整个项目的配置。接下来测试,
在home控制中调用服务层输出。
    public class HomeController : AbpController //控制器必须继承 AbpController
    {

        private readonly IUserService _userService;
        public HomeController(IUserService userService)  {
            _userService = userService;
        }

        public IActionResult Index()
        {
            return Content(_userService.GetName("c52c1c0e110146c2b785ab2800fff2f0"));
        }

    }
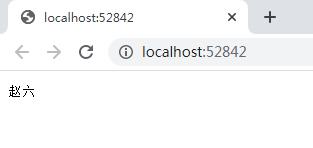
输出结果:

数据库数据:

正确,完成数据库的操作示例。
代码:示例代码地址:https://gitee.com/fei686868/abpvnext-learning-shili
更多分享,请大家关注我的个人公众号:


