(数据科学学习手札112)Python+Dash快速web应用开发——表单控件篇(上)
本文示例代码已上传至我的
Github仓库https://github.com/CNFeffery/DataScienceStudyNotes
- 😋由我开源的先进
Dash组件库feffery-antd-components正处于早期测试版本阶段,欢迎前往官网http://fac.feffery.tech/了解更多
1 简介
这是我的系列教程Python+Dash快速web应用开发的第九期,在之前三期的教程中,我们针对Dash中经常会用到的一些静态部件进行了较为详细的介绍,从而get到在Dash应用中组织静态内容的常用方法。
而从今天的教程开始,我将带大家来认识和学习Dash生态中非常实用的一些交互式部件,配合回调函数,可以帮助我们构建一个形式丰富的可接受输入,并反馈输出的交互式应用,今天要介绍的交互部件为表单输入类部件的基础知识,下面来学习吧~

2 Dash中常用的表单输入类交互部件
交互部件跟之前介绍的一系列静态部件的区别在于它们不仅具有供用户交互操作的特点,还承担了接受用户输入,并传递这些输入参数的作用。而网页开发中,表单输入类部件则是交互部件中最常用到的。
在Dash生态中常用到的表单输入类交互部件有:
2.1 输入框部件Input()#
其实在之前的教程内容中我们已经使用过很多次输入框部件Input()了,而我比较推荐使用的是dash_bootstrap_components中封装的Input(),它相较于dash_core_components中自带的Input()拥有更多特性。
除了几乎所有部件都具有的id、className以及style参数之外,Input()中还有一个特殊的参数type,它的不同取值从根本上奠定了Input()的角色,常用的有:
- text、password、search
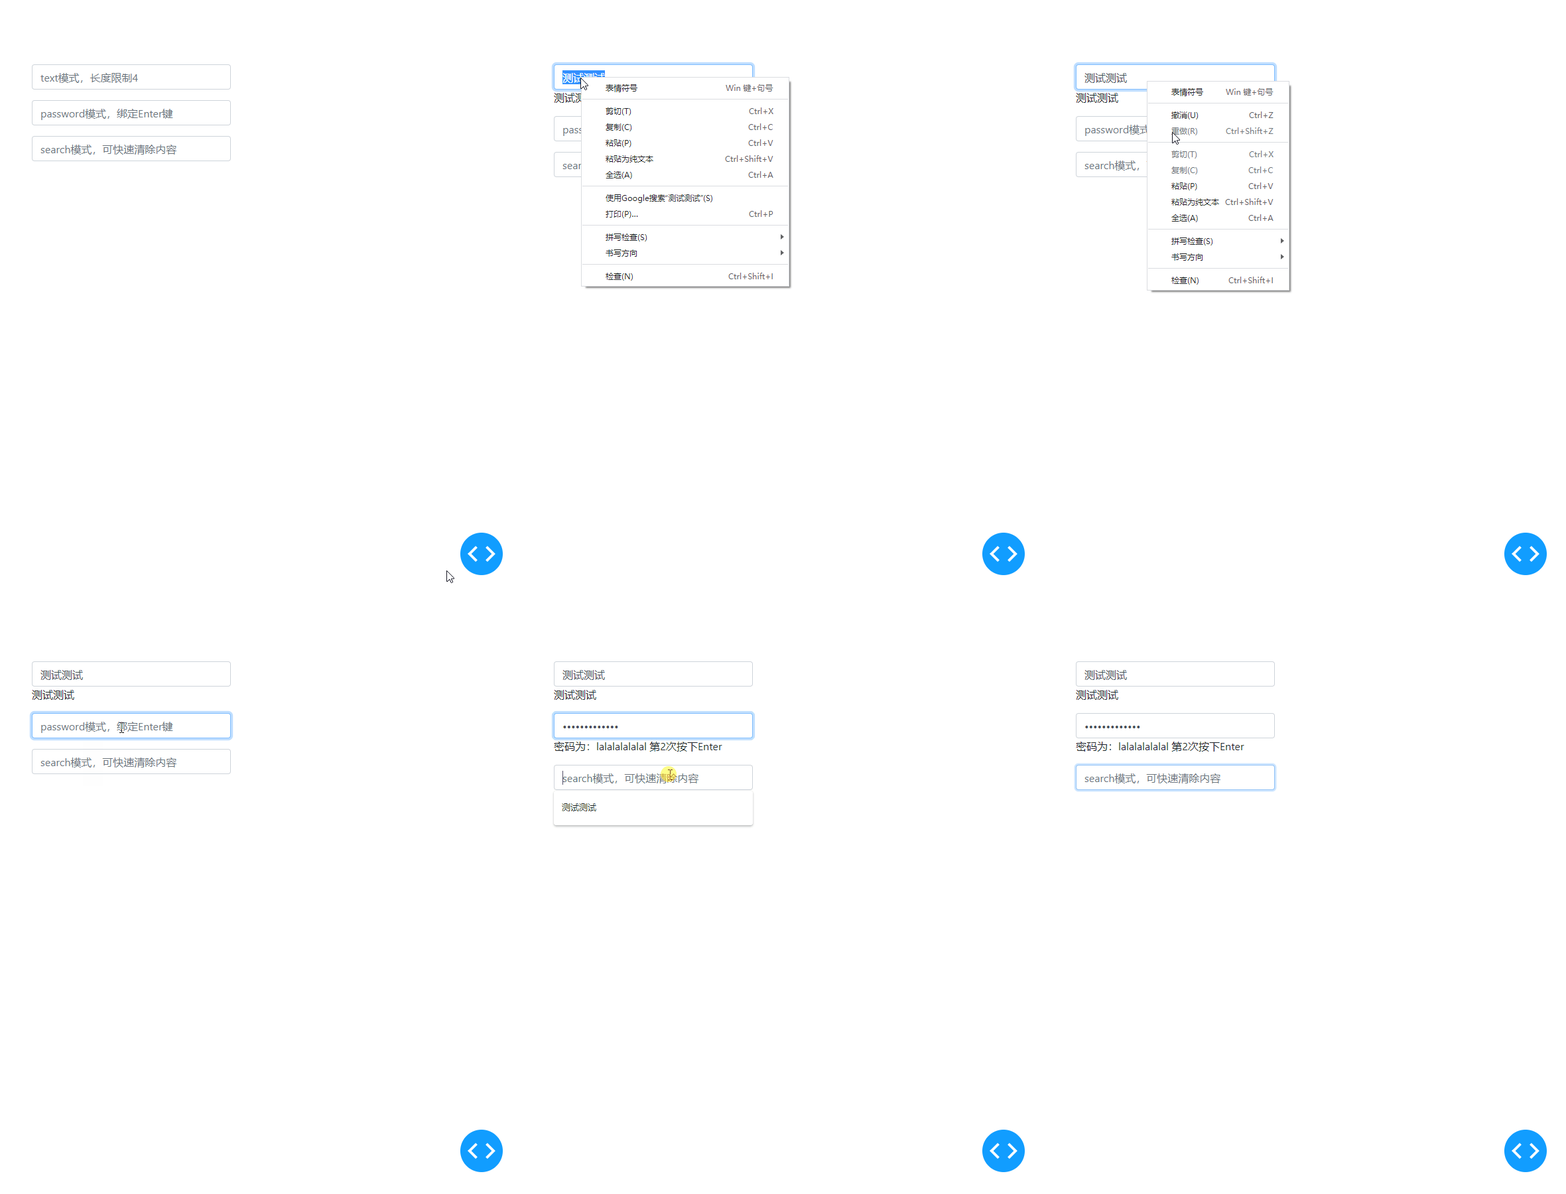
当Input()的type参数取值为'text'、'password'以及'search'之一时,它分别扮演文本输入框、密码输入框以及搜索框等角色,也拥有了一些特别的常用参数&属性:
value属性对应它当前的输入值;
placeholder用于设置未输入时输入框内的提示文字;
maxLength用于设置最多可输入的字符数量;
n_submit用于记录光标在输入框内部时键盘Enter键被点按的次数;
debounce设置为True时会强制每次用户按下Enter键或点击其他部件时才同步value值给后台Dash服务。
valid和invalid参数都接受Bool型参数,分别用来控制输入框显示正确状态以及错误状态,我们可以在检查用户名、密码等是否正确时通过回调输出设置这些参数为True来告知用户相关提示信息。
我们来通过下面的示例来直观感受这些特性:
app1.py
import dash
import dash_bootstrap_components as dbc
import dash_html_components as html
from dash.dependencies import Input, Output

app = dash.Dash(__name__)

app.layout = html.Div(
    dbc.Container(
        [
            dbc.Input(id='input-text',
                      placeholder='text模式,长度限制4',
                      type='text',
                      maxLength=4,
                      style={'width': '300px'}),
            html.P(id='output-text'),
            dbc.Input(id='input-password',
                      placeholder='password模式,绑定Enter键',
                      type='password',
                      style={'width': '300px'},
                      debounce=True),
            html.P(id='output-password'),
            dbc.Input(id='input-search',
                      placeholder='search模式,可快速清除内容',
                      type='search',
                      style={'width': '300px'}),
            html.P(id='output-search'),
        ],
        style={'margin-top': '100px'}
    )
)

@app.callback(
    Output('output-text', 'children'),
    Input('input-text', 'value')
)
def output_text(value):

    return value

@app.callback(
    Output('output-password', 'children'),
    [Input('input-password', 'value'),
     Input('input-password', 'n_submit')]
)
def output_password(value, n_submit):

    if value:

        return '密码为:'+value+'  '+f'第{n_submit}次按下Enter'

    return dash.no_update

if __name__ == '__main__':
    app.run_server(debug=True)
- number、range
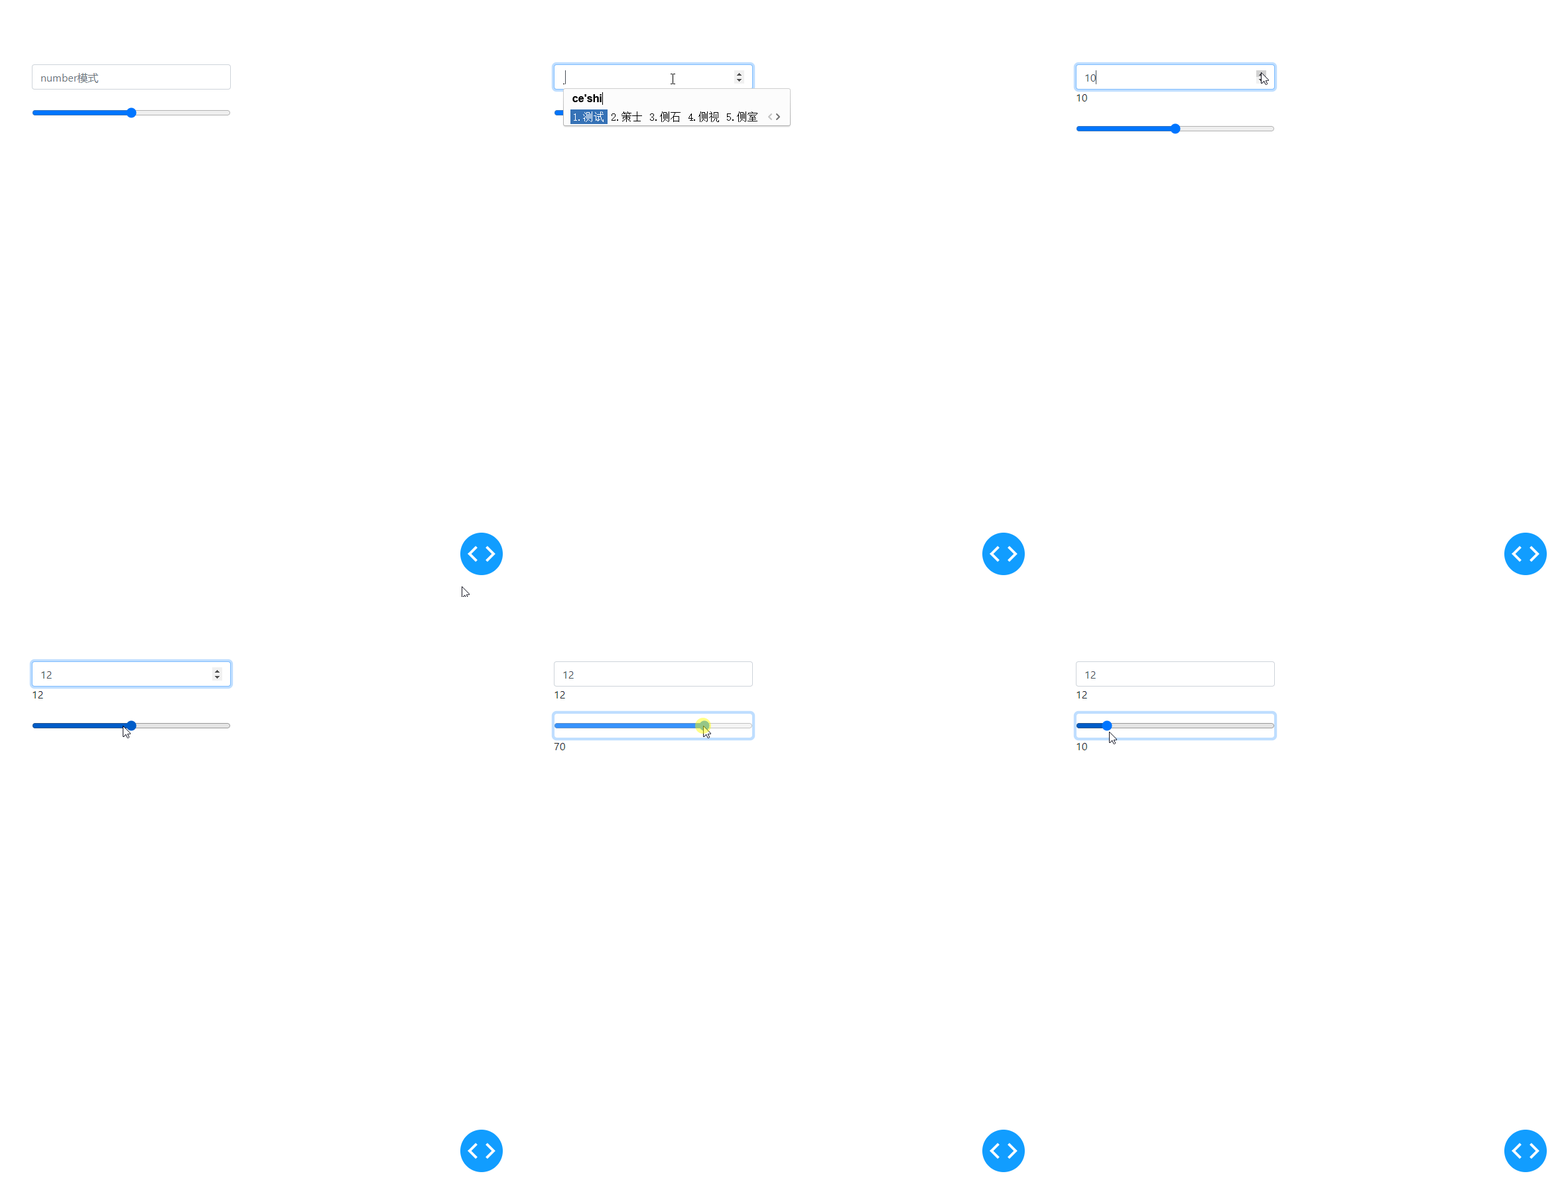
当Input()部件的type属性设置为'number'时,它便摇身一变成了数值输入框,并拥有了一些特殊的参数&属性:
min与max参数用来约束数值输入框的输入值上下限;
step参数用来设定数值输入框右侧上下箭头点按一次后数值变化的步长
而当type设置为range时就更有意思了,我们的Input()这时变成了一个滑杆,也是通过上述三个参数来限制范围和拖动的步长值。
app2.py
import dash
import dash_bootstrap_components as dbc
import dash_html_components as html
from dash.dependencies import Input, Output

app = dash.Dash(__name__)

app.layout = html.Div(
    dbc.Container(
        [
            dbc.Input(id='input-number',
                      placeholder='number模式',
                      type='number',
                      min=0,
                      max=100,
                      step=0.5,
                      style={'width': '300px'}),
            html.P(id='output-number'),
            dbc.Input(id='input-range',
                      placeholder='range模式',
                      type='range',
                      style={'width': '300px'},
                      min=0,
                      max=100,
                      step=10,),
            html.P(id='output-range')
        ],
        style={'margin-top': '100px'}
    )
)

@app.callback(
    Output('output-number', 'children'),
    Input('input-number', 'value')
)
def output_number(value):
    return value

@app.callback(
    Output('output-range', 'children'),
    Input('input-range', 'value')
)
def output_range(value):
    return value

if __name__ == '__main__':
    app.run_server(debug=True)
2.2 下拉选择部件Dropdown()#
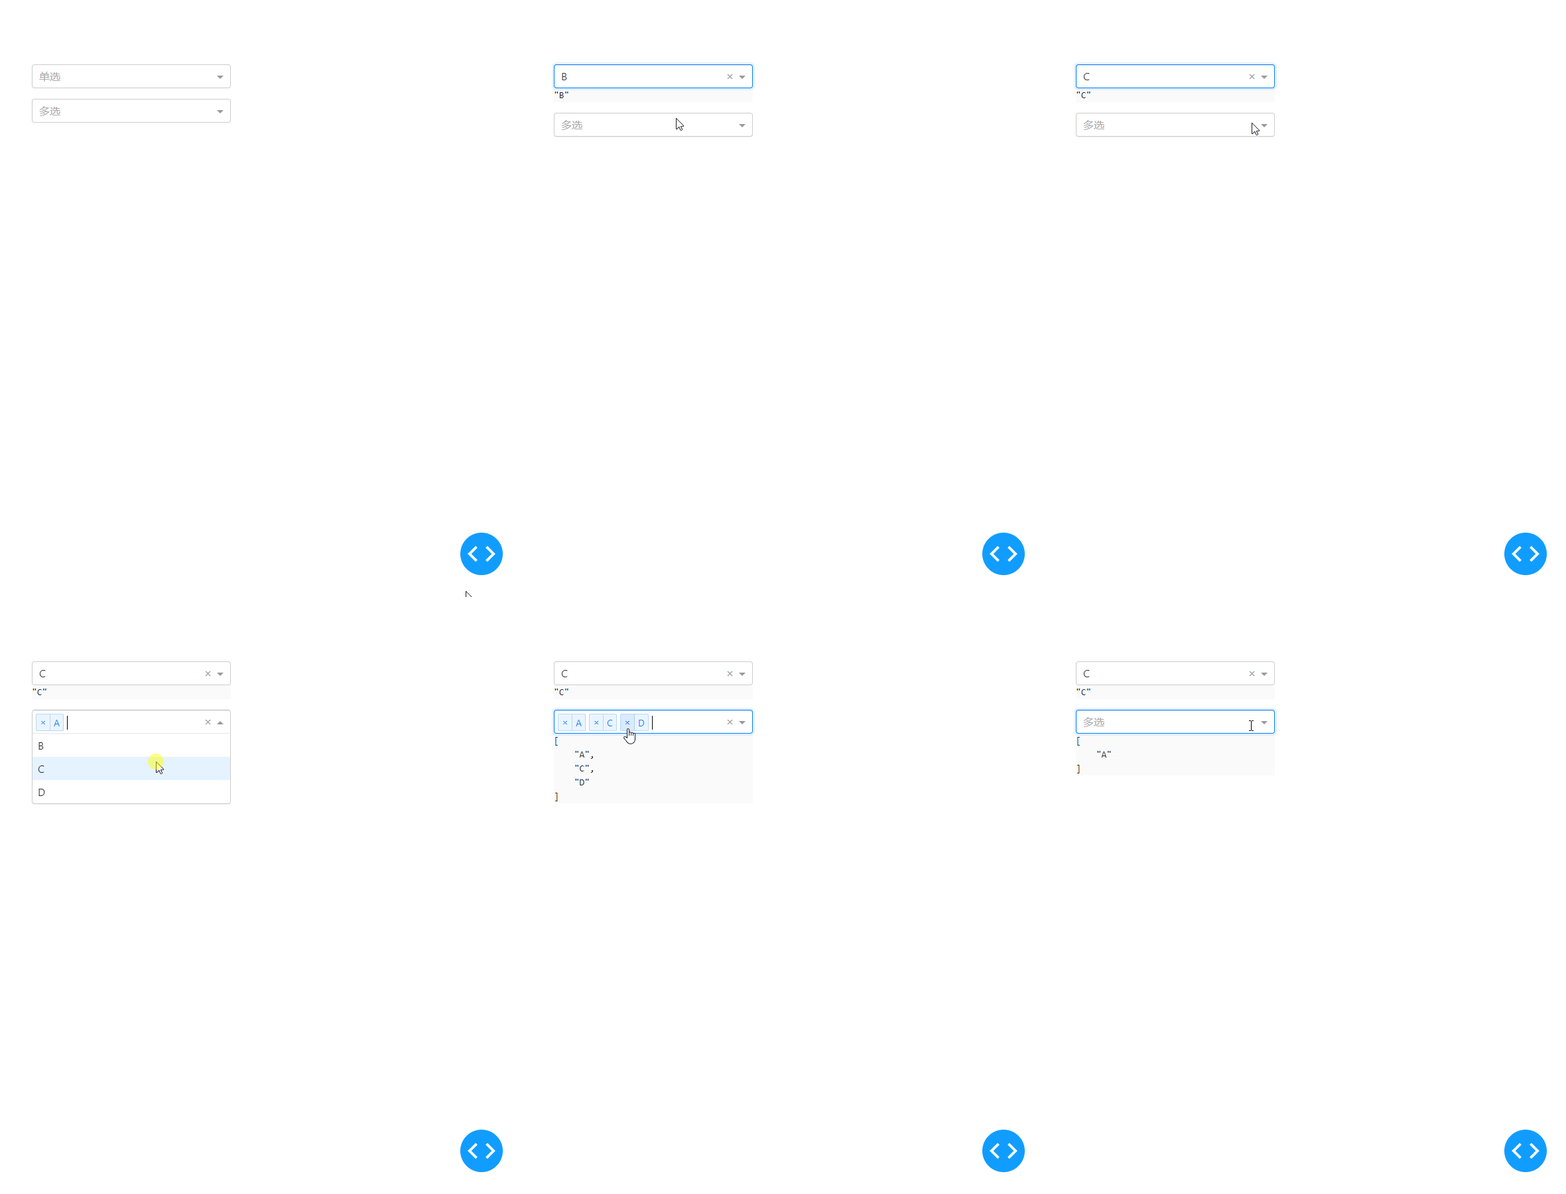
接下来我们来深入学习之前也使用过很多次的下拉选择部件Dropdown(),直接使用dash_core_components中的Dropdown()即可,它的主要属性&参数有:
options用于设置我们的下拉选择部件中显示的选项,传入列表,列表每个元素为字典,必填键有:'label',用于设置对应选项显示的标签名称;'value',对应当前选项的值,也是我们书写回调函数接受的输入;'disabled',一般情况下不用设置,除非你想指定对应选项不可点选就设置为True;
multi,bool型,用于设置是否允许多选;
optionHeight,用于设置每个选项的显示像素高度,默认35;
placeholder,同Input()同名参数;
searchable,bool型,用于设置是否可以在输入框中搜索下拉选项;
search_value,可用作回调的输入,记录了用户的搜索内容;
value,记录用户已选择的选项,单选模式下为对应单个选项的'value'值,多选模式下为对应多个选项'value'值组成的列表;
app3.py
import dash
import dash_bootstrap_components as dbc
import dash_html_components as html
from dash.dependencies import Input, Output
import dash_core_components as dcc
import json

app = dash.Dash(__name__)

app.layout = html.Div(
    dbc.Container(
        [
            dcc.Dropdown(
                id='dropdown-input-1',
                placeholder='单选',
                options=[
                    {'label': item, 'value': item}
                    for item in list('ABCD')
                ],
                style={
                    'width': '300px'
                }
            ),
            html.Pre(id='dropdown-output-1',
                     style={'background-color': '#d4d4d420',
                            'width': '300px'}),
            dcc.Dropdown(
                id='dropdown-input-2',
                placeholder='多选',
                multi=True,
                options=[
                    {'label': item, 'value': item}
                    for item in list('ABCD')
                ],
                style={
                    'width': '300px'
                }
            ),
            html.Pre(id='dropdown-output-2',
                     style={'background-color': '#d4d4d420',
                            'width': '300px'})
        ],
        style={'margin-top': '100px'}
    )
)

@app.callback(
    Output('dropdown-output-1', 'children'),
    Input('dropdown-input-1', 'value')
)
def dropdown_output_1(value):
    if value:
        return json.dumps(value, indent=4)

    return dash.no_update

@app.callback(
    Output('dropdown-output-2', 'children'),
    Input('dropdown-input-2', 'value')
)
def dropdown_output_2(value):
    if value:
        return json.dumps(value, indent=4)

    return dash.no_update

if __name__ == '__main__':
    app.run_server(debug=True)
2.3 单选框与复选框#
我们分别可以使用dash_bootstrap_components中的RadioItems与Checklist来创建单选框与复选框:
- 单选框RadioItems
单选框的特点是我们只能在其展示的一组选项中选择1项。
它的参数options格式同Dropdown();
inline参数设置为True时会横向布局所有选项;
switch设置为True时会将每个选项样式切换为开关;
app4.py
import dash
import dash_bootstrap_components as dbc
import dash_html_components as html
from dash.dependencies import Input, Output
import dash_core_components as dcc
import json

app = dash.Dash(__name__)

app.layout = html.Div(
    dbc.Container(
        [
            dbc.RadioItems(
                id='radio-items-input',
                inline=True,
                switch=True,
                options=[
                    {'label': item, 'value': item}
                    for item in list('ABCD')
                ],
                style={
                    'width': '300px'
                }
            ),
            html.P(id='radio-items-output')
        ],
        style={'margin-top': '100px'}
    )
)

@app.callback(
    Output('radio-items-output', 'children'),
    Input('radio-items-input', 'value')
)
def radio_items_output(value):

    if value:
        return '已选择:'+value

    return dash.no_update

if __name__ == '__main__':
    app.run_server(debug=True)

- 复选框Checklist
与单选框相对的,是复选框,它的参数与RadioItems完全一致,唯一不同的是它是可以多选的:
app5.py
import dash
import dash_bootstrap_components as dbc
import dash_html_components as html
from dash.dependencies import Input, Output
import dash_core_components as dcc
import json

app = dash.Dash(__name__)

app.layout = html.Div(
    dbc.Container(
        [
            dbc.Checklist(
                id='check-list-input',
                inline=True,
                options=[
                    {'label': item, 'value': item}
                    for item in list('ABCD')
                ],
                style={
                    'width': '300px'
                }
            ),
            html.P(id='check-list-output')
        ],
        style={'margin-top': '100px'}
    )
)

@app.callback(
    Output('check-list-output', 'children'),
    Input('check-list-input', 'value')
)
def check_list_output(value):

    if value:
        return '已选择:'+'、'.join(value)

    return dash.no_update

if __name__ == '__main__':
    app.run_server(debug=True)

而除了上述两种供用户对多个选项进行单选或多选的部件之外,dash_bootstrap_components中还有可以创建单个选择部件的RadioButton与Checkbox,它们只能进行勾选操作,对应回调用的的输入值为checked,是个Bool型属性,用来区分是否被勾选上,这里就不再赘述。
3 动手编写在线调查问卷
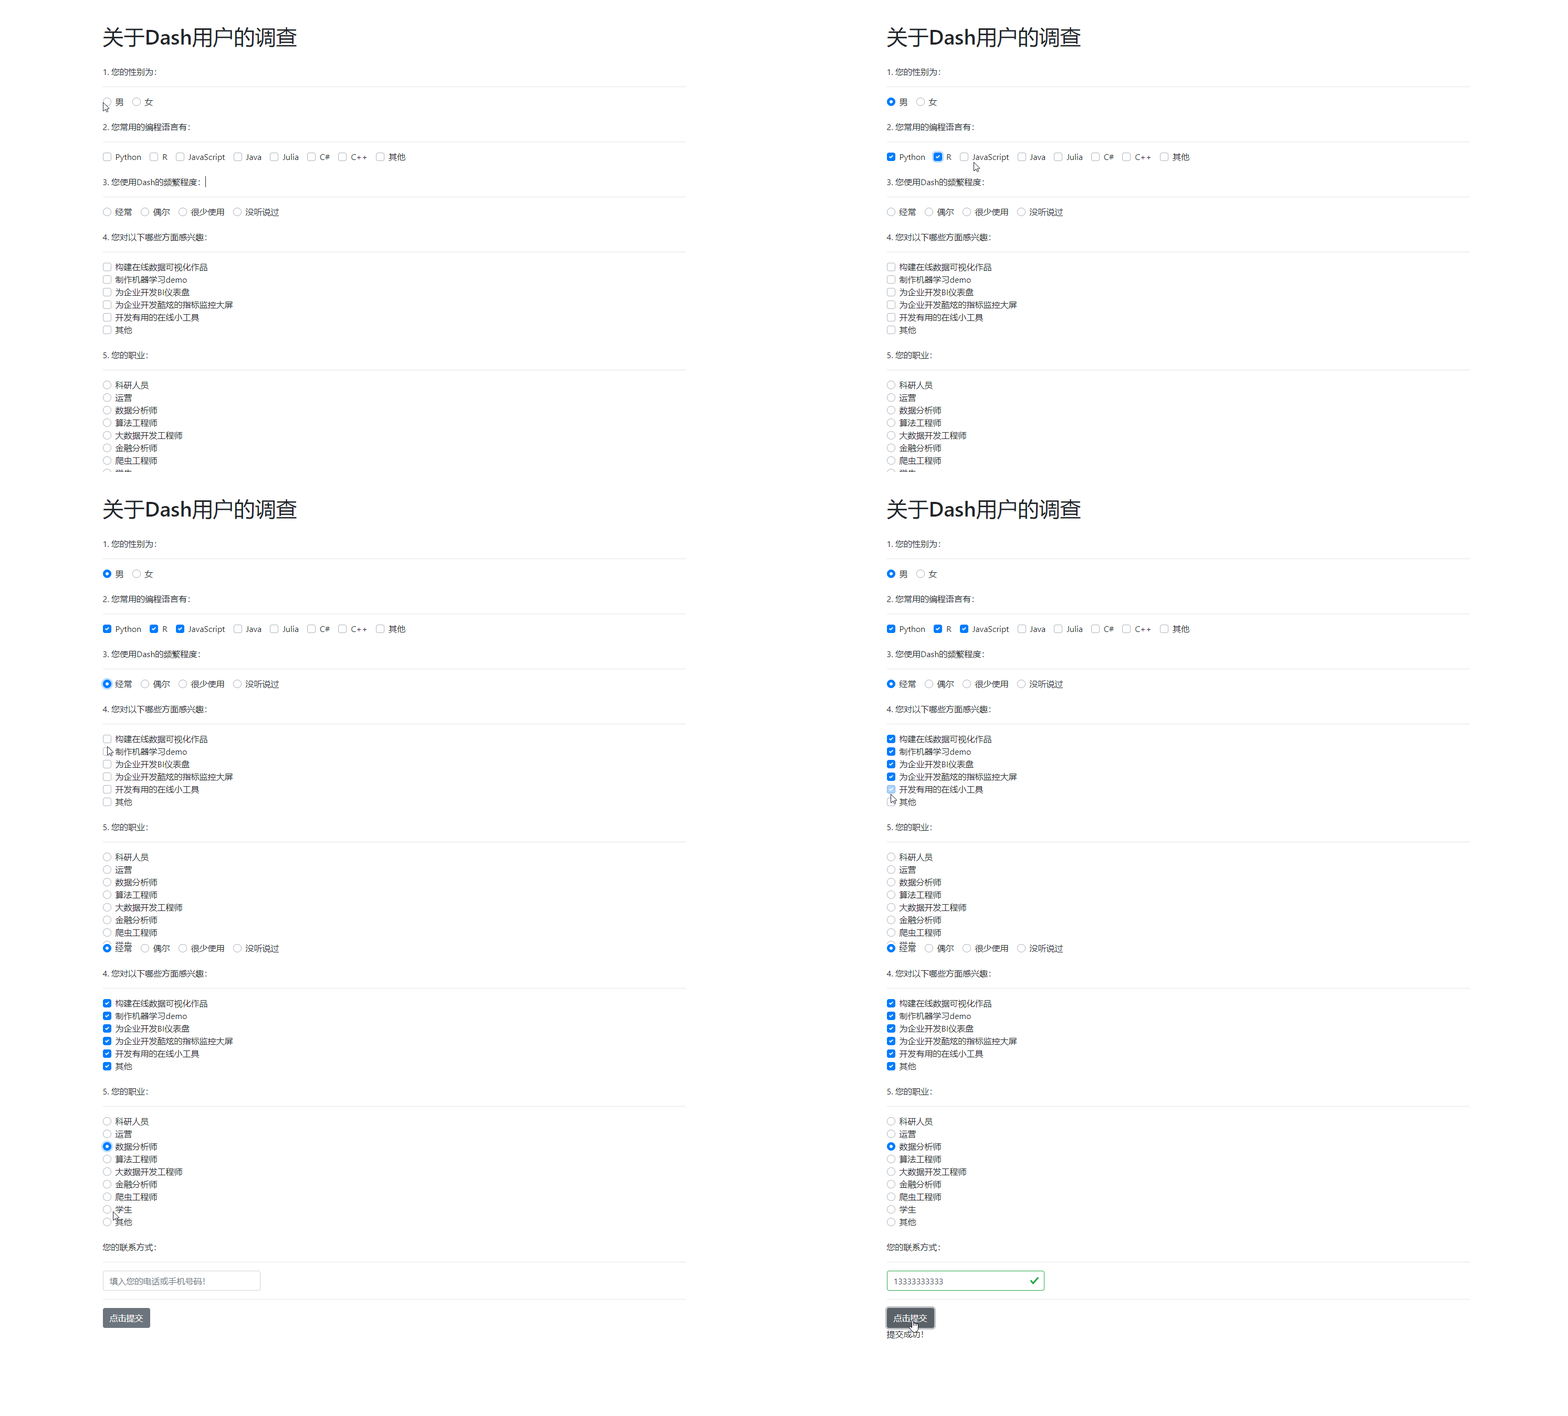
学习完今天的内容之后,我们就可以将它们应用到实际需求中,譬如我们现在需要向其他人发放一份调查问卷,其中涉及到不少输入文字或单选或多选内容,最后我们还需要将用户填写完成的表单内容保存到本地,用Dash就可以很快速地完成这项工作:
对应的代码如下:
app6.py
import dash
import dash_html_components as html
import dash_bootstrap_components as dbc
from dash.dependencies import Input, Output, State
import json
import re

app = dash.Dash(__name__)

app.layout = html.Div(
    dbc.Container(
        [
            html.H1('关于Dash用户的调查'),
            html.Br(),

            html.P('1. 您的性别为:'),
            html.Hr(),
            dbc.RadioItems(
                id='gender',
                inline=True,
                options=[
                    {'label': '男', 'value': '男'},
                    {'label': '女', 'value': '女'}
                ]
            ),
            html.Br(),

            html.P('2. 您常用的编程语言有:'),
            html.Hr(),
            dbc.Checklist(
                id='programming-language',
                inline=True,
                options=[
                    {'label': 'Python', 'value': 'Python'},
                    {'label': 'R', 'value': 'R'},
                    {'label': 'JavaScript', 'value': 'JavaScript'},
                    {'label': 'Java', 'value': 'Java'},
                    {'label': 'Julia', 'value': 'Julia'},
                    {'label': 'C#', 'value': 'C#'},
                    {'label': 'C++', 'value': 'C++'},
                    {'label': '其他', 'value': '其他'},
                ]
            ),
            html.Br(),

            html.P('3. 您使用Dash的频繁程度:'),
            html.Hr(),
            dbc.RadioItems(
                id='frequency',
                inline=True,
                options=[
                    {'label': '经常', 'value': '经常'},
                    {'label': '偶尔', 'value': '偶尔'},
                    {'label': '很少使用', 'value': '很少使用'},
                    {'label': '没听说过', 'value': '没听说过'},
                ]
            ),
            html.Br(),

            html.P('4. 您对以下哪些方面感兴趣:'),
            html.Hr(),
            dbc.Checklist(
                id='interests',
                options=[
                    {'label': '构建在线数据可视化作品', 'value': '构建在线数据可视化作品'},
                    {'label': '制作机器学习demo', 'value': '制作机器学习demo'},
                    {'label': '为企业开发BI仪表盘', 'value': '为企业开发BI仪表盘'},
                    {'label': '为企业开发酷炫的指标监控大屏', 'value': '为企业开发酷炫的指标监控大屏'},
                    {'label': '开发有用的在线小工具', 'value': '开发有用的在线小工具'},
                    {'label': '其他', 'value': '其他'},
                ]
            ),
            html.Br(),

            html.P('5. 您的职业:'),
            html.Hr(),
            dbc.RadioItems(
                id='career',
                options=[
                    {'label': '科研人员', 'value': '科研人员'},
                    {'label': '运营', 'value': '运营'},
                    {'label': '数据分析师', 'value': '数据分析师'},
                    {'label': '算法工程师', 'value': '算法工程师'},
                    {'label': '大数据开发工程师', 'value': '大数据开发工程师'},
                    {'label': '金融分析师', 'value': '金融分析师'},
                    {'label': '爬虫工程师', 'value': '爬虫工程师'},
                    {'label': '学生', 'value': '学生'},
                    {'label': '其他', 'value': '其他'},
                ]
            ),
            html.Br(),

            html.P('您的联系方式:'),
            html.Hr(),
            dbc.Input(
                id='tel',
                placeholder='填入您的电话或手机号码!',
                autoComplete='off', # 关闭浏览器自动补全
                style={
                    'width': '300px'
                }
            ),
            html.Hr(),

            dbc.Button(
                '点击提交',
                id='submit'
            ),

            html.P(id='feedback')

        ],
        style={
            'margin-top': '50px',
            'margin-bottom': '200px',
        }
    )
)


@app.callback(
    Output('feedback', 'children'),
    Input('submit', 'n_clicks'),
    [
        State('gender', 'value'),
        State('programming-language', 'value'),
        State('frequency', 'value'),
        State('interests', 'value'),
        State('tel', 'value'),
    ],
    prevent_initial_call=True
)
def fetch_info(n_clicks, gender, programming_language, frequency, interests, tel):
    if all([gender, programming_language, frequency, interests, tel]):

        # 简单以写出到本地指定json文件为例来演示写出过程
        with open(tel+'.json', 'w') as j:
            json.dump(
                {
                    'gender': gender,
                    'programming_language': programming_language,
                    'frequency': frequency,
                    'interests': interests
                },
                j
            )
        return '提交成功!'

    else:
        return '您的信息未填写完整,请检查后提交!'

@app.callback(
    [Output('tel', 'valid'),
     Output('tel', 'invalid')],
    Input('tel', 'value'),
    prevent_initial_call=True
)
def check_if_tel_completed(value):
    try:
        if re.findall('\d+', value)[0] == value and value.__len__() == 11:
            return True, False
    except:
        pass

    return False, True

if __name__ == '__main__':
    app.run_server(debug=True)
以上就是本文的全部内容,欢迎在评论区与我进行讨论,分享你的见解~
作者:Feffery
出处:https://www.cnblogs.com/feffery/p/14532519.html
版权:本作品采用「署名-非商业性使用-相同方式共享 4.0 国际」许可协议进行许可。


【推荐】国内首个AI IDE,深度理解中文开发场景,立即下载体验Trae
【推荐】编程新体验,更懂你的AI,立即体验豆包MarsCode编程助手
【推荐】抖音旗下AI助手豆包,你的智能百科全书,全免费不限次数
【推荐】轻量又高性能的 SSH 工具 IShell:AI 加持,快人一步
· 10年+ .NET Coder 心语,封装的思维:从隐藏、稳定开始理解其本质意义
· .NET Core 中如何实现缓存的预热?
· 从 HTTP 原因短语缺失研究 HTTP/2 和 HTTP/3 的设计差异
· AI与.NET技术实操系列:向量存储与相似性搜索在 .NET 中的实现
· 基于Microsoft.Extensions.AI核心库实现RAG应用
· 10年+ .NET Coder 心语 ── 封装的思维:从隐藏、稳定开始理解其本质意义
· 地球OL攻略 —— 某应届生求职总结
· 提示词工程——AI应用必不可少的技术
· 字符编码:从基础到乱码解决
· Open-Sora 2.0 重磅开源!
2018-03-14 实用的Python(1)os与shutil模块的常用方法总结
2018-03-14 (数据科学学习手札07)R在数据框操作上方法的总结(初级篇)