
Hog实例
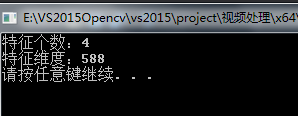
1.计算Hog的特征得维度:
1 2 3 4 5 6 7 8 9 10 11 12 13 14 15 16 17 18 19 20 21 22 23 24 25 26 27 28 29 30 31 32 33 34 35 36 37 38 39 40 41 42 43 44 45 46 47 48 49 50 51 52 53 54 55 56 57 | #include <iostream>#include <opencv2/core/core.hpp>#include <opencv2/highgui/highgui.hpp>#include <opencv2/objdetect/objdetect.hpp>#include <opencv2/imgproc/imgproc.hpp>using namespace std;using namespace cv;#define Posnum 2 //正样本个数#define Negnum 2 //负样本个数int main(){ char adpos[128], adneg[128]; HOGDescriptor hog(Size(64, 64), Size(16, 16), Size(8, 8), Size(8, 8), 3);//利用构造函数,给对象赋值。 int DescriptorDim;//HOG描述子的维数 Mat samFeatureMat, samLabelMat; //依次读取正样本图片,生成HOG描述子 for (int i = 1; i <= Posnum; i++) { sprintf_s(adpos, "E:\\VS2015Opencv\\vs2015\\project\\picture\\pos\\%d.png", i); Mat src = imread(adpos);//读取图片 resize(src, src, Size(64, 64)); vector<float> descriptors;//HOG描述子向量 hog.compute(src, descriptors); if (i == 1) { DescriptorDim = descriptors.size(); samFeatureMat = Mat::zeros(Posnum + Negnum, DescriptorDim, CV_32FC1); samLabelMat = Mat::zeros(Posnum + Negnum, 1, CV_32FC1); } for (int j = 0; j<DescriptorDim; j++) { samFeatureMat.at<float>(i - 1, j) = descriptors[j]; samLabelMat.at<float>(i - 1, 0) = 1; } } //依次读取负样本图片,生成HOG描述子 for (int k = 1; k <= Negnum; k++) { sprintf_s(adneg, "E:\\VS2015Opencv\\vs2015\\project\\picture\\neg\\%d.png", k); Mat src = imread(adneg);//读取图片 resize(src, src, Size(64, 64)); vector<float> descriptors;//HOG描述子向量 hog.compute(src, descriptors); for (int l = 0; l<DescriptorDim; l++) { samFeatureMat.at<float>(k + Posnum - 1, l) = descriptors[l]; samLabelMat.at<float>(k + Posnum - 1, 0) = -1; } } cout << "特征个数:" << samFeatureMat.rows << endl; cout << "特征维度:" << samFeatureMat.cols << endl; system("pause"); return 0;} |
这是一个很简单的代码;
1 2 3 4 5 6 7 8 9 10 11 12 | HOGDescriptor(Size _winSize, ---:窗口大小,即检测的范围大小,前面的64*128 Size _blockSize,--- 前面的2*2的cell,即cell的数量,这里要填像素值Size(16,16) Size _blockStride,---每次block移动的步长,以像素计,为一个cell像素块大小 Size _cellSize, ---cell的大小,前面的8*8 int _nbins, ----直方图的组数 int _derivAperture=1, --梯度计算的参数 double _winSigma=-1, --梯度计算的参数 int _histogramNormType=HOGDescriptor::L2Hys,---归一化的方法 double _L2HysThreshold=0.2, bool _gammaCorrection=false, ---是否要伽马校正 int _nlevels=HOGDescriptor::DEFAULT_NLEVELS, bool _signedGradient=false) |
相关函数可参考:HOG:从理论到OpenCV实践
setSVMDetector 函数
(1)作用:设置线性SVM分类器的系数
(2)函数原型:C++: void gpu::HOGDescriptor::setSVMDetector(const vector<float>& detector)
detect 函数
(1)作用:用没有多尺度的窗口进行物体检测
(2)函数原型:
vector<Point>& found_locations,
double hit_threshold=0,
Size win_stride=Size(),
Size padding=Size()
)
(3)参数注释
<1>img:源图像。只支持CV_8UC1和CV_8UC4数据类型。
<2>found_locations:检测出的物体的边缘。
<3>hit_threshold:特征向量和SVM划分超平面的阀值距离。通常它为0,并应由检测器系数决定。但是,当系数被省略时,可以手动指定它。
<4>win_stride:窗口步长,必须是块步长的整数倍。
<5>padding:模拟参数,使得CUP能兼容。目前必须是(0,0)。
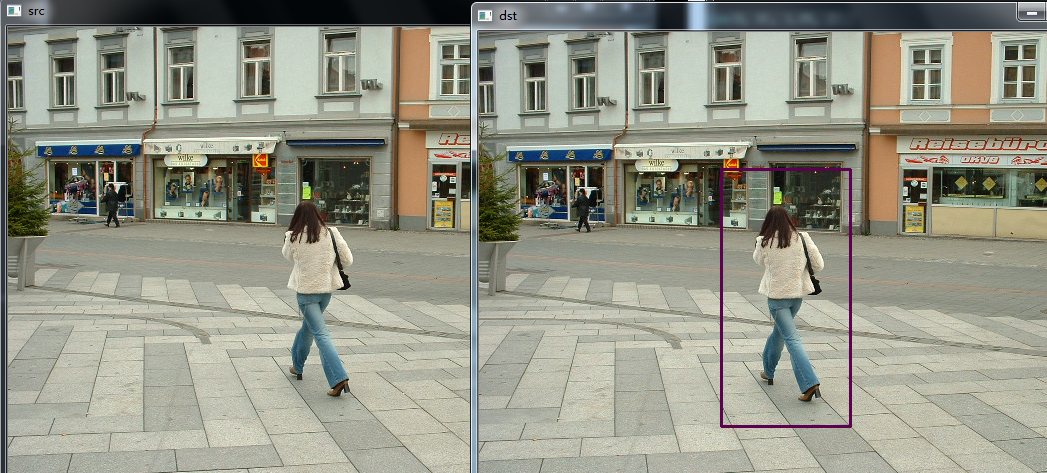
下面是简单调用api进行行人检测:

#include <opencv2/opencv.hpp>
#include <opencv2/objdetect.hpp>
using namespace std;
using namespace cv;

int main()
{
    Mat src, dst;
    src = imread("E:\\VS2015Opencv\\vs2015\\project\\picture\\x1.png", 1);
    if (src.empty())
    {
        printf("can not load the image...\n");
        return -1;
    }
    dst = src.clone();
    vector<Rect> findrects, findrect;
    HOGDescriptor HOG;
    //SVM分类器
    HOG.setSVMDetector(HOGDescriptor::getDefaultPeopleDetector());
    //多尺度检测
    HOG.detectMultiScale(src, findrects, 0, Size(4, 4), Size(0, 0), 1.05, 2);
    //若rects有嵌套,则取最外面的矩形存入rect
    for (int i = 0; i < findrects.size(); i++)
    {
        Rect rect = findrects[i];
        int j = 0;
        for (; j < findrects.size(); j++)
            if (j != i && (rect & findrects[j]) == rect)
                break;
        if (j == findrects.size())
            findrect.push_back(rect);
    }
    //框选出检测结果
    for (int i = 0; i<findrect.size(); i++)
    {
        RNG rng(i);
        Scalar color = Scalar(rng.uniform(0, 255), rng.uniform(0, 255), rng.uniform(0, 255));
        rectangle(dst, findrect[i].tl(), findrect[i].br(), color, 2);
    }

    imshow("src", src);
    imshow("dst", dst);
    waitKey();
    return 0;
}

【推荐】编程新体验,更懂你的AI,立即体验豆包MarsCode编程助手
【推荐】凌霞软件回馈社区,博客园 & 1Panel & Halo 联合会员上线
【推荐】抖音旗下AI助手豆包,你的智能百科全书,全免费不限次数
【推荐】轻量又高性能的 SSH 工具 IShell:AI 加持,快人一步