

flowable的流转与扩展
一、引言
我们在业务开发中,使用flowable的过程中,一般实际使用的,都是flowable提供给我们的一些门面服务。即下图中的servcie

对于任意一个service,比如runtimeService,我们查看它的实现类,会发现都是形如commandExecutor.execute(new XXCmd())的代码。点击查看commandExecutor类,会发现这下面是几是一条责任链。下面我们先从初始化开始分析这个责任链的构建。
二、初始化
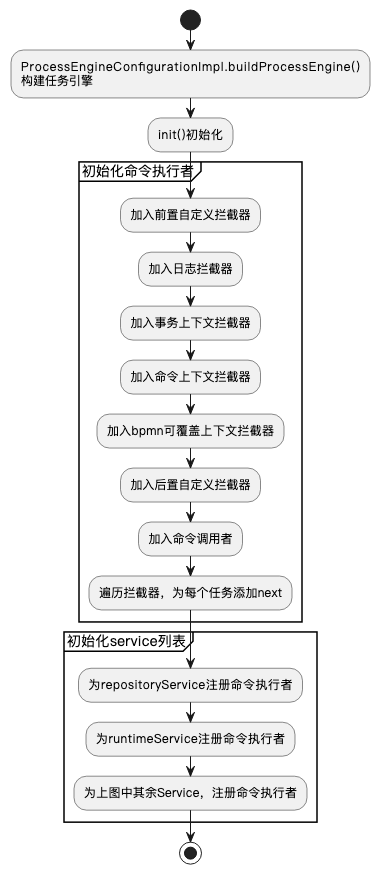
整个初始化的过程,基本如上图。此处具体代码如下:
在初始化的过程中,initCommandExecutors()方法内,初始化了命令执行器。我们来看具体代码:

public void initCommandExecutors() {
    //初始化命令默认配置(主要设置事务类型)
    initDefaultCommandConfig();
    //初始化schema命令配置
    initSchemaCommandConfig();
    // 初始化命令调用者
    initCommandInvoker();
    // 初始化命令拦截器
    initCommandInterceptors();
    // 初始化命令执行者
    initCommandExecutor();
}
接下来看下initCommandInvoker方法
public void initCommandInterceptors() {
    if (commandInterceptors == null) {
        commandInterceptors = new ArrayList<>();
        // 加入前置自定义拦截器
        if (customPreCommandInterceptors != null) {
            commandInterceptors.addAll(customPreCommandInterceptors);
        }

        // 加入默认拦截器
        commandInterceptors.addAll(getDefaultCommandInterceptors());

        // 加入后置自定义拦截器
        if (customPostCommandInterceptors != null) {
            commandInterceptors.addAll(customPostCommandInterceptors);
        }

        // 加入命令调用者的拦截器
        commandInterceptors.add(commandInvoker);
    }
}
显然,我们可以通过自定义customPreCommandInterceptors或者customPostCommandInterceptors,在flowable流程中,加入我们需要的自定义拦截器。下面我们看下默认拦截器的初始化:
public Collection<? extends CommandInterceptor> getDefaultCommandInterceptors() {
    if (defaultCommandInterceptors == null) {
        List<CommandInterceptor> interceptors = new ArrayList<>();
        // 加入日志拦截器
        interceptors.add(new LogInterceptor());

        // 如果db是crdb,加入crdb重试拦截器
        if (DATABASE_TYPE_COCKROACHDB.equals(databaseType)) {
            interceptors.add(new CrDbRetryInterceptor());
        }

        // 加入事务拦截器
        CommandInterceptor transactionInterceptor = createTransactionInterceptor();
        if (transactionInterceptor != null) {
            interceptors.add(transactionInterceptor);
        }

        //加入命令上下文拦截器(用于命令上下文的环境依赖创建初始化工作)
        if (commandContextFactory != null) {
            String engineCfgKey = getEngineCfgKey();
            CommandContextInterceptor commandContextInterceptor = new CommandContextInterceptor(commandContextFactory,
                    classLoader, useClassForNameClassLoading, clock, objectMapper);
            engineConfigurations.put(engineCfgKey, this);
            commandContextInterceptor.setEngineCfgKey(engineCfgKey);
            commandContextInterceptor.setEngineConfigurations(engineConfigurations);
            interceptors.add(commandContextInterceptor);
        }

        // 加入事务上下文拦截器
        if (transactionContextFactory != null) {
            interceptors.add(new TransactionContextInterceptor(transactionContextFactory));
        }

        // 加入额外拦截器列表-实际有一个bpmn的可覆盖上下文拦截器
        List<CommandInterceptor> additionalCommandInterceptors = getAdditionalDefaultCommandInterceptors();
        if (additionalCommandInterceptors != null) {
            interceptors.addAll(additionalCommandInterceptors);
        }

        defaultCommandInterceptors = interceptors;
    }
    return defaultCommandInterceptors;
}
到这里,其实拦截器虽然加好了,但是还没有形成责任链,即定义好每一个拦截器的next。flowable接下来在initCommandExecutor中,遍历了拦截器列表,进行了批量设置,代码如下:
public void initCommandExecutor() {
    if (commandExecutor == null) {
        // 循环设置next,并返回第一个拦截器
        CommandInterceptor first = initInterceptorChain(commandInterceptors);
        // 设定命令拦截器
        commandExecutor = new CommandExecutorImpl(getDefaultCommandConfig(), first);
    }
}

public CommandInterceptor initInterceptorChain(List<CommandInterceptor> chain) {
    if (chain == null || chain.isEmpty()) {
        throw new FlowableException("invalid command interceptor chain configuration: " + chain);
    }
    for (int i = 0; i < chain.size() - 1; i++) {
        chain.get(i).setNext(chain.get(i + 1));
    }
    return chain.get(0);
}
图中的命令执行者,其实就是上文中的commandExecutor。至此责任链已经在流程引擎启动阶段,注册到了各个我们日常使用的service。
三、流程流转过程
3.1命令执行器分析
上面已经说过,命令真正执行,实际都是调用commandExecutor的excute方法(即通过命令执行器执行),对于命令执行器,代码的具体流转如下
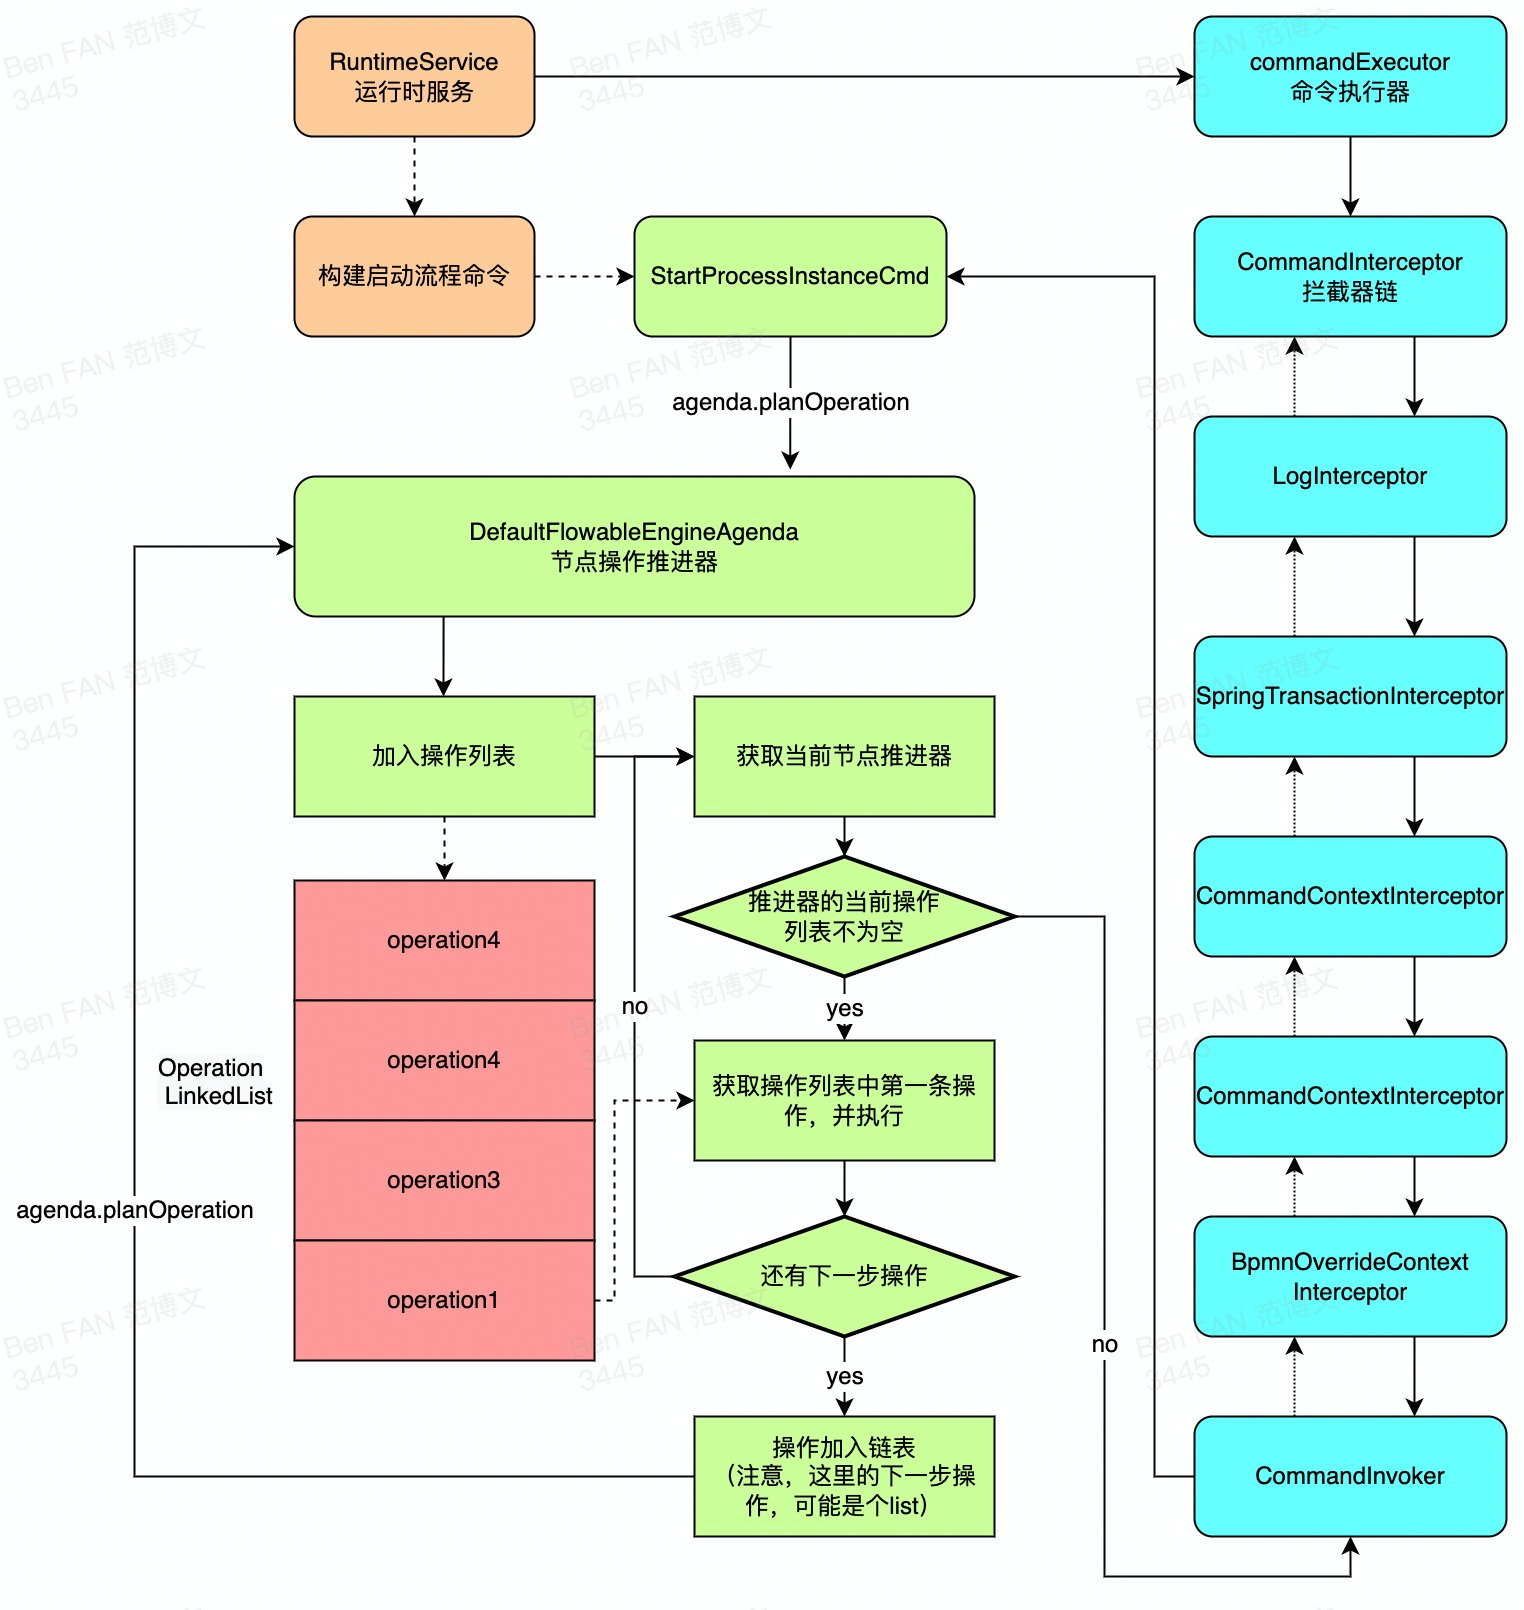
图中的节点推进器中的操作列表,实际每一步操作,大多是当前操作执行完成后,再去压入下一步操作。具体情况我们后续分析。且对于flowable的命令模式,实际并不是所有操作都有后续操作,例如AbstractQuery.query也会进入此命令执行器,但是显然此时不需要进行额外操作。
3.2 流程流转的分析
讲流程流转之前,我们先补充一些基本概念,即流程元素、操作与推进。
3.3.1 流程元素
先看下flowable的类图:
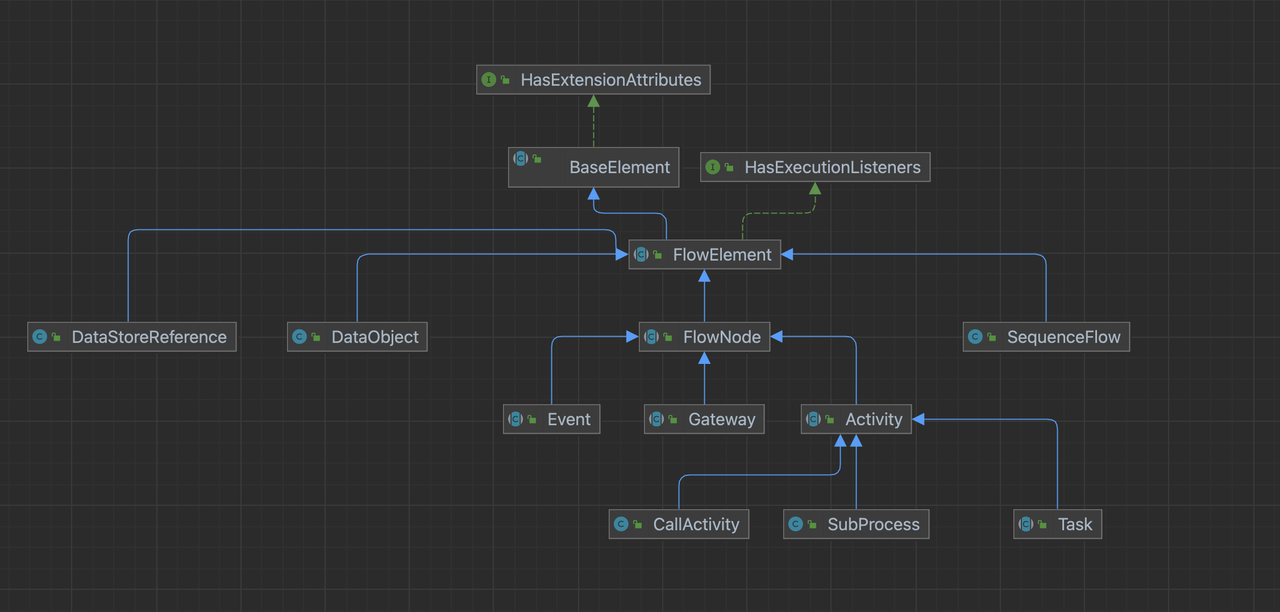
其中在flowable中,flowNode代表流程元素,它有以下子类:
- flownode代表流程节点,基本实现为事件(如开始事件/结束事件),网关(如排他网关,并行网关),活动三种,其中活动的主要实现为子进程和事件。
- squenceFlow代表顺序流。
- dataObject代表数据对象
一张流程图上的所有元素,都可以认为是流程元素。
先明确两个操作,即当前节点操作,与寻找下一条线的操作。对于操作与推进,分析如下:
3.3.2 操作与推进
操作
我们对flowable进行可视化编辑的时候,可以对每个节点添加边界事件,执行监听器等,这些组件的执行,都是通过操作来完成的。
对于flowable来讲,操作的基类为AbstractOperation。所有操作都会实现此类。他的实现列表如下:
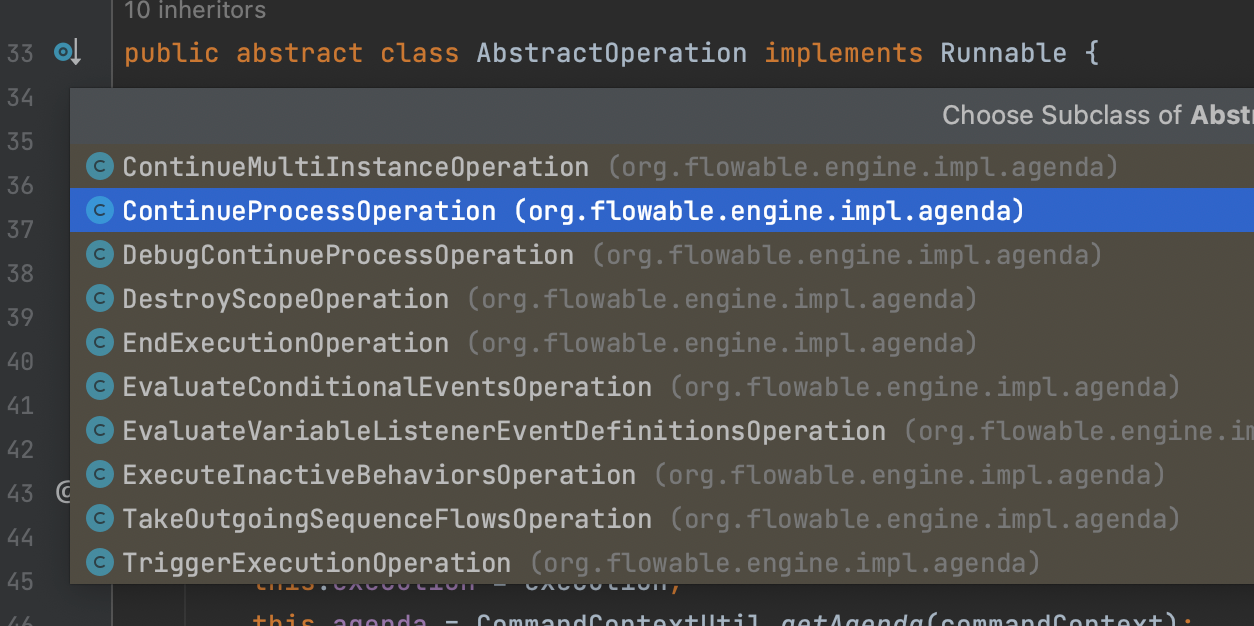
这些实现中,在流程流转中最常用的为ContinueProcessOperation和TakeOutgoingSequenceFlowsOperation。分别代表继续流程操作和寻找顺序流操作(出线)。
在工作流引擎执行过程中,每经过一个流程元素,都需要执行该节点的继续流程操作。每个流程节点执行完成,都需要进行寻找顺序流操作,确定接下来的线的走向。
节点推进器
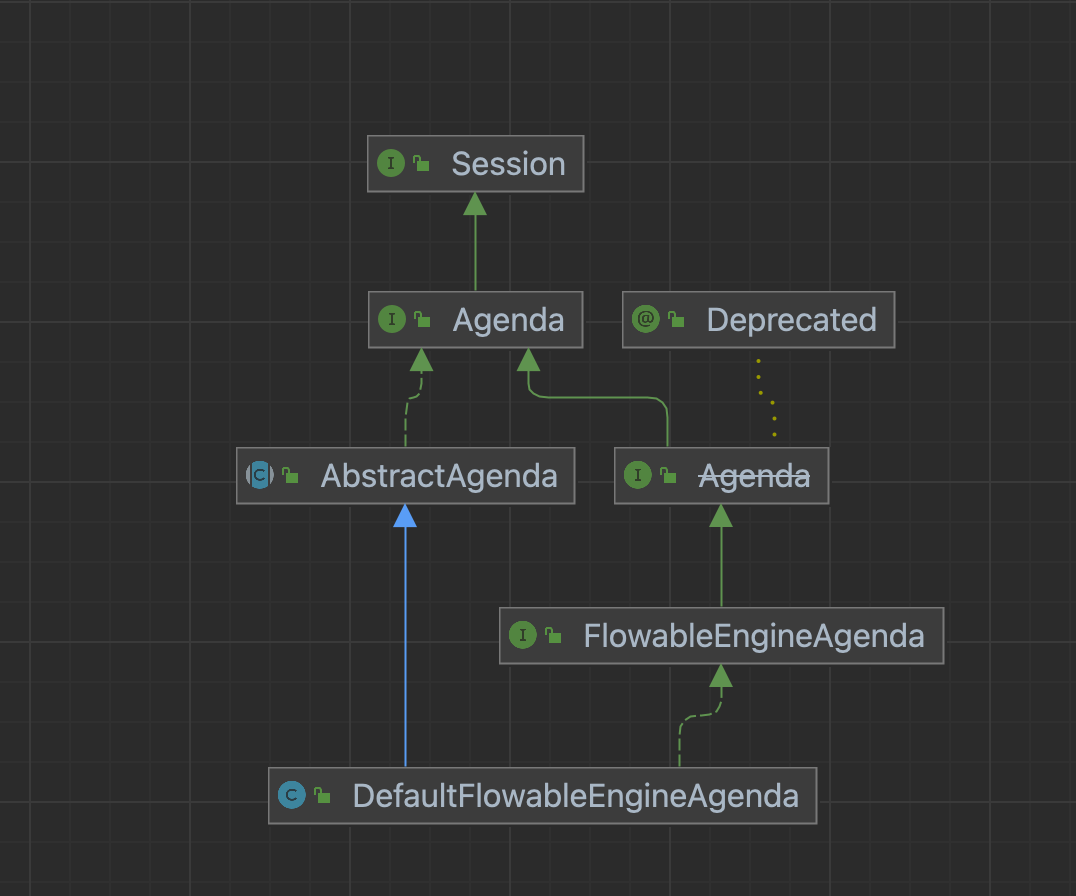
上面讲的操作,在flowable中,被节点操作推进器,即AbstractAgenda所持有。这个抽象类中,我们常用的实现类为DefaultFlowableEngineAgenda。AbstractAgenda实现了Agenda接口,而Agenda接口有继承了session。简单类图如下:
对于议程,我们的常用操作,是在Agenda中,具体代码如下:
public interface Agenda extends Session {

    /**
     * 返回操作计划是否为空
     */
    boolean isEmpty();

    /**
     * 把下一个操作返回并从队列中移除
     */
    Runnable getNextOperation();

    /**
     * 把操作加入队列
     */
    void planOperation(Runnable operation);

    /**
     * 加入一个异步执行的操作
     */
    <V> void planFutureOperation(CompletableFuture<V> future, BiConsumer<V, Throwable> completeAction);

}
AbstractAgenda持有的对象如下:
public abstract class AbstractAgenda implements Agenda {
    // 命令上下文
    protected CommandContext commandContext;
    // 操作列表
    protected LinkedList<Runnable> operations = new LinkedList<>();
    // 异步操作列表
    protected List<ExecuteFutureActionOperation<?>> futureOperations = new ArrayList<>();
}
3.3.3流程流转分析
下面是一个简单的bpmn流程图的例子,我们接下来结合这张图,继续分析流程的流转
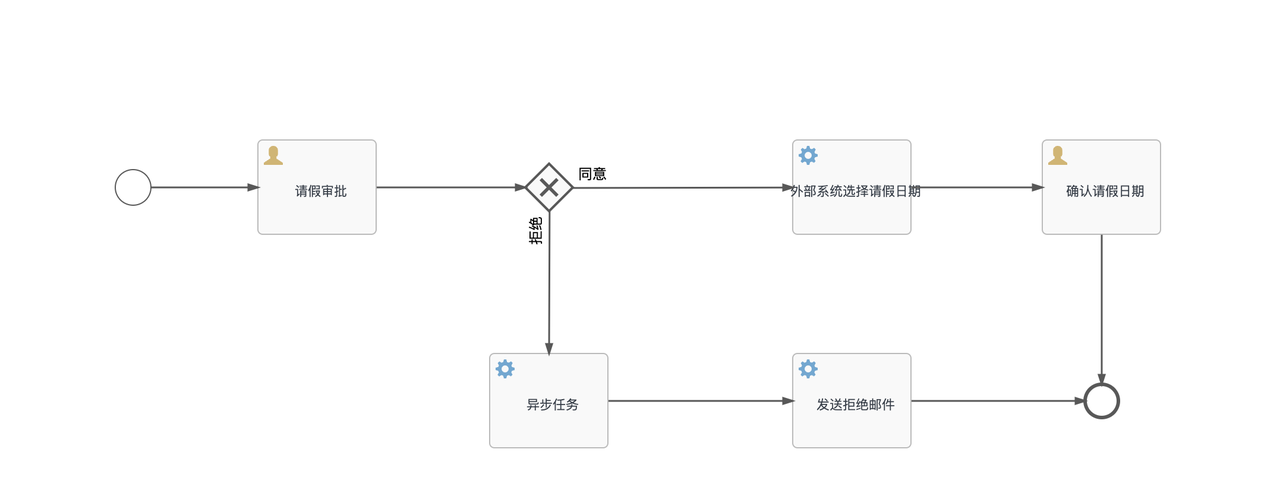
简要描述当流程经过流程节点,或者顺序流时,会执行的操作如下:
- 如果当前节点是流程节点,则可以执行当前节点操作。当前流程节点操作如果完成,就会执行寻找下一条线的操作。
- 如果当前节点本身就是顺序流(线),执行完成后只会进入顺序流指向节点的当前节点操作。
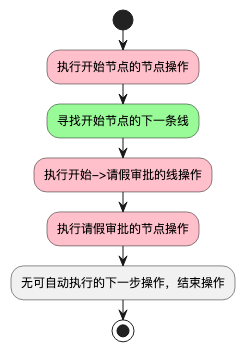
每一次流程流转中,工作流引擎都会一直尝试完成这两种操作。对于上面的流程图,如果是执行了开始流程与请假审批同意流程,那么经历过的操作顺序分别如下图:

我们可以发现,当流程满足条件能自动向后执行时,当前节点操作与寻找下一条线的操作,总是交替运行的。实际上,每个操作进行中,如果符合条件,都会向操作栈中,压入下一(多)个操作。这种压入有时是在操作自身中进行的,有时是通过行为(ActivityBehavior)进行的。
3.3 异步流程分析
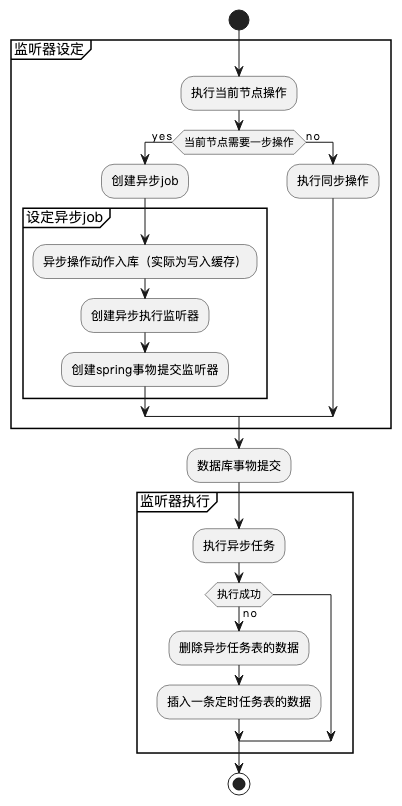
在flowable的任务节点中,我们可以通过勾选异步,来实现当前操作异步处理。这块具体代码逻辑如下图:
四、自定义扩展
flowable通过对外提供一些spi以及自定义设置的方法,支持我们进行一些自定义扩展。下面简单讲一下id生成器与缓存的初始化与自定义扩展。
4.1 id生成器
flowable的id生成器,使用接口IdGenerator类,此类中只有一个方法,即getNextId方法,代码如下:
public interface IdGenerator {
    String getNextId();
}
在需要获取id时,flowable会调用此方法。我们可以通过实现此接口,并压入配置的方式,使用自己的id生成器。

flowable自行实现的全局id生成器,有两种,即DbIdGenerator与StrongUuidGenerator。默认为DbIdGenerator。spring自动化配置时,定义为StrongUuidGenerator。
4.1.1DbIdGenerator
先来聊下DbIdGenerator。实际上DbIdGenerator数据存储在数据库。每次取回后会在本地进行缓存一个区间段(2500)。然后更新数据库中的对应字段(act_ge_property表中,name_为next.dbid的字段)。全局自增,且不能区分业务。当前区间段用完会重新请求数据库。
这种id显然存在以下问题:
- 长度容易变动,且id单调递增,容易被识别出单量
- qps较高时,对数据库请求较多
4.1.2 StrongUuidGenerator
实际为uuid方案,不依赖数据库。
4.1.3 自定义
只要实现IdGenerator接口,并且写入配置即可。对于非spring环境示例代码如下:
public class SelfWithoutSpringTest {

    @Test
    public void testProcessEngine() {
        ProcessEngineConfiguration configuration = new StandaloneProcessEngineConfiguration();
        //数据库配置
        configuration.setJdbcDriver("com.mysql.jdbc.Driver");
        configuration.setJdbcUsername("XXX");
        configuration.setJdbcPassword("XXX");
        configuration.setJdbcUrl("XXX");
        configuration.setIdGenerator(new MyIdGenerator());

        ProcessEngine processEngine = configuration.buildProcessEngine();
        RuntimeService runtimeService = processEngine.getRuntimeService();

        ProcessInstance processInstance =
                runtimeService.startProcessInstanceById("benAskForLeaveFlow:5:758ba816-acdd-11ed-8563-aa5b81408f73");

        log.info(JSON.toJSONString(processInstance.getId()));
    }

    class MyIdGenerator implements IdGenerator {

        @Override
        public String getNextId() {
            return "ben-"+UUID.randomUUID().toString();
        }
    }
}
对于spring环境,实例代码如下
@Configuration
public class flowableIdConfig {

    @Bean
    @Primary
    public IdGenerator primaryIdGenerator(){
        return new PrimaryIdGenerator();
    }

    @Bean
    @Process
    public IdGenerator processIdGenerator(){
        return new ProcessIdGenerator();
    }
}

public class PrimaryIdGenerator implements IdGenerator {

    public String getNextId() {
        return "primary-"+ UUID.randomUUID().toString();
    }
}

public class ProcessIdGenerator implements IdGenerator {

    public String getNextId() {
        return "process-"+ UUID.randomUUID().toString();
    }
}
4.2 缓存
flowable运行中的缓存,大致可以分为两种,即流程定义缓存和各种实体缓存。
- 对流程定义(ProcessDefinition)这类数据的缓存,因为变更较少且访问频繁,将数据解析后常驻缓存在了进程中,且因每次部署时都是重新插入新的数据,所以不会存在有一致性的问题。
- 对于各数据实体的缓存,Flowable 设计了生命周期为一次命令的缓存,这类缓存能有效降低一次调用中相同数据对DB的多次查询,并随着CommandContext的销毁而销毁。
下面我们详细分析啊下流程定义的缓存
4.2.1缓存的初始化
在flowbale的的init中,下面的代码,主要用于初始化本地缓存
    initProcessDefinitionCache();
    initProcessDefinitionInfoCache();
    initAppResourceCache();
    initKnowledgeBaseCache();
其中除了initProcessDefinitionInfoCache方法,其余三个传入limitcount后,都是只是通过重写linkedHashmap的removeEldestEntry方法,来实现了LRU模式。initProcessDefinitionInfoCache还会对返回类型封装为ProcessDefinitionInfoCacheObject。以initProcessDefinitionCache为例,我们继续看下此方法的代码:
public void initProcessDefinitionCache() {
    // 流程定义缓存不存在,则初始化
    if (processDefinitionCache == null) {
        if (processDefinitionCacheLimit <= 0) {
            // 初始化一个容量无限的缓存map
            processDefinitionCache = new DefaultDeploymentCache<>();
        } else {
            // 初始化一个容量为limit的LRU的map
            processDefinitionCache = new DefaultDeploymentCache<>(processDefinitionCacheLimit);
        }
    }
}

public DefaultDeploymentCache() {
    this.cache = Collections.synchronizedMap(new HashMap<>());
}

/**
 * Cache which has a hard limit: no more elements will be cached than the limit.
 */
public DefaultDeploymentCache(final int limit) {
    this.cache = Collections.synchronizedMap(new LinkedHashMap<String, T>(limit + 1, 0.75f, true) {
        // +1是不要的,因为要在删除旧数据前,把老数据加进来
        // 0.75的负载因子是默认参数
        private static final long serialVersionUID = 1L;

        @Override
        protected boolean removeEldestEntry(Map.Entry<String, T> eldest) {
            boolean removeEldest = size() > limit;
            if (removeEldest && LOGGER.isTraceEnabled()) {
                LOGGER.trace("Cache limit is reached, {} will be evicted", eldest.getKey());
            }
            return removeEldest;
        }

    });
}
4.2.2、缓存的查询
对缓存进行查询时,就是简单的从map中获取数据,方法如下:
public T get(String id) {
    return cache.get(id);
}
4.2.3、缓存的设定
设定有限制的LRU的map,demo如下:
@Test
public void testProcessEngine() {
    ProcessEngineConfigurationImpl configuration = new StandaloneProcessEngineConfiguration();
    //数据库配置
    configuration.setJdbcDriver("com.mysql.jdbc.Driver");
    configuration.setJdbcUsername("XXX");
    configuration.setJdbcPassword("XXX");
    configuration.setJdbcUrl("XXX");
    configuration.setProcessDefinitionCacheLimit(1);

    ProcessEngine processEngine = configuration.buildProcessEngine();
    RuntimeService runtimeService = processEngine.getRuntimeService();

    ProcessInstance processInstance =
            runtimeService.startProcessInstanceById("benAskForLeaveFlow:5:758ba816-acdd-11ed-8563-aa5b81408f73");
    ProcessInstance processInstance2 =
            runtimeService.startProcessInstanceById("benTestFlow:11:ce3839b1-a7af-11ed-b124-ca62e3fd2f34");
    ProcessInstance processInstance3 =
            runtimeService.startProcessInstanceById("benAskForLeaveFlow:5:758ba816-acdd-11ed-8563-aa5b81408f73");


    log.info(JSON.toJSONString(processInstance.getId()));
}
流程启动过程中,在StartProcessInstanceCmd的execute方法内,会调用getProcessDefinition方法,这其中,又会调用deploymentCache.findDeployedProcessDefinitionById方法,尝试通过流程定义id,获取流程定义。此方法代码如下:
public ProcessDefinition findDeployedProcessDefinitionById(String processDefinitionId) {
    if (processDefinitionId == null) {
        throw new FlowableIllegalArgumentException("Invalid process definition id : null");
    }

    // first try the cache
    ProcessDefinitionCacheEntry cacheEntry = processDefinitionCache.get(processDefinitionId);
    ProcessDefinition processDefinition = cacheEntry != null ? cacheEntry.getProcessDefinition() : null;

    if (processDefinition == null) {
        processDefinition = processDefinitionEntityManager.findById(processDefinitionId);
        if (processDefinition == null) {
            throw new FlowableObjectNotFoundException("no deployed process definition found with id '" + processDefinitionId + "'", ProcessDefinition.class);
        }
        processDefinition = resolveProcessDefinition(processDefinition).getProcessDefinition();
    }
    return processDefinition;
}
我们可以在上面代码中第七行加上断点进行debug。会发现上面业务代码中,每次启动流程时,map的容量都只有1,保留为最近使用,符合预期。
当然,我们也可以通过自行实现DeploymentCache类,把这份缓存替换为redis缓存,但是并不建议这么做,因为对于流程定义缓存,实际缓存对象为ProcessDefinitionCacheEntry。他持有的两个对象,即BpmnModel与Process,并没有实现序列化。此问题2017年在github已经提出,但是至今没有解决,详见https://github.com/flowable/flowable-engine/issues/481
五、并行网关流转的一些问题
5.1、Q:流程经过并行网关后,接下来会出现多个流程实例。看起来其中有一个流程实例是复用原有流程实例。这个复用原流程实例的实例,是如何确定的?
A:关于并行网关出线的时候,哪个线使用原流程,通过代码看是第一条线,具体代码在org.flowable.engine.impl.agenda.TakeOutgoingSequenceFlowsOperation#leaveFlowNode方法内。
// 获取所有出线流程
List<ExecutionEntity> outgoingExecutions = new ArrayList<>(flowNode.getOutgoingFlows().size());

// 获取第一个顺序流
SequenceFlow sequenceFlow = outgoingSequenceFlows.get(0);

// 复用第一个当前流程实例
execution.setCurrentFlowElement(sequenceFlow);
execution.setActive(false);
outgoingExecutions.add(execution);

// 为其他流程实例出线
if (outgoingSequenceFlows.size() > 1) {
    for (int i = 1; i < outgoingSequenceFlows.size(); i++) {

        ExecutionEntity parent = execution.getParentId() != null ? execution.getParent() : execution;
        ExecutionEntity outgoingExecutionEntity = processEngineConfiguration.getExecutionEntityManager().createChildExecution(parent);

        SequenceFlow outgoingSequenceFlow = outgoingSequenceFlows.get(i);
        outgoingExecutionEntity.setActive(false);
        outgoingExecutionEntity.setCurrentFlowElement(outgoingSequenceFlow);

        executionEntityManager.insert(outgoingExecutionEntity);
        outgoingExecutions.add(outgoingExecutionEntity);
    }
}
第一个线的概念,是在于flowable会把bpmn解析为一个Process对象,其中FlowNode持有一个outgoingFlows对象。对于出线列表对象中的第一个元素,即第一条线。 对于同一个bpnm文件,生成的Process应该用于是一致的,所以谁使用原流程不是随机的,而是固定的。
5.2、Q:并行网关如何决定继续向下流转?
A:关于并行网关如何收线决定往下走,根据代码分析,是会比较这个并行网关进入的线的条数,和完成的条数是否一致(注意下,这里只看当前网关的进入线数量,而非上一个网关出线数量。因为两个数量可能不一致)。 这块还是涉及到之前说的当前节点执行类和出线类。当前节点执行类(ContinueProcessOperation)发现当前节点为并行网关时,经过一系列操作,会调用并行网关操作行为尝试出线,即ParallelGatewayActivityBehavior.execute。关键代码就在这个方法中,简要罗列如下:
// 获取已完成实例
Collection<ExecutionEntity> joinedExecutions = executionEntityManager.findInactiveExecutionsByActivityIdAndProcessInstanceId(execution.getCurrentActivityId(), execution.getProcessInstanceId());
if (multiInstanceExecution != null) {
    joinedExecutions = cleanJoinedExecutions(joinedExecutions, multiInstanceExecution);
}

// 获取当前并行网关入线数量
int nbrOfExecutionsToJoin = parallelGateway.getIncomingFlows().size();
// 获取已完成实例
int nbrOfExecutionsCurrentlyJoined = joinedExecutions.size();

// Fork

// Is needed to set the endTime for all historic activity joins
CommandContextUtil.getActivityInstanceEntityManager().recordActivityEnd((ExecutionEntity) execution, null);

// 如果当前入线数量=已完成数量。那么出线
if (nbrOfExecutionsCurrentlyJoined == nbrOfExecutionsToJoin) {
// 省略
    // 出线操作
   CommandContextUtil.getAgenda().planTakeOutgoingSequenceFlowsOperation((ExecutionEntity) execution, false);

}


【推荐】国内首个AI IDE,深度理解中文开发场景,立即下载体验Trae
【推荐】编程新体验,更懂你的AI,立即体验豆包MarsCode编程助手
【推荐】抖音旗下AI助手豆包,你的智能百科全书,全免费不限次数
【推荐】轻量又高性能的 SSH 工具 IShell:AI 加持,快人一步
· winform 绘制太阳,地球,月球 运作规律
· 超详细:普通电脑也行Windows部署deepseek R1训练数据并当服务器共享给他人
· 上周热点回顾(3.3-3.9)
· AI 智能体引爆开源社区「GitHub 热点速览」
· 写一个简单的SQL生成工具