Fork me on GitHub

【趣味设计模式系列】之【代理模式2--JDK动态代理源码解析】


1. 图解

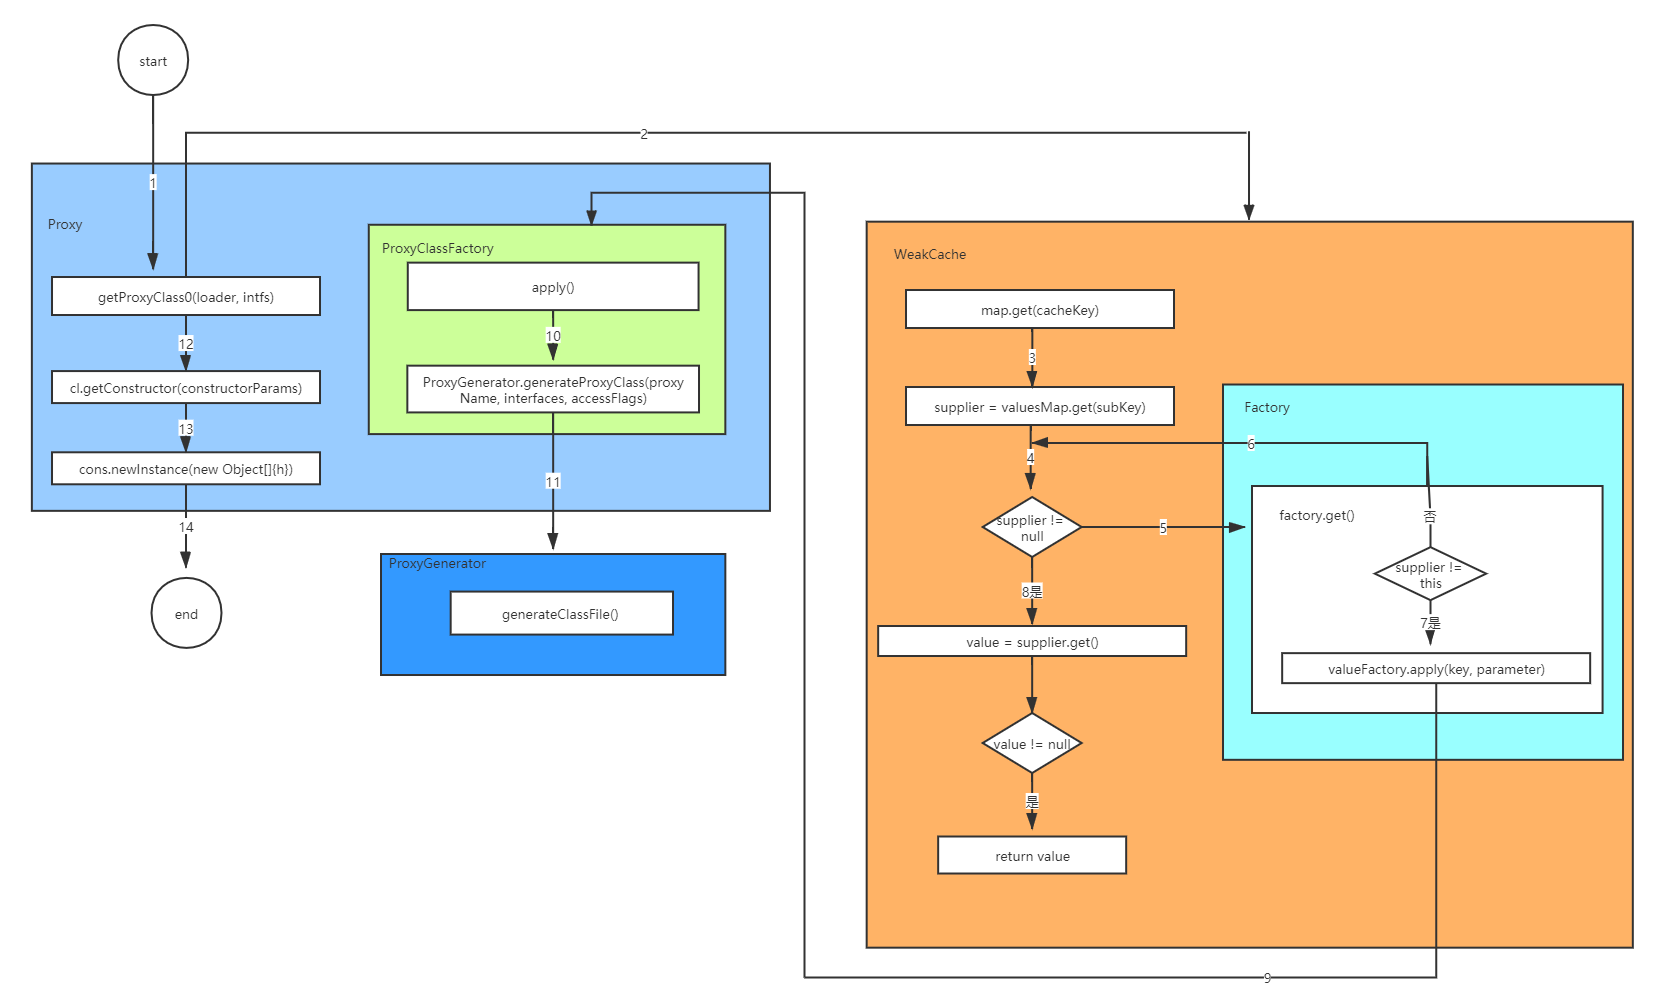
上图主要描述了JDK动态代理的执行过程,下面做详细分析。

2. Proxy源码分析

上一篇,在使用JDK动态代理的时候,借助于Proxy类,使用newProxyInstance静态方法,创建了动态代理对象,这个方法接收三个参数,分别是目标类的类加载器、目标类实现的接口数组、自定义的InvocationHandler类,下面从该方法开始,详细分析该类如何生成的。本文所用JDK版本为1.8.0_161,为了保留源码英文注释的原汁原味,未对英文注释做删减,并在代码后面加注中文注释。

public static Object newProxyInstance(ClassLoader loader, Class<?>[] interfaces, InvocationHandler h) throws IllegalArgumentException { Objects.requireNonNull(h);// 验证InvocationHandler不为空 final Class<?>[] intfs = interfaces.clone(); // 克隆代理类实现的所有接口 final SecurityManager sm = System.getSecurityManager(); //获取安全管理器 if (sm != null) { checkProxyAccess(Reflection.getCallerClass(), loader, intfs); //进行一些权限检验 } /* * Look up or generate the designated proxy class. */ Class<?> cl = getProxyClass0(loader, intfs); // 查找或创建指定的代理对象 /* * Invoke its constructor with the designated invocation handler. */ try { if (sm != null) { checkNewProxyPermission(Reflection.getCallerClass(), cl); //进行一些权限检验 } final Constructor<?> cons = cl.getConstructor(constructorParams); //获取参数类型是InvocationHandler.class的代理类构造器 final InvocationHandler ih = h; if (!Modifier.isPublic(cl.getModifiers())) { //如果代理类是不可访问的, 就使用特权将它的构造器设置为可访问 AccessController.doPrivileged(new PrivilegedAction<Void>() { public Void run() { cons.setAccessible(true); return null; } }); } return cons.newInstance(new Object[]{h}); //传入InvocationHandler实例去构造一个代理类的实例 } catch (IllegalAccessException|InstantiationException e) { throw new InternalError(e.toString(), e); } catch (InvocationTargetException e) { Throwable t = e.getCause(); if (t instanceof RuntimeException) { throw (RuntimeException) t; } else { throw new InternalError(t.toString(), t); } } catch (NoSuchMethodException e) { throw new InternalError(e.toString(), e); } }

从上面代码可以看出,创建代理对象总共如下几步:

  1. 对参数进行一些权限校验;
  2. getProxyClass0方法生成了代理类的类对象;
  3. 获取参数类型是InvocationHandler.class的代理类构造器;
  4. 通过InvocationHandler实例的引用,去构造出一个代理类对象。

因为生成的代理类继承自Proxy类,子类创建实例对象时,会优先调用父类Proxy的构造,所以最后会调用Proxy的构造器将InvocationHandler将引用传入。
下面重点看getProxyClass0方法是如何获取代理对象的。

private static Class<?> getProxyClass0(ClassLoader loader, Class<?>... interfaces) { if (interfaces.length > 65535) { throw new IllegalArgumentException("interface limit exceeded"); } // If the proxy class defined by the given loader implementing // the given interfaces exists, this will simply return the cached copy; // otherwise, it will create the proxy class via the ProxyClassFactory return proxyClassCache.get(loader, interfaces); // 如果实现给定接口的给定加载器所定义的代理类存在,则从缓存取,否则通过ProxyClassFactory创建 }

上述代码主要做了两件事:

  1. 判断代理类实现的接口不能大于65535这个数;
  2. 缓存存在代理类,则从缓存取,否则从ProxyClassFactory创建。

3. WeakCache源码

下面将继续深入WeakCache的源码,分析proxyClassCache.get方法相关实现。

final class WeakCache<K, P, V> { private final ReferenceQueue<K> refQueue = new ReferenceQueue<>(); // Reference引用队列 // the key type is Object for supporting null key private final ConcurrentMap<Object, ConcurrentMap<Object, Supplier<V>>> map //缓存的底层实现, key为一级缓存, value为二级缓存。 为了支持null, map的key类型设置为Object = new ConcurrentHashMap<>(); private final ConcurrentMap<Supplier<V>, Boolean> reverseMap // 记录了所有代理类生成器是否可用, 这是为了实现缓存的过期机制 = new ConcurrentHashMap<>(); private final BiFunction<K, P, ?> subKeyFactory; //生成二级缓存key的工厂, 这里传入的是KeyFactory private final BiFunction<K, P, V> valueFactory; //生成二级缓存value的工厂, 这里传入的是ProxyClassFactory /** * Construct an instance of {@code WeakCache} * * @param subKeyFactory a function mapping a pair of * {@code (key, parameter) -> sub-key} * @param valueFactory a function mapping a pair of * {@code (key, parameter) -> value} * @throws NullPointerException if {@code subKeyFactory} or * {@code valueFactory} is null. */ public WeakCache(BiFunction<K, P, ?> subKeyFactory, //构造器, 传入生成二级缓存key的工厂和生成二级缓存value的工厂 BiFunction<K, P, V> valueFactory) { this.subKeyFactory = Objects.requireNonNull(subKeyFactory); this.valueFactory = Objects.requireNonNull(valueFactory); } /** * Look-up the value through the cache. This always evaluates the * {@code subKeyFactory} function and optionally evaluates * {@code valueFactory} function if there is no entry in the cache for given * pair of (key, subKey) or the entry has already been cleared. * * @param key possibly null key * @param parameter parameter used together with key to create sub-key and * value (should not be null) * @return the cached value (never null) * @throws NullPointerException if {@code parameter} passed in or * {@code sub-key} calculated by * {@code subKeyFactory} or {@code value} * calculated by {@code valueFactory} is null. */ public V get(K key, P parameter) { Objects.requireNonNull(parameter); //这里要求实现的接口不能为空 expungeStaleEntries(); //清除过期的缓存 Object cacheKey = CacheKey.valueOf(key, refQueue); //将ClassLoader包装成CacheKey, 作为一级缓存的key // lazily install the 2nd level valuesMap for the particular cacheKey ConcurrentMap<Object, Supplier<V>> valuesMap = map.get(cacheKey); // 懒加载获取二级缓存 if (valuesMap == null) { //如果根据ClassLoader没有获取到对应的值 ConcurrentMap<Object, Supplier<V>> oldValuesMap // 如果不存在则放入,否则返回原先的值 = map.putIfAbsent(cacheKey, valuesMap = new ConcurrentHashMap<>()); if (oldValuesMap != null) { //如果oldValuesMap有值, 说明放入失败 valuesMap = oldValuesMap; } } // create subKey and retrieve the possible Supplier<V> stored by that // subKey from valuesMap Object subKey = Objects.requireNonNull(subKeyFactory.apply(key, parameter)); //根据代理类实现的接口数组来生成二级缓存key, 分为key0, key1, key2, keyx Supplier<V> supplier = valuesMap.get(subKey); //这里通过subKey获取到二级缓存的值 Factory factory = null; while (true) { //这个循环提供了轮询机制, 如果条件为假就继续重试直到条件为真为止 if (supplier != null) { // supplier might be a Factory or a CacheValue<V> instance V value = supplier.get(); // 在这里supplier可能是一个Factory也可能会是一个CacheValue if (value != null) { return value; } } // else no supplier in cache // or a supplier that returned null (could be a cleared CacheValue // or a Factory that wasn't successful in installing the CacheValue) // lazily construct a Factory if (factory == null) { //缓存中没有supplier factory = new Factory(key, parameter, subKey, valuesMap); //新建一个Factory实例作为subKey对应的值 } if (supplier == null) { // supplier返回null supplier = valuesMap.putIfAbsent(subKey, factory); //到这里表明subKey没有对应的值, 就将factory作为subKey的值放入 if (supplier == null) { // successfully installed Factory supplier = factory; //到这里表明成功将factory放入缓存 } // else retry with winning supplier } else { //Factory 没有成功装入缓存 if (valuesMap.replace(subKey, supplier, factory)) { //期间可能其他线程修改了值, 那么就将原先的值替换 // successfully replaced // cleared CacheEntry / unsuccessful Factory // with our Factory supplier = factory; //成功将factory替换成新的值 } else { // retry with current supplier supplier = valuesMap.get(subKey); //替换失败, 继续使用原先的值 } } } } //后面省略

WeakCache的成员变量map,是通过ConcurrentMap来完成的,key为一级缓存, value为二级缓存,类型也是ConcurrentMapreverseMap是为了实现缓存的过期机制;subKeyFactory是二级缓存key的生成工厂,通过构造器传入Proxy类的KeyFactoryvalueFactory是二级缓存value的生成工厂,通过构造器传入Proxy类的ProxyClassFactory

get方法大致做了如下几步:

  1. ClassLoader包装成CacheKey, 作为一级缓存的key
  2. 懒加载获取二级缓存valuesMap
  3. 根据代理类实现的接口数组来生成二级缓存subKey
  4. 这里通过二级缓存的subKey获取到二级缓存的值;
  5. 若缓存中没有值、或者返回null、或者Factory实例没有成功装载,通过轮询方式获取二级缓存的值,直到缓存的值被装载进去。

这里的二级缓存的值是一个Factory实例,最终代理类的值是通过Factory这个工厂来获得的。

/** * A factory {@link Supplier} that implements the lazy synchronized * construction of the value and installment of it into the cache. */ private final class Factory implements Supplier<V> { private final K key; //一级缓存key, 根据ClassLoader生成 private final P parameter; //代理类实现的接口数组 private final Object subKey; //二级缓存key, 根据接口数组生成 private final ConcurrentMap<Object, Supplier<V>> valuesMap; //二级缓存 Factory(K key, P parameter, Object subKey, ConcurrentMap<Object, Supplier<V>> valuesMap) { this.key = key; this.parameter = parameter; this.subKey = subKey; this.valuesMap = valuesMap; } @Override public synchronized V get() { // serialize access // re-check Supplier<V> supplier = valuesMap.get(subKey); //再次检查并获取二级缓存里面的Supplier, 用来验证是否是Factory本身 if (supplier != this) { //在这里验证supplier是否是Factory实例本身, 如果不是则返回null让调用者继续轮询重试; // something changed while we were waiting: // might be that we were replaced by a CacheValue // or were removed because of failure -> // return null to signal WeakCache.get() to retry // the loop return null; } // else still us (supplier == this) // create new value V value = null; try { value = Objects.requireNonNull(valueFactory.apply(key, parameter)); // 通过valueFactory生成代理类, 实际传入ProxyClassFactory去生成代理类 } finally { if (value == null) { // remove us on failure valuesMap.remove(subKey, this); //如果生成代理类失败, 就将这个二级缓存删除 } } // the only path to reach here is with non-null value assert value != null; //只有value的值不为空才能到达这里 // wrap value with CacheValue (WeakReference) CacheValue<V> cacheValue = new CacheValue<>(value); //使用弱引用包装生成的代理类 // put into reverseMap reverseMap.put(cacheValue, Boolean.TRUE); //将包装后的cacheValue作为可用的代理类,放入reverseMap中 // try replacing us with CacheValue (this should always succeed) if (!valuesMap.replace(subKey, this, cacheValue)) { //将包装后的cacheValue放入二级缓存中, 这个操作必须成功, 否则就报错 throw new AssertionError("Should not reach here"); } // successfully replaced us with new CacheValue -> return the value // wrapped by it return value; //最后返回未被弱引用包装的原始代理类value } }

内部类Factoryget方法是使用synchronized关键字进行了同步,主要做了如下几步:

  1. 检查并获取二级缓存里面的Supplier, 验证是否是Factory本身;
  2. 如果1不是,则返回null,让调用者继续轮询重试;
  3. 如果1是,则通过valueFactory生成代理类, 实际传入ProxyClassFactory去生成代理类;
  4. 如果生成代理类失败, 就将这个二级缓存删除;
  5. 断言,只有代理类生成成功才能继续下面步骤;
  6. 使用弱引用包装生成的代理类;
  7. 将包装后的cacheValue作为可用的代理类,放入reverseMap中;
  8. 将包装后的cacheValue放入二级缓存中, 且操作必须成功;
  9. 最后返回未被弱引用包装的原始代理类value

至此,WeakCache一级缓存和二级缓存实现的原理,已经阐述清楚,上述过程中的第3步,二级缓存key生成的原理,是怎样通过Proxy的内部类ProxyClassFactory来生成代理类的,下面继续深入ProxyGenerator这个类,分享代理类的字节码生成过程。

4. ProxyClassFactory源码分析

/** * A factory function that generates, defines and returns the proxy class given * the ClassLoader and array of interfaces. */ private static final class ProxyClassFactory implements BiFunction<ClassLoader, Class<?>[], Class<?>> { // prefix for all proxy class names private static final String proxyClassNamePrefix = "$Proxy"; // 所有代理类名称的前缀 // next number to use for generation of unique proxy class names private static final AtomicLong nextUniqueNumber = new AtomicLong(); // 用原子类来生成代理类的序号, 生成唯一的代理类名称 @Override public Class<?> apply(ClassLoader loader, Class<?>[] interfaces) { Map<Class<?>, Boolean> interfaceSet = new IdentityHashMap<>(interfaces.length); for (Class<?> intf : interfaces) { /* * Verify that the class loader resolves the name of this * interface to the same Class object. */ Class<?> interfaceClass = null; try { interfaceClass = Class.forName(intf.getName(), false, loader); } catch (ClassNotFoundException e) { } if (interfaceClass != intf) { // intf是否可以由指定的类加载进行加载 throw new IllegalArgumentException( intf + " is not visible from class loader"); } /* * Verify that the Class object actually represents an * interface. */ if (!interfaceClass.isInterface()) { // intf是否是一个接口 throw new IllegalArgumentException( interfaceClass.getName() + " is not an interface"); } /* * Verify that this interface is not a duplicate. */ if (interfaceSet.put(interfaceClass, Boolean.TRUE) != null) { // intf在数组中是否有重复 throw new IllegalArgumentException( "repeated interface: " + interfaceClass.getName()); } } String proxyPkg = null; // package to define proxy class in //生成代理类的包名 int accessFlags = Modifier.PUBLIC | Modifier.FINAL; //生成代理类的访问标志, 默认是public final的 /* * Record the package of a non-public proxy interface so that the * proxy class will be defined in the same package. Verify that * all non-public proxy interfaces are in the same package. */ for (Class<?> intf : interfaces) { int flags = intf.getModifiers(); //获取接口的访问标志 if (!Modifier.isPublic(flags)) { //如果接口的访问标志不是public, 那么生成代理类的包名和接口包名相同 accessFlags = Modifier.FINAL; //生成的代理类的访问标志设置为final String name = intf.getName(); //获取接口全限定名 int n = name.lastIndexOf('.'); String pkg = ((n == -1) ? "" : name.substring(0, n + 1)); if (proxyPkg == null) { proxyPkg = pkg; //生成的代理类的包名和接口包名是一样的 } else if (!pkg.equals(proxyPkg)) { //代理类如果实现不同包的接口, 并且接口都不是public的, 那么就会在这里报错 throw new IllegalArgumentException( "non-public interfaces from different packages"); } } } if (proxyPkg == null) { // if no non-public proxy interfaces, use com.sun.proxy package proxyPkg = ReflectUtil.PROXY_PACKAGE + "."; //如果接口访问标志都是public的话, 那生成的代理类都放到默认的包下:com.sun.proxy } /* * Choose a name for the proxy class to generate. */ long num = nextUniqueNumber.getAndIncrement(); //生成代理类的序号 String proxyName = proxyPkg + proxyClassNamePrefix + num; //生成代理类的全限定名, 包名+前缀+序号, 例如:com.sun.proxy.$Proxy0 /* * Generate the specified proxy class. */ byte[] proxyClassFile = ProxyGenerator.generateProxyClass( proxyName, interfaces, accessFlags); // 用ProxyGenerator来生成字节码, 该类放在sun.misc包下 try { return defineClass0(loader, proxyName, proxyClassFile, 0, proxyClassFile.length); //根据二进制文件生成相应的Class实例 } catch (ClassFormatError e) { /* * A ClassFormatError here means that (barring bugs in the * proxy class generation code) there was some other * invalid aspect of the arguments supplied to the proxy * class creation (such as virtual machine limitations * exceeded). */ throw new IllegalArgumentException(e.toString()); } } }

上述代码主要完成以下步骤:

  1. 判断接口是否由指定类的加载器加载、是否是接口、接口是否重复;
  2. 指定生成包名类名的相关规则,接口访问标志都是public,代理类都放到默认的com.sun.proxy包下,接口的访问标志不是public, 那么生成代理类的包名和接口包名相同;
  3. 通过ProxyGenerator类的generateProxyClass方法生成字节码文件;
  4. 根据二进制文件生成相应的代理类实例。
    第3步是关键,下面将进一步分析ProxyGenerator类的generateProxyClass方法。

5. ProxyGenerator源码分析

由于ProxyGenerator类不在jdk中,需要下载openjdk才能看到源码,openjdk1.8官网下载地址如下http://hg.openjdk.java.net/jdk8/jdk8/jdk/archive/tip.zip,解压后在openjdk\jdk\src\share\classes\sun\misc下面。

/** * Generate a class file for the proxy class. This method drives the * class file generation process. */ private byte[] generateClassFile() { /* ============================================================ * Step 1: Assemble ProxyMethod objects for all methods to * generate proxy dispatching code for. */ //第一步, 将所有的方法组装成ProxyMethod对象 /* * Record that proxy methods are needed for the hashCode, equals, * and toString methods of java.lang.Object. This is done before * the methods from the proxy interfaces so that the methods from * java.lang.Object take precedence over duplicate methods in the * proxy interfaces. */ addProxyMethod(hashCodeMethod, Object.class); //为代理类生成hashCode代理方法 addProxyMethod(equalsMethod, Object.class); //为代理类生成equals代理方法 addProxyMethod(toStringMethod, Object.class); //为代理类生成toString代理方法 /* * Now record all of the methods from the proxy interfaces, giving * earlier interfaces precedence over later ones with duplicate * methods. */ for (Class<?> intf : interfaces) { //遍历每一个接口的每一个方法, 并且为其生成ProxyMethod对象 for (Method m : intf.getMethods()) { addProxyMethod(m, intf); } } /* * For each set of proxy methods with the same signature, * verify that the methods' return types are compatible. */ for (List<ProxyMethod> sigmethods : proxyMethods.values()) { //对于具有相同签名的代理方法, 检验方法的返回值是否兼容 checkReturnTypes(sigmethods); } /* ============================================================ * Step 2: Assemble FieldInfo and MethodInfo structs for all of * fields and methods in the class we are generating. */ //第二步, 组装要生成的class文件的所有的字段信息和方法信息 try { methods.add(generateConstructor()); //添加构造器方法 for (List<ProxyMethod> sigmethods : proxyMethods.values()) { //遍历缓存中的代理方法 for (ProxyMethod pm : sigmethods) { // add static field for method's Method object fields.add(new FieldInfo(pm.methodFieldName, //添加代理类的静态字段 "Ljava/lang/reflect/Method;", ACC_PRIVATE | ACC_STATIC)); // generate code for proxy method and add it methods.add(pm.generateMethod()); //添加代理类的代理方法 } } methods.add(generateStaticInitializer()); //添加代理类的静态字段初始化方法 } catch (IOException e) { throw new InternalError("unexpected I/O Exception", e); } if (methods.size() > 65535) { //验证方法和字段集合不能大于65535 throw new IllegalArgumentException("method limit exceeded"); } if (fields.size() > 65535) { throw new IllegalArgumentException("field limit exceeded"); } /* ============================================================ * Step 3: Write the final class file. */ //第三步, 写入最终的class文件 /* * Make sure that constant pool indexes are reserved for the * following items before starting to write the final class file. */ cp.getClass(dotToSlash(className)); //验证常量池中存在代理类的全限定名 cp.getClass(superclassName); //验证常量池中存在代理类父类的全限定名, 父类名为:"java/lang/reflect/Proxy" for (Class<?> intf: interfaces) { //验证常量池存在代理类接口的全限定名 cp.getClass(dotToSlash(intf.getName())); } /* * Disallow new constant pool additions beyond this point, since * we are about to write the final constant pool table. */ cp.setReadOnly(); //接下来要开始写入文件了,设置常量池只读 ByteArrayOutputStream bout = new ByteArrayOutputStream(); DataOutputStream dout = new DataOutputStream(bout); try { /* * Write all the items of the "ClassFile" structure. * See JVMS section 4.1. */ // u4 magic; dout.writeInt(0xCAFEBABE); //1.写入魔数 // u2 minor_version; dout.writeShort(CLASSFILE_MINOR_VERSION); //2.写入次版本号 // u2 major_version; dout.writeShort(CLASSFILE_MAJOR_VERSION); //3.写入主版本号 cp.write(dout); // (write constant pool) //4.写入常量池 // u2 access_flags; dout.writeShort(accessFlags); //5.写入访问修饰符 // u2 this_class; dout.writeShort(cp.getClass(dotToSlash(className))); //6.写入类索引 // u2 super_class; dout.writeShort(cp.getClass(superclassName)); //7.写入父类索引, 生成的代理类都继承自Proxy // u2 interfaces_count; dout.writeShort(interfaces.length); //8.写入接口计数值 // u2 interfaces[interfaces_count]; for (Class<?> intf : interfaces) { dout.writeShort(cp.getClass( //9.写入接口集合 dotToSlash(intf.getName()))); } // u2 fields_count; dout.writeShort(fields.size()); //10.写入字段计数值 // field_info fields[fields_count]; for (FieldInfo f : fields) { f.write(dout); //11.写入字段集合 } // u2 methods_count; dout.writeShort(methods.size());//12.写入方法计数值 // method_info methods[methods_count]; for (MethodInfo m : methods) { m.write(dout); //13.写入方法集合 } // u2 attributes_count; dout.writeShort(0); // (no ClassFile attributes for proxy classes) //14.写入属性计数值, 代理类class文件没有属性所以为0 } catch (IOException e) { throw new InternalError("unexpected I/O Exception", e); } return bout.toByteArray(); //转换成二进制数组输出 }

上述代码主要完成以下步骤:

  1. 收集所有要生成的代理方法,将其包装成ProxyMethod对象并注册到Map集合中;
  2. 收集所有要为Class文件生成的字段信息和方法信息;
  3. 完成了上面的工作后,开始组装Class文件。

其中第2步是核心,为代理类生成字段和方法,完成以下步骤:

  1. 为代理类生成一个带参构造器,传入InvocationHandler实例的引用并调用父类的带参构造器;
  2. 遍历代理方法Map集合,为每个代理方法生成对应的Method类型静态域,并将其添加到fields集合中;
  3. 遍历代理方法Map集合,为每个代理方法生成对应的MethodInfo对象,并将其添加到methods集合中;
  4. 为代理类生成静态初始化方法,该静态初始化方法主要是将每个代理方法的引用赋值给对应的静态字段。
    最终引用上一篇的例子,生成的代理类如下:
// // Source code recreated from a .class file by IntelliJ IDEA // (powered by Fernflower decompiler) // package com.sun.proxy; import com.wzj.proxy.v9.Sellalbe; import java.lang.reflect.InvocationHandler; import java.lang.reflect.Method; import java.lang.reflect.Proxy; import java.lang.reflect.UndeclaredThrowableException; public final class $Proxy0 extends Proxy implements Sellalbe { private static Method m1; private static Method m3; private static Method m2; private static Method m0; public $Proxy0(InvocationHandler var1) throws { super(var1); } public final boolean equals(Object var1) throws { try { return (Boolean)super.h.invoke(this, m1, new Object[]{var1}); } catch (RuntimeException | Error var3) { throw var3; } catch (Throwable var4) { throw new UndeclaredThrowableException(var4); } } public final void secKill() throws { try { super.h.invoke(this, m3, (Object[])null); } catch (RuntimeException | Error var2) { throw var2; } catch (Throwable var3) { throw new UndeclaredThrowableException(var3); } } public final String toString() throws { try { return (String)super.h.invoke(this, m2, (Object[])null); } catch (RuntimeException | Error var2) { throw var2; } catch (Throwable var3) { throw new UndeclaredThrowableException(var3); } } public final int hashCode() throws { try { return (Integer)super.h.invoke(this, m0, (Object[])null); } catch (RuntimeException | Error var2) { throw var2; } catch (Throwable var3) { throw new UndeclaredThrowableException(var3); } } static { try { m1 = Class.forName("java.lang.Object").getMethod("equals", Class.forName("java.lang.Object")); m3 = Class.forName("com.wzj.proxy.v9.Sellalbe").getMethod("secKill"); m2 = Class.forName("java.lang.Object").getMethod("toString"); m0 = Class.forName("java.lang.Object").getMethod("hashCode"); } catch (NoSuchMethodException var2) { throw new NoSuchMethodError(var2.getMessage()); } catch (ClassNotFoundException var3) { throw new NoClassDefFoundError(var3.getMessage()); } } }

到此为止,JDK动态代理的生成原理基本上分析完了,笔者通过多次调试源码,并结合英文注解,理解并翻译其中的主要步骤,读者可以根据本文的分析,自己调试JDK源码,相信也会有不一样的收获,文章如有分析不恰当之处,欢迎交流,一起进步。


__EOF__

本文作者小猪爸爸
本文链接https://www.cnblogs.com/father-of-little-pig/p/13471042.html
关于博主:不要为了技术而技术,总结分享技术,感恩点滴生活!
版权声明:本博客所有文章除特别声明外,均采用 BY-NC-SA 许可协议。转载请注明出处!
声援博主:如果您觉得文章对您有帮助,可以点击文章右下角推荐一下。您的鼓励是博主的最大动力!
posted @   小猪爸爸  阅读(515)  评论(0编辑  收藏  举报
编辑推荐:
· 开发者必知的日志记录最佳实践
· SQL Server 2025 AI相关能力初探
· Linux系列:如何用 C#调用 C方法造成内存泄露
· AI与.NET技术实操系列(二):开始使用ML.NET
· 记一次.NET内存居高不下排查解决与启示
阅读排行:
· Manus重磅发布:全球首款通用AI代理技术深度解析与实战指南
· 被坑几百块钱后,我竟然真的恢复了删除的微信聊天记录!
· 没有Manus邀请码?试试免邀请码的MGX或者开源的OpenManus吧
· 【自荐】一款简洁、开源的在线白板工具 Drawnix
· 园子的第一款AI主题卫衣上架——"HELLO! HOW CAN I ASSIST YOU TODAY
点击右上角即可分享
微信分享提示