

Consul 集群带ACL控制搭建
机器规划
我这里起了四台虚拟机,三台用作Server agent,一台用作Client agent。(说明:当然Client可以配置多个,这里由于开太多虚拟机比较耗费资源,就只设置了一个。)
机器ip(机器名) http端口(其他端口使用默认值) Agent类型 节点名称
10.211.55.28 node1 8500 server consul-server1
10.211.55.25 node2 8500 server consul-server2
10.211.55.26 node3 8500 server consul-server3
10.211.55.27 node4 7110 client 带ui consul-client1
先配置好三个Server,并启动一遍
consul-server1.json

{
    "datacenter":"dc1",
    "primary_datacenter":"dc1",
    "bootstrap_expect":1,
    "start_join":[
        "10.211.55.25",
        "10.211.55.26"
    ],
    "retry_join":[
        "10.211.55.25",
        "10.211.55.26"
    ],
    "advertise_addr": "10.211.55.28",
    "bind_addr": "10.211.55.28",
    "server":true,
    "connect":{
        "enabled":true
    },
    "node_name":"consul-server1",
    "data_dir":"/opt/consul/data/",
    "enable_script_checks":false,
    "enable_local_script_checks":true,
    "log_file":"/opt/consul/log/",
    "log_level":"info",
    "log_rotate_bytes":100000000,
    "log_rotate_duration":"24h",
    "encrypt":"krCysDJnrQ8dtA7AbJav8g==",
    "acl":{
        "enabled":true,
        "default_policy":"deny",
        "enable_token_persistence":true,
        "tokens":{
            "master":"cd76a0f7-5535-40cc-8696-073462acc6c7"
           }
    }
}
consul-server2.json
{
    "datacenter":"dc1",
    "primary_datacenter":"dc1",
    "advertise_addr":  "10.211.55.25",
    "bind_addr": "10.211.55.25",
    "server":true,
    "connect":{
        "enabled":true
    },
    "node_name":"consul-server2",
    "data_dir":"/opt/consul/data/",
    "enable_script_checks":false,
    "enable_local_script_checks":true,
    "log_file":"/opt/consul/log/",
    "log_level":"info",
    "log_rotate_bytes":100000000,
    "log_rotate_duration":"24h",
    "encrypt":"krCysDJnrQ8dtA7AbJav8g==",
    "acl":{
        "enabled":true,
        "default_policy":"deny",
        "enable_token_persistence":true,
        "tokens":{
            "master":"cd76a0f7-5535-40cc-8696-073462acc6c7"
        }
    }
}
consul-server3.json
{
    "datacenter":"dc1",
    "primary_datacenter":"dc1",
    "advertise_addr":"10.211.55.26",
    "bind_addr":"10.211.55.26",
    "server":true,
    "connect":{
        "enabled":true
    },
    "node_name":"consul-server3",
    "data_dir":"/opt/consul/data/",
    "enable_script_checks":false,
    "enable_local_script_checks":true,
    "log_file":"/opt/consul/log/",
    "log_level":"info",
    "log_rotate_bytes":100000000,
    "log_rotate_duration":"24h",
    "encrypt":"krCysDJnrQ8dtA7AbJav8g==",
    "acl":{
        "enabled":true,
        "default_policy":"deny",
        "enable_token_persistence":true,
        "tokens":{
            "master":"cd76a0f7-5535-40cc-8696-073462acc6c7"
           }
    }
}
可以看到,consul-server2和consul-server3的配置类似,只是换了下ip和端口;另外consul-server1主要是多了开始连接和重试连接等配置。
接着,启动集群:
在机器10.2111.55.25 (node2)上执行,./consul agent -config-file start-conf/consul-server2.json
在机器10.2111.55.26 (node3)上执行,./consul agent -config-file start-conf/consul-server3.json
在机器10.2111.55.28 (node1)上执行,./consul agent -config-file start-conf/consul-server1.json
生成并配置agent-token,解决server agent ACL block问题
当上面的语句执行完之后,会发现协调更新由于ACL被阻塞。如下图: 
经过查看官方文档,发现是由于未生成和配置agent-token导致。
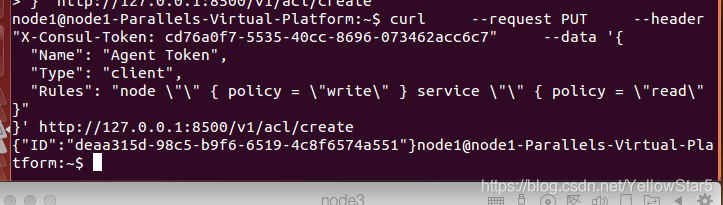
在任意一台server上执行下面的语句来生成agent-token:
curl \
    --request PUT \
    --header "X-Consul-Token: cd76a0f7-5535-40cc-8696-073462acc6c7" \
    --data \
'{
  "Name": "Agent Token",
  "Type": "client",
  "Rules": "node \"\" { policy = \"write\" } service \"\" { policy = \"read\" }"
}' http://127.0.0.1:8500/v1/acl/create
此时会返回生成的agent-token
将生成的agent_token设置到每个server agent的配置文件中。
此时consul-server1.json, consul-server2.json, consul-server3.json中acl部分就变为:
"acl":{
        "enabled":true,
        "default_policy":"deny",
        "enable_token_persistence":true,
        "tokens":{
            "master":"cd76a0f7-5535-40cc-8696-073462acc6c7",
             "agent":"deaa315d-98c5-b9f6-6519-4c8f6574a551"
        }
    }
也就是多了agent这个配置。
接着一次重启各个server agent(把之前的进程先停掉)
在机器10.2111.55.25 (node2)上执行,./consul agent -config-file start-conf/consul-server2.json
在机器10.2111.55.26 (node3)上执行,./consul agent -config-file start-conf/consul-server3.json
在机器10.2111.55.28 (node1)上执行,./consul agent -config-file start-conf/consul-server1.json
等server agent集群稳定下来之后,我们会看到之前的ACL block已经解决。 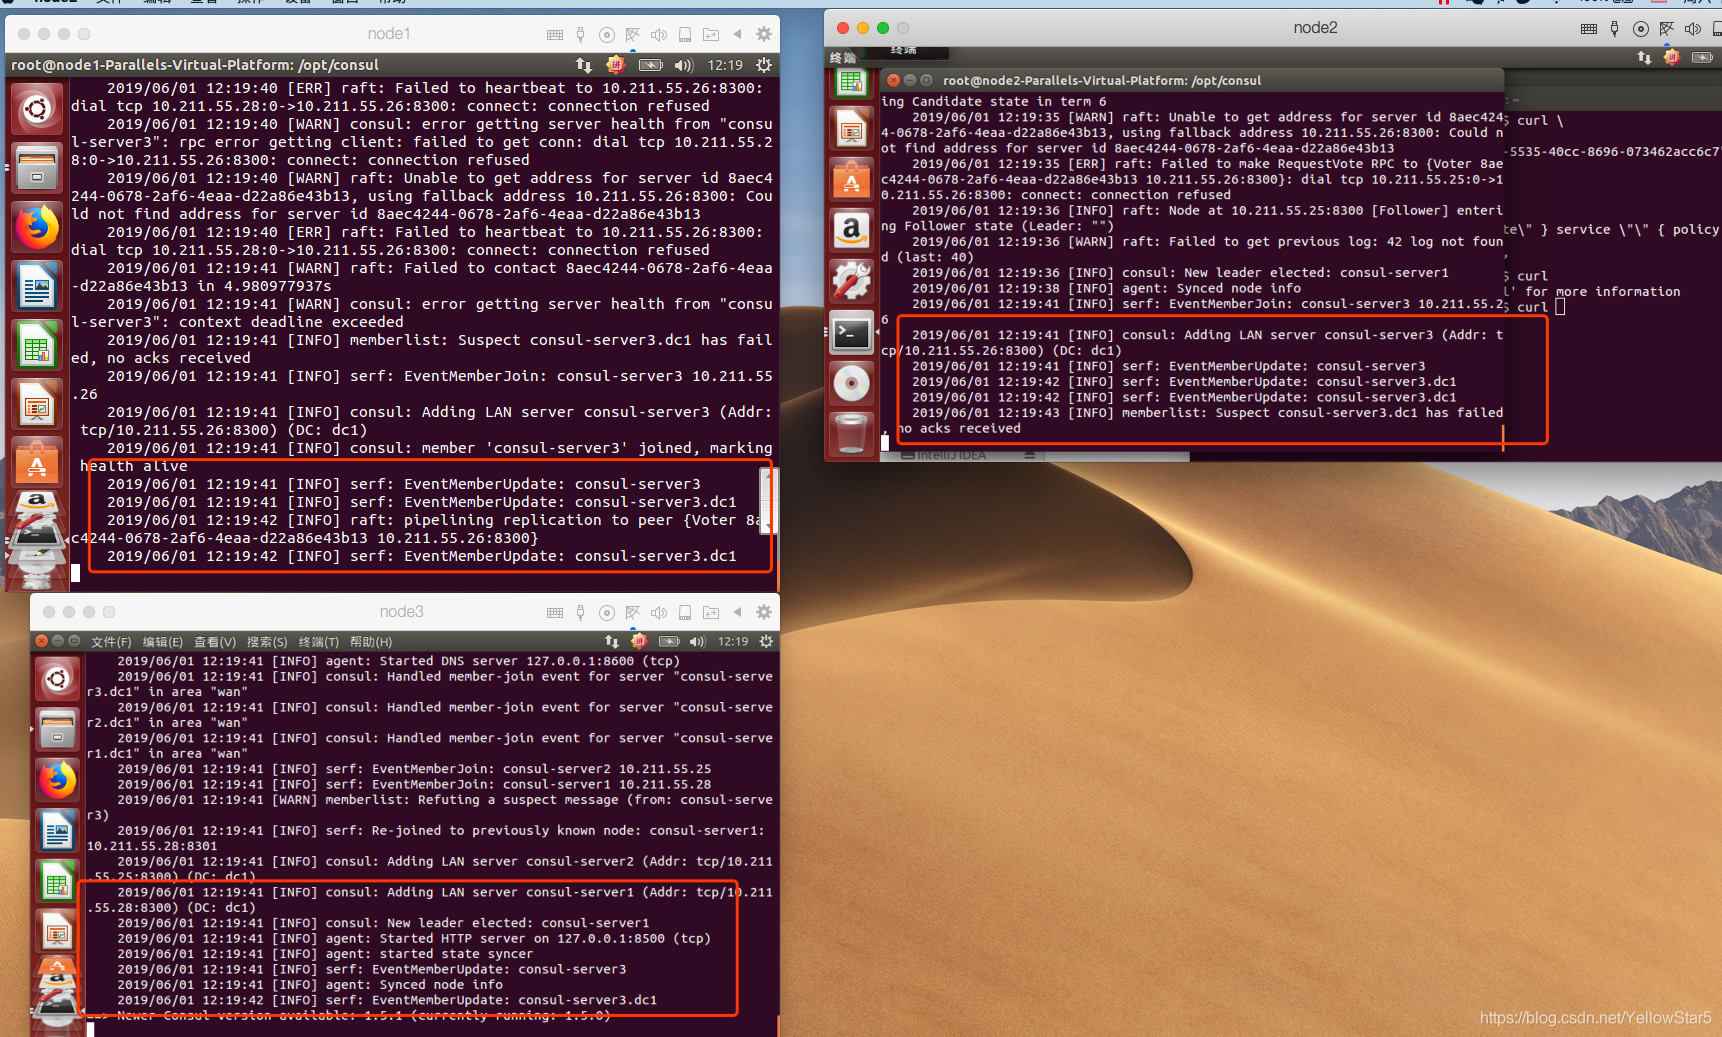
启动一个带ui的client agent
{
    "datacenter":"dc1",
    "primary_datacenter":"dc1",
    "advertise_addr": "10.211.55.27",
    "start_join":[
         "10.211.55.25",
        "10.211.55.26",
        "10.211.55.28"
    ],
    "retry_join":[
         "10.211.55.25",
        "10.211.55.26",
        "10.211.55.28"
    ],
    "bind_addr":"10.211.55.27",
    "node_name":"consul-client1",
    "client_addr":"0.0.0.0",
    "connect":{
        "enabled":true
    },
    "data_dir":"/opt/consul/data/",
    "log_file":"/opt/consul/log/",
    "log_level":"info",
    "log_rotate_bytes":100000000,
    "log_rotate_duration":"24h",
    "encrypt":"krCysDJnrQ8dtA7AbJav8g==",
    "ui":true,
    "enable_script_checks":false,
    "enable_local_script_checks":true,
    "disable_remote_exec":true,
    "ports":{
        "http":7110
    },
    "acl":{
        "enabled":true,
        "default_policy":"deny",
        "enable_token_persistence":true,
        "tokens":{
        "agent":"deaa315d-98c5-b9f6-6519-4c8f6574a551"
        }
    }
}
配置环境变量
经过前面一番配置,本以为已经搞定了所有东西,此时只想摸摸自己帅气的头发。
可一执行./consul members, 想看看我这里都有哪些成员,居然发现一个都没有

经过查看官方文档及搜索,发现是没有配置环境变量导致。
1.给三个server的环境变量添加CONSUL_HTTP_TOKEN, vim /etc/profile添加下面一句
export CONSUL_HTTP_TOKEN=cd76a0f7-5535-40cc-8696-073462acc6c7
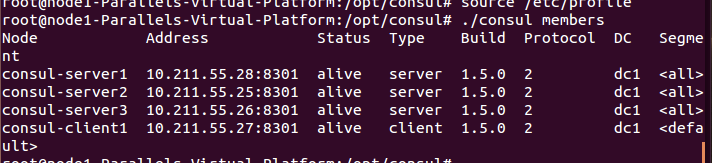
然后,source /etc/profile一下。
为了简单方便,我这里配了最大的权限即master_token
此时发现./consul members已经有数据了
给client agent 设置环境变量
由于client agent 带web-ui,这里你的公司不一定对外开放8500端口,所以我这里把它改成了7110,方便在外网查看。
不过此时需要添加一个环境变量CONSUL_HTTP_ADDR,来告诉命令行不是使用默认的127.0.0.1:8500
更改client-agent的环境变量,在最后添加下面两行
#consul http-token
export CONSUL_HTTP_TOKEN=cd76a0f7-5535-40cc-8696-073462acc6c7
#only consul-client1 need, because http port has changed to 7110
export CONSUL_HTTP_ADDR=127.0.0.1:7110
此时发现在client agent上执行./consul members也是ok的。
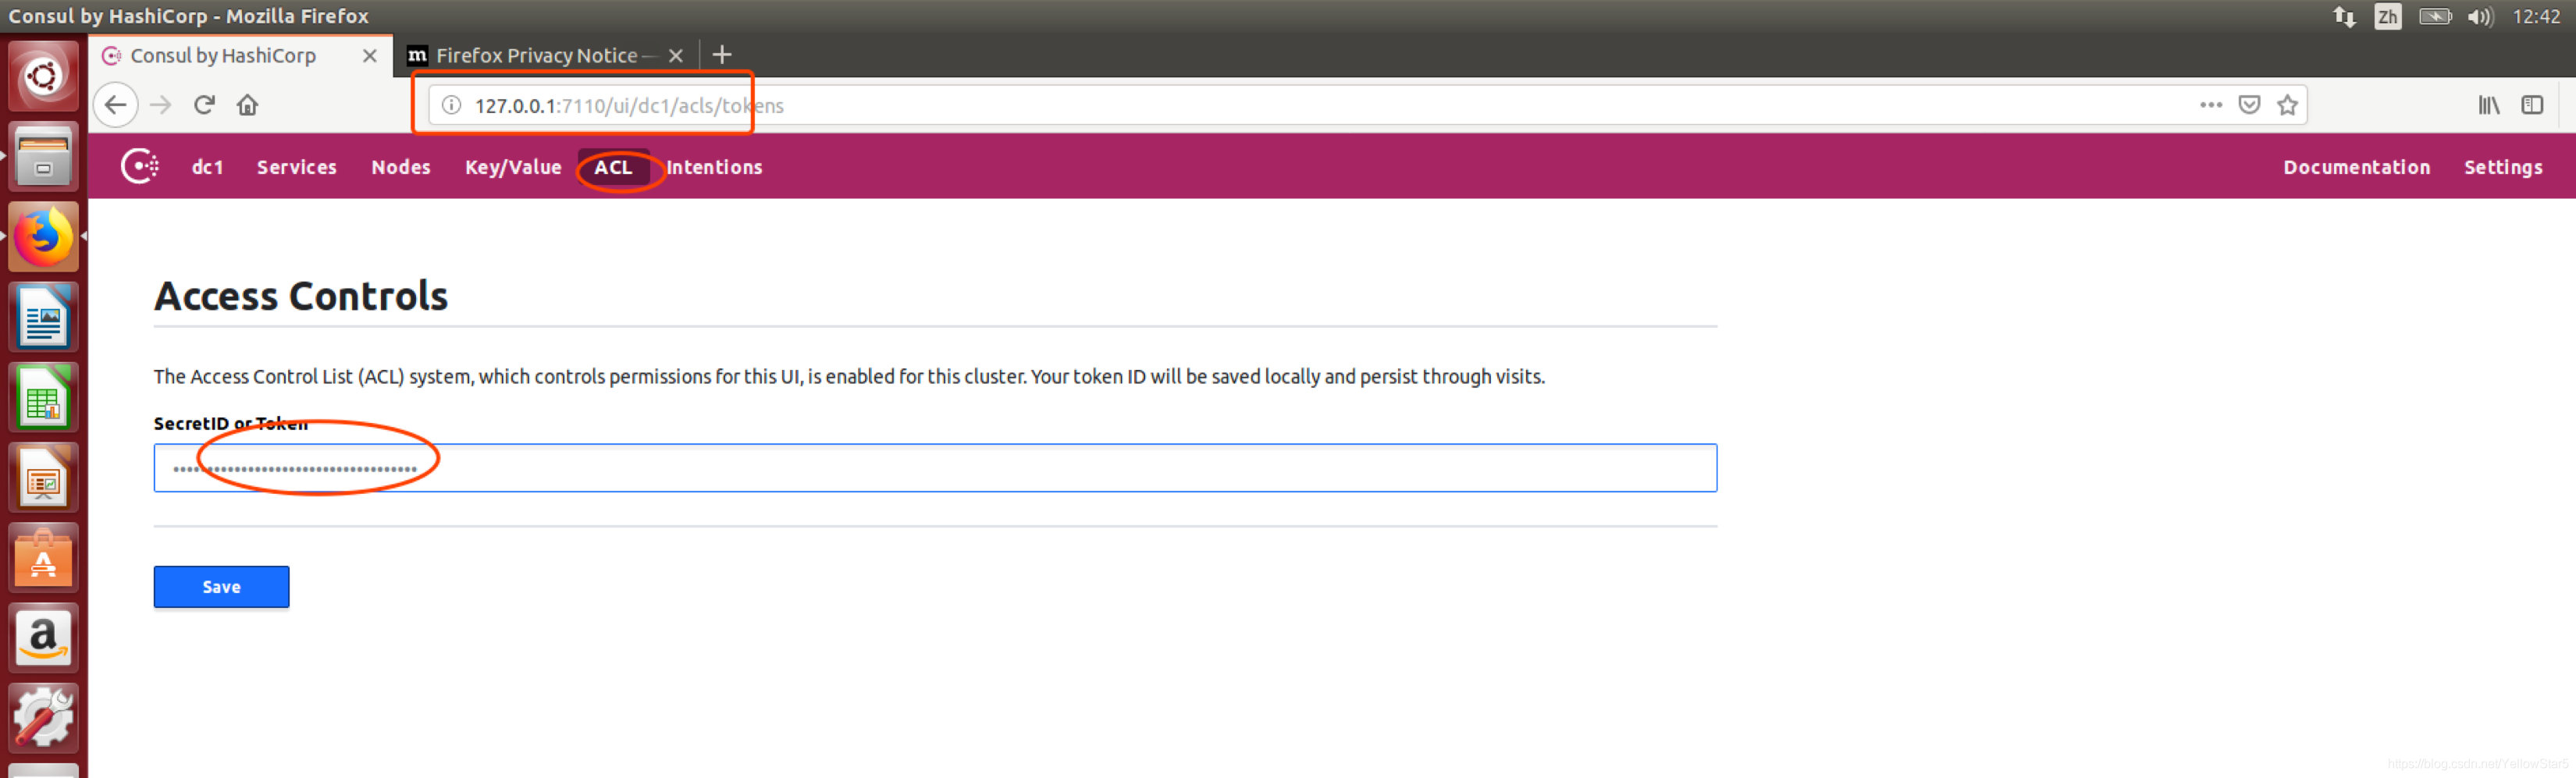
给web-ui 设置master_token
在client-agent上,输入127.0.0.1:7110, 点击ACL, 输入master-token即可。如下图:
原文链接:https://blog.csdn.net/yellowstar5/article/details/90728468
参考:
https://www.consul.io/docs/acl/acl-legacy.html#bootstrapping-acls
https://www.consul.io/docs/agent/options.html
https://www.consul.io/docs/commands/index.html#environment-variables


【推荐】国内首个AI IDE,深度理解中文开发场景,立即下载体验Trae
【推荐】编程新体验,更懂你的AI,立即体验豆包MarsCode编程助手
【推荐】抖音旗下AI助手豆包,你的智能百科全书,全免费不限次数
【推荐】轻量又高性能的 SSH 工具 IShell:AI 加持,快人一步
· Linux系列:如何用heaptrack跟踪.NET程序的非托管内存泄露
· 开发者必知的日志记录最佳实践
· SQL Server 2025 AI相关能力初探
· Linux系列:如何用 C#调用 C方法造成内存泄露
· AI与.NET技术实操系列(二):开始使用ML.NET
· 被坑几百块钱后,我竟然真的恢复了删除的微信聊天记录!
· 没有Manus邀请码?试试免邀请码的MGX或者开源的OpenManus吧
· 【自荐】一款简洁、开源的在线白板工具 Drawnix
· 园子的第一款AI主题卫衣上架——"HELLO! HOW CAN I ASSIST YOU TODAY
· Docker 太简单,K8s 太复杂?w7panel 让容器管理更轻松!