Day3
1、Search模块中商品分类与过渡动画
过渡动画:前提条件是组件或者元素必须要有v-if v-show指令才可以进行过渡动画
<template>
<!--商品分类导航-->
  <div class="type-nav">
    <div class="container">
<!--事件委派-->
      <div @mouseleave="leaveShow" @mouseenter="enterShow">
        <h2 class="all">全部商品分类</h2>
        <!-- 过渡动画 -->
        <transition name="sort">
<!--          三级联动-->
          <div class="sort" v-show="show">
<!--            利用事件的委派+编程式导航实现路由的跳转与传递参数-->
            <div class="all-sort-list2" @click="goSearch">
<!--              遍历一级菜单,以及索引值index,在计算属性categoryList中遍历  :key为一级分类的categoryId-->
              <div
                  class="item"
                  v-for="(c1, index) in categoryList"
                  :key="c1.categoryId"
              >
<!--             @mouseenter鼠标接触时调用changeIndex方法,需要传参数index  在methods中写对应的方法
                  :class="{ cur: currentIndex == index }"意思是当值相等时,h3类名叫cur-->
                <h3
                    :class="{ cur: currentIndex == index }"
                    @mouseenter="changeIndex(index)"
                >
<!--                  一级分类:这里不能写死,需要写一级分类的名字和ID,从一级菜单中的categoryName,categoryId中获取-->
                  <a
                      :data-categoryName="c1.categoryName"
                      :data-category1Id="c1.categoryId"
                  >{{ c1.categoryName }}</a
                  >
                </h3>
<!--                二三级分类,当值相等的时候:none	此元素不会被显示。
                            block	此元素将显示为块级元素,此元素前后会带有换行符。-->
                <div
                    class="item-list clearfix"
                    :style="{ display: currentIndex == index ? 'block' : 'none' }"
                >
<!--                  二级分类:遍历的是一级分类下的categoryChild-->
                  <div class="subitem">
                    <dl
                        class="fore"
                        v-for="(c2, index) in c1.categoryChild"
                        :key="c2.categoryId"
                    >
                      <dt>
<!--                        二级分类的名字和id-->
                        <a
                            :data-categoryName="c2.categoryName"
                            :data-category2Id="c2.categoryId"
                        >{{ c2.categoryName }}</a
                        >
                      </dt>
<!--                      三级分类-->
                      <dd>
                        <em
                            v-for="(c3, index) in c2.categoryChild"
                            :key="c3.categoryId"
                        >
                          <a
                              :data-categoryName="c3.categoryName"
                              :data-category3Id="c3.categoryId"
                          >{{ c3.categoryName }}</a
                          >
                        </em>
                      </dd>
                    </dl>
                  </div>
                </div>
              </div>
            </div>
          </div>
        </transition>
      </div>
      <nav class="nav">
        <a href="#">服装城</a>
        <a href="#">美妆馆</a>
        <a href="#">尚品汇超市</a>
        <a href="#">全球购</a>
        <a href="#">闪购</a>
        <a href="#">团购</a>
        <a href="#">有趣</a>
        <a href="#">秒杀</a>
      </nav>
    </div>
  </div>
</template>

<script>
import { mapState } from "vuex";
//引入lodash:是把lodash全部封装好的函数全都引入进来了
//按需引入:只是引入节流函数,其他的函数没有引入(模块),这样做的好处是,当你打包项目的时候体积会小一些
import throttle from "lodash/throttle";
export default {
  name: "TypeNav",
  data() {
    return {
      //当前这个属性决定了到底那个h3身上有类名
      currentIndex: -1,
      show: true,
    };
  },
  //发请求经常在mounted生命周期函数中进行
  //组件挂载完毕
  mounted() {
    //  通知vuex发请求,获取数据,存储于仓库当中
    this.$store.dispatch('categoryList');
    //当组件挂载完毕,让show属性变为false
    //如果不是Home路由组件,将typeNav进行隐藏
    if (this.$route.path != '/home') {
      this.show = false;
    }
  },
  //计算属性
  computed: {
    //state:他是咱们大仓库中的state(包含home|search)
    //右侧需要的是一个函数,当使用这个计算属性的时候,右侧函数会立即执行一次
    ...mapState({
      categoryList: state => state.home.categoryList,
    }),
  },
  methods: {
    //鼠标进入修改响应式数据currentIndex属性   (index)接受index的值
    //当用户鼠标移入到h3身上的时候就会立即出发一次
    changeIndex: throttle(function(index) {
      //  index:鼠标移动到某一个一级分类上时,一级分类元素的索引值
      //  正常操作:鼠标慢慢进入,每一个一级分类h3,都会触发鼠标进入事件
      //  非正常情况:鼠标进入很快,本身的一级分类都应该触发鼠标进入事件,但是经过测试,只有部分h3出发了
      //  由于用户的行为过快,导致浏览器反应不过来,如果当前回调函数中,有一些大量的业务,有可能出现卡顿现象。
      //函数节流:在20MS时间之内只能执行一次
      this.currentIndex = index;
    }, 20),
    //进行路由跳转的回调函数
    goSearch(event) {
      //event.target:获取到的是出发事件的元素(div、h3、a、em、dt、dl)
      let element = event.target;
      //给a标签添加自定义属性data-categoryName,全部的字标签当中只有a标签带有自定义属性.
      //节点有一个属性dataset属性,可以获取节点的自定义属性与属性值
      let {
        categoryname,
        category1id,
        category2id,
        category3id,
      } = element.dataset;
      //第二个问题解决了:点击的到底是不是a标签(只要这个标签身上带有categoryname)一定是a标签
      //当前这个if语句:一定是a标签才会进入
      if (categoryname) {
        //准备路由跳转的参数对象
        let location = { name: "search" };
        let query = { categoryName: categoryname };
        //一定是a标签:一级目录
        if (category1id) {
          query.category1Id = category1id;
          //一定是a标签:二级目录
        } else if (category2id) {
          query.category2Id = category2id;
          //一定是a标签:三级目录
        } else {
          query.category3Id = category3id;
        }
        //判断:如果路由跳转的时候,带有params参数,捎带脚传递过去
        if (this.$route.params) {
          location.params = this.$route.params;
          //动态给location配置对象添加query属性
          location.query = query;
          //路由跳转
          this.$router.push(location);
        }
      }
    },
    //当鼠标移入的时候,让商品分类列表进行展示
    enterShow() {
      if (this.$route.path != "/home") {
        this.show = true;
      }
    },
    //当鼠标离开的时候,让商品分类列表进行隐藏
    leaveShow() {
      this.currentIndex = -1;
      //判断如果是Search路由组件的时候才会执行
      if (this.$route.path != "/home") {
        this.show = false;
      }
    },
  },
};
</script>

<style scoped lang="less">
.type-nav {
  border-bottom: 2px solid #e1251b;

  .container {
    width: 1200px;
    margin: 0 auto;
    display: flex;
    position: relative;

    .all {
      width: 210px;
      height: 45px;
      background-color: #e1251b;
      line-height: 45px;
      text-align: center;
      color: #fff;
      font-size: 14px;
      font-weight: bold;
    }

    .nav {
      a {
        height: 45px;
        margin: 0 22px;
        line-height: 45px;
        font-size: 16px;
        color: #333;
      }
    }

    .sort {
      position: absolute;
      left: 0;
      top: 45px;
      width: 210px;
      height: 461px;
      position: absolute;
      background: #fafafa;
      z-index: 999;

      .all-sort-list2 {
        .item {
          h3 {
            line-height: 30px;
            font-size: 14px;
            font-weight: 400;
            overflow: hidden;
            padding: 0 20px;
            margin: 0;

            a {
              color: #333;
            }
          }

          .item-list {
            display: none;
            position: absolute;
            width: 734px;
            min-height: 460px;
            background: #f7f7f7;
            left: 210px;
            border: 1px solid #ddd;
            top: 0;
            z-index: 9999 !important;

            .subitem {
              float: left;
              width: 650px;
              padding: 0 4px 0 8px;

              dl {
                border-top: 1px solid #eee;
                padding: 6px 0;
                overflow: hidden;
                zoom: 1;

                &.fore {
                  border-top: 0;
                }

                dt {
                  float: left;
                  width: 54px;
                  line-height: 22px;
                  text-align: right;
                  padding: 3px 6px 0 0;
                  font-weight: 700;
                }

                dd {
                  float: left;
                  width: 415px;
                  padding: 3px 0 0;
                  overflow: hidden;

                  em {
                    float: left;
                    height: 14px;
                    line-height: 14px;
                    padding: 0 8px;
                    margin-top: 5px;
                    border-left: 1px solid #ccc;
                  }
                }
              }
            }
          }
        }
        .cur{
          background: lightskyblue;
        }

      }
    }
  }
  //  过渡动画的样式
//  过渡动画的开始状态,进入
  .sort-enter{
    height: 0px;
  }
//  过渡动画的结束状态(进入)
  .sort-enter-to{
    height: 461px;
  }
//定义动画事件、速率
  .sort-enter-active{
    transition: all .5s linear;
  }
}
</style>
三级列表的优化
在app根组件中发送请求【根组件mounted】执行一次
this.$store.dispatch("getCategoryList")放入到App.vue中,这样子mounted只会执行一次
2、合并参数params与query
Header.vue
  methods:{
    //搜索按钮的回调函数:需要向search进行跳转
    goSearch(){
      //路由传递参数:
      //第一种:字符串形式
      //this.$router.push('/search/'+this.keyword+"?k="+this.keyword.toUpperCase());
      //第二种:模板字符串
      //this.$router.push('/search/${this.keyword}?k=${this.keyword.toUpperCase}')
      //第三种:对象
      //代表的是如果有query参数也带过去
      if (this.$route.query) {
        let location = {
          name: "search",
          params: { keyword: this.keyword || undefined }
        };
        location.query = this.$route.query;
        this.$router.push(location);
      }
    }
  },
TypeNav index.vue
     //判断:如果路由跳转的时候,带有params参数,捎带脚传递过去
        if (this.$route.params) {
          location.params = this.$route.params;
          //动态给location配置对象添加query属性
          location.query = query;
          //路由跳转
          this.$router.push(location);
        }
3、开发Home首页当中ListContainer组件与floor组件
服务器返回的数据无轮播图和底部的数据,需要用到mock模拟:用插件mock.js
D:\项目\project-hph\app>cnpm install --save mockjs
使用步骤
1、在src文件夹下创建mock文件夹
2、准备JSON数据(mock文件夹中创建相应的json文件)--别留有空格
3、把mock数据需要的图片放置到public文件夹中【public文件夹再打包的时候,会把对应的资源原封不动的打包到dist文件夹中】
4、开始mock,通过mockjs模块实现
5、在mock文件夹下创建mockServe.js文件,通过mock.js插件实现模拟数据
//先引入mockjs模块
import Mock from 'mockjs';
//把json数据引入进来,图片和json数据格式默认对外暴露
import banner from './banners.json';
import floor from './floors.json';
//mock数据:第一个参数:请求地址  第二个参数:请求数据
Mock.mock("/mock/banner",{code:200,data:banner});//模拟轮播图
Mock.mock("/mock/floor",{code:200,data:floor})
6、mockServe.js文件在入口mian.js文件中引入
//引入mockServe.js
import '@/mock/mockSerce';
7、在api文件夹中创建mockAjax.js文件,用来发送请求---路径需要修改成/mock
//对axios进行二次封装,主要是用到它的请求和响应拦截器

//引入axios
import axios from "axios";

//引入进度条
import nprogress from 'nprogress';
//引入进度条样式
import "nprogress/nprogress.css"
//start:进度条开始 done:进度条结束


//1:利用axios对象的方法,去创建一个axios实例
//2:request就是axios,只不过稍微配置一下
const  requests = axios.create({
    //配置对象
    // 基础路径,发请求的时候,路径当中会出现/api
    baseURL:"/mock",

    //请求超时的时间,五秒
    timeout:5000,

});

//请求拦截器:在发请求之前,请求拦截器可以检测到,可以在请求发出去之前做一些事情
requests.interceptors.request.use((config)=>{
// config:配置对象,对象里面有一个属性很重要
//    进度条开始动
    nprogress.start();
    return config;
})

//响应拦截器
requests.interceptors.response.use((res)=>{
//成功回调的函数:服务器相应数据回来以后,响应拦截器可以检测到,可以做一些事情
//    进度条结束
    nprogress.done();
    return res.data;

},(error)=>{
//    响应失败的回调函数
    return Promise.reject(new Error('fail'))
});
//对外暴露
export default requests;
8、发请求
//当前这个模块:对API进行统一管理
import requests from './request';
import mockRequest from './mockAjax';
//三级联动的接口:/api/product/getBaseCategoryList  GET请求  参数无

//对外暴露一个函数,只要外部调用这个函数,就向服务器发送ajax请求、获取咱们的三级菜单数据。当前这个函数只需要把服务器返回的结果返回即可
//发请求:axios发请求返回结果Promise对象
export const reqCategoryList = ()=>requests({url:'/product/getBaseCategoryList' ,method:'get'});


//获取banner(home首页轮播图接口)
export const reqGetBannerList= () =>mockRequest.get('/banner');
在listcontainer中index.vue发请求
mounted(){
//派发action:通过Vuex发起ajax请求,将数据存储在仓库中
  this.$sotre.dispatch('getBannerList' )
}
在home.js中的state,mutation,action中
import {reqgetCategoryList,reqGetBannerList} from "@/api";
//home模块的仓库
const state = {
  categoryList:[],
  bannerList:[]
};
//mutation是修改state的地方
const mutation = {
  GETCATEGORYLIST(state,categoryList){
    state.categoryList = categoryList;
  },
  GETBANNERLIST(state,bannerList){
    state.bannerList = bannerList;
  }
};
const action ={
  async getCategoryList({commit}){
    let result = await reqCategoryList();
    if(result.code==200){
      commit('GETCategoryList',result.data);
    }
  },
  async getBannerList({commit}){
    let result = await reqGetBannerList();
    if(result.code==200){
      commit('GETBANNERLIST',result.data);  //开始写mutation
    }
  },
};
const getters = {

};
export default{
  state,
  mutation,
  action,
  getters,
};
在ListContainer中的vue
<script>
	import {mapState} from 'vuex';
  export default{
    name:"",
    mounted(){
      this.$store.dispatch('getBannerList');
    },
    computed:{
      ...mapState({
        bannerList:state=>state.home.bannerList;
      })
    }
  }
</script>
3.1 listcontainer组件开发
安装swiper插件
cnpm install --save swiper@5
在轮播图vue中引入
import Swiper from 'swiper';
考虑到其他地方有相同的轮播图,这边可以把引入样式,放进入口文件main.js
//引入swiper样式文件
import "swiper/css/swiper.css";

 mounted() {
  //  派发action:通过Vuex发起ajax秦桧去,将数据存储在仓库中
    this.$store.dispatch('getBannerList');
  //  在new Swiper实例之前,页面中结构必须有【new Swiper 实例放在这里发现不行】
  //  因为dispatch当中涉及到异步语句,导致v-for遍历时结构还没有完全ok
  可以用延迟器试试
  settimeout(()=>{

  })
  },
第一种解决方案
//  在new Swiper实例之前,页面中结构必须有【new Swiper 实例放在这里发现不行】
//  因为dispatch当中涉及到异步语句,导致v-for遍历时结构还没有完全ok
  setTimeout(()=>{
    var mySwiper = new Swiper(document.querySelector(".swiper-container"),{
      loop:true,
    //  如果需要分页器
      pagination:{
        el:".swiper-pagination",
      //  点击小球的时候页切换图片
        clickable:true
      },
    //  如果需要前进回退按钮
      navigation:{
        nextEl:".swiper-button-next",
        prevEl:".swiper-button-prev",
      },
    });
  },1000);
完美解决方案:
watch + nextTick:数据监听:监听已有数据的变化
nextTick:在下次 DOM 更新【原本bannerList是个空数组,之后数组里面有四个元素】循环结束之后【v-for循环结束】执行延迟回调。在修改数据之后立即使用这个方法,获取更新后的 DOM。
  watch:{
  //  监听bannerList数据的变化-因为这条数据发生过变化--有空数组变为数组里面的四个元素
    bannerList:{
      handler(newValue,oldValue){
      //  现在咱们通过watch监听bannerList属性的属性值的变化
      //  如果执行handler方法,代表组件实例身上这个属性的属性已经有了【数组:四个元素】
      //  当这个函数执行:只能保证bannerList数据有了,此时v-for遍历需要时间,可能此时还没渲染好没有执行结束,
      //  v-for执行完毕你才能有结构
       //nextTick:在下次DOM更新循环结束之后,执行延迟回调,在修改数据之后立刻使用这个方法,获取更新后的DOM
        this.$nextTick(()=>{
        //  当你执行这个毁掉的时候:保证服务器数据据回来了,v-for执行完毕了【轮播图结构一定有了】
          var mySwiper = new Swiper(document.querySelector(".swiper-container"),{
            loop:true,
            //  如果需要分页器
            pagination:{
              el:".swiper-pagination",
              //  点击小球的时候页切换图片
              clickable:true
            },
            //  如果需要前进回退按钮
            navigation:{
              nextEl:".swiper-button-next",
              prevEl:".swiper-button-prev",
            },
          });
        })
      },
    },

  },
4、获取floor组件的mock数据
静态组件---写api-像服务器发请求*---写vuex的三连环---组件捞数据,展示数据
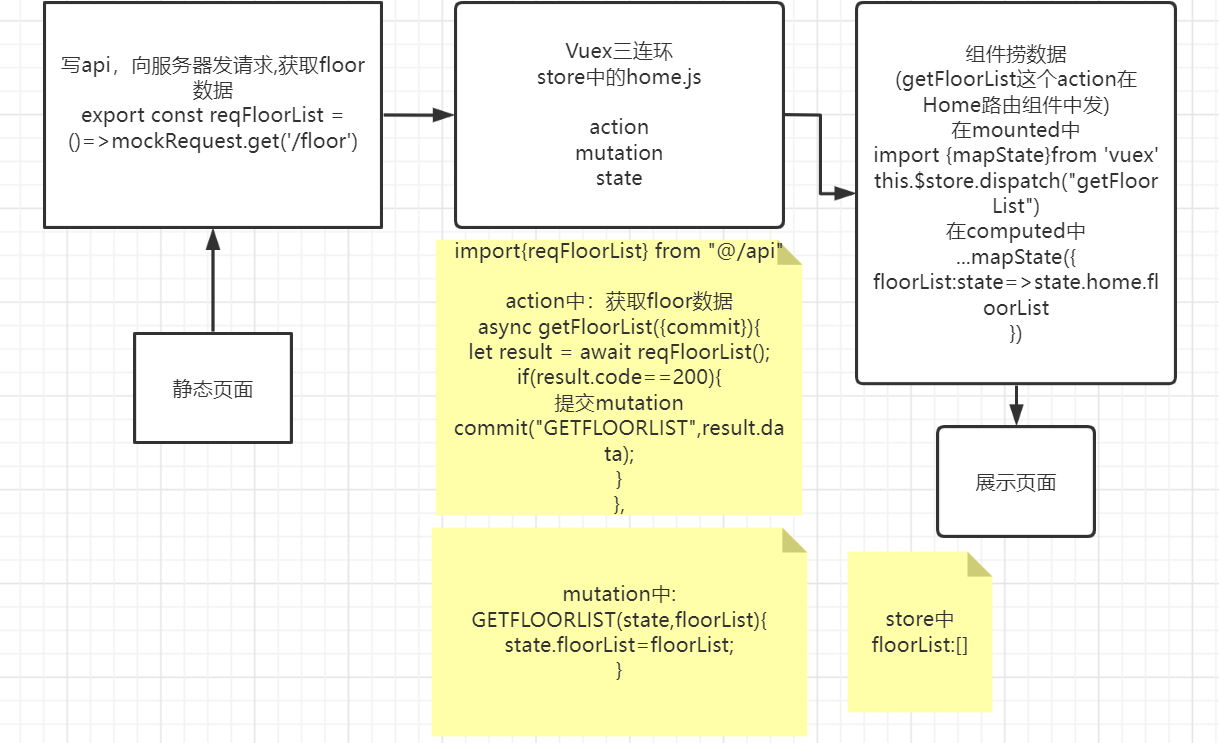
1、在api文件夹中的index.js
//获取floor组建的数据
export const reqFloorList= ()=>mockRequest.get('/floor');
2、到store仓库文件夹中的home.js
import {reqCategoryList,reqGetBannerList,reqFloorList} from '@/api';
3、写action,用户处理派发action的地方
//    获取floor的数据
    async getFloorList({commit}){
       let result = await reqFloorList();
       if (result.code==200){
           //提交mutation
           commit('GETFLOORLIST',result.data);
       }
    }
4、到mutation,修改state的地方
GETFLOORLIST(state,floorList){
    state.floorList = floorList;
}
5、state存储数据的地方:数据格式取决于服务器返回的数据
floorList:[]
4.1 getFloorList这个action在哪里触发
由于floor组件复用,而且mock中给的数据有两组。所以触发就不能单独在floor组件内部写,在里面写没办法v-for遍历出两个floor组件
所以在home.vue路由中发
<Floor v-for="(floor,index) in "floorList" :key="floor.id"/>
1、在

 浙公网安备 33010602011771号