PROXYSQL
mysql实现读写分离的方式
mysql在处理数据量庞大的时候单主机负荷过大,引入mysql的读写分离。
实现读写分离的方式有:
- 程序修改mysql直接和数据库通信,简单快捷的读写分离和随机的方式实现的负载均衡,权限独立分配需要开发人员协助。
- amoeba,直接实现读写分离和负载均衡,不用修改代码,有很灵活的数据解决方案,自己分配账户,和后端数据库权限管理独立,权限处理不够灵活。
- mysql-proxy,直接实现读写分离和负载均衡,不用修改代码,master和slave用一样的帐号,效率低
- mycat中间件
- proxysql中间件(推荐使用)
proxysql
简介
ProxySQL 是一款可以实际用于生产环境的 MySQL 中间件,它有官方版和 percona 版两种。percona版是在官方版的基础上修改的,添加了几个比较实用的工具。生产环境建议用官方版。
ProxySQL 是用 C++ 语言开发的,虽然也是一个轻量级产品,但性能很好(据测试,能处理千亿级的数据),功能也足够,能满足中间件所需的绝大多数功能,包括:
- 最基本的读/写分离。
- 可定制基于用户、基于schema、基于语句的规则对SQL语句进行路由。换句话说,规则很灵活。基于schema和与语句级的规则,可以实现简单的sharding(分库分表)
- 可缓存查询结果。虽然ProxySQL的缓存策略比较简陋,但实现了基本的缓存功能。
- 监控后端节点。ProxySQL可以监控后端节点的多个指标,包括:ProxySQL和后端的心跳信息,后端节点的read-only/read-write,slave和master的数据同步延迟性(replication lag)
分库分表
传统单机数据储存会随着数据量的增加,导致操作性能下降。
解决方法:
-
更换更好的硬件。成本高,且瓶颈在数据库本身的话以后数据还会增加,治标不治本。
-
将一个大库里的数据分散到不同数据库中,大表也拆分为若干小表。这样就不会集中访问同一个数据库造成访问瓶颈。
proxysql安装
下载网址:
https://www.proxysql.com/documentation/installing-proxysql/
[root@node4 ~]# systemctl stop firewalld.service
[root@node4 ~]# setenforce 0

//配置proxy源
[root@node4 ~]# cat /etc/yum.repos.d/proxysql.repo
[proxysql_repo]
name= ProxySQL YUM repository
baseurl=https://repo.proxysql.com/ProxySQL/proxysql-2.1.x/centos/8/
gpgcheck=1
gpgkey=https://repo.proxysql.com/ProxySQL/repo_pub_key

//清除缓存,安装proxysql和mysql客户端
[root@node4 ~]# yum clean all
[root@node4 ~]# yum makecache
[root@node4 ~]# yum -y install proxysql	mariadb
proxysql的admin管理接口
原理图:

6033端口监听开发以root身份发送的sql语句,,并根据需求将sql语句分发到各mysql服务器上(如读请求给读服务器,写给写服务器)。admin账户通过6032端口管理proxysql。
proxysql启动后监听2个端口:
- admin管理接口,默认端口6032,用于查看配置
- admin 管理接口是一个使用 MySQL 协议的接口,所以,可以直接使用 mysql 客户端、navicat 等工具去连接这个管理接口,其默认的用户名和密码均为 admin
- 接收sql语句接口,默认端口6033,类似于mysql的3306
[root@node4 ~]# systemctl enable --now proxysql-initial.service
[root@node4 ~]# ss -antl
State    Recv-Q   Send-Q     Local Address:Port     Peer Address:Port
LISTEN   0        128              0.0.0.0:6032          0.0.0.0:*
LISTEN   0        128              0.0.0.0:6033          0.0.0.0:*
LISTEN   0        128              0.0.0.0:6033          0.0.0.0:*
LISTEN   0        128              0.0.0.0:6033          0.0.0.0:*
LISTEN   0        128              0.0.0.0:6033          0.0.0.0:*
LISTEN   0        128              0.0.0.0:22            0.0.0.0:*
LISTEN   0        128                 [::]:22               [::]:*


//通过mysql客户端连接管理接口(本地连接)
[root@node4 ~]# mysql -uadmin -padmin -P6032 -h127.0.0.1
Welcome to the MariaDB monitor.  Commands end with ; or \g.
Your MySQL connection id is 1
Server version: 5.5.30 (ProxySQL Admin Module)

Copyright (c) 2000, 2018, Oracle, MariaDB Corporation Ab and others.

Type 'help;' or '\h' for help. Type '\c' to clear the current input statement.

MySQL [(none)]> show databases;
+-----+---------------+-------------------------------------+
| seq | name          | file                                |
+-----+---------------+-------------------------------------+
| 0   | main          |                                     |
| 2   | disk          | /var/lib/proxysql/proxysql.db       |
| 3   | stats         |                                     |
| 4   | monitor       |                                     |
| 5   | stats_history | /var/lib/proxysql/proxysql_stats.db |
+-----+---------------+-------------------------------------+
5 rows in set (0.000 sec)
admin管理接口相关变量
admin-admin_credentials
该变量控制的是admin管理接口的管理员账户。默认的管理员账户和密码为admin:admin,但是这个默认的用户只能在本地使用。
//node4机器上远程登录访问报错
[root@node3 ~]# mysql -uadmin -padmin -P6032 -h192.168.94.130
mysql: [Warning] Using a password on the command line interface can be insecure.
ERROR 1040 (42000): User 'admin' can only connect locally
自定义新管理员账户
//proxysql端添加新账户
[root@node4 ~]# mysql -uadmin -padmin -P6032 -h127.0.0.1
...
MySQL [(none)]> select @@admin-admin_credentials;	#查看现有账户
+---------------------------+
| @@admin-admin_credentials |
+---------------------------+
| admin:admin               |
+---------------------------+
1 row in set (0.001 sec)

MySQL [(none)]> set admin-admin_credentials='admin:admin;fxx:fxx123';	#添加新账户
Query OK, 1 row affected (0.001 sec)

MySQL [(none)]> select @@admin-admin_credentials;	#再次查看
+---------------------------+
| @@admin-admin_credentials |
+---------------------------+
| admin:admin;fxx:fxx123    |
+---------------------------+
1 row in set (0.001 sec)

MySQL [(none)]> load admin variables to runtime;	#生效
Query OK, 0 rows affected (0.001 sec)

MySQL [(none)]> save admin variables to disk;	#将修改保存到磁盘
Query OK, 43 rows affected (0.001 sec)

//远程以新建账户fxx登录
[root@node3 ~]# mysql -ufxx -pfxx123 -P6032 -h192.168.94.130
mysql: [Warning] Using a password on the command line interface can be insecure.
Welcome to the MySQL monitor.  Commands end with ; or \g.
Your MySQL connection id is 5
...
mysql>
所有的配置操作就是在更改main库对应的表
//比如这个用户就是更改了main库中global_variables表的admin-admin_credentials
MySQL [(none)]> select * from global_variables where variable_name='admin-admin_credentials'
    -> ;
+-------------------------+------------------------+
| variable_name           | variable_value         |
+-------------------------+------------------------+
| admin-admin_credentials | admin:admin;fxx:fxx123 |
+-------------------------+------------------------+
1 row in set (0.002 sec)
注意区分admin管理接口的用户名和mysql_users的用户名
- admin管理用户接口6032的用来配置proxysql的。
- mysql_users是用app连接proxysql6033,以及proxysql连接后端mysql服务器的用户。作用是发送路由sql语句。该用户必须存在于后端服务器且授权
admin-stats_credentials
该变量是控制的是admin管理接口的普通用户,普通用户没有管理员权限,只能查看main库和monitor库关于统计的数据,且没有写权限。
这个变量中的用户必须不能存在于mysql_users表中
默认用户密码都为stats,和admin用户一样,默认用户仅作本地登录,远程需要添加指定用户。
//添加用户
MySQL [(none)]> select @@admin-stats_credentials;
+---------------------------+
| @@admin-stats_credentials |
+---------------------------+
| stats:stats               |
+---------------------------+
1 row in set (0.001 sec)

MySQL [(none)]> set admin-stats_credentials='stats:stats;fxxstat:fxx123';
Query OK, 1 row affected (0.001 sec)

MySQL [(none)]> load admin variables to runtime;
Query OK, 0 rows affected (0.001 sec)

MySQL [(none)]> save admin variables to disk;
Query OK, 43 rows affected (0.001 sec)

MySQL [(none)]> select @@admin-stats_credentials;
+----------------------------+
| @@admin-stats_credentials  |
+----------------------------+
| stats:stats;fxxstat:fxx123 |
+----------------------------+
1 row in set (0.001 sec)

//远程登录查看
[root@node3 ~]# mysql -ufxxstat -pfxx123 -P6032 -h192.168.94.130
mysql: [Warning] Using a password on the command line interface can be insecure.
Welcome to the MySQL monitor.  Commands end with ; or \g.
...
mysql>
admin-mysql_ifaces
admin-mysql_ifaces 变量指定admin接口的监听地址,格式为冒号分隔的hostname:port列表。默认监听在 0.0.0.0:6032
//修改默认端口
MySQL [main]> set admin-mysql_ifaces='0.0.0.0:8080';
Query OK, 1 row affected (0.000 sec)

MySQL [main]> select @@admin-mysql_ifaces;
+----------------------+
| @@admin-mysql_ifaces |
+----------------------+
| 0.0.0.0:8080         |
+----------------------+
1 row in set (0.001 sec)
MySQL [(none)]> load admin variables to runtime;
Query OK, 0 rows affected (0.001 sec)

MySQL [(none)]> save admin variables to disk;
Query OK, 43 rows affected (0.001 sec)

//退出重写登录发现无法登录
[root@node4 ~]# mysql -uadmin -padmin -P6032 -h127.0.0.1
ERROR 2002 (HY000): Can't connect to MySQL server on '127.0.0.1' (115)
[root@node4 ~]# ss -antl|grep 8080
LISTEN    0         128                0.0.0.0:8080             0.0.0.0:*
//更改新端口登录
[root@node4 ~]# mysql -uadmin -padmin -P8080 -h127.0.0.1
Welcome to the MariaDB monitor.  Commands end with ; or \g.
Your MySQL connection id is 1
Server version: 5.5.30 (ProxySQL Admin Module)

Copyright (c) 2000, 2018, Oracle, MariaDB Corporation Ab and others.

Type 'help;' or '\h' for help. Type '\c' to clear the current input statement.

MySQL [(none)]>
多层配置系统
proxysql的库
MySQL [(none)]> show databases;
+-----+---------------+-------------------------------------+
| seq | name          | file                                |
+-----+---------------+-------------------------------------+
| 0   | main          |                                     |
| 2   | disk          | /var/lib/proxysql/proxysql.db       |
| 3   | stats         |                                     |
| 4   | monitor       |                                     |
| 5   | stats_history | /var/lib/proxysql/proxysql_stats.db |
+-----+---------------+-------------------------------------+
5 rows in set (0.000 sec)
- main库是proxysql的主库,修改配置时需要使用的库。他其实是一个内存数据库系统,需要持久化到“disk”上才能永久保存。
- disk库是磁盘数据库,其数据库结构和内存数据库完全相同。持久化内存数据库中,就是写入到disk库里,该库有db文件做保存。
- stats库是统计数据库,保存在内存中,无法持久化。
- monitor库是监控后端mysql节点的库,监控收集的信息全都放到对应的log日志表中。
- stats_history库是1.4.4版新增的库,用于存放历史统计数据。
proxysql内部使用的sqlite3数据库。它和mysql语句有些许不同,proxysql会对不兼容的部分调整,最大程度保证mysql语句的有效率。
#上面描述main库的时候,只是说了内存数据库需要持久化到disk库才能永久保存配置。但实际上,修改了main库中的配置后,并不会立即生效,它还需要load到runtime的数据结构中才生效,只有在runtime数据结构中的配置才是对ProxySQL当前有效的配置
MySQL [(none)]> show tables;
+----------------------------------------------------+
| tables                                             |
+----------------------------------------------------+
| global_variables                                   |
| mysql_aws_aurora_hostgroups                        |
| mysql_collations                                   |
| mysql_firewall_whitelist_rules                     |
| mysql_firewall_whitelist_sqli_fingerprints         |
| mysql_firewall_whitelist_users                     |
| mysql_galera_hostgroups                            |
| mysql_group_replication_hostgroups                 |
| mysql_query_rules                                  |
| mysql_query_rules_fast_routing                     |
| mysql_replication_hostgroups                       |
| mysql_servers                                      |
| mysql_users                                        |
| proxysql_servers                                   |
| restapi_routes                                     |
| runtime_checksums_values                           |
| runtime_global_variables                           |
| runtime_mysql_aws_aurora_hostgroups                |
| runtime_mysql_firewall_whitelist_rules             |
| runtime_mysql_firewall_whitelist_sqli_fingerprints |
| runtime_mysql_firewall_whitelist_users             |
| runtime_mysql_galera_hostgroups                    |
| runtime_mysql_group_replication_hostgroups         |
| runtime_mysql_query_rules                          |
| runtime_mysql_query_rules_fast_routing             |
| runtime_mysql_replication_hostgroups               |
| runtime_mysql_servers                              |
| runtime_mysql_users                                |
| runtime_proxysql_servers                           |
| runtime_restapi_routes                             |
| runtime_scheduler                                  |
| scheduler                                          |
+----------------------------------------------------+
32 rows in set (0.001 sec)
更改6033端口
MySQL [(none)]> select * from global_variables where variable_value='0.0.0.0:6033';
+------------------+----------------+
| variable_name    | variable_value |
+------------------+----------------+
| mysql-interfaces | 0.0.0.0:6033   |
+------------------+----------------+
1 row in set (0.001 sec)

MySQL [(none)]> set mysql-interfaces='0.0.0.0:3306';
Query OK, 1 row affected (0.001 sec)

MySQL [(none)]> save mysql variables to disk;
Query OK, 140 rows affected (0.003 sec)

MySQL [(none)]> select @@mysql-interfaces;
+--------------------+
| @@mysql-interfaces |
+--------------------+
| 0.0.0.0:3306       |
+--------------------+
1 row in set (0.001 sec)

MySQL [(none)]> quit
Bye
[root@node4 ~]# systemctl restart proxysql
[root@node4 ~]# ss -antl
State    Recv-Q    Send-Q       Local Address:Port       Peer Address:Port
LISTEN   0         128                0.0.0.0:22              0.0.0.0:*
LISTEN   0         128                0.0.0.0:3306            0.0.0.0:*
LISTEN   0         128                0.0.0.0:3306            0.0.0.0:*
LISTEN   0         128                0.0.0.0:3306            0.0.0.0:*
LISTEN   0         128                0.0.0.0:3306            0.0.0.0:*
LISTEN   0         128                0.0.0.0:8080            0.0.0.0:*
LISTEN   0         128                   [::]:22                 [::]:*
proxysql多层配置系统
该配置系统能在线修改几乎所有的配置(只有 mysql-threads 和 mysql-stacksize需要重启才能生效)。即时生效,持久保存。
多层配置结构:
       +-------------------------+
       |         RUNTIME         |
       +-------------------------+
              /|\          |
           [1] |       [2] |
               |          \|/
       +-------------------------+
       |         MEMORY          |
       +-------------------------+ _
              /|\          |      |\
           [3] |       [4] |        \ [5]
               |          \|/        \
       +-------------------------+  +---------------+
       |          DISK           |  |  CONFIG FILE  |
       +-------------------------+  +---------------+
disk和configfile是最底层,他们都是有保存在磁盘的真实有效的文件。proxyslq每次启动会优先读取disk库的配置(/var/lib/proxysql/proxysql.db),少数在config file(/etc/proxysql.cnf)里加载,最终加载到rumtime生效。
中间层是memory,内存数据库。就是main库,该库顾名思义是放在内存中的,因此当应用重启或崩溃会导致数据丢失,因此需要加载到runtime才能即时生效,持久性保存则需要保存到disk库去。
最上层是runtime。这层是已经生效的配置,线程运行时会读取该数据结构。因此main库配置修改后需要加载到runtime数据结构才能生效。
//加载跟保存语句根据对象不同,主体不同后缀会有些许差别,结构图中标明的数字代表对应的操作
#[1]:main库加载到runtime库,LOAD XXX {FROM MEMORY|TO RUNTIME}
#[2]:runtime持久化保存到memory库。SAVE xxx {FROM RUNTIME|TO MEMORY}
#[3]:disk库配置加载到main库。LOAD XXX {FROM DISK|TO MEMORY}
#[4]:main库配置保存到disk库。SAVE XXX {FROM MEMORY|TO DISK}
#[5]:config配置加载到main库。LOAD XXX FROM CONFIG
几个层级可以缩写
辨识度要高
RUNTIME >>RUN,MEMORY >>MEM
配置加载选项
- mysql users
- mysql servers
- mysql variables
- mysql query rules
- admin variables
- scheduler
- proxysql_servers:目前ProxySQL集群功能还处于实验阶段,所以该类配置不应该去使用
这些从main库或disk库中就可以查看到
|global_variables                    |  # (1)
| mysql_collations                   |  # (N)
| mysql_group_replication_hostgroups |  # (2)
| mysql_query_rules                  |  # (3)
| mysql_query_rules_fast_routing     |  # (4)
| mysql_replication_hostgroups       |  # (5)
| mysql_servers                      |  # (6)后端真实服务器列表
| mysql_users                        |  # (7)后端RS真实用户
| proxysql_servers                   |  # (8)
| scheduler
- (1)中包含两类变量,以amdin-开头的表示admin variables,以mysql-开头的表示mysql variables。修改哪类变量,前文的XXX就代表哪类
- (2,5,6)对应的都是mysql servers
- (3,4)对应的是mysql query rules
- (7)对应的mysql users
- (9)对应的scheduler
- (N)只是一张表,保存的是ProxySQL支持的字符集和排序规则,它是不用修改的
- (8)是ProxySQL的集群配置表,该功能目前还处于实验阶段。如果想要配置该功能,则load/save proxysql_servers to/from ...
启动proxysql的时候的配置加载顺序
初次安装的情况:
disk库为空,没有任何配置文件,启动proxysql时会使用--initial(初始化)选项,从传统配置文件的config file中读取配置,自动加载到rumtime,保存到disk去。
非初次安装的情况:
disk库有配置文件,poxysql会优先读取disk库的几乎所有配置(即使传统配置文件更改也不会读取),其中三项必须从传统配置文件读取。
- datadir:proxysql启动时必须确认数据目录的路径。这个变量定义了数据库文件和日志文件的存放路径。
- restart_on_missing_heartbeats:MySQL线程丢失多少次心跳,就会杀掉这个线程并重启它。默认值为10。(需自己写入)
- execute_on_exit_failure:如果设置了该变量,ProxySQL父进程将在每次ProxySQL崩溃的时候执行已经定义好的脚本。建议使用它来生成一些崩溃时的警告和日志。注意,ProxySQL的重启速度可能只有几毫秒,因此很多其它的监控工具可能无法探测到ProxySQL的一次普通故障,此时可使用该变量
读写分离方案解析
How to set up ProxySQL Read/Write Split - ProxySQL
ProxySQL 支持读写分离。而且 ProxySQL 支持的路由规则非常灵活,不仅可以实现最简单的读写分离,还可以将读/写都分散到多个不同的组,以及实现分库 (sharding)
读写实现方式:
- ip/port,
- client,
- username,
- schemaname
通过规则指定的语句级读写分离。
最基本读写分离

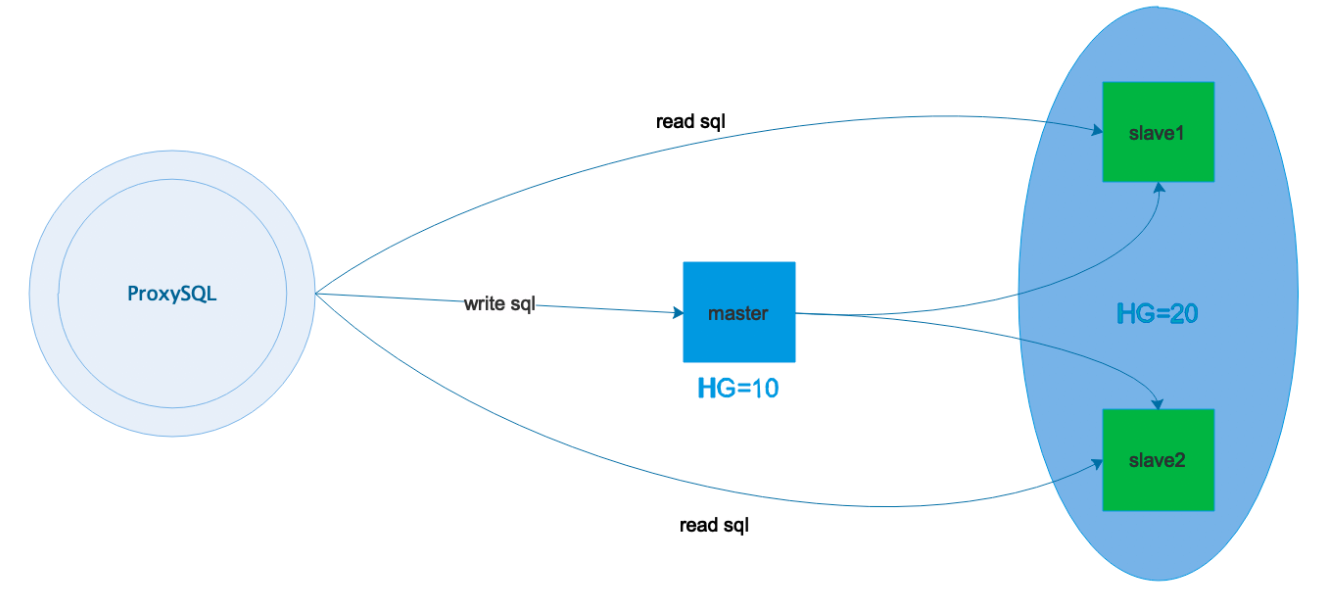
HG: hostgroups组id
基于主机组的id分组,主组id为10,从组id为20。其中slave节点必须设置read_only=1(启用只读)。
proxysql会启用monitor模块的readonly监控功能,通过监控这个值来分配后端服务器到主组还是从组。
mysql_users表中设置用户的默认路由组为写组HG=10,并在mysql_query_rules中加上两条简单的规则(一个select for update,一个select)。
特点
- 环境简单时满足绝大多数需求
- 复杂环境时,死板,全程由monitor监控来判断的
- 主库挂的情况可能无法写入
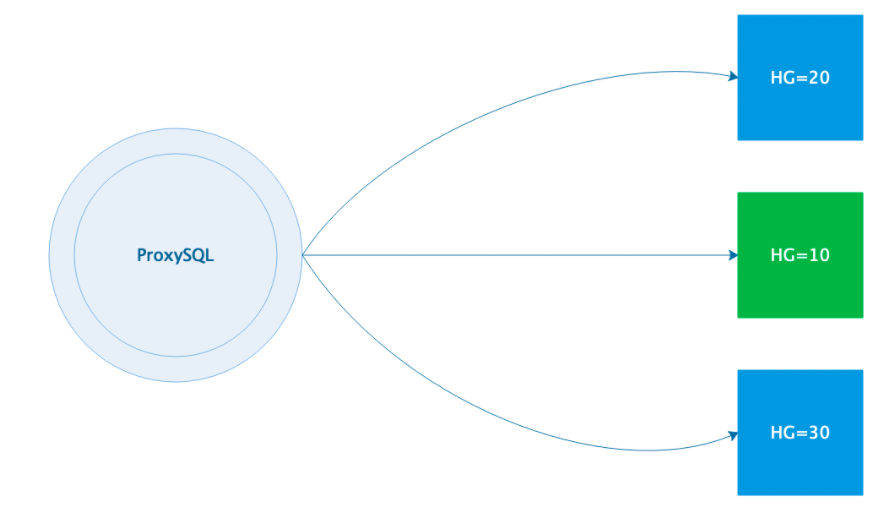
多读组或写组的分离模式

多分组模式能应对一个主从集群,或多个主从集群。前提是不能开启monitor模块的read_only监控功能,也不要设置mysql_replication_hostgroup 表。


