KVM
虚拟化介绍
虚拟化:
通过hypervisor让物理机的硬件资源虚拟化提供给虚拟机使用,他们共享硬件资源,但是逻辑上却是相互隔离的。
物理机称为宿主机(host),宿主机上的虚拟机称为客户机(guest)。
Hypervisor:
虚拟机监视器(virtual machine monitor,缩写为 VMM),是用来建立与执行虚拟机器的软件、固件或硬件。是物理服务器和操作系统之间的中间层。
根据其部署方式不同,虚拟化分为两种:
-
全虚拟化
-
半虚拟化
全虚拟化
硬件层面直接安装hypervisor(定制的linux系统),部署多个虚拟机在他上面运行。
半虚拟化
硬件层面安装常规操作系统(centos,windows等),hypervisor作为一个应用程序运行。
KVM介绍
kVM 全称是 Kernel-Based Virtual Machine。也就是说 KVM 是基于 Linux 内核实现的。
KVM有一个内核模块叫 kvm.ko,只用于管理虚拟 CPU 和内存。
作为一个 Hypervisor,KVM 本身只关注虚拟机调度和内存管理这两个方面。IO 外设的任务交给 Linux 内核和 Qemu。
KVM部署
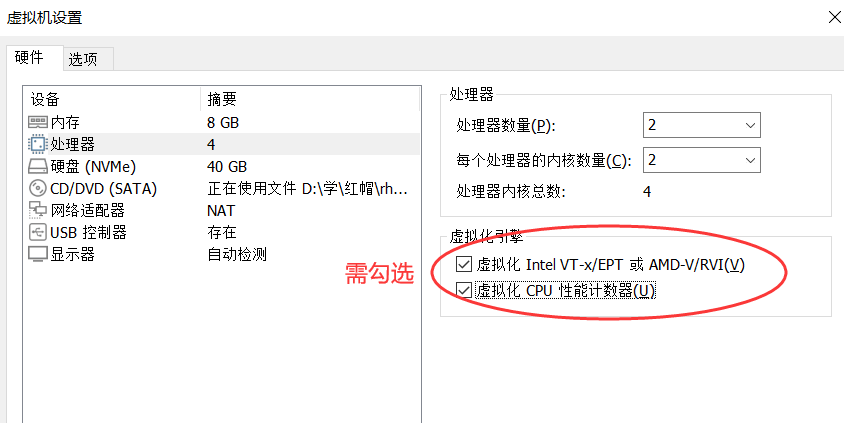
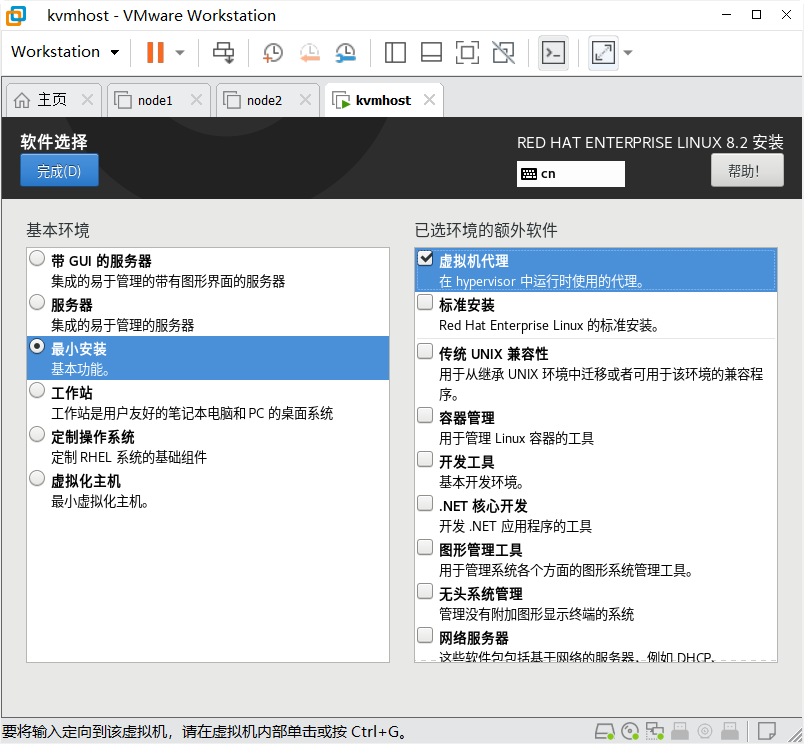
环境:
| 系统 | ip |
|---|---|
| rhel8 | 192.168.94.132 |
下载必要工具
#配置仓库源
curl -o /etc/yum.repos.d/CentOS-Base.repo https://mirrors.aliyun.com/repo/Centos-8.repo
[root@kvm ~]#  yum -y install vim unzip epel-release bash-completion
[root@kvm ~]# yum -y install qemu-kvm libvirt virt-install bridge-utils python3-libvirt  git
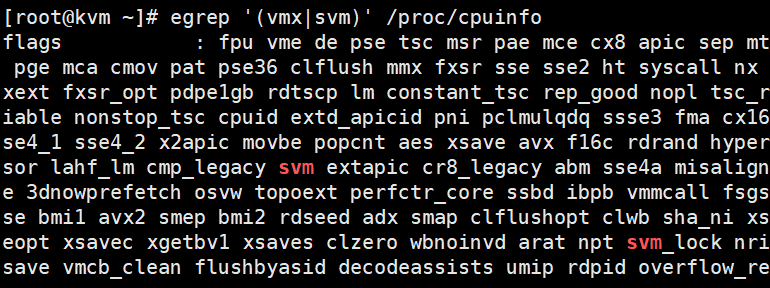
查看cpu是否支持kvm,结果含有svm(amd)或vmx(intel)就说明支持
//kvm服务器配置桥接网卡
[root@kvm ~]# cat /etc/sysconfig/network-scripts/ifcfg-br0
TYPE=Bridge
NAME=br0
DEVICE=br0
BOOTPROTO=static
IPADDR=192.168.94.132
NETMASK=255.255.255.0
GATEWAY=192.168.94.2
DNS=114.114.114.114
[root@kvm ~]# cat /etc/sysconfig/network-scripts/ifcfg-ens160
TYPE=Ethernet
BOOTPROTO=static
NAME=ens160
DEVICE=ens160
ONBOOT=yes
BRIDGE=br0
[root@kvm ~]# ifdown br0 ;ifup br0
[root@kvm ~]# ifdown ens160 ;ifup ens160
[root@kvm ~]# systemctl restart NetworkManager
[root@kvm ~]# ip a
1: lo: <LOOPBACK,UP,LOWER_UP> mtu 65536 qdisc noqueue state UNKNOWN group default qlen 1000
    link/loopback 00:00:00:00:00:00 brd 00:00:00:00:00:00
    inet 127.0.0.1/8 scope host lo
       valid_lft forever preferred_lft forever
    inet6 ::1/128 scope host
       valid_lft forever preferred_lft forever
2: ens160: <BROADCAST,MULTICAST,UP,LOWER_UP> mtu 1500 qdisc mq master br0 state UP group default qlen 1000
    link/ether 00:0c:29:2f:8a:83 brd ff:ff:ff:ff:ff:ff
4: br0: <BROADCAST,MULTICAST,UP,LOWER_UP> mtu 1500 qdisc noqueue state UP group default qlen 1000
    link/ether 00:0c:29:2f:8a:83 brd ff:ff:ff:ff:ff:ff
    inet 192.168.94.132/24 brd 192.168.94.255 scope global noprefixroute br0
       valid_lft forever preferred_lft forever
    inet6 fe80::20de:91ff:fe10:32f/64 scope link
       valid_lft forever preferred_lft forever

//启动服务
[root@kvm ~]# systemctl enable --now libvirtd
[root@kvm ~]# systemctl status libvirtd
● libvirtd.service - Virtualization daemon
   Loaded: loaded (/usr/lib/systemd/system/libvirtd.service; enab>
   Active: active (running) since Wed 2021-05-19 17:48:07 CST; 2s
//验证安装结果,说明成功安装
[root@kvm ~]# lsmod |grep kvm
kvm_amd               110592  0
ccp                    98304  1 kvm_amd
kvm                   786432  1 kvm_amd
irqbypass              16384  1 kvm
//查看桥接信息
[root@kvm ~]# brctl show
bridge name	bridge id		STP enabled	interfaces
br0		8000.000c292f8a83	no		ens160
virbr0		8000.525400440c81	yes		virbr0-nic
kvm web管理界面安装
[root@kvm ~]# yum -y install python2-pip python3-libvirt python3-libxml2 nginx python3-websocket-client python36-devel supervisor
//升级pip
[root@kvm ~]# pip3 install --upgrade pip

//拉取webvirtmgr
[root@kvm src]# git clone git://github.com/retspen/webvirtmgr.git
[root@kvm src]# cd webvirtmgr
//安装webvirmgr
[root@kvm webvirtmgr]# pip install -r requirements.txt

//查看sqlite3是否安装
[root@kvm webvirtmgr]# python2
Python 2.7.17 (default, Aug 31 2020, 21:02:14)
[GCC 8.3.1 20191121 (Red Hat 8.3.1-5)] on linux2
Type "help", "copyright", "credits" or "license" for more information.
>>> import sqlite3
>>> exit()

//初始化账号信息
[root@kvm webvirtmgr]# python2 manage.py syncdb
WARNING:root:No local_settings file found.
Creating tables ...
Creating table auth_permission
Creating table auth_group_permissions
Creating table auth_group
Creating table auth_user_groups
Creating table auth_user_user_permissions
Creating table auth_user
Creating table django_content_type
Creating table django_session
Creating table django_site
Creating table servers_compute
Creating table instance_instance
Creating table create_flavor

You just installed Django's auth system, which means you don't have any superusers defined.
Would you like to create one now? (yes/no): yes #创建超级用户
Username (leave blank to use 'root'): #默认root
Email address: 1@2.com	#管理员邮箱
Password: 	#密码123456
Password (again): #再次输入
Superuser created successfully.
Installing custom SQL ...
Installing indexes ...
Installed 6 object(s) from 1 fixture(s)

[root@kvm webvirtmgr]# mkdir -p /var/www
[root@kvm webvirtmgr]# cp -r /usr/local/src/webvirtmgr/ /var/www/
[root@kvm webvirtmgr]# chown -R nginx:nginx /var/www/webvirtmgr/

//生成公钥
[root@kvm webvirtmgr]# ssh-keygen -t rsa
[root@kvm webvirtmgr]# ssh-copy-id 192.168.94.132

//配置端口转发
[root@kvm webvirtmgr]# ssh 192.168.94.132 -L localhost:8000:localhost:8000 -L localhost:6080:localhost:60

//nginx配置
[root@kvm ~]# vim /etc/nginx/nginx.conf
...
  include /etc/nginx/conf.d/*.conf;

    server {
        listen       80;
        server_name  localhost;

        # Load configuration files for the default server block.
        include /etc/nginx/default.d/*.conf;

        location / {
            root html;
            index index.html index.htm;
        }

        error_page 404 /404.html;
            location = /40x.html {
        }

        error_page 500 502 503 504 /50x.html;
            location = /50x.html {
        }
    }
...

//配置webvirmgr
[root@kvm ~]# vim /etc/nginx/conf.d/webvirtmgr.conf

server {
    listen 80 default_server;

    server_name $hostname;
    #access_log /var/log/nginx/webvirtmgr_access_log;

    location /static/ {
        root /var/www/webvirtmgr/webvirtmgr;
        expires max;
    }

    location / {
        proxy_pass http://127.0.0.1:8000;
        proxy_set_header X-Real-IP $remote_addr;
        proxy_set_header X-Forwarded-for $proxy_add_x_forwarded_for;
        proxy_set_header Host $host:$server_port;
        proxy_set_header X-Forwarded-Proto $remote_addr;
        proxy_connect_timeout 600;
        proxy_read_timeout 600;
        proxy_send_timeout 600;
        client_max_body_size 1024M;
    }
}

//确保绑定8000端口
[root@kvm ~]# vim /var/www/webvirtmgr/conf/gunicorn.conf.py
...
bind = '0.0.0.0:8000'
backlog = 2048
...

//重启nginx
[root@kvm ~]# systemctl restart nginx
[root@kvm ~]# ss -antl
State   Recv-Q  Send-Q   Local Address:Port    Peer Address:Port
LISTEN  0       32       192.168.122.1:53           0.0.0.0:*
LISTEN  0       128            0.0.0.0:22           0.0.0.0:*
LISTEN  0       128          127.0.0.1:6080         0.0.0.0:*
LISTEN  0       128          127.0.0.1:8000         0.0.0.0:*
LISTEN  0       128            0.0.0.0:111          0.0.0.0:*
LISTEN  0       128            0.0.0.0:80           0.0.0.0:*
LISTEN  0       128               [::]:22              [::]:*
LISTEN  0       128              [::1]:6080            [::]:*
LISTEN  0       128              [::1]:8000            [::]:*
LISTEN  0       128               [::]:111             [::]:*

//设置supervisor
[root@kvm ~]# vim /etc/supervisord.conf
...#最后追加
[program:webvirtmgr]
command=/usr/bin/python2 /var/www/webvirtmgr/manage.py run_gunicorn -c /var/www/webvirtmgr/conf/gunicorn.conf.py
directory=/var/www/webvirtmgr
autostart=true
autorestart=true
logfile=/var/log/supervisor/webvirtmgr.log
log_stderr=true
user=nginx

[program:webvirtmgr-console]
command=/usr/bin/python2 /var/www/webvirtmgr/console/webvirtmgr-console
directory=/var/www/webvirtmgr
autostart=true
autorestart=true
stdout_logfile=/var/log/supervisor/webvirtmgr-console.log
redirect_stderr=true
user=nginx
[root@kvm ~]# systemctl enable --now  supervisord.service
Created symlink /etc/systemd/system/multi-user.target.wants/supervisord.service → /usr/lib/systemd/system/supervisord.service.


//nginx用户配置
[nginx@kvm ~]$ ssh-keygen -t rsa
Generating public/private rsa key pair.
Enter file in which to save the key (/var/lib/nginx/.ssh/id_rsa):
Created directory '/var/lib/nginx/.ssh'.
Enter passphrase (empty for no passphrase):
Enter same passphrase again:
Your identification has been saved in /var/lib/nginx/.ssh/id_rsa.
Your public key has been saved in /var/lib/nginx/.ssh/id_rsa.pub.
The key fingerprint is:
SHA256:fSvmF+whZ3g8CWFYidPNaGPkrzt2aPOENc+VTzQYo7s nginx@kvm
The key's randomart image is:
+---[RSA 3072]----+
|         *o= o   |
|        +.X + +  |
|         =.+ . ..|
|         ....  .o|
|        S .*=. .o|
|          o=%= o.|
|          =Eo+o .|
|         o*++    |
|         oo*.    |
+----[SHA256]-----+

[nginx@kvm ~]$ vim  ~/.ssh/config

StrictHostKeyChecking=no
UserKnownHostsFile=/dev/null
[nginx@kvm ~]$ chmod 0600 ~/.ssh/config
[nginx@kvm ~]$ ssh-copy-id root@192.168.94.132
/usr/bin/ssh-copy-id: INFO: Source of key(s) to be installed: "/var/lib/nginx/.ssh/id_rsa.pub"
/usr/bin/ssh-copy-id: INFO: attempting to log in with the new key(s), to filter out any that are already installed
/usr/bin/ssh-copy-id: INFO: 1 key(s) remain to be installed -- if you are prompted now it is to install the new keys
Warning: Permanently added '192.168.94.132' (ECDSA) to the list of known hosts.
root@192.168.94.132's password:

Number of key(s) added: 1

Now try logging into the machine, with:   "ssh 'root@192.168.94.132'"
and check to make sure that only the key(s) you wanted were added.
[nginx@kvm ~]$ exit
注销

[root@kvm ~]# vim /etc/polkit-1/localauthority/50-local.d/50-libvirt-remote-access.pkla
[Remote libvirt SSH access]
Identity=unix-user:root
Action=org.libvirt.unix.manage
ResultAny=yes
ResultInactive=yes
ResultActive=yes

[root@kvm ~]# chown -R root.root /etc/polkit-1/localauthority/50-local.d/50-libvirt-remote-access.pkla
[root@kvm ~]# systemctl restart nginx
[root@kvm ~]# systemctl restart libvirtd
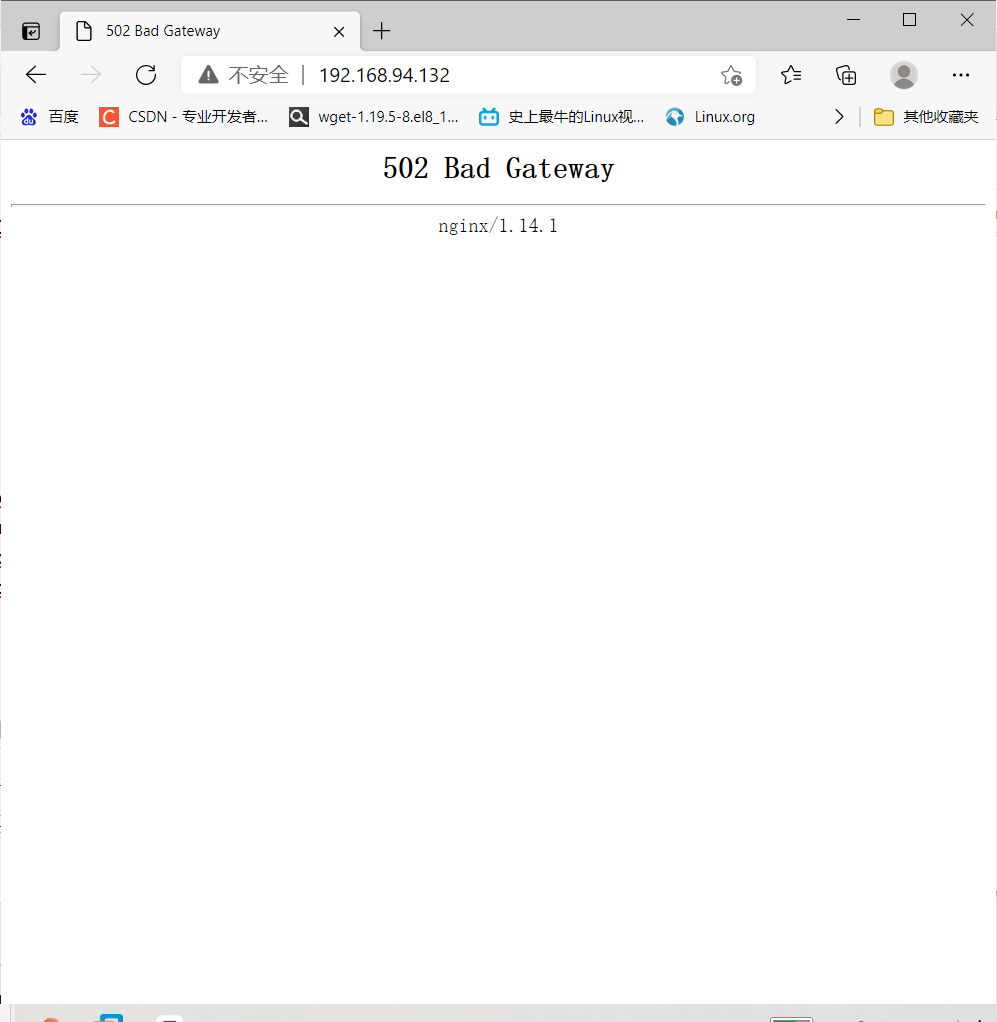
访问测试
[root@kvm ~]# tail -2  /var/log/nginx/error.log
2021/05/19 23:31:11 [error] 3155#0: *15 upstream prematurely closed connection while reading response header from upstream, client: 192.168.94.132, server: kvm, request: "GET / HTTP/1.1", upstream: "http://127.0.0.1:8000/", host: "192.168.94.132"
2021/05/19 23:35:25 [error] 3155#0: *17 upstream prematurely closed connection while reading response header from upstream, client: 192.168.94.1, server: kvm, request: "GET / HTTP/1.1", upstream: "http://127.0.0.1:8000/", host: "192.168.94.132"
- 参考文章https://www.cnblogs.com/daiorz/p/13173061.html 能实现但是过一会网卡会挂
