结对作业——四则运算
一、在文章开头给出Coding.Net项目地址。
可以直接使用的URL地址:
http://39.105.6.214/four_Operations/
coding仓库地https://git.coding.net/meiyoupiqidefan/jieduizuoye.git
二、在开始实现程序之前,在下述PSP表格记录下你估计将在程序的各个模块的开发上耗费的时间。
PSP
|
PSP |
任务内容 |
计划共完成需要的时间(min) |
实际完成需要的时间(min) |
|
Planning |
计划 |
10 |
|
|
Estimate |
估计这个任务需要多少时间,并规划大致工作步骤 |
5 |
|
|
Development |
开发 |
5*60 |
|
|
Analysis |
需求分析 (包括学习新技术) |
10*60 |
|
|
Design Spec |
生成设计文档 |
1*60 |
|
|
Design Review |
设计复审 (和同事审核设计文档) |
20 |
|
|
Coding Standard |
代码规范 (为目前的开发制定合适的规范) |
10 |
|
|
Design |
具体设计 |
30 |
|
|
Coding |
具体编码 |
20*60 |
|
|
Code Review |
代码复审 |
3*60 |
|
|
Test |
测试(自我测试,修改代码,提交修改) |
5*60 |
|
|
Reporting |
报告 |
2*60 |
|
|
Test Report |
测试报告 |
3*60 |
|
|
Size Measurement |
计算工作量 |
20 |
|
|
Postmortem & Process Improvement Plan |
事后总结, 并提出过程改进计划 |
30 |
|
三、看教科书和其它资料中关于Information Hiding, Interface Design, Loose Coupling的章节,说明你们在结对编程中是如何利用这些方法对接口进行设计的。
Information Hiding 信息隐藏:
什么是信息隐藏:
信息隐藏指在设计和确定模块时,使得一个模块内包含的特定信息(过程或数据),对于不需要这些信息的其他模块来说,是不可访问的。
为什么要信息隐藏:
隐藏复杂度:这样你就不用再去应付它,除非你要特别关注的时候;
隐藏变化源:这样当变化发生时,其影响就能被限制在局部范围内。复杂度的根源包括复杂的数据类型、文件结构、布尔判断以及晦涩的算法等等。
我们是怎么做的:
提供稳定接口,将逻辑集中到一个单独的类、包或者子系统中,使得改动不会给系统带来全局性的影响。
Interface Design 接口设计:
什么是接口设计:
对接口的名字,内容,逻辑进行设计
为什么要接口设计:
好的接口设计可以增强代码可读性,易用性,可更改性
我们是怎么做的:
设计接口,规范接口名字,注重接口逻辑。
Loose Coupling 松耦合:
什么是松耦合:
也叫做弱耦合,低耦合。耦合性也称块间联系。指软件系统结构中各模块间相互联系紧密程度的一种度量。模块之间联系越紧密,其耦合性就越强,模块的独立性则越差。模块间耦合高低取决于模块间接口的复杂性、调用的方式及传递的信息。
什么要松耦合:
功能上或代码上可以达到重用,再组合新功能的时候,可以像搭积木一样,分别拿出去再重用,而不会太关联其他。
我们是怎么做的:
将相互依赖的类放在一个命名空间(包)中,对外模块尽量与其他方法或功能减少联系。
四、计算模块接口的设计与实现过程。设计包括代码如何组织,比如会有几个类,几个函数,他们之间关系如何,关键函数是否需要画出流程图?说明你的算法的关键(不必列出源代码),以及独到之处。
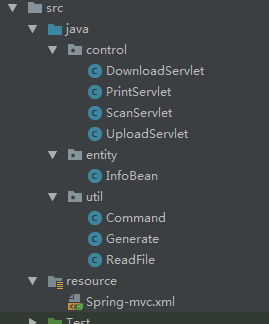
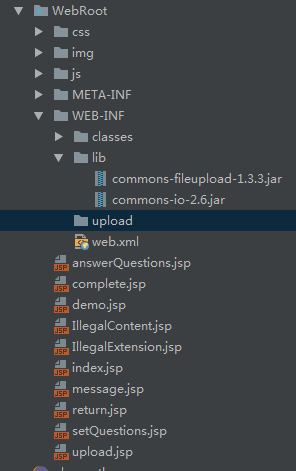
先看一下目录结构:


关键代码:
ScanServelet.jsp
package control;

import entity.InfoBean;
import util.ReadFile;

import javax.servlet.ServletException;
import javax.servlet.annotation.WebServlet;
import javax.servlet.http.HttpServlet;
import javax.servlet.http.HttpServletRequest;
import javax.servlet.http.HttpServletResponse;
import java.io.IOException;
import java.util.ArrayList;
import java.util.Date;
import java.util.List;

@WebServlet(name = "ScanServlet")
public class ScanServlet extends HttpServlet {

    protected void doPost(HttpServletRequest request, HttpServletResponse response) throws ServletException, IOException {
        try {
            response.setCharacterEncoding("utf-8");
            //计数器
            int count = 0;
            count = Integer.parseInt(request.getParameter("count"));
            //将题目有关信息存储
            List<InfoBean> L = new ArrayList<InfoBean>();
//            String file="C:\\Program Files\\apache-tomcat-8.5.15\\result\\result.txt";
            /*成功取出L*/
            String file = request.getParameter("file");
            L = ReadFile.readFileByLines(file);
            int line = Integer.parseInt(request.getParameter("line"));
            int user_ans = Integer.parseInt(request.getParameter("user_ans"));
            if (user_ans == L.get(line).getRight_ans()) {
                count++;
            }
            line++;
            String startTime = request.getParameter("startTime");
//                String startTime = request.getParameter("startTime");
            //比较正确答案
            request.setAttribute("file",file);
            request.setAttribute("List", L);
            request.setAttribute("line", line);
            request.setAttribute("count", count);
            request.setAttribute("startTime", startTime);
            if (line == L.size()) {
                request.getRequestDispatcher("complete.jsp").forward(request, response);
            } else request.getRequestDispatcher("answerQuestions.jsp").forward(request, response);
        } catch (Exception e) {
            response.sendRedirect("message.jsp");

        }

    }

    protected void doGet(HttpServletRequest request, HttpServletResponse response) throws ServletException, IOException {
        doPost(request, response);
    }
}
五、计算模块接口部分的性能改进。记录在改进计算模块性能上所花费的时间,描述你改进的思路,并展示一张性能分析图,并展示你程序中消耗最大的函数。


六、计算模块部分单元测试展示。展示出项目部分单元测试代码,并说明测试的函数,构造测试数据的思路。并将单元测试得到的测试覆盖率截图,发表在博客中。只需要测试命令行部分,且该部分覆盖率到90%以上,否则单元测试部分视作无效。


七、计算模块部分异常处理说明。在博客中详细介绍每种异常的设计目标。每种异常都要选择一个单元测试样例发布在博客中,并指明错误对应的场景。
我们制作的是web端四则运算器,在网页的输入中,我们使用前端的js,对于不合法的参数输入,不予通过,使得后端接收到的值都是合法的参数。
具体代码如下:answerQuestions.jsp
 1 <script type="text/javascript"
 2 src="js/bootstrap.js"></script>
 3
 4     <script type="text/javascript" src="js/jquery-1.10.2.min.js"></script>
 5     <script type="text/javascript" src="js/bootstrap.min.js"></script>
 6     <script type="text/javascript" src="js/bootstrapValidator.js"></script>
 7     <script type="text/javascript"
 8             src="js/bootstrap.min.js"></script>
 9     <link href="//cdn.bootcss.com/bootstrap-validator/0.5.3/css/bootstrapValidator.min.css" rel="stylesheet">
10     <script src="//cdn.bootcss.com/bootstrap-validator/0.5.3/js/bootstrapValidator.min.js"></script>
<center>
    <h1 style="font-family:华文新魏;font-size:5em">WELCOME</h1>
    <div class="container-fluid">
        <div class="row-fluid">
            <div class="span12">
                <form class="form-horizontal" role="form"
                      id="defaultForm"
                      onsubmit="return tishi(this)"
                      action="Print" method="get">

                    <div class="form-group">
                        <label class="col-sm-5 control-label">最小值 :</label>
                        <div class="col-sm-2">
                            <input type="text" class="form-control"  placeholder="范围 :1~100" name="min">
                        </div>
                    </div>
                    <div class="form-group">
                        <label class="col-sm-5 control-label">最大值 :</label>
                        <div class="col-sm-2">
                            <input type="text" class="form-control" id="" placeholder="范围 :50~1000" name="max">
                        </div>
                    </div>
                    <div class="form-group">
                        <label class="col-sm-5 control-label">题目数量 :</label>
                        <div class="col-sm-2">
                            <input type="text" class="form-control" id="" placeholder="范围 :1~10000" name="n">
                        </div>
                    </div>
                    <div class="form-group">
                        <label class="col-sm-5 control-label">操作符最大个数:</label>
                        <div class="col-sm-2">
                            <input type="text" class="form-control" id="" placeholder="范围 :1~10" name="o">
                        </div>
                    </div>

                    <div class="form-group">
                        <div class="col-sm-offset-2 col-sm-6">
                            <div class="checkbox">
                                <label>
                                    <input type="checkbox" name="c">是否乘除
                                </label>
                            </div>
                            <div class="checkbox">
                                <label>
                                    <input type="checkbox" name="b">是否有小括号
                                </label>
                            </div>
                        </div>
                    </div>
                    <div class="form-group">
                        <div class="col-sm-offset-2 col-sm-10">
                            <button type="submit" class="btn btn-default" id="">出题</button>
                        </div>
                    </div>
                </form>
                <a href="index.jsp">返回</a>


</div>
</div>
</div>
</center>
 1 <script type="text/javascript">
 2     $(document).ready(function() {
 3         // Generate a simple captcha
 4         function randomNumber(min, max) {
 5             return Math.floor(Math.random() * (max - min + 1) + min);
 6         };
 7         $('#captchaOperation').html([randomNumber(1, 100), '+', randomNumber(1, 200), '='].join(' '));
 8
 9         $('#defaultForm').bootstrapValidator({
10 //        live: 'disabled',
11             message: 'This value is not valid',
12             feedbackIcons: {
13                 valid: 'glyphicon glyphicon-ok',
14                 invalid: 'glyphicon glyphicon-remove',
15                 validating: 'glyphicon glyphicon-refresh'
16             },
17             fields: {
18                 min: {
19                     validators: {
20                         notEmpty: {
21                             message: '请输入1-100之间的数'
22                         },stringLength: {
23                             min: 1,
24                             max: 3,
25                             message: '请输入1-100之间的数'
26                         },
27                     }
28                 },
29                 max: {
30                     validators: {
31
32                         notEmpty: {
33                             message: '请输入50-1000之间的数'
34                         },
35                         stringLength: {
36                             min: 1,
37                             max: 4,
38                             message: '请输入50-1000之间的数'
39                         },
40                     }
41                 },
42                 n: {
43
44                     validators: {
45                         notEmpty: {
46                             message: '请输入1-10000之间的数'
47                         },
48                         stringLength: {
49                             min: 1,
50                             max: 5,
51                             message: '请输入1-10000之间的数'
52                         },
53                         regexp: {
54                             regexp: /^[0-9]/,
55                             message: '请输入数字'
56                         },
57
58                     }
59                 },
60                 o: {
61                     validators: {
62                         notEmpty: {
63                             message: '请输入1-10之间的数'
64                         },stringLength: {
65                             min: 1,
66                             max: 2,
67                             message: '请输入1-10之间的数'
68                         },
69                     }
70                 }
71             }
72         });
73
74      // Validate the form manually
75        $('#validateBtn').click(function() {
76             $('#defaultForm').bootstrapValidator('validate');
77         });
78
79
80      $('#resetBtn').click(function() {
81          $('#defaultForm').data('bootstrapValidator').resetForm(true);
82     });
83      });
84
85
86 </script>
八、界面模块的详细设计过程。在博客中详细介绍界面模块是如何设计的,并写一些必要的代码说明解释实现过程。
以下为流程图:

页面不一一列举,在这里举两个地方的内容:
index.jsp
 1   <body>
 2    <center>
 3         <div class="indexbtn">
 4             <h2 id="title">
 5                 WELCOME!
 6             </h2>
 7             <br>
 8             <form action="setQuestions.jsp" method="get">
 9                      <input type="submit" class="btn" value="出题" class="index">
10
11                 </form>
12                 <form action="uploadInterface.jsp" method="get">
13
14                      <input type="submit" class="btn" value="做题" class="index">
15
16                 </form></div>
17     </center>
18   </body>
answeQuestio.jsp
<%
    String path = request.getContextPath();
    String basePath = request.getScheme() + "://"
            + request.getServerName() + ":" + request.getServerPort()
            + path + "/";

%>

<%
    List<InfoBean> L = new ArrayList<InfoBean>();
    L = (List<InfoBean>) request.getAttribute("List");
    String startTime = (String)request.getAttribute("startTime");
    int line = Integer.parseInt(request.getAttribute("line").toString());
    int first = L.get(line).getLine();
    String second = L.get(line).getQuestion();
    int count = Integer.parseInt(request.getAttribute("count").toString());
%>
 1 <center>
 2     <div class="container-fluid">
 3         <div class="row-fluid">
 4             <div class="span12">
 5                 <div class="row-fluid">
 6                     <div class="span2">
 7                     </div>
 8                     <fi class="span8">
 9                         <h1 style="font-family:华文新魏;font-size:5em">WELCOME</h1>
10
11
12                         <!-- 禁用 for="disabledTextInput" -->
13
14                         <form action="Scan" method="get">
15                             <fieldset>
16                                 <input type="text" name="line" value="<%=line %>" style="display: none" id="line">
17                                 <input type="submit" value="<%=L.size()%>" style="display:none" id="size" >
18                                 <input type="text" name="count" value="<%=count%>" style="display:none">
19                                 <li><label>序号:<input type="text" value="<%=first%>" disabled/> </label></li>
20                                 <li><label>题目:<input type="text" value="<%=second%>" disabled/> </label></li>
21                                 <li><label> 答案:<input type="text" name="user_ans" /> </label></li>
22                                 <input type="submit" value="下一题" style="display: block" id="nextOne">
23                                 <input type="text" name="startTime" value="<%=startTime%>" style="display: none">
24                                 <input type="submit"  id="finish" value="完成" style="display:none">
25                             </fieldset>
26                         </form>
27                         <%--<form action="complete.jsp" method="get">--%>
28                             <%--<input type="submit"  id="finish" value="完成" style="display:none">--%>
29                             <%--<input type="text" name="count" value="<%=count%>" style="display:none" >--%>
30                             <%--<li><label> 答案:<input type="text" name="user_ans" style="display:none" id=""/> </label></li>--%>
31                         <%--</form>--%>
32                     </fi>
33                 </div>
34                 <div class="span2">
35                 </div>
36             </div>
37         </div>
38     </div>
39     </div>
40
41     <a href="index.jsp">返回</a>
42 </center>
九、界面模块与计算模块的对接。详细地描述UI模块的设计与两个模块的对接,并在博客中截图实现的功能。
我们整个界面的设计,采用了bootstrap框架,色调以绿色为主基调,加上生动有趣的3D的跟随鼠标JS,使得整个界面简洁大方,生动活泼,绿色护眼。
index.jsp
主界面,可以选择出题还是做题

setQuestions.jsp 出题界面,输入参数,定制题目

利用BootstrapValidate 插件,对输入空值,超过范围等情况进行处理,不能提交表单,并给出对应提示。界面简洁大方又富有友好性。下面是一张不合法输入的效果图:

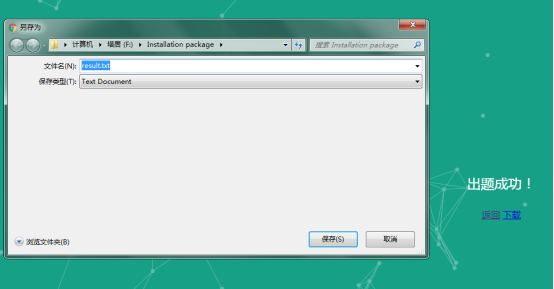
点击出题之后,可以选择浏览器下载出好的题目:

接下去是做题界面
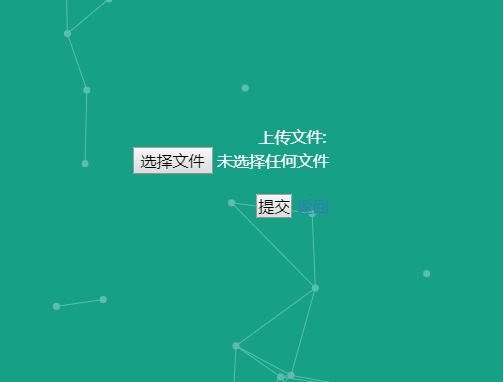
upload.jsp 先从本地上传文件到服务器

服务器接收数据并显示出来:
其中序号框和题目框设置了disablied属性,使得用户不能更改input框里的内容,更加安全。

在答案框输入答案会触发变大效果:


一直点下一题,直到最后一题,则下一题按钮消失,出现完成按钮。点击完成按钮则跳转到最后一个页面。

Finished.jsp 显示答对的题数和总共用的时间:

十、描述结对的过程,提供非摆拍的两人在讨论的结对照片。

十一、结对编程的优缺点和结对成员的优缺点
结对编程:
优点:
- 两个人思维互补,互相讨论,有助于解决问题。
- 在有另一个人在场的情况下,给了编码者一定的压力,使得效率更高,互相监督,互相促进。
- 增强代码的可靠性,增强代码和产品质量,减少bug。
缺点:需要互相配合时间,习惯。
我:
优点:
- 思路清晰,规划项目
- 认真细致,遇到问题,耐心调试
- 有写注释的好习惯,代码可读性强
缺点:编码速度慢
我的搭档:
优点:
- 帅
- 代码逻辑强,善于优化代码
- 代码规范便于阅读
- 态度认真积极
缺点:
- 太高
- 太帅
- 太优秀
十二、在你实现完程序之后,在附录提供的PSP表格记录下你在程序的各个模块上实际花费的时间。
PSP
|
PSP |
任务内容 |
计划共完成需要的时间(min) |
实际完成需要的时间(min) |
|
Planning |
计划 |
10 |
15 |
|
Estimate |
估计这个任务需要多少时间,并规划大致工作步骤 |
5 |
30 |
|
Development |
开发 |
5*60 |
3*60 |
|
Analysis |
需求分析 (包括学习新技术) |
10*60 |
10*60 |
|
Design Spec |
生成设计文档 |
1*60 |
1*60 |
|
Design Review |
设计复审 (和同事审核设计文档) |
20 |
30 |
|
Coding Standard |
代码规范 (为目前的开发制定合适的规范) |
10 |
15 |
|
Design |
具体设计 |
30 |
1*60 |
|
Coding |
具体编码 |
20*60 |
24*60 |
|
Code Review |
代码复审 |
3*60 |
5*60 |
|
Test |
测试(自我测试,修改代码,提交修改) |
5*60 |
2*60 |
|
Reporting |
报告 |
2*60 |
1*60 |
|
Test Report |
测试报告 |
3*60 |
1*60 |
|
Size Measurement |
计算工作量 |
20 |
20 |
|
Postmortem & Process Improvement Plan |
事后总结, 并提出过程改进计划 |
30 |
30 |


