idea比较好用的断点调试方法
断点处打印日志
断点处可以打印一些变量日志,方便后面查看当时断点处的变量值,以免debug到后面去了忘了前面的值。另外,不用写在代码中,省去了万一忘记删除日志的麻烦。
代码:
    public static void main(String[] args) {
        ThreadLocalRandom localRandom = ThreadLocalRandom.current();
        int count = 0;
        for (int i = 0; i < 5; i++) {
            if(isInterested(localRandom.nextInt(100))){
                count++;
            }
        }
    }

    private static boolean isInterested(int i){
        return i % 2 == 0;
    }
打个断点,鼠标右键这个断点,点击More(Ctrl+Shift+F8),

打印日志效果
isInterested:57
isInterested:12
isInterested:16
isInterested:50
isInterested:93
显示具体哪一行
Breakpoint reached at com.fangqiang.anothertest.testttt.test.Test04.isInterested(Test04.java:26)
isInterested:49
Breakpoint reached at com.fangqiang.anothertest.testttt.test.Test04.isInterested(Test04.java:26)
isInterested:25
Breakpoint reached at com.fangqiang.anothertest.testttt.test.Test04.isInterested(Test04.java:26)
isInterested:8
Breakpoint reached at com.fangqiang.anothertest.testttt.test.Test04.isInterested(Test04.java:26)
isInterested:66
Breakpoint reached at com.fangqiang.anothertest.testttt.test.Test04.isInterested(Test04.java:26)
isInterested:9
完整堆栈
Breakpoint reached at com.fangqiang.anothertest.testttt.test.Test04.isInterested(Test04.java:26)
Breakpoint reached
	  at com.fangqiang.anothertest.testttt.test.Test04.isInterested(Test04.java:26)
	  at com.fangqiang.anothertest.testttt.test.Test04.main(Test04.java:19)
isInterested:84
Breakpoint reached at com.fangqiang.anothertest.testttt.test.Test04.isInterested(Test04.java:26)
Breakpoint reached
	  at com.fangqiang.anothertest.testttt.test.Test04.isInterested(Test04.java:26)
	  at com.fangqiang.anothertest.testttt.test.Test04.main(Test04.java:19)
isInterested:89
字段断点
可用于定位某个字段在何时被赋值,何时被赋成这个值,在源码阅读时,经常搞不懂这个变量的值从哪里来的,这个断点可以很好解决这个问题
给测试类加上name,age属性
private String name;
private Integer age;

//测试代码
Test04 test04 = new Test04();
test04.setName("888");
test04.setName("444");
test04.setName("555");
test04.setName("哈哈哈");
test04.setName("999");
test04.getName();
还是一样的操作,此时断点变成了红色眼睛。
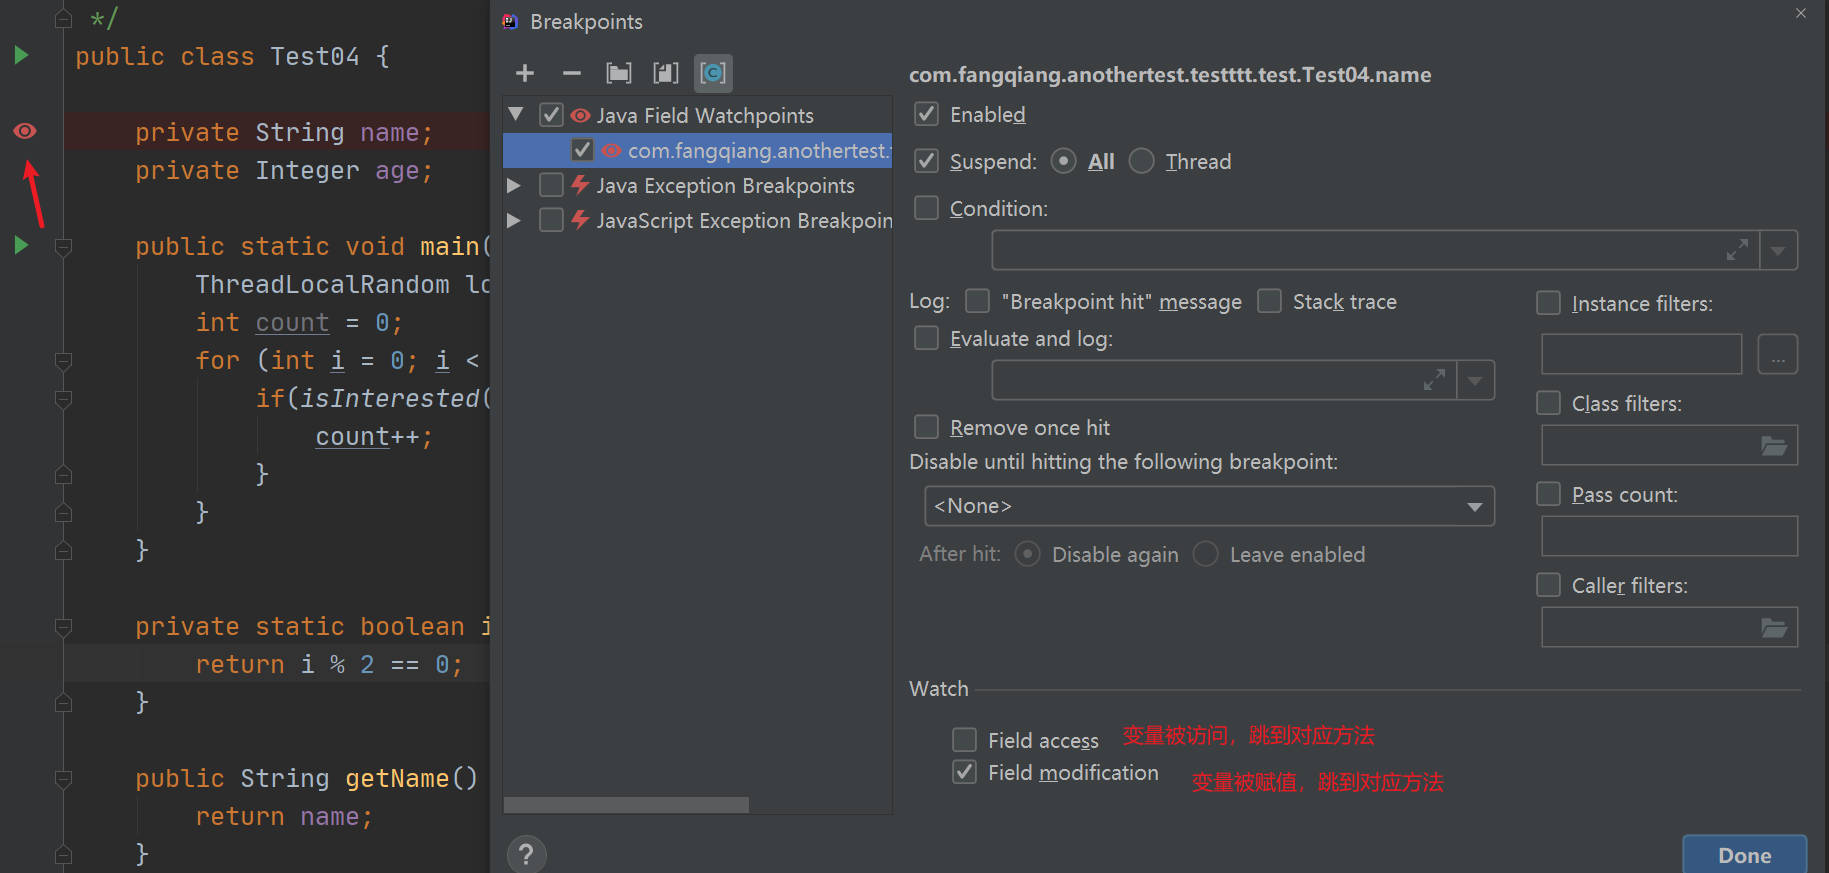
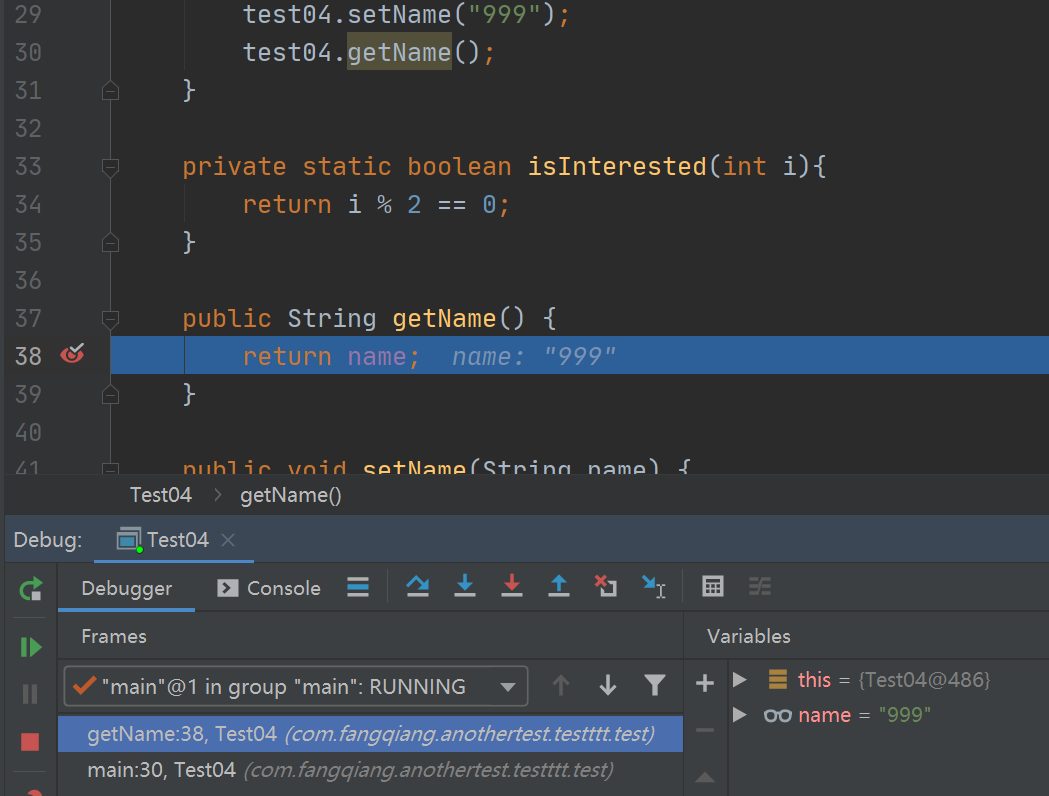
看看勾选Field access效果。跳到getName方法处
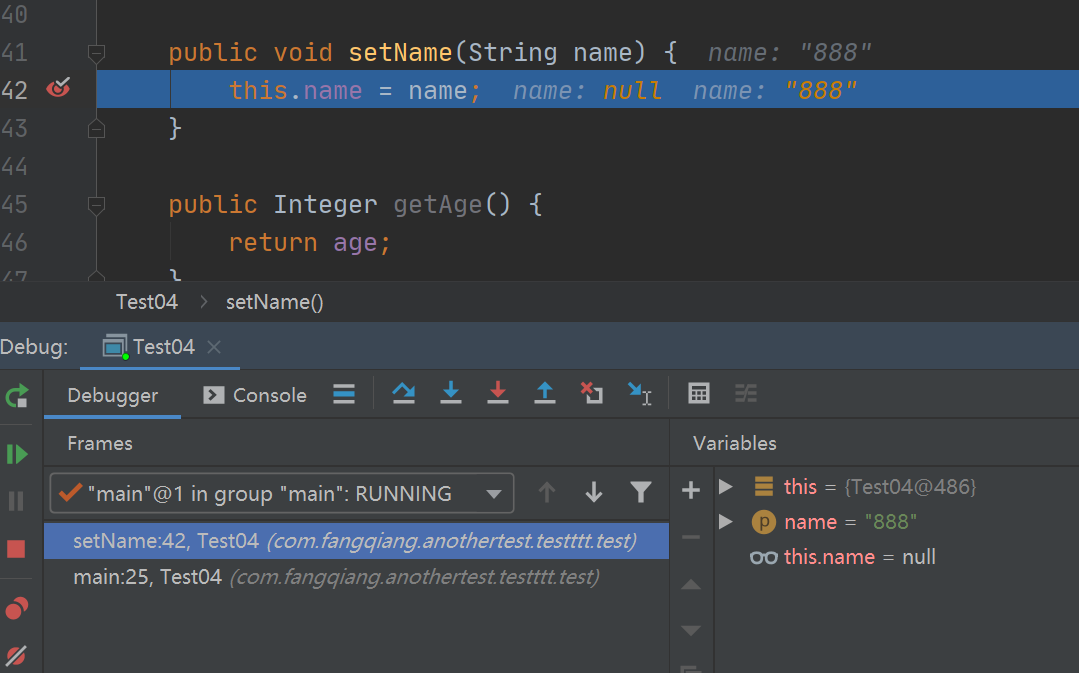
勾选Field modification效果。跳到第一个调用setName处,后面每次setName都会经过这个断点
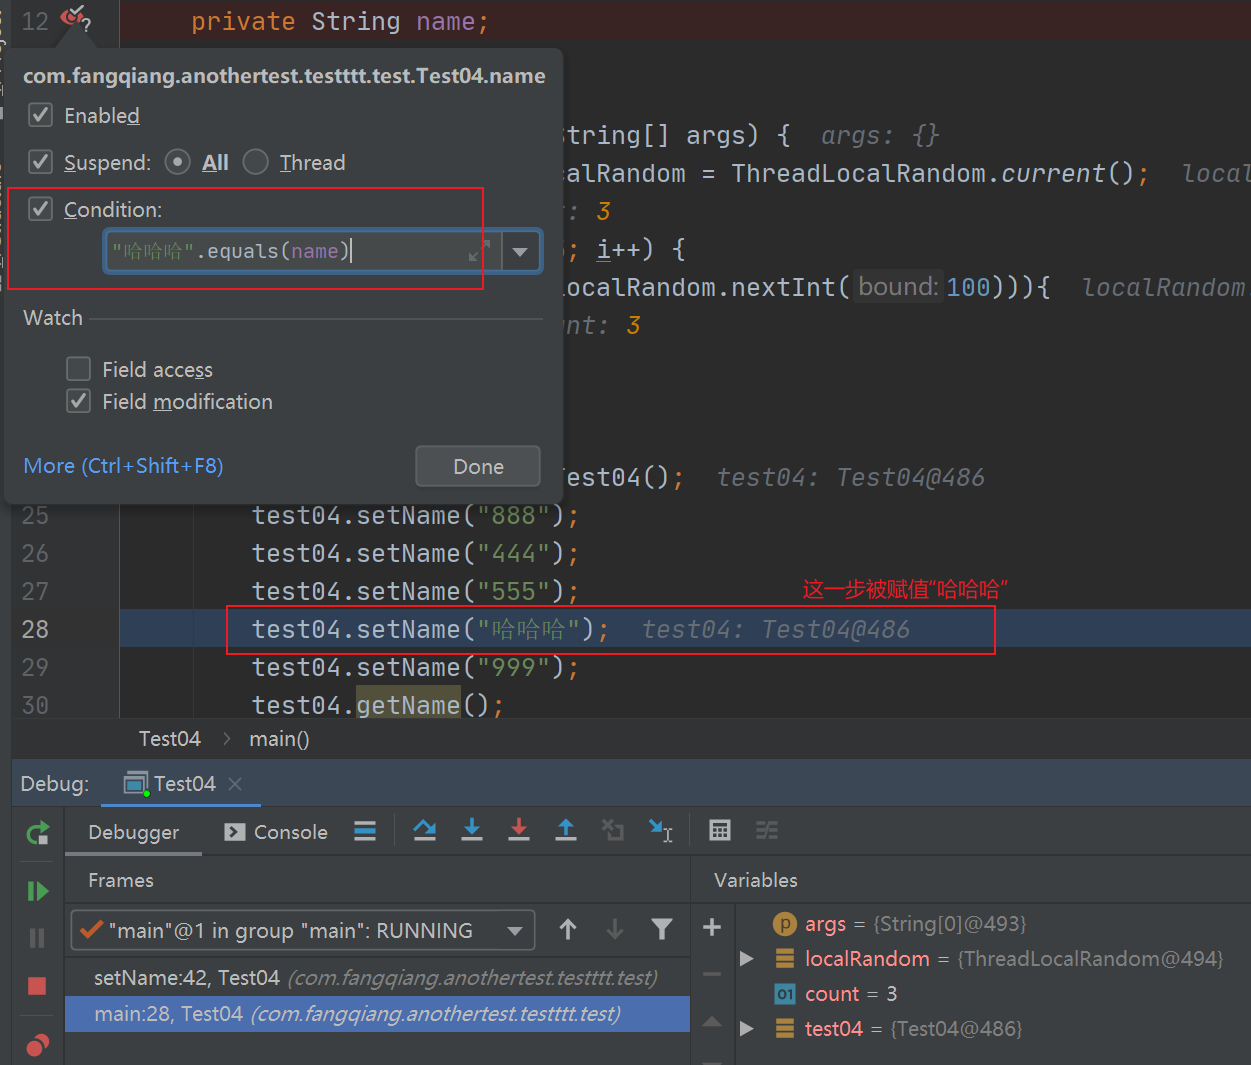
也可以加上条件判断,这个变量啥时候被赋成这个值的,勾选Condition,填写表达式
异常断点
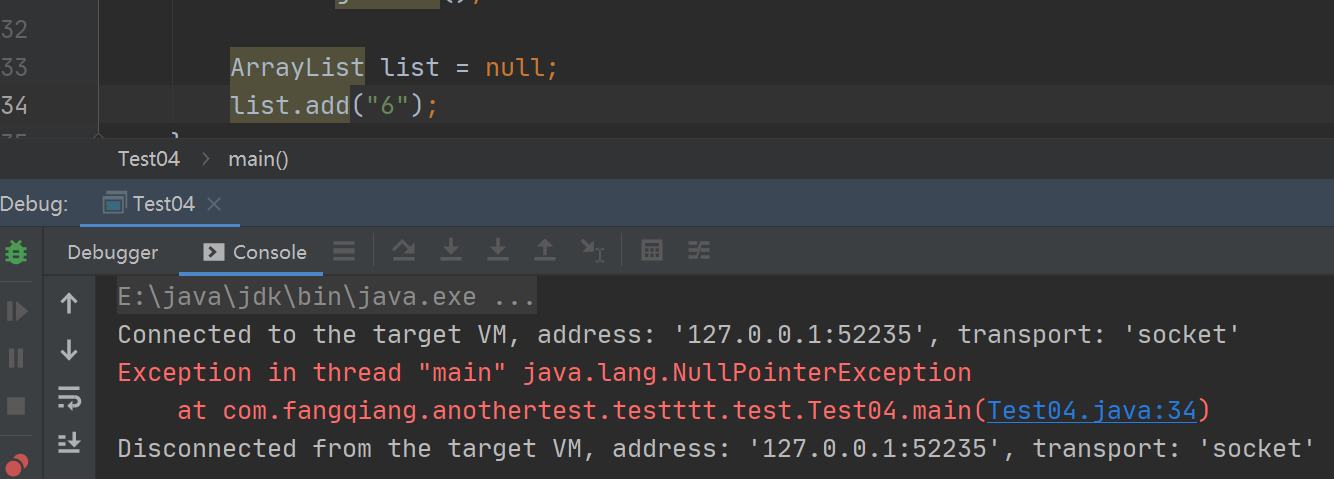
代码报错抛出异常了,知道是啥类型异常,希望在抛异常之前,看看数据是什么样的,为啥异常了,就可以使用这种方法,比如最常见的空指针异常
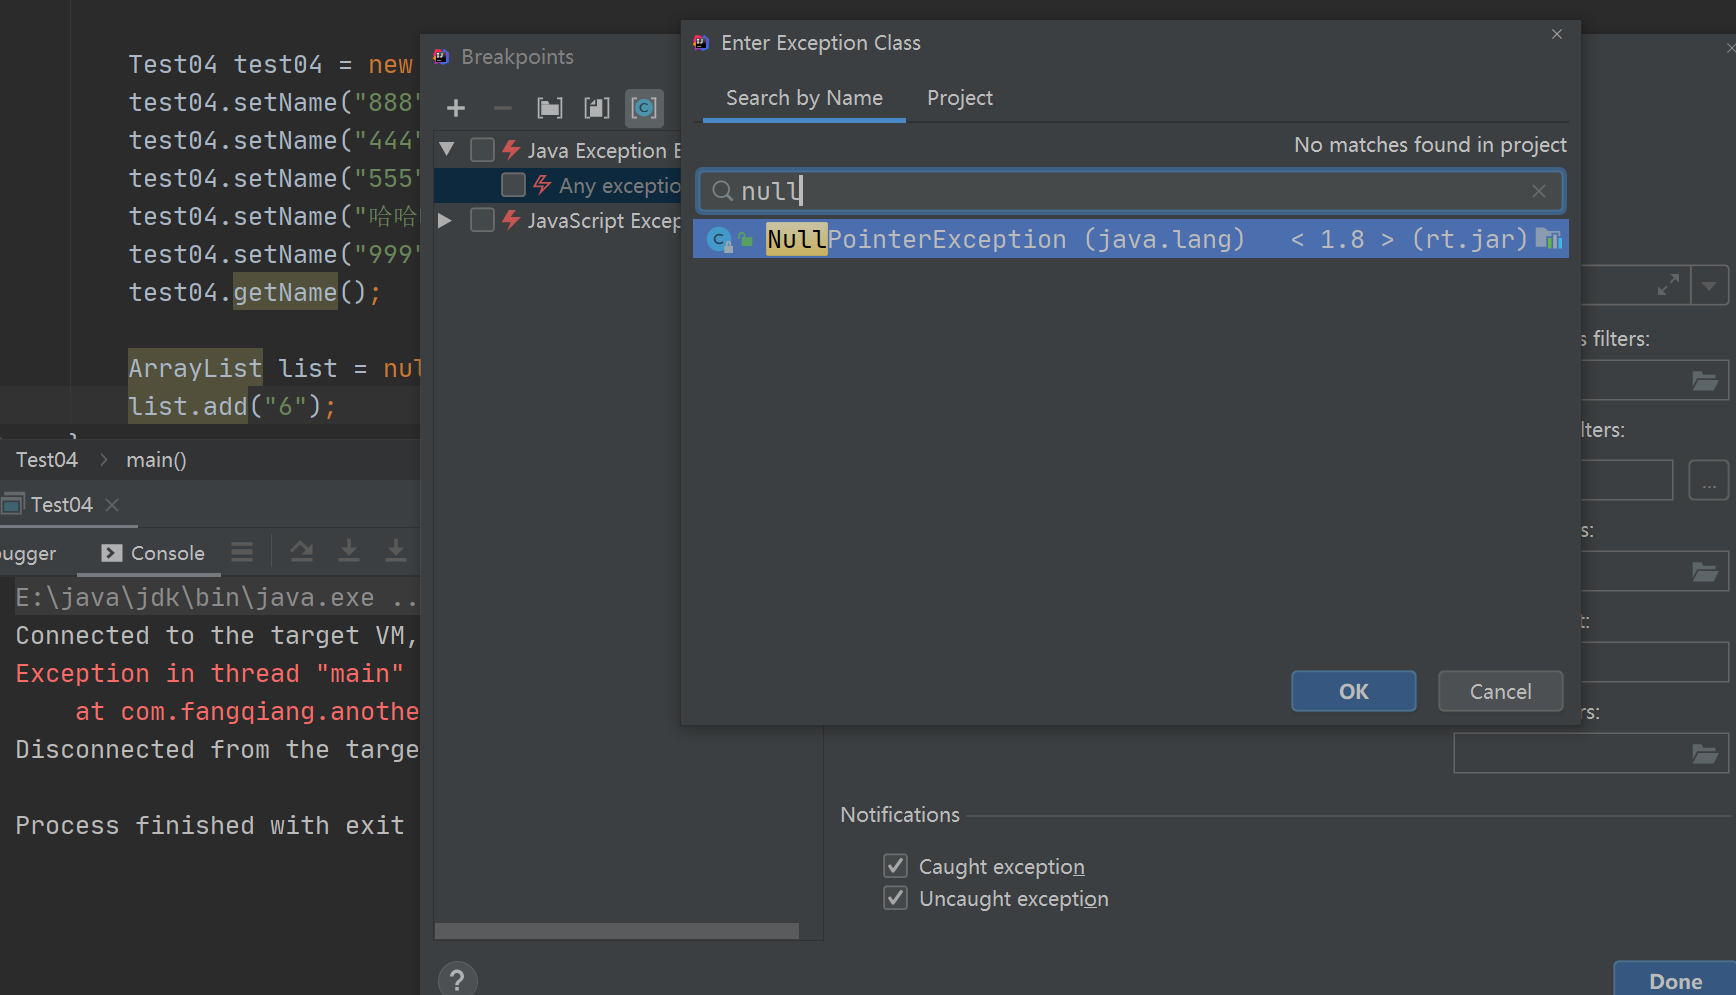
我们打个断点,点击左下角两个叠加的红色圆圈,可以查看所有断点,然后点击加号,出现5中类型断点,选择第三个Java Exception Breakpoints,选择空指针异常
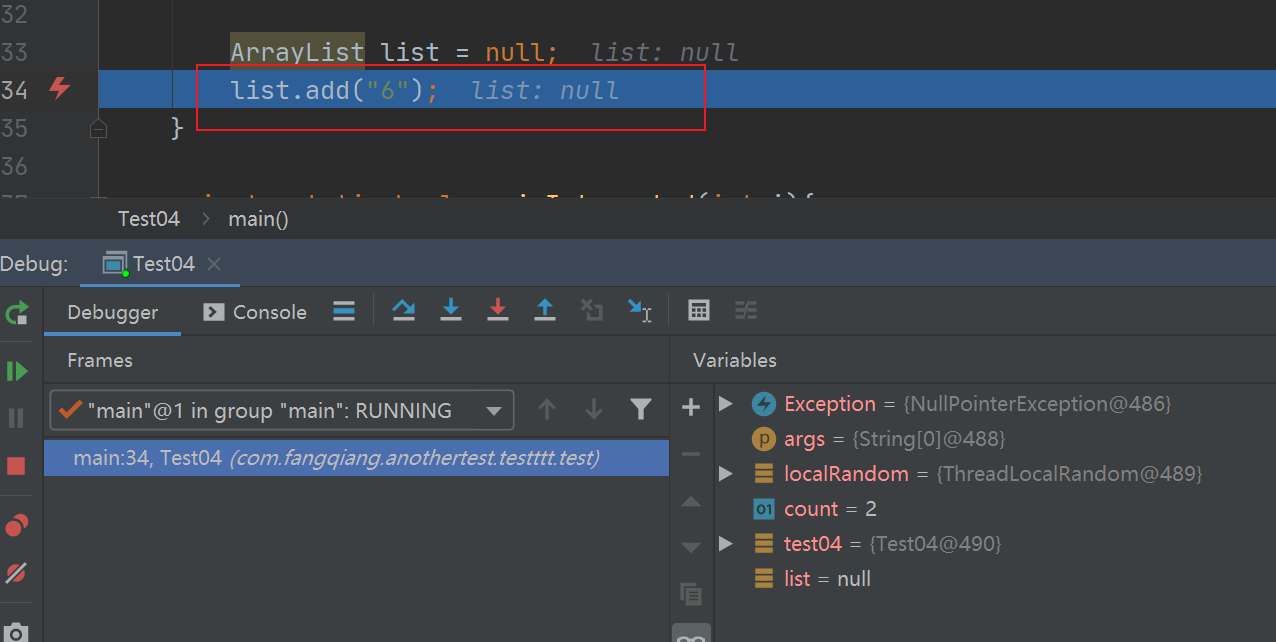
打好断点后,再次debug,再发生异常前,会停留在即将发生异常的那行代码上
方法断点
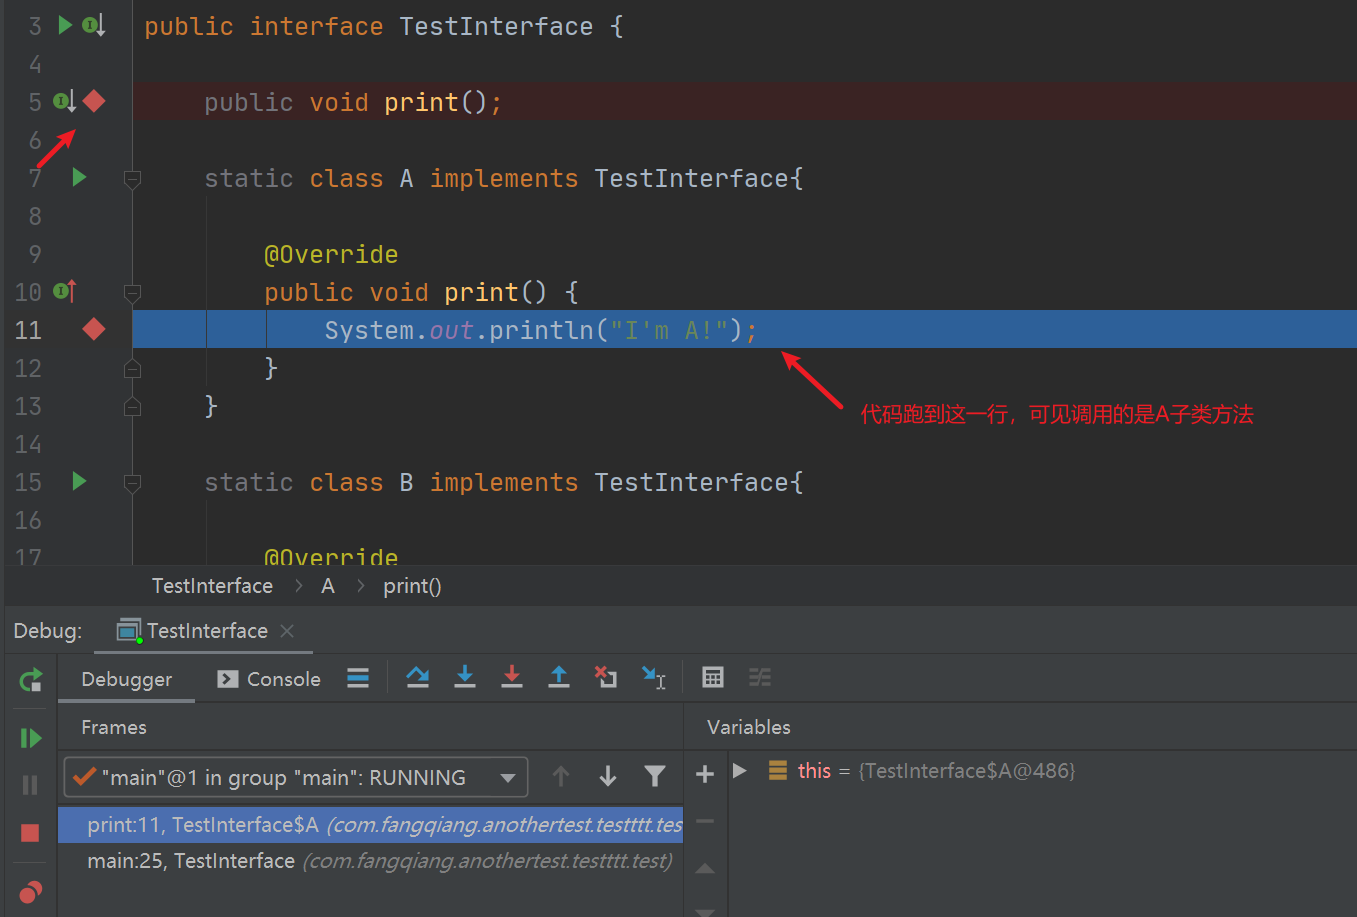
当一个接口的实现类特别多,比如spring里面比比皆是,变量类型为接口,实际调用时,可以通过强制进入方法内可以看进入哪个子类,也可采用接口方法打断点方式来选择走到哪个子类
上代码,一个接口,两个子类。测试方法中使用接口类型的变量调用print方法。
在接口的print()方法打断点,是红色方块形的断点,然后运行
public interface TestInterface {

    public void print();

    static class A implements TestInterface{

        @Override
        public void print() {
            System.out.println("I'm A!");
        }
    }

    static class B implements TestInterface{

        @Override
        public void print() {
            System.out.println("I'm B!");
        }
    }

    public static void main(String[] args) {
        TestInterface testInterface = new A();
        testInterface.print();
    }
}
Stream流的debug
Java8加入了Stream流特性,把集合的操作变简单了,同时可读性也降低了。一阵链式操作,行云流水,却把人搞得丈二和尚摸不着头脑,啥玩意
idea也提供了一个很方便的功能,那就是Trace Current Stream Chain
上代码
public class Test03 {

    public static void main(String[] args) {
        List<Integer> list = new ArrayList<>();
        list.add(1);
        list.add(2);
        list.add(3);
        list.add(4);
        list.add(5);
        list.add(6);
        list.stream().filter(i -> i % 2 == 0).count();

        List<Optional<Person>> persons = Arrays.asList(
                Optional.of(new Person("方大大", 18)),
                Optional.of(new Person("六打打", 17)),
                Optional.of(new Person("李大大", 16)),
                Optional.empty(),
                Optional.of(new Person("喜大大", 15)),
                Optional.of(new Person("乐大大", 14)),
                Optional.of(new Person("克大大", 13))

        );

        long num = persons.stream().flatMap(c -> c.map(Stream::of).orElse(Stream.empty()))
                .filter(c -> c.getAge() > 15).count();
    }

    public static class Person {
        private String name;
        private Integer age;

        public Person(String name, Integer age) {
            this.name = name;
            this.age = age;
        }

        public String getName() {
            return name;
        }

        public void setName(String name) {
            this.name = name;
        }

        public Integer getAge() {
            return age;
        }

        public void setAge(Integer age) {
            this.age = age;
        }
    }
}
打个断点,运行,点击红框中的按钮
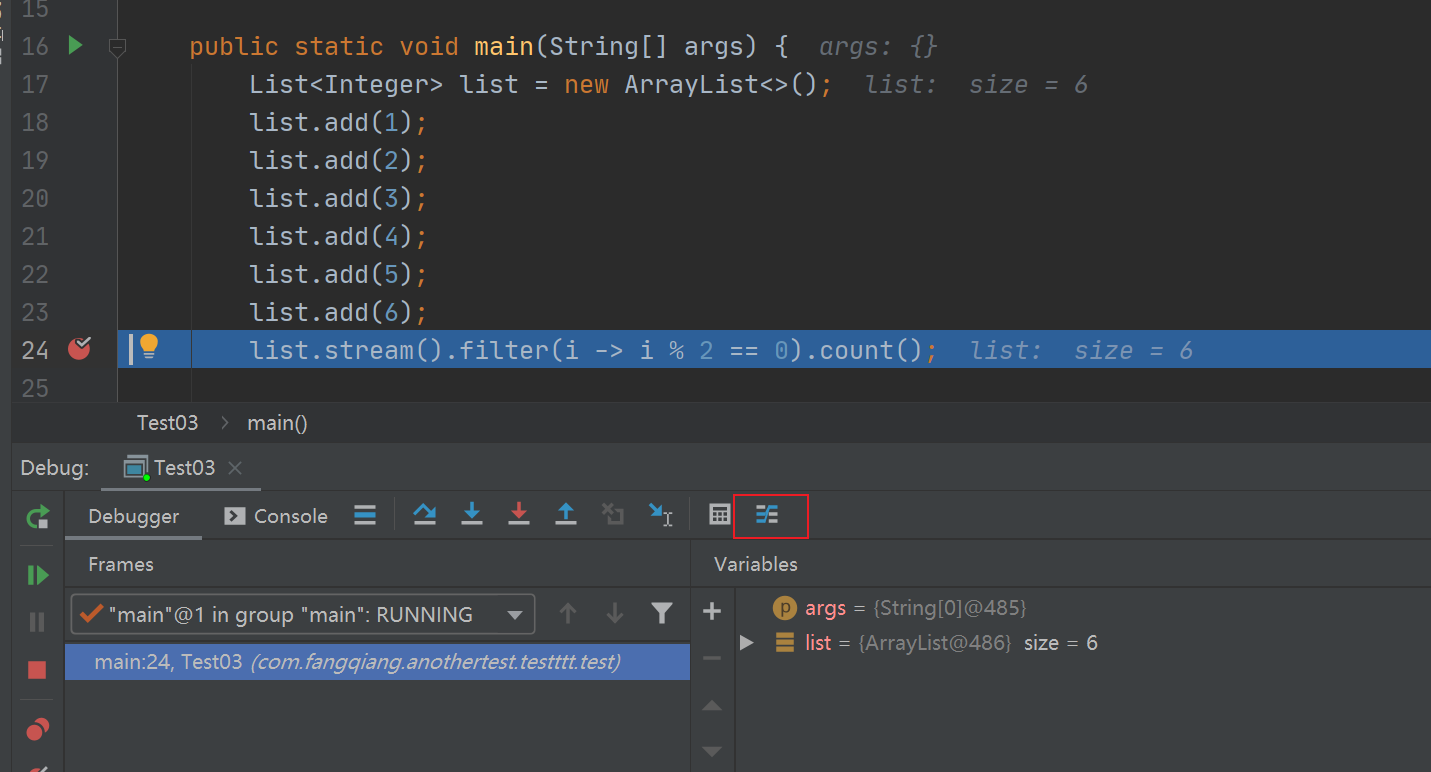
点击后效果如下
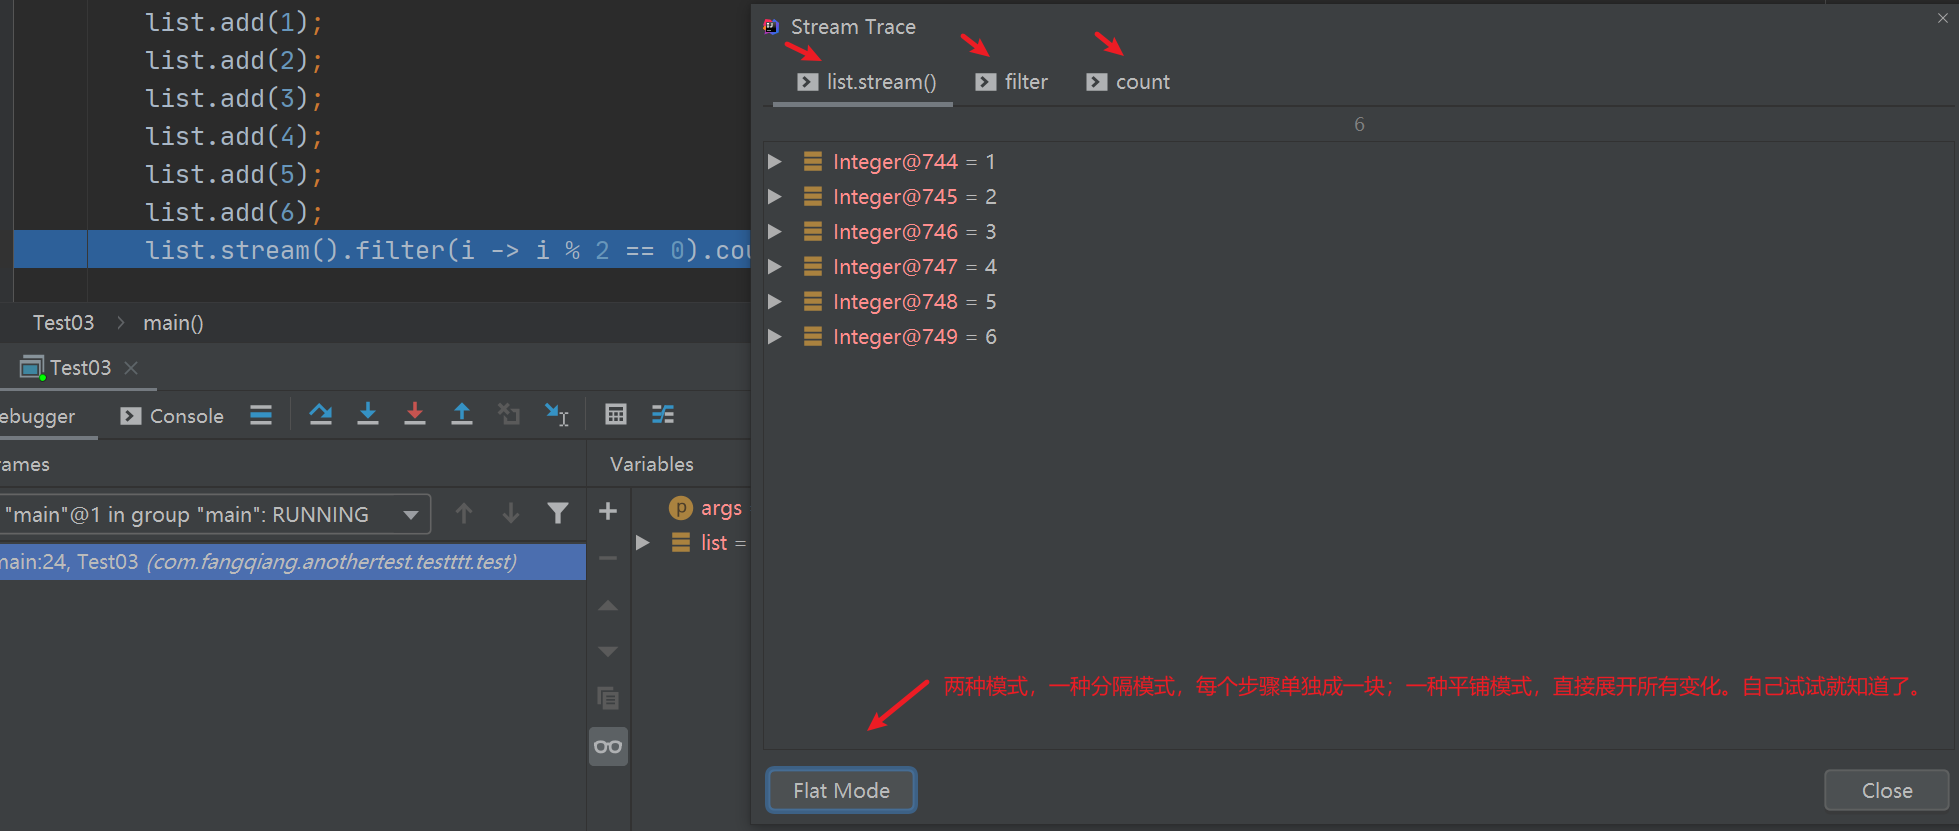
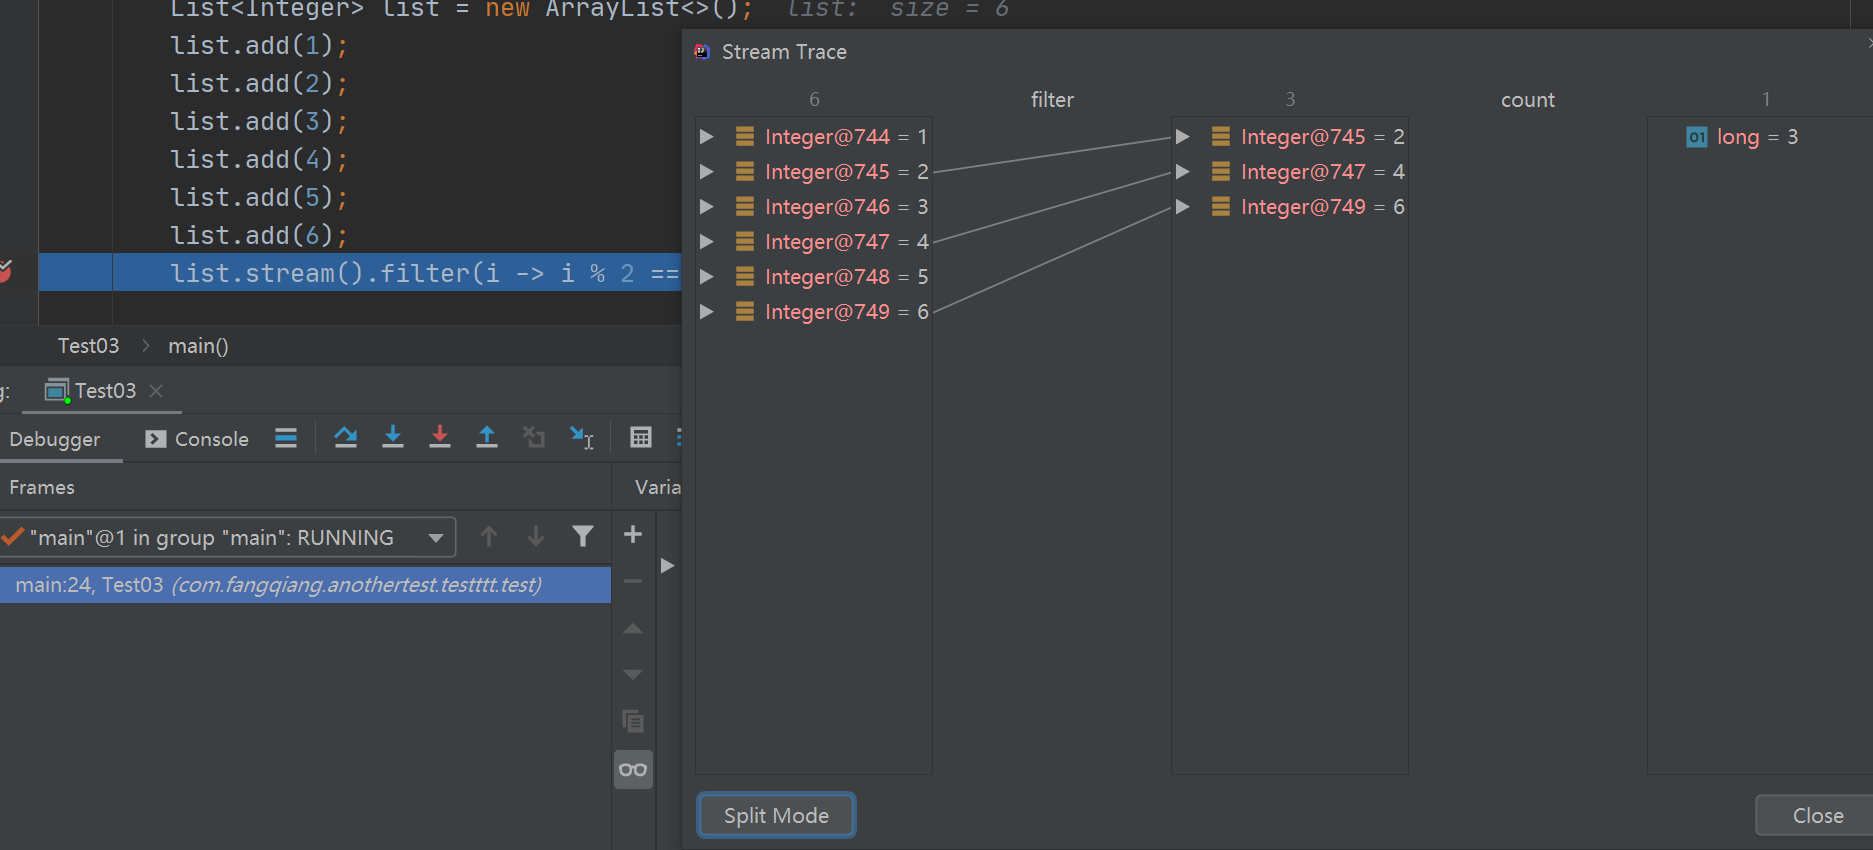
两种模式,点击Mode按钮就可以切换。很清晰展现出stream每一步操作后数据是怎么变化的。先开始数据6个,过滤偶数还剩3个,最后count就是3。上面代码后面还有个例子,也可以试试。

 浙公网安备 33010602011771号