Netty入门使用教程
原创:转载需注明原创地址 https://www.cnblogs.com/fanerwei222/p/11827026.html
本文介绍Netty的使用, 结合我本人的一些理解和操作来快速的让初学者入门Netty, 理论知识会有, 但是不会太深入, 够用即可, 仅供入门! 需要想详细的知识可以移步Netty官网查看官方文档!
理论知识 : Netty提供异步的、事件驱动的网络应用程序框架和工具,用以快速开发高性能、高可靠性的网络服务器和客户端程序
当然, 我们这里主要是用Netty来发送消息, 接收消息, 测试一下demo, 更厉害的功能后面再慢慢发掘, 我们先看看这玩意怎么玩, 后面再深入
需要工具和Java类:
netty-4.1.43
netty服务器类 SayHelloServer.java
netty服务端处理器类 SayHelloServerHandler.java
netty客户端类 SayHelloClient.java
netty客户端处理器类 SayHelloClientHandler.java
服务器main方法测试类 MainNettyServer.java
客户端main方法测试类 MainNettyClient.java
首先先来一张演示图, 最下面也会放:
我们看完以下部分就能实现这个东西了!
话不多说, 先贴代码:
package netty.server;

import io.netty.bootstrap.ServerBootstrap;
import io.netty.channel.ChannelFuture;
import io.netty.channel.ChannelInitializer;
import io.netty.channel.ChannelOption;
import io.netty.channel.EventLoopGroup;
import io.netty.channel.nio.NioEventLoopGroup;
import io.netty.channel.socket.SocketChannel;
import io.netty.channel.socket.nio.NioServerSocketChannel;
import netty.handler.SayHelloServerHandler;

/**
 * sayhello 服务器
 */
public class SayHelloServer {

    /**
     * 端口
     */
    private int port ;

    public SayHelloServer(int port){
        this.port = port;
    }

    public void run() throws Exception{
        /**
         * Netty 负责装领导的事件处理线程池
         */
        EventLoopGroup leader = new NioEventLoopGroup();
        /**
         * Netty 负责装码农的事件处理线程池
         */
        EventLoopGroup coder = new NioEventLoopGroup();
        try {
            /**
             * 服务端启动引导器
             */
            ServerBootstrap server = new ServerBootstrap();

            server
                    .group(leader, coder)//把事件处理线程池添加进启动引导器
                    .channel(NioServerSocketChannel.class)//设置通道的建立方式,这里采用Nio的通道方式来建立请求连接
                    .childHandler(new ChannelInitializer<SocketChannel>() {
                        //构造一个由通道处理器构成的通道管道流水线
                        @Override
                        protected void initChannel(SocketChannel socketChannel) throws Exception {
                            /**
                             * 此处添加服务端的通道处理器
                             */
                            socketChannel.pipeline().addLast(new SayHelloServerHandler());
                        }
                    })
                    /**
                     * 用来配置一些channel的参数,配置的参数会被ChannelConfig使用
                     * BACKLOG用于构造服务端套接字ServerSocket对象,
                     * 标识当服务器请求处理线程全满时,
                     * 用于临时存放已完成三次握手的请求的队列的最大长度。
                     * 如果未设置或所设置的值小于1,Java将使用默认值50
                     */
                    .option(ChannelOption.SO_BACKLOG, 128)
                    /**
                     * 是否启用心跳保活机制。在双方TCP套接字建立连接后(即都进入ESTABLISHED状态)
                     * 并且在两个小时左右上层没有任何数据传输的情况下,这套机制才会被激活。
                     */
                    .childOption(ChannelOption.SO_KEEPALIVE, true);
            /**
             * 服务端绑定端口并且开始接收进来的连接请求
             */
            ChannelFuture channelFuture = server.bind(port).sync();
            /**
             * 查看一下操作是不是成功结束了
             */
            if (channelFuture.isSuccess()){
                //如果没有成功结束就处理一些事情,结束了就执行关闭服务端等操作
                System.out.println("服务端启动成功!");
            }
            /**
             * 关闭服务端
             */
            channelFuture.channel().closeFuture().sync();
            System.out.println("服务端即将关闭!");
        } finally {
            /**
             * 关闭事件处理组
             */
            leader.shutdownGracefully();
            coder.shutdownGracefully();
            System.out.println("服务端已关闭!");
        }

    }
}
package netty.handler;

import io.netty.buffer.ByteBuf;
import io.netty.buffer.Unpooled;
import io.netty.channel.ChannelHandlerContext;
import io.netty.channel.ChannelInboundHandlerAdapter;
import io.netty.util.CharsetUtil;

/**
 * 服务端入站处理器适配器的继承类
 * 用来处理服务端的一些事情
 * 根据需要来实现一些方法
 */
public class SayHelloServerHandler extends ChannelInboundHandlerAdapter {

    @Override
    public void channelRead(ChannelHandlerContext ctx, Object msg) throws Exception {
        ByteBuf buf = (ByteBuf) msg;
        System.out.println("直接打印服务端需要处理的信息: " + buf.toString(CharsetUtil.UTF_8));
        ByteBuf res = Unpooled.wrappedBuffer(new String("塔台收到!塔台收到!信息如下, 请确认 " + buf.toString(CharsetUtil.UTF_8)).getBytes());
        /**
         * 给客户端回复消息
         */
        ctx.writeAndFlush(res);
    }

    /**
     * 连接成功后,自动执行该方法
     * @param ctx
     * @throws Exception
     */
    @Override
    public void channelActive(ChannelHandlerContext ctx) throws Exception {
        System.out.println("服务器首次处理!");
        /**
         * 这种发送的消息格式是错误的!!!!!
         * 消息格式必须是ByteBuf才行!!!!!
         */
        ctx.writeAndFlush("Hello is server !");
    }

    @Override
    public void exceptionCaught(ChannelHandlerContext ctx, Throwable cause) throws Exception {
        super.exceptionCaught(ctx, cause);
        /**
         * 异常捕获
         */
        cause.printStackTrace();
        ctx.close();
    }
}
package netty.client;

import io.netty.bootstrap.Bootstrap;
import io.netty.channel.*;
import io.netty.channel.nio.NioEventLoopGroup;
import io.netty.channel.socket.SocketChannel;
import io.netty.channel.socket.nio.NioSocketChannel;
import netty.handler.SayHelloClientHandler;

/**
 * sayhello 客户端
 */
public class SayHelloClient {

    private int port;
    private String host = "127.0.0.1";
    private Channel channel;

    public SayHelloClient(int port){
        this.port = port;
    }

    /**
     * 客户端运行方法
     * @throws InterruptedException
     */
    public void run() throws InterruptedException {
        /**
         * 负责装客户端的事件处理线程池
         */
        EventLoopGroup clientWorker = new NioEventLoopGroup();
        try {
            /**
             * netty客户端引导启动器
             */
            Bootstrap bootstrap = new Bootstrap();
            bootstrap
                    .group(clientWorker)//把事件处理线程池添加进启动引导器
                    .channel(NioSocketChannel.class)//设置通道的建立方式,这里采用Nio的通道方式来建立请求连接
                    //.option(ChannelOption.SO_KEEPALIVE, true)
                    .handler(new ChannelInitializer<SocketChannel>() {
                        @Override
                        protected void initChannel(SocketChannel socketChannel) throws Exception {
                            /**
                             * 此处添加客户端的通道处理器
                             */
                            socketChannel.pipeline().addLast(new SayHelloClientHandler());
                        }
                    });
            /**
             * 客户端绑定端口并且开始发起连接请求
             */
            ChannelFuture future = bootstrap.connect(host, port).sync();
            if (future.isSuccess()){
                System.out.println("客户端连接服务器成功!");
            }
            /**
             * 将通道设置好, 以便外面获取
             */
            this.channel = future.channel();
            /**
             * 关闭客户端
             */
            future.channel().closeFuture().sync();
            System.out.println("客户端即将关闭!");
        } finally {
            /**
             * 关闭事件处理组
             */
            clientWorker.shutdownGracefully();
            System.out.println("客户端已关闭!");
        }
    }

    public Channel getChannel(){
        return this.channel;
    }
}
package netty.handler;

import io.netty.buffer.ByteBuf;
import io.netty.buffer.Unpooled;
import io.netty.channel.ChannelHandlerContext;
import io.netty.channel.ChannelInboundHandlerAdapter;

import java.nio.charset.Charset;
import java.util.Date;

/**
 * sayhello 客户端处理器
 */
public class SayHelloClientHandler extends ChannelInboundHandlerAdapter {

    /**
     * 通道信息读取处理
     * @param ctx
     * @param msg
     */
    @Override
    public void channelRead(ChannelHandlerContext ctx, Object msg) {
        ByteBuf m = (ByteBuf) msg; // 将消息转化成bytebuf
        try {
            System.out.println("客户端直接打印接收到的消息: " + m.toString(Charset.defaultCharset()));
            long currentTimeMillis = (m.readUnsignedInt() - 2208988800L) * 1000L;
            System.out.println(new Date(currentTimeMillis));
            /**
             * 给服务端回复消息
             */
            ctx.writeAndFlush("客户端收到! 消息为: " + m.toString(Charset.defaultCharset()));
        } finally {
            m.release();
        }
    }

    /**
     * 连接成功后,自动执行该方法
     * @param ctx
     * @throws Exception
     */
    @Override
    public void channelActive(ChannelHandlerContext ctx) throws Exception {
        /**
         * 往服务端发送消息
         * 消息格式必须是ByteBuf才行!!!!!
         * 如果是其他格式服务端是接收不到的!!!!
         */
        String helo = "你好呀!";
        ByteBuf byteBuf = Unpooled.wrappedBuffer(helo.getBytes());
        ctx.channel().writeAndFlush(byteBuf);
        System.out.println("首次连接完成!");
    }

    @Override
    public void exceptionCaught(ChannelHandlerContext ctx, Throwable cause) {
        cause.printStackTrace();
        ctx.close();
    }
}
package netty;

import netty.server.SayHelloServer;

/**
 * Netty server 使用main类
 */
public class MainNettyServer {

    /**
     * 端口
     */
    private static int port = 8686;

    public static void main(String[] args) throws Exception {
        /**
         * 启动netty服务器
         */
        SayHelloServer sayHelloServer = new SayHelloServer(port);
        sayHelloServer.run();
    }
}
package netty;

import io.netty.buffer.ByteBuf;
import io.netty.buffer.Unpooled;
import io.netty.channel.Channel;
import netty.client.SayHelloClient;

import java.util.Scanner;

/**
 * 客户端main方法类
 */
public class MainNettyClient {
    public static void main(String[] args) throws InterruptedException {
        /**
         * 创建netty客户端
         */
        SayHelloClient client = new SayHelloClient(8686);
        /**
         * 新建一个线程让它单独去跑,我们可以main方法测试一下发送消息和接受消息
         */
        Thread clientThread = new Thread(new Runnable() {
            @Override
            public void run() {
                try {
                    client.run();
                } catch (InterruptedException e) {
                    e.printStackTrace();
                }
            }
        });
        clientThread.start();
        /**
         * 如果不新建一个线程去跑客户端的话, 以下的代码就执行不到
         * 这里用while是因为客户端的channel并不能立马生成, 会在client启动后一段时间才生成获取到
         * 所以需要延迟一点获取channel, 否则channel为null
         */
        Channel channel = null;
        boolean isStart = false;
        while (!isStart) {
            if (null != client.getChannel()) {
                channel = client.getChannel();
                isStart = true;
            }
        }
        String helo = "你好呀!我这里是客户端, 收到请回答";
        ByteBuf byteBuf = Unpooled.wrappedBuffer(helo.getBytes());
        channel.writeAndFlush(byteBuf);
        /**
         * 我们通过控制台输入来给服务端发送消息
         * 此处只做模拟使用
         */
        for (int i = 0; i < 10 ; i++) {
            Scanner scanner = new Scanner(System.in);
            String text = scanner.nextLine();
            channel.writeAndFlush(Unpooled.wrappedBuffer(text.getBytes()));
        }
    }
}
接下来我们来使用一下看看, 我们用客户端控制台输入消息和服务端"对话": (gif录制软件-->ScreenToGif)
首先我们把项目打包成jar包, 步骤如下:(eclipse的自行百度, 此处用的是IDEA)
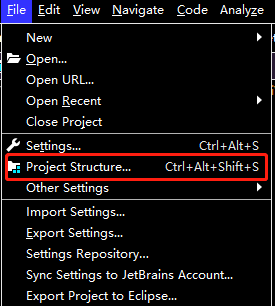
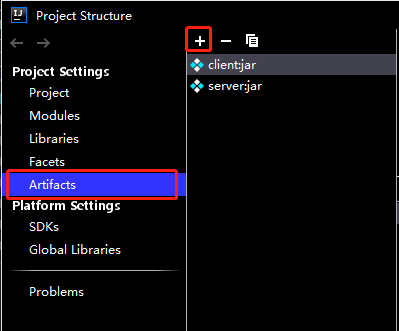
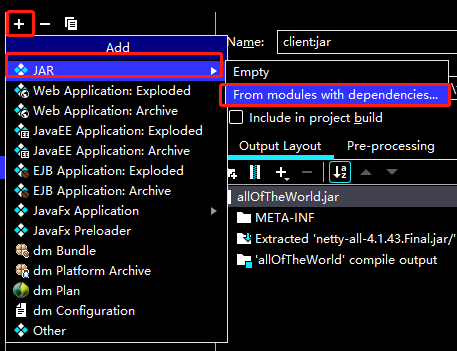
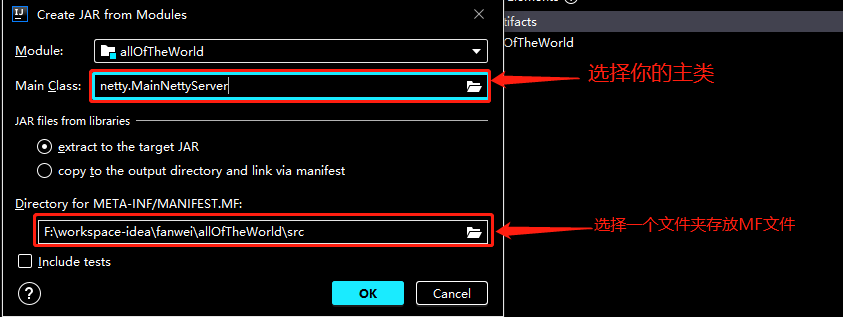
保存之后
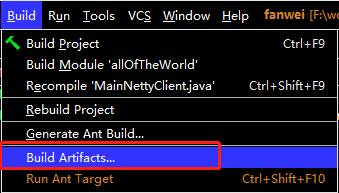
去输出的文件目录找到jar包即可!
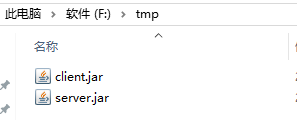
我放在了一起, 然后开始用CMD运行!
运行命令 : java -jar client.jar
开两个CMD演示!
左边是服务器, 右边是客户端, 直接看图!
演示到此结束! over !


