Android自动化测试之——MonkeyRunner(2)
一、MonkeyRunner API
MonkeyRunner API包含了三个模块在com.android.monkeyruner包中:
1、MonkeyRunner
一类用于MonkeyRunner程序的实用方法。该类提供了一种将MonkeyRunner连接到设备或仿真器的方法。它还提供了为monkeyrunner程序创建UI以及显示内置帮助的方法
2、MonkeyDevice
表示设备或仿真器。这个类提供了安装和卸载包、启动Activity、以及向app发送键盘或触摸事件的方法。您还可以使用该类运行测试包。
3、MonkeyImage
表示屏幕捕获图像。这个类提供了用于捕获屏幕、将位图图像转换为各种格式、比较两个MonkeyImage对象以及将图像写入文件的方法。
二、运行MonkeyRunner
有两种方式可以编写MonkeyRunner用例:
- 在cmd窗口直接运行monkeyrunner
- 使用Python编写测试代码,在CMD中执行monkeyrunner test.py运行


三、MonkeyRunner
MonkeyRunner常用方法如下
1、waitForConnection(float timeout, string deviceId)
waitForConnection ()方法返回一个MonkeyDevice对象
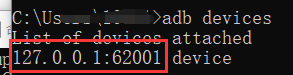
device = MonkeyRunner.waitForConnection(3,'127.0.0.1:62001')
deviceId可通过adb devices查看
2、sleep(float seconds)
等待时长
MonkeyRunner.sleep(5)
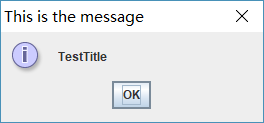
3、alert(string message, string title, string okTitle)
向运行当前程序的进程显示警报对话框。对话框是模态的,所以程序暂停,直到用户点击对话框的按钮。
MonkeyRunner.alert('TestTitle', 'This is the message', 'OK')
结果如图:
4、choice(string message, iterable choices, string title)
在运行当前程序的进程中显示一个具有选择列表的对话框。对话框是模态的,所以程序暂停,直到用户点击对话框中的一个按钮。
MonkeyRunner.choice('TestChoice', ['choice1','choice2'], 'Title')

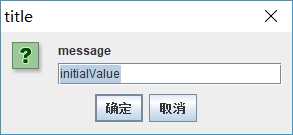
5、input(string message string initialValue, string title, string okTitle, string cancelTitle)
显示一个接受输入并将其返回给程序的对话框。对话框是模态的,所以程序暂停,直到用户点击对话框中的一个按钮。
对话框包含两个按钮,一个显示okTitle值,另一个显示cancelTitle值。如果用户单击OKTITE按钮,则返回输入框的当前值。如果用户单击取消标题按钮,则返回一个空字符串。
MonkeyRunner.input('message', 'initialValue', 'title', 'ok', 'cancel')
四、MonkeyImage
MonkeyImage类提供了用于捕获屏幕、将图像转换为各种格式、比较两个MonkeyImage对象以及将图像写入文件的方法。
通过MonkeyDevice.takeSnapshot() 方法截图,并返回一个MonkeyImage对象
newimage = MonkeyDevice.takeSnapshot() # 截图,MonkeyDevice的方法,返回一个MonkeyImage对象
1、writeToFile(string path, string format)
newimage.writeToFile('E:\\autoTest\\test_02.png','png') # 保存图片
返回布尔变量(True 或 False)表示写入结果
2、convertToBytes(string format)
将当前图像转换为特定格式,并将其作为一个字符串返回,然后可以将该字符串作为二进制字节的迭代进行访问。format默认值为‘png’
newimage.convertToBytes('jpg')
3、sameAs(MonkeyImage otherImage, float percent)
将此MonkeyImage对象与另一个对象进行比较,并返回比较结果(布尔值)。百分比参数指定允许两个图像“相等”的百分比差异。
newimage.sameAs(image1, 1.0) #和image1对比是否100%相同
4、getSubImage(touple rect)
从当前图像的矩形(x, y, w, h)选择中图像,返回一个新的MonkeyImage对象。
subimage= newimage.getSubImage((4,41,400,700))
5、getRawPixel(integer x, integer y)
以整数元组的形式(a,r,g,b)返回图像位置(x,y)的单个像素。
6、getRawPixelInt(integer x, integer y)
将图像位置(x,y)上的单个像素作为整数返回。用这种方法节约内存。

 浙公网安备 33010602011771号